


Ultra Violet Air Disinfection Systems
2
1 Prepare unit for installation: Remove the nuts holding the mounting brackets to
the light fixture and set aside. Fingerprints can be removed using a dry cloth.
2 UV light can fade wall + ceiling finishes over time. Please locate accordingly.
Locate the mounting holes on the wall, drill 3/16” holes and install mounting
plugs to wall. Mounting holes should be spaced 18” (45.7 cm) apart for the
VK
-250 and 48” (122 cm) apart for the
VK-
1500.
CAUTION:
Install the unit at least 7 feet (213 cm) from the floor to ensure
eye shielding from the UV light. Do not install anywhere the UV light can be
seen from above.
UV emitted from this product. The installation instructions must be followed to
ensure no direct human exposure. Eye or skin irritation may result from expo-
sure. Must be installed with the light shining upward only. This device may not
be installed in rooms where the ceiling height is less than 9 feet (275 cm)
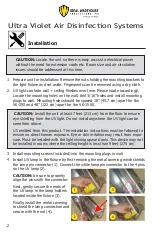
3 Install mounting screws (included) into the mounting plugs in wall.
4 Install UV lamp in the fixture by first removing the metal covering which shields
the lamp pin connector (1). Connect the white lamp pin connector to the 4 pins
on the UV lamp (2).
CAUTION:
be sure to properly
align the pins with the connector.
Next, gently secure the ends of
the UV lamp in the lamp holders
located inside the fixture (3).
Finally, install the metal covering
to shield the lamp connection and
secure with the nut (4).
Installation
CAUTION:
Locate the unit so there is easy acccss to electrical power
without the need for extension cords etc. Room size and air circulation
issues should be addressed at this time.


