background image

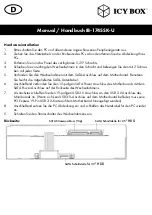
SATA Stromanschluss (15p)

SATA Schnittstelle für 2.5

" HDD

SATA Schnittstelle für 3.5

" HDD

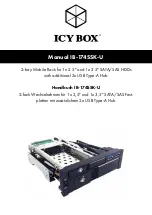
Manual / Handbuch IB-174SSK-U 

Hardwareinstallation

1. 

Bitte schalten Sie den PC und alle anderen angeschlossenen Peripheriegeräte aus.

2. 

Ziehen Sie das Netzkabel von der Rückseite des PCs ab und entfernen Sie die Abdeckung Ihres 
PCs.

3. 

Entfernen Sie nun das Panel des verfügbaren 5,25" Schachts. 

4. 

Schieben Sie vorsichtig den Wechselrahmen in den Schacht und befestigen Sie den mit 2 Schrau-
ben auf jeder Seite.

5. 

Verbinden Sie den Wechselrahmen mit dem SATA-Anschluss auf dem Motherboard. Benutzen 
Sie hierfür die mitgelieferten SATA-Datenkabel.

6. 

Anschließend verbinden Sie den 15-poligen SATA Power Anschluss des Motherboards mit dem 
SATA Power Anschluss auf der Rückseite des Wechselrahmens.

7. 

Als nächstes schließen Sie den 19-poligen USB 3.0 Anschluss an den USB 3.0 Anschluss des 
Mainboards an. (Wenn sich kein USB 3.0-Anschluss auf dem Motherboard befindet, muss eine 
PCI Express 19-Pin USB 3.0-Karte auf dem Motherboard hinzugefügt werden).

8. 

Anschließend setzen Sie die PC Abdeckung ein und schließen das Netzkabel für den PC wieder 
an.

9. 

Schalten Sie den Stromschalter des Wechselrahmens ein.

Rückseite: 

Summary of Contents for IB-174SSK-U

Page 1: ...SSK U 2 bay Mobile Rack for 1x 2 5 and 1x 3 5 SATA SAS HDDs with additional 2x USB Type A Hub Handbuch IB 174SSK U 2 fach Wechselrahmen für 1x 2 5 und 1x 3 5 SATA SAS Fest platten mit zusätzlichem 2x USB Type A Hub ...

Page 2: ...rnen Kontakt mit Spannungsführenden Komponenten vermeiden Steckkontakte nicht mit spitzen und metallischen Gegenständen berühren Verwendung nur in dafür vorgesehenen Umgebungen Gerät ausschließlich mit Typenschildkonformen Netzteil betreiben Gerät Netzteil fern von Feuchtigkeit Flüssigkeit Dampf und Staub halten Eigenständige Modifikationen sind unzulässig Gerät nicht während eines Gewitters ansch...

Page 3: ... vor Reinigung das Gerät außer Betrieb nehmen aggressive bzw scharfe Reinigungs und Lösungsmittel sind ungeeignet nach der Reinigung sicherstellen dass keine Restfeuchtigkeit vorhanden ist Reinigung der Geräte am besten mit trockenem Antistatiktuch durchführen 7 Entsorgung des Gerätes Umweltverschmutzung Wiederverwertung nicht möglich Mögliche Umweltbelastung durch Bestandteile Recyclingkreislauf ...

Page 4: ... plug contacts in contact with pointed and metal objects Use in intended environments only Operate the device using a power unit meeting the specifications of the type plate only Keep the device power unit away from humidity liquid vapour and dust Do not modify the device Do not connect the device during thunderstorms Approach specialist retailers if you require repairs 2 Hazards during assembly i...

Page 5: ...eaning Aggressive or intense cleaning agents and solvents are unsuitable Make sure there is no residual moisture after cleaning We recommend cleaning devices using a dry anti static cloth 7 Disposing of the device Environmental pollution unsuitable for recycling Potential environmental pollution caused by components recycling circle interrupted This icon on product and packaging indicates that thi...

Page 6: ...er operation Power switch for both HDD and LED for power access Supports Hot Swap Verpackungsinhalt 1x IB 174SSK U 2x SATA Kabel 1x Schraubenset 2x Schlüssel 1x Handbuch Haupteigenschaften 2 fach Wechselrahmen für 1x 2 5 und 1x 3 5 SATA SAS Festplatten Zusätzlicher 2x USB 3 0 Type A Hub bis zu 5 Gbit s Schneller Festplatteneinbau und wechsel ohne Träger Unterstützt SATA III bis zu 6 Gbit s Einbau ...

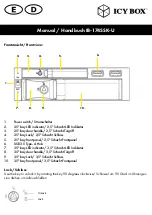
Page 7: ...2 5 bay front panel 2 5 Schacht Frontpanel 6 USB 3 0 Type A Hub 7 3 5 bay LED indicator 3 5 Schacht LED Indikator 8 3 5 bay door handle 3 5 Schacht Türgriff 9 3 5 bay Lock 3 5 Schacht Schloss 10 3 5 bay front panel 3 5 Schacht Frontpanel Lock Schloss Use the key to unlock it by rotating the key 90 degrees clockwise Schlüssel um 90 Grad im Uhrzeiger sinn drehen um aufzuschließen 1 2 3 4 5 7 8 9 10 ...

Page 8: ...5 Verbinden Sie den Wechselrahmen mit dem SATA Anschluss auf dem Motherboard Benutzen Sie hierfür die mitgelieferten SATA Datenkabel 6 Anschließend verbinden Sie den 15 poligen SATA Power Anschluss des Motherboards mit dem SATA Power Anschluss auf der Rückseite des Wechselrahmens 7 Als nächstes schließen Sie den 19 poligen USB 3 0 Anschluss an den USB 3 0 Anschluss des Mainboards an Wenn sich kein...

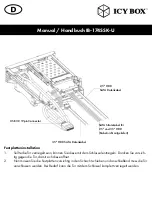
Page 9: ...gegen die Tür damit sich diese öffnet 2 Nun müssen Sie die Festplatten vorsichtig in den Schacht schieben und anschließend muss die Tür verschlossen werden Bei Bedarf kann die Tür mit dem Schlüssel komplett verriegelt werden 3 5 HDD SATA Datenkabel USB 3 0 19pin Connector SATA Stromkabel für 2 5 und 3 5 HDD Kabel nicht mitgeliefert 2 5 HDD SATA Datenkabel ...

Page 10: ...ay and fix it with 2 screws on each side 5 Connect the mobile rack to the SATA port on the motherboard with the included SATA data cables 6 Then connect 15 Pin SATA Power port of motherboard to SATA power port at the back of the mobile rack 7 Finally connect 19 Pin USB 3 0 connector to USB 3 0 port of motherboard If there is no USB 3 0 port on the motherboard it will need to add a PCI Express 19 P...

Page 11: ...ueeze the door to release the door handle then pull the door handle open 2 Insert the HDD into the HDD enclosure gently and close the door Lock the door if needed 3 5 HDD SATA data cable USB 3 0 19pin Connector SATA power cable for both 2 5 and 3 5 HDD cable not included 2 5 HDD SATA data cable ...

Page 12: ...l RaidSonic Technology GmbH reserves the right to make changes in the specifications and or design of the above mentioned product without prior notice The diagrams contained in this manual may also not fully represent the product that you are using and are there for illustration purposes only RaidSonic Technology GmbH assumes no responsibility for any differences between the product mentioned in t...

Reviews: