background image


© ICSPI Corp. 2007-2021 

nGauge AFM User Manual 2.0 

21 


When you click on 

Approach

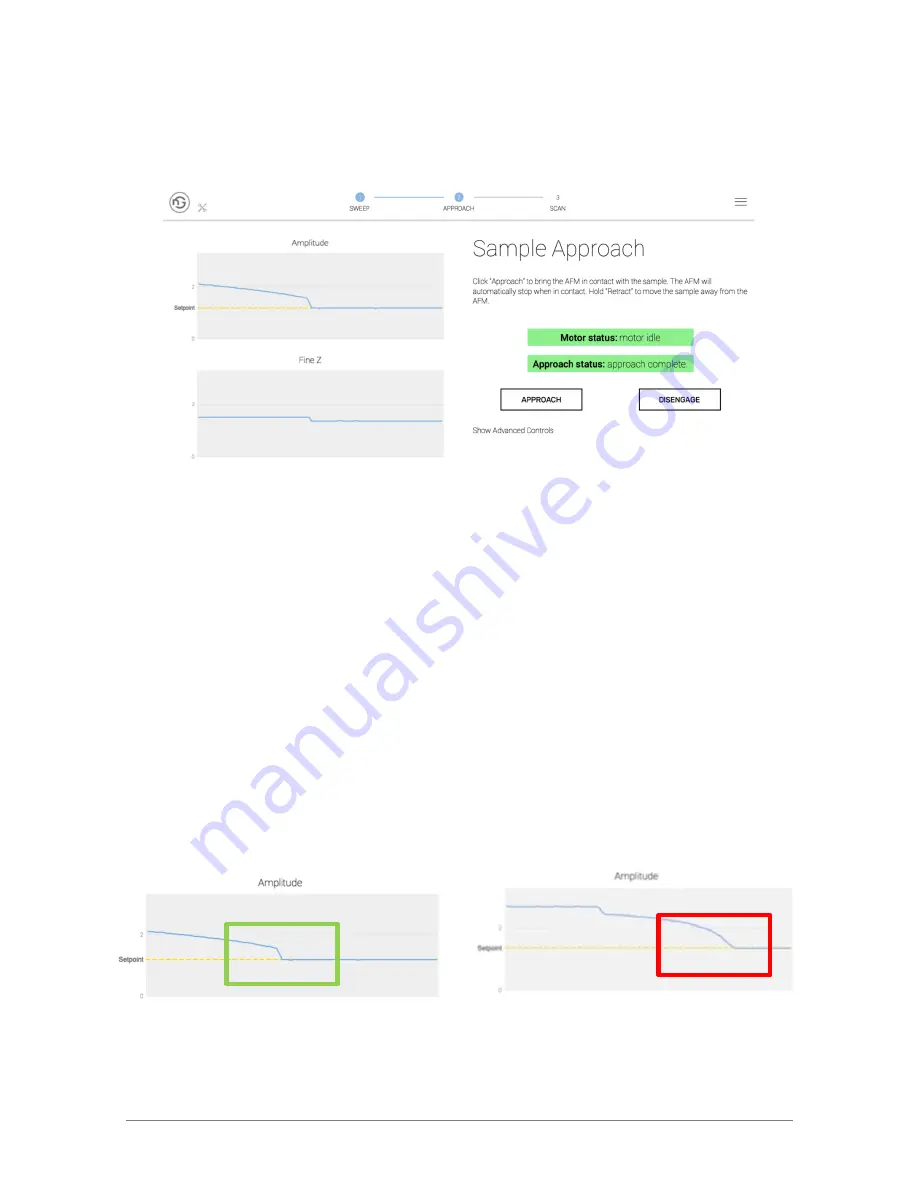
, the amplitude will start to decrease as the sample gets close and 

tip-sample interaction is observed. When the amplitude reaches the setpoint, the auto-approach 
is complete. 

The approach status will change to “Approach Complete”. 


Ensure that there is an abrupt drop in the amplitude to the setpoint. 

This is called “snap in”. If 

the amplitude snapped into the setpoint, you can proceed to the Scan page. If the amplitude 
gradually decreases to the setpoint, there have may been a “false engage”. Refer to Section 
5.5.2 False Engage for more information. 

If the amplitude does not track the setpoint (it is noisy or far away from the setpoint), refer to 
Section 7.3.6 Setpoint Not Tracked. 

5.5.2.


False Engage 

If the amplitude gradually decreases towards the set-point and does no

t “snap in” to the 

setpoint, it is possible that other interactions such as electrostatic forces have affected the auto-
approach, leading to a “false engage”. If a false engage occurs, the tip is not close enough to 
the sample for scanning to be possible. 

Try disengaging and re-approaching and look for a snap-in. If you continue to observe false 
engages, refer to Section 7.3.3 False Engage. 


Proper approach. Steep snap-in to the 
setpoint on the amplitude graph. 

False engage. Gradual decrease to the 
setpoint on the amplitude graph. 

Summary of Contents for nGauge

Page 1: ...nGauge Atomic Force Microscope User Manual Version 2 0 For Software and Firmware versions 1 0 0 0...

Page 2: ...Operation 13 5 1 Start up 13 5 2 Chip Installation and Sample Placement 14 5 3 Software Overview 17 5 4 Sweep 17 5 5 Approach 19 5 6 Scan 23 5 7 Scanning Recommendations 29 5 8 Improving Performance...

Page 3: ...ICSPI Corp 2007 2021 nGauge AFM User Manual 2 0 3 8 3 Menu Button Advanced Controls 58 9 Appendix 61 9 1 Gwyddion Supplement 61...

Page 4: ...ment Use only the power supply provided The driving electronics are designed to accept 7 5 V DC and an internal fuse prevents the input current from exceeding 1 A The stage contains moving parts that...

Page 5: ...the tip facing down in the storage box Use tweezers to pick them up The AFM chip can be placed on a flat surface with the tip facing up The AFM chip can be picked up by hand as long as you don t touc...

Page 6: ...the software go to the Approach page and click and hold the Retract button Probe tip is susceptible to damage when engaged Do not touch the sample chip or unit when the tip is approaching or in contac...

Page 7: ...Conventional AFMs typically use a probe with a sharp tip on a silicon cantilever A laser beam is reflected off the backside of the cantilever onto a photodetector that measures any small displacement...

Page 8: ...m These screws are removable and the stage can be customized 3 3 2 Hole in base plate The base plate features a hole for mounting the nGauge AFM onto an optical table 3 4 nGauge AFM Capabilities 3 4 1...

Page 9: ...o 10 m in Z peak to valley with 1 nm RMS noise in the vertical direction 3 4 4 Sample Types Any solid sample can be imaged including both conductive and non conductive but the nGauge AFM cannot operat...

Page 10: ...ow frequency vibrations such as those caused by people walking by doors opening and closing and building vibrations However it is best to set the system up on a solid stable surface away from as many...

Page 11: ...0 11 4 2 Basic Set up Follow these steps to set up your nGauge AFM system 1 Remove the components from the carrying case Set the stage upright on a flat surface 2 Plug the power supply into a wall ou...

Page 12: ...cspicorp com resources To install the software run the executable installer nGauge_setup_x x x x_windows exe 4 3 1 Automatic Updates If a network internet connection is available the software will aut...

Page 13: ...on net download php See Section 6 1 for more details on how to use Gwyddion 5 Basic Operation 5 1 Start up Launch the software by double clicking on the nGauge program on your desktop or searching for...

Page 14: ...Chip Installation and Sample Placement Once the AFM has been set up and the software installed you are ready to install a chip 1 Completely unscrew and remove the thumb nut from the stage 2 Open the...

Page 15: ...e sample platform should be retracted sufficiently to avoid any contact between the tip and platform If the sample platform is 10 mm away it is recommended to go to the Approach page in the software a...

Page 16: ...and holding down the Retract button until the platform is low enough Position the sample so that the area to be scanned is directly under the tip You can also remove the chip before placing the sample...

Page 17: ...nu are not required for normal operation and only advanced users should use these controls More details are available in Section 8 3 Menu Button Advanced Controls 5 4 Sweep Click the Sweep button to p...

Page 18: ...n the Sweep button is clicked the resistances of the MEMS scanners of the AFM chip are checked There are five scanners on the AFM chip X1 X2 Y1 Y2 and Z A high or low resistance value indicates that t...

Page 19: ...for the Motor status and the Approach status Ensure that the target area of your sample is below the nGauge AFM tip Click the Approach button to initiate the automatic approach of the sample to the pr...

Page 20: ...e tip is engaged with the sample and the tip is not on the target area you must click on Disengage and then click and hold on Retract to move the sample platform away from the tip before re positionin...

Page 21: ...5 2 False Engage for more information If the amplitude does not track the setpoint it is noisy or far away from the setpoint refer to Section 7 3 6 Setpoint Not Tracked 5 5 2 False Engage If the ampli...

Page 22: ...ne Z and Vertical Scan Range 5 5 4 Fine Z Drift After approaching you may notice that the Fine Z drifts upwards or downwards Usually this is due to sample relaxation such as polymer relaxation The MEM...

Page 23: ...4 Scan settings 5 File settings 6 Advanced Controls Click Scan to begin scanning The image will begin to build up line by line The color in the image represents the height of the features a bright go...

Page 24: ...ed simultaneously topography offset phase and error In addition both the forward and reverse scans are collected for each type 5 6 3 1 Topography scan The topography scan displays data in nanometer nm...

Page 25: ...ossible 5 6 4 Scan Area The scan area is where the scan will be displayed The top of the scan area shows the size of the scan in micrometers or nanometers The legend to the right of the scan area chan...

Page 26: ...it will take longer to complete Default is 256 lines 8 16 32 64 128 256 512 1024 Scan range Size of the scan Default is 10 m 1 20 m for area 1 60 m for line Time spent at each point The amount of time...

Page 27: ...your computer s configuration Windows can occasionally store the data in the AppData folder C Users username AppData Local VirtualStore Program Files x86 ICSPI nGauge All 6 images topography phase er...

Page 28: ...ied Leveling Direction switches between adding or subtracting a tilt and is device specific Different types of AFM chips may require different Leveling Directions Forward Forward Reverse Leveling If t...

Page 29: ...ine Z Warning Disabling the controller while engaged may damaged the tip N A N A 5 7 Scanning Recommendations 5 7 1 Changing the scan size Changing the scan size considerably for example from 20 micro...

Page 30: ...of its range because the tip goes back to its initial lateral position The end of the scanner range is 0 V or 3 3 V on the Fine Z page If the tip reaches either of these extremes data can no longer be...

Page 31: ...ample to ensure that the tip comes into contact with the sample 2 The tip and cantilever assembly bends away from the chip at a certain angle see image of nGauge AFM chip in Section 3 2 MEMS AFM or AF...

Page 32: ...e Leveling setting is set correctly These scans show the difference in the tilt when the leveling direction and leveling magnitude are changed Each scan is opened in Gwyddion and a line profile is tak...

Page 33: ...er words lowering the Z Fine PGA makes the tip more prone to damage as the Z scanner can more easily go out of range Before the Z Fine PGA is decreased it is recommended that the Leveling is set to an...

Page 34: ...setpoint is recommended when scanning materials that may move around such as particles that are not strongly affixed to the surface substrate A high setpoint may be 75 of the drive amplitude For examp...

Page 35: ...as flat an error image as possible 5 8 3 1 PI Settings Example As an example three different PI settings are used during the scan of a calibration grating The line profiles of the topography are show...

Page 36: ...s should be as flat as possible 5 9 Advanced Scan Features There are several advanced scan features that are explained in this section 5 9 1 Line Profile View A profile view can be found below the ima...

Page 37: ...into an area of interest To zoom into a region of interest you can click and drag across the displayed image to select an area to zoom in Click the Scan button again after the selection has been made...

Page 38: ...r width of a specific feature or the RMS roughness of the surface These measurements are best acquired using Gwyddion a powerful free and open source AFM post processing program Gwyddion can be downlo...

Page 39: ...ct Data Align Rows If each horizontal line in the image does not quite line up with the ones above and below it this function will subtract the height differences line by line Median of differences wo...

Page 40: ...ches for X Y calibration are required Each chip will have slightly different calibration factors An example on how to process scans collect line profiles and apply calibration factors is available in...

Page 41: ...500 nm tall it is important to have a 100 nm and a 500 nm calibration grating that you can use to calibrate 6 2 2 Lateral Calibration For XY calibration it is important to have calibration gratings wi...

Page 42: ...Waiting for serial connection will be displayed instead of AFM Ready and the Firmware version will be x x x x Follow these steps to resolve the issue 1 Unplug and then plug in the USB and or power Re...

Page 43: ...lose the nGauge AFM software and navigate to C Program Files x86 ICSPI nGauge firmware ISP If the firmware folder does not exist download it from the ICSPI website https www icspicorp com downloads Do...

Page 44: ...M unit is plugged in to the computer and plugged in to power but is not recognized in Device Manager by your computer contact ICSPI for support 7 2 Sweep Troubleshooting 7 2 1 Broken device or device...

Page 45: ...n 7 2 3 Inspecting AFM Chips 7 2 1 2 Disabling the resistance check Occasionally the resistance check routine is overly sensitive for the Z scanner Follow these steps 1 Navigate to the advanced menu b...

Page 46: ...an error proceed to 5a If the resistances are above 250 ohm after following these steps one or more of the lateral scanners of your device may have been damaged 5a If the frequency sweep is smooth not...

Page 47: ...o 55 and is too high Decrease the value and click on Sweep Continue to change the Cantilever Drive Amplitude and re Sweep until you are satisfied 7 2 3 Inspecting AFM Chips If the frequency sweep cont...

Page 48: ...notification on the splash screen The sample platform can only be lowered so far before a limit switch prevents further travel Once the limit switch is triggered you will not be able to retract any m...

Page 49: ...s flat and noisy tighten the thumb nut on the AFM chip If the problem persists the AFM chip may be damaged If the maximum value of the peak is less than 2V click on Show Advanced Controls and increase...

Page 50: ...that the maximum of the amplitude peak is as high as possible depending on the type of chip The recommended maximum cantilever drive amplitude is 3 V for aluminum tips and 2 V for diamond tips Decreas...

Page 51: ...ne Z Drift and Fine Z Not Centered It is possible that the sample topography is not centered around the middle of the Fine Z range which could result in image clipping The Approach tab displays a grap...

Page 52: ...otor Speed by dragging the indicator to the right 7 4 Scan Troubleshooting 7 4 1 Drift If there are large line to line variations in height the sample may not be secure For instance if imaging a light...

Page 53: ...essing in Gwyddion using the Mark scars or Limit Range tools It is usually caused by electrostatic effects from samples that are electrically resistive 7 4 2 3 Wave pattern If the topography of the sa...

Page 54: ...shows that it reached 3 3 V near the end of the scan There are two main settings to change to ensure that the Fine Z does not reach either end of the scan range 1 Leveling refer to Section 5 7 2 1 Lev...

Page 55: ...ient for normal imaging conditions However each tab in the navigation contains advanced controls that can extend the functionality or control of the scan In addition there is a side menu available by...

Page 56: ...rease the tip oscillation amplitude Default value is 35 Different chips may require different cantilever drive amplitudes 8 1 3 Manual Sweep Controls The manual sweep controls are not required for nor...

Page 57: ...d the coarse Z positioning Parameter Description Proportional The proportional gain coefficient of the PI controller See Section 5 8 3 Proportional and Integral Control for details on tuning the contr...

Page 58: ...the platform move up and Retract makes the platform go down clicking either Approach or Retract takes a single step while clicking and holding Approach or Retract moves the platform continuously PID C...

Page 59: ...frequency To set a new frequency change both start and end frequencies to the desired frequency Safety Configurations Encapsulates various safety features Safety thresholds and features may be modifi...

Page 60: ...rmware update Firmware update files are binary bin files and can be downloaded from our support page Enter Bootloader erase the firmware program to allow for firmware updates or flashing custom firmwa...

Page 61: ...is not raw In order to do perform calibration scans must be saved as gsf in nGauge software and opened in Gwyddion 9 1 1 1 Change the Color Changing the color is optional but the default for AFM is g...

Page 62: ...tilt in Y by changing the Levelling setting This will physically change the angle at which the tip scans across the sample To simply correct for the tilt in a scan you can also click on the Level Imag...

Page 63: ...n under Tools To use the plane fit tool the user clicks on three points that should have the same height and Gwyddion fits a plane through these three points We re going to place these three points in...

Page 64: ...ICSPI Corp 2007 2021 nGauge AFM User Manual 2 0 64 Three Point Level tool Three points selected in the troughs of the grating...

Page 65: ...to measure the step heights 9 1 1 5 Line Profile Click on the Line Profile tool When the Line Profile tool is pressed a blank graph will show up In order to show a line profile click onto the scan ima...

Page 66: ...easing this will increase the area over which the profile of the grating is averaged Increasing this value will result in a smoother profile as more measurements are used to determine the profile When...

Page 67: ...new graph select Graph Critical Dimension This allows for robust step height measurements Once the tool is open select Step Height Positive Negative from a dropdown on the right hand side Negative is...

Page 68: ...the appropriate step height calculator is selected click and drag a range on the image which matches the guide picture Once this is selected hit Fit The parameters will fill out with values Looking b...

Page 69: ...data obtained with the critical dimension tool On the line profile graph select the Measure Distances in Graphs button in the bottom right corner A window will pop up This will allow you to gather dat...

Page 70: ...th likely two peaks This is a density function of the heights One peak will be found at the height of the plateaus of the calibration grating and one peak will be found at the height of the valleys If...

Page 71: ...ICSPI Corp 2007 2021 nGauge AFM User Manual 2 0 71 1D Statistical Functions button Measure distances button...

Page 72: ...ed line profile shows 200 nm 0 2 um then your vertical calibration factor is 100 200 or 0 5 This is an extreme example From the image above it is shown that the average difference between peak and val...

Page 73: ...ready existing image To see the results firsthand create a line profile and make sure that the heights of the grating are as desired 9 1 4 Multi Point Vertical Calibration If there is a scan for which...

Page 74: ...ation data at 20 nm and at 110 nm and use these measurements to correct your 50 nm tall feature heights 9 1 4 2 Create a Linear or Polynomial Correction Function Follow the same post processing steps...

Page 75: ...on More complicated functions such as a polynomial function can be applied to a datafield the Gwyddion term for a scan by using Data Process Multidata Arithmetic The function calculated can be applied...

Page 76: ...ation can be performed in the X and Y directions A grating with a known pitch is required Often the same grating can be used for vertical and lateral calibration For example to calibrate in the X dire...

Page 77: ...ICSPI Corp 2007 2021 nGauge AFM User Manual 2 0 77 Use the Measure distances in graph tool in the bottom left Then select a point at the beginning of each of the line structures...

Page 78: ...factor is 3 00 3 032 or 0 99 In this case the pitch is within 1 of the known value With the calibration factor calculated the Dimensions and Units tool is found under Data Process Basic Operations Dim...

Page 79: ...User Manual 2 0 79 ICSPI Corp Integrated Circuit Scanning Probe Instruments Corp The AFM on a chip Company 248 Corrie Cres Waterloo Ontario N2L 6E1 Canada Telephone 1 289 236 0204 Email info icspicorp...

Reviews: