


7
Click Iris “-” to realize auto focus.
Click up/down button to view all the items on the left pane of the following list. Click left/right
button to set the corresponding values on the right pane of the following list. If there is “ ”,
click confirm button to go to the 2nd menu. Repeat the previous steps to set detailed value.
Click Return button to go back to the previous menu interface.
Click Zoom
“+” to zoom in and click Zoom “-” to zoom out.
4.2
Note
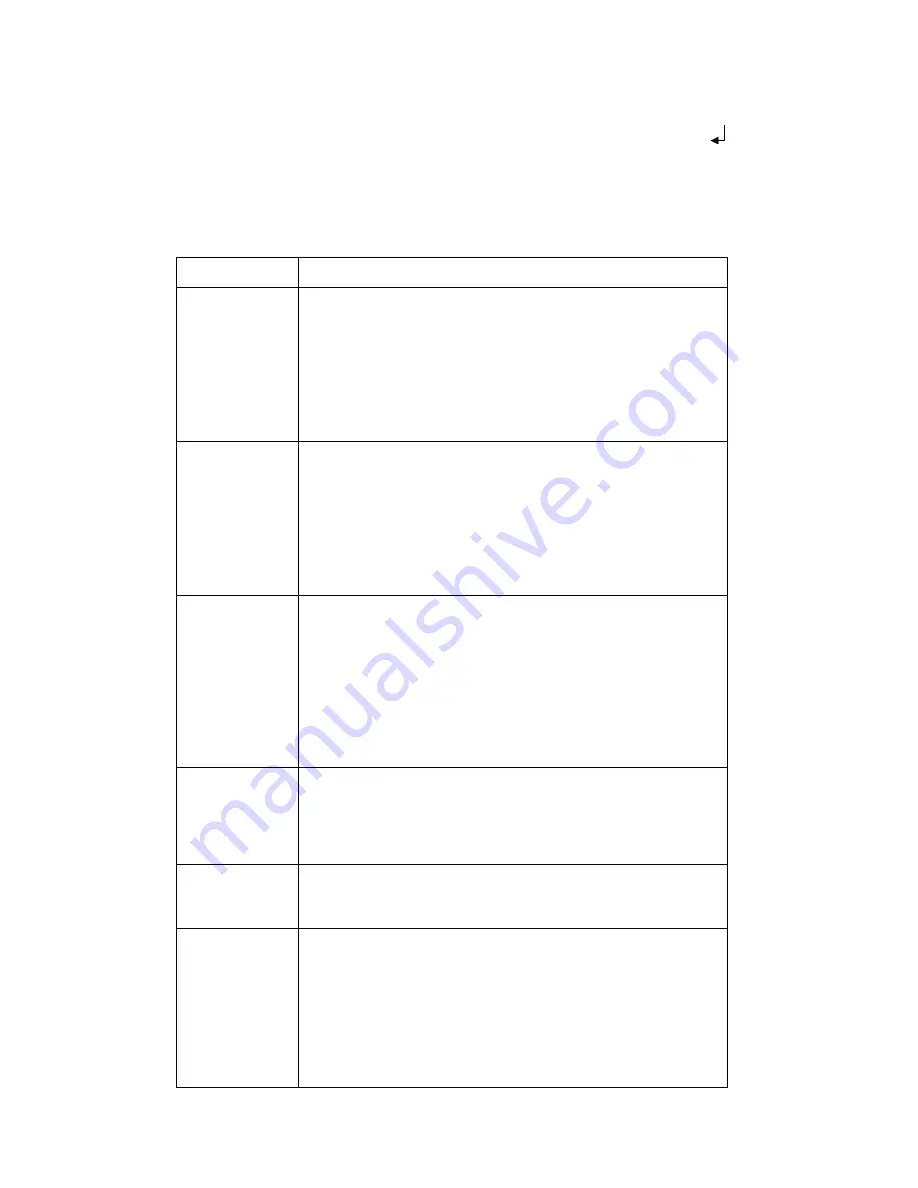
Parameter
Function
Brightness
It is to adjust monitor window bright. The value ranges from 0
to 100. The default value is 50.
The larger the number is, the bright the video is. When you
input the value here, the bright section and the dark section of
the video will be adjusted accordingly. You can use this
function when the whole video is too dark or too bright. Please
note the video may become hazy if the value is too high. The
recommended value ranges from 40 to 60.
Contrast
It is to adjust monitor window contrast. The value ranges from
0 to 100. The default value is 50.
The larger the number is, the higher the contrast is. You can
use this function when the whole video bright is OK but the
contrast is not proper. Please note the video may become
hazy if the value is too low. If this value is too high, the dark
section may lack brightness while the bright section may over
exposure .The recommended value ranges from 40 to 60.
Saturation
It is to adjust monitor window saturation. The value ranges
from 0 to 100. The default value is 50.
The larger the number, the strong the color is. This value has
no effect on the general brightness of the whole video. The
video color may become too strong if the value is too high. For
the grey part of the video, the distortion may occur if the white
balance is not accurate. Please note the video may not be
attractive if the value is too low. The recommended value
ranges from 40 to 60.
Sharpness
The value here is to adjust the edge of the video. The value
ranges from 0 to 100. The larger the value is, the clear the
edge is and vice versa. Please note there is noise if the value
here is too high. The default value is 50 and the recommended
value ranges from 40 to 60.
3DNR
It is to reduce video noise. The larger the number is, the lower
the noise is. The details of the video may disappear if the
value here is too large.
Anti-flicker
Outdoor: In this mode, you can switch exposure mode to
get the effect under the corresponding exposure mode.
50Hz: When the current is 50Hz, system can auto adjust
the exposure according to the environment brightness in
case there is any strip.
60Hz: When the current is 60Hz, system can auto adjust
the exposure according to the environment brightness in
case there is any strip.


