background image

Control and maintenance

Service Unit iMAT 33

9

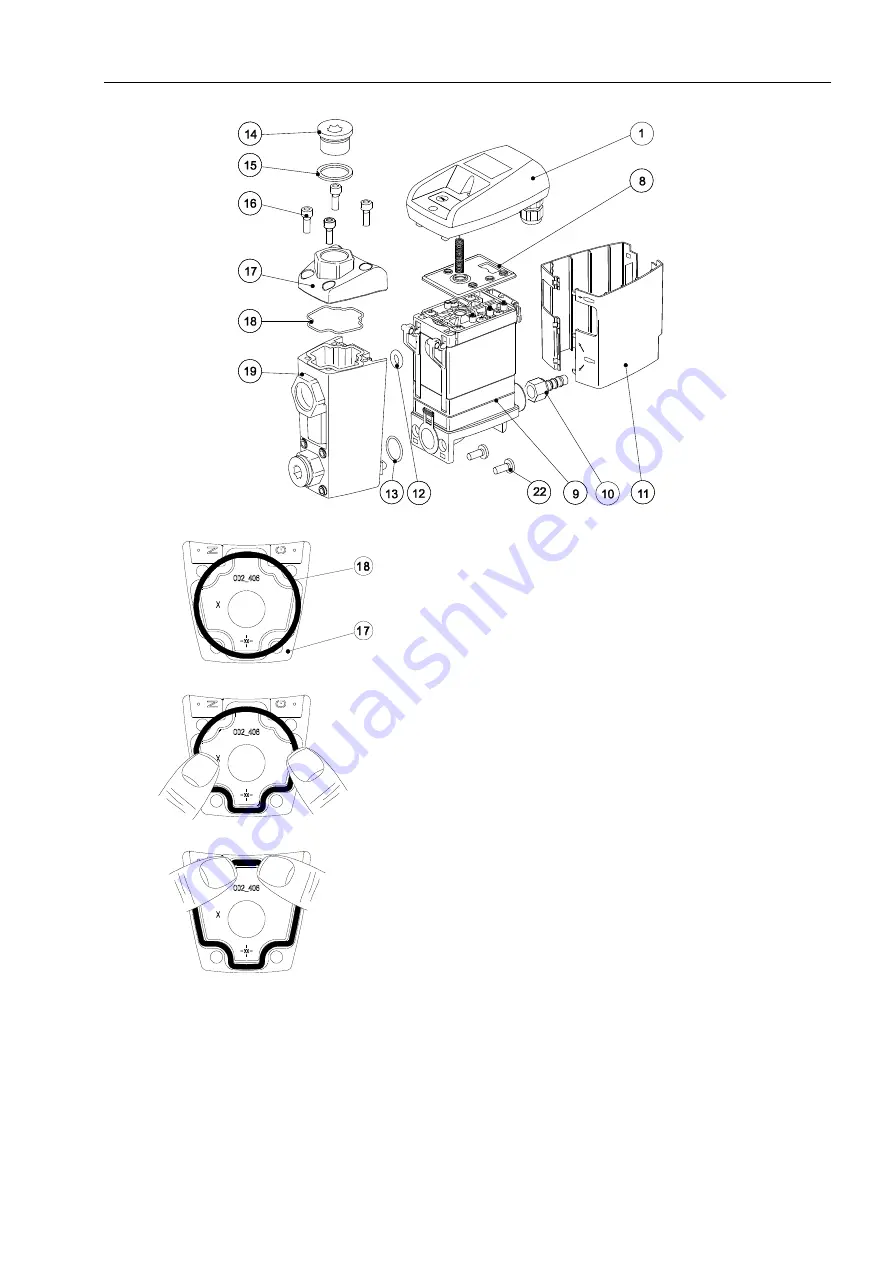
8. Insert new cover O-ring (18)

(

gasket kit)

according to the diagram.

9. Clean the sealing surfaces of the cover.
10.Put on the cover (17) with the new O-ring and

carefully tighten the four cover screws (16)
crosswise (8 Nm).

Summary of Contents for Service Unit iMAT 33

Page 1: ...EN US english US Instructions for installation and operation Replacement unit SERVICE UNIT MAT 33 01 2791...

Page 2: ...2 Service Unit iMAT 33...

Page 3: ...Service Unit iMAT 33 3 1 Pictograms and symbols 4 2 Safety instructions 4 3 Technical data 6 4 Control and maintenance 7 5 Elements and components 13 6 Recommended spare parts 14...

Page 4: ...ce Therefore it is imperative for the service technician and the responsible operator technical staff to read these operating instructions prior to installation start up and maintenance The operating...

Page 5: ...st button for permanent drainage Use genuine spare parts only This is imperative to ensure perfect functioning Pos 13 Beko Technische D okumentati on Sicher hei t Zusatz Sicherheitshi nweise BM33 BM33...

Page 6: ...tg 5 mod_1358843578945_15098 docx 30477 1 min max operating pressure see type plate 0 8 16 bar 12 230 psi or 1 2 16 bar 17 230 psi min max temperature see type plate 1 60 C 34 140 F or 1 70 C 34 158 F...

Page 7: ...4 Beko Technische D okumentati on Sicher hei t Ma nahmen N etzspannung BM 31U 32U 33U 7 mod_1390467197804_15098 docx 38070 1 Measures During electric installations all regulations in force need to be...

Page 8: ...ct to mandatory waste disposal As such it must be collected in suitable containers and disposed of or processed properly Pos 28 Beko Technische D okumentati on Wartung BEKOM AT Wartung BM 33U Ser vice...

Page 9: ...ce Unit iMAT 33 9 8 Insert new cover O ring 18 gasket kit according to the diagram 9 Clean the sealing surfaces of the cover 10 Put on the cover 17 with the new O ring and carefully tighten the four c...

Page 10: ...Control and maintenance 10 Service Unit iMAT 33 11 Clean the sealing surfaces at the condensate receiver tank 19...

Page 11: ...of the arresting hook 13 Check the O rings at the new service unit 12 13 14 Mount the design shell 11 15 Mount the service unit along with the design shell at the condensate receiver tank 19 and tight...

Page 12: ...he arresting hook 2 Check whether or not the sealing mat 8 and the contact springs 28 are clean dry and free from impurities 3 Introduce the sensor 5 into the service unit 9 4 Hang the hook 29 of the...

Page 13: ...1 1 Screw 3 5 x 10 2 Upper part of the cover 3 Gasket 4 Printed circuit board 5 Sensor 6 Lower part of the cover 7 Cable bushing 8 Sealing mat 9 Service unit 10 Hose connector 11 Design shell 12 O rin...

Page 14: ...5 1 Available sets of spare parts Contents Order number Service Unit iMAT 33 8 9 12 13 4028459 ICP Gasket kit 3 8 12 13 18 4024397 ICP Design shell 11 4010167 ICP Pos 35 Beko Technische D okumentati o...

Page 15: ...ty instructions 4 L Lower part of the cover 13 M Maintenance 7 Maintenance including the cleaning of the condensate receiver tank 8 O Order number 14 P Piktogramme 4 Printed circuit board 13 Q Qualifi...

Page 16: ...206 Jeffersonville IN 47131 www icompressorpartners com Translation of the original manual instructions Original instructions are in German Subject to technical modifications without notice errors ac...

Reviews: