background image

441 01 2613 06

9

Specifications are subject  to change without notice.

2. Turn the logo rightside

up, and install the logo retainer pins

into holes in burner compartment door.

3. New labels for rightside

up application on outside of blower

compartment door may be purchased in a kit from your

distributor to cover upside

down labels.

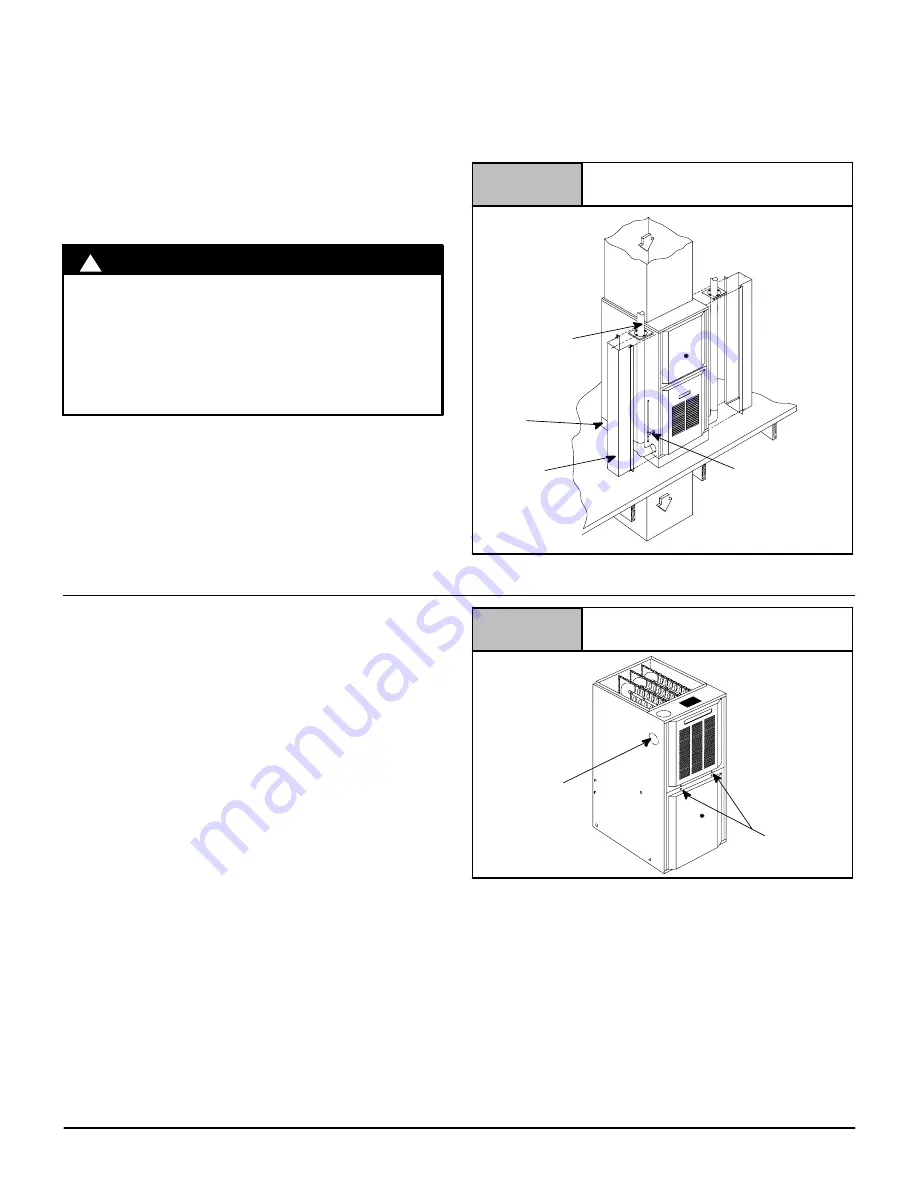
Downflow Venting: 

The combustion venter 

MUST 

be rotated to

vent out the side for all downflow installations, (see 

Figure 5

)

.

Bottom venting is not permitted. See “

Side venting”

 for

instructions to rotate the vent to the side. In addition to rotating the

vent to the side a 

Vent Pipe Shield (NAHA002VC) 

is required to

shield the hot vent pipe.

!

BURN HAZARD
Failure to follow this warning could result in

personal injury and/or property damage.
Vent pipe is HOT and could cause personal injury.

Hot vent pipe is in reach of small children when

installed in downflow position.
Install vent pipe shield NAHA002VC.

WARNING

Pressure Switch Relocation

If the furnace is installed in the upflow position, the pressure switch

will remain in the same position as installed by the factory unless

the inducer is rotated. If the furnace is installed in an orientation

that places the pressure switch below the pressure tap on the

inducer housing, then the switch 

MUST 

be relocated. In order to

relocate the switch, locate 2 mounting holes or drill above the

inducer pressure tap. When drilling the 2 holes make sure to keep

the switch and tubing far enough away from the burners or hot

surfaces as to not melt the hose, switch, or wires. To prevent

possible kinking of the pressure switch hose, trim the hose to

remove excess length.
Note: When drilling new holes make sure metal shavings do not fall

on or in components, as this can shorten the life of the furnace.

See side venting

 for venter rotation

Typical Downflow Installation

Figure 5

VENT

GAS SUPPLY

MUST BE OPPOSITE

VENT DISCHARGE

SIDE

SUPPLY

AIR

RETURN

AIR

OPTIONAL

 VENT

25

23

19

Combustible floor

base outlet flange 

adapter

Vent Shield

Kit

3.  Side Venting

This furnace is shipped from the factory with the venter assembly

in an upflow configurations (top vent). The venter assembly can

easily be rotated to a side vent configuration for use in upflow,

horizontal

flow, or downflow application.

When using a side vent configuration (side outlet instead of top

outlet), it may be necessary to relocate the pressure switch to the

alternate position on the opposite side of the top panel.  Two screw

holes are provided at the alternate position.  Route the pressure

switch tubing so the tubing is not kinked and not touching the hot

collector box, venter housing, or motor.  It may be necessary to

shorten the length of the tubing to properly route the tubing and

eliminate kinks.

Rotating the Venter Assembly

1. If gas and electrical power have already been connected to

unit shut off gas and remove power from unit. Unscrew screws

on burner compartment door and remove burner compartment

door. (see 

Figure 6

)

.

2. Disconnect power leads to the venter motor and hose to

pressure switch. Remove three (3) or four (4) screws which

secure the venter to the collector box, (see 

Figure 7

).

3. Cut webbing with a pair of snips holding the vent plate to the

cabinet on either the left or right side of unit depending on right

or left venting as desired. Discard vent plate, (see 

Figure 6

).

4. Replace venter gasket (part # 1013540, if needed) to venter

assembly with adhesive in the same location as the old one.

5. Clip the wire tie for the venter wires, if needed.
6. Rotate venter assembly 90

°

right or left from original location

depending on venting configurations.

Figure 6

25

23

45

Screws (2)

Furnace with Screws

Vent Plate

Summary of Contents for N8MPN

Page 1: ...jury TABLE OF CONTENTS SAFETY CONSIDERATIONS 2 Safe Installation Requirements 4 INSTALLATION 5 Side Venting 9 Combustion Ventilation Air 10 Gas Vent Installation 13 Venting Horizontal 14 Masonry Chimn...

Page 2: ...nformation This is the safety alert symbol When you see this symbol on the unit and in instructions or manuals be alert to the potential for personal injury Understand these signal words DANGER WARNIN...

Page 3: ...e ON setting ____ Fan Time OFF Setting ___ Manual Gas Shut Off Upstream of Furnace Drip Leg Gas Valve turned ON Type of Gas Natural Propane Filter Type and Size Calculated Firing Rate See Checks and A...

Page 4: ...return air ducts Install correct filter type and size Unit MUST be installed so electrical components are protected from direct contact with water Safety Rules Your unit is built to provide many year...

Page 5: ...stall furnace directly on carpeting tile or other combustible material other than wood flooring 6 Maintain clearance for fire safety and servicing A front clearance of 24 609 6mm required and 30 762mm...

Page 6: ...7 440 38 95 127 178 124 48 337 838 670 622 337 440 38 552 57 762 587 103 83 25 552 165 676 135 6 441 01 2613 06 Specifications are subject to change without notice Figure 1 Dimensions and Clearances N...

Page 7: ...Vent 6 152 mm Type B 1 Double Wall Vent 1 25 mm TOP OF FURNACE 1 25 mm 30 762 mm clearance recommended for furnace removal Horizontal position Line contact is permissible only between lines formed by...

Page 8: ...wood floor and extend 12 304 8mm beyond the front of the furnace louver door This is a recommendation only not a requirement This furnace MUST NOT be installed directly on carpeting tile or other comb...

Page 9: ...s as this can shorten the life of the furnace See side venting for venter rotation Typical Downflow Installation Figure 5 VENT GAS SUPPLY MUST BE OPPOSITE VENT DISCHARGE SIDE SUPPLY AIR RETURN AIR OPT...

Page 10: ...minated Combustion Air Installations in certain areas or types of structures could cause excessive exposure to contaminated air having chemicals or halogens that will result in safety and performance...

Page 11: ...commence within 12 304 8mm of the top of the enclosure Appliances shall have clearances of at least 1 25 4mm from the sides and back and 6 152 4mm from the front The opening shall directly communicate...

Page 12: ...0 3 750 105 5 000 140 6 250 175 7 500 210 6 0 20 3 150 88 2 4 200 117 6 5 250 147 3 750 105 5 625 157 5 7 500 210 9 375 262 5 11 250 316 0 10 6 300 176 4 8 400 235 2 10 500 294 7 500 210 11 250 315 15...

Page 13: ...l burning appliance 3 Use the same diameter Category I connector or pipe as permitted by the National Fuel Gas Code Code ANSI Z223 1 NFPA 54 2009 Sections 12 and 13 venting requirements in the United...

Page 14: ...is restricted A chimney must first be lined with either Type B vent sized in accordance with ANSIZ223 1 NFPA 2009 tables 13 1a or 13 1b or a listed metal lining system See Masonry Chimney Venting of t...

Page 15: ...dryer or water heater vent or other appliance s direct vent intake or exhaust N Clearance to the vent terminal of a dryer vent water heater vent or other appliances direct vent intake or exhaust O Cle...

Page 16: ...Standard for Chimneys Fireplaces Vents and Solid Fuel Burning Appliances ANSI NFPA 211 2006 in the United States and to a Provincial or Territorial Building Code in Canada in its absence the National...

Page 17: ...anufacturer s installation instructions CHIMNEY INSPECTION CHART For additional requirements refer to the National Fuel Gas Code ANSI Z223 1 NFPA 54 2009 and ANSI NFPA 211 2006 Chimneys Fireplaces Ven...

Page 18: ...ype B vent is considered to be a vent in a chase If a metal liner or Type B vent is used to line a chimney no other appliance shall be vented into the annular space between the chimney and the metal l...

Page 19: ...husetts a Gas supply connections MUST be performed by a licensed plumber or gas fitter b When flexible connectors are used the maximum length shall not exceed 36 914 4mm c When lever handle type manua...

Page 20: ...re 12 Piping with Street Elbows 1 Assemble the elbows so that the outlet of one 1 elbow is 90 from the inlet of the other The elbows should be tight enough to be leak proof An additional 1 4 turn will...

Page 21: ...Propane Piping Requirements Have a licensed Propane gas dealer make all connections at storage tank and check all connections from tank to furnace If copper tubing is used it MUST comply with limitati...

Page 22: ...res when reinstalling blower compartment door 8MPN L Models The J Box is installed in the burner compartment on left side of casing An alternate J Box location on right side can be used 1 Remove and s...

Page 23: ...result in personal injury or death Do NOT draw return air from inside a closet or utility room where furnace is located Return air duct MUST be sealed to furnace casing WARNING Duct Connections This...

Page 24: ...ers A filter MUST be used Filters are not supplied with these furnaces but can be purchased from your distributor See Table 4 for required high velocity filter sizes Table 4 High Velocity Air Filter S...

Page 25: ...de clips first and push filter back until it is fully engaged into back clip Center Clip side to side Figure 25 Bottom Mounted Filter 25 24 18 1 9 Figure 26 Filter Clip Construction in mm 26 Ga Galvan...

Page 26: ...ire the furnace outlet duct flange to be bent outward and flat to mate the outlet of the furnace to the cased coil Sub Bases for Combustible Floors Furnace Only Note When using the subbase for combust...

Page 27: ...11 8 28 6mm narrower than the minimum required size of the opening in the floor This is done to maintain a 1 25 4mm clearance between the floor and the plenum 2 Fabricate the plenum to the dimensions...

Page 28: ...s operating FIRE OR EXPLOSION HAZARD Failure to follow this warning could result in personal injury death and or property damage Turn OFF gas at shut off before connecting manometer WARNING 1 With gas...

Page 29: ...eath and or property damage This high altitude gas conversion shall be done by a qualified service agency in accordance with the Manufacturer s instructions and all applicable codes and requirements o...

Page 30: ...UDE BTU CU FT MEAN ELEVATION ABOVE SEA LEVEL ft m 0 to 2000 0 to 610 2001 to 3000 610 to 914 3001 to 4000 915 to 1219 4001 to 5000 1220 to 1524 5001 to 6000 1524 to 1829 6001 to 7000 1829 to 2134 7001...

Page 31: ...property damage A Propane conversion accessory kit is re quired when operating the furnace with Propane gas WARNING 8MPLs and N8MPLs contain NOx inserts FOR PROPANE CONVERSION REMOVE SCREWS THAT SECU...

Page 32: ...eed by removing the motor speed lead from the Heat or Cool terminal and replace it with the desired motor speed lead from the M1 or M2 location Connect the wire previously removed from the Heat or Coo...

Page 33: ...ualified service agency WARNING See User s Information Manual ELECTRICAL SHOCK FIRE OR EXPLOSION HAZARD Failure to follow this warning could result in dangerous operation personal injury death or prop...

Page 34: ...continuously while there are no other blower demands from furnace control Fan demands from furnace control for heat cool or G will override hard wired speed tap NOTE 3 EAC is NOT active for hard wired...

Page 35: ...AC or 115VAC is off fuse is open Heartbeat Normal operation or no previous Diagnostic Code ON SOLID Soft Lockout Furnace Control Error 1 hr delay If code repeats immediately following power reset then...

Page 36: ...8MPN100F20B2 N8MPL100J22B2 N8MPN100J22B2 N8MPL125J20B2 N8MPN125J20B2 N8MPL125J22B2 N8MPN125J22B2 8MPN050B12B2 8MPL050B12B2 8MPN075B12B2 8MPL075B12B2 8MPN075F16B2 8MPL075F16B2 8MPN100F14B2 8MPL100F20B2...

Page 37: ...e Series Hot Surface Combustion Flue Outlet Size Inches 4 4 4 4 4 4 4 4 Limits Controls Thermal Sensor oF oC Limit Control 300 149 See Parts List 300 149 See Parts List 300 149 See Parts List 300 149...

Page 38: ...es Hot Surface Combustion Flue Outlet Size Inches 4 4 4 4 4 4 4 Limits Controls Thermal Sensor oF oC Limit Control 300 149 See Parts List 300 149 See Parts Listt 300 149 See Parts List 300 149 See Par...

Page 39: ...Outlet Size Inches 4 4 4 4 4 4 4 4 Limits Controls Thermal Sensor oF oC Limit Control Auxiliary Limit oF oC 300 149 See Parts List 130 54 300 149 See Parts List 130 54 300 149 See Parts List 130 54 3...

Page 40: ...Limits Controls Thermal Sensor oF oC Limit Control Auxiliary Limit oF oC 300 149 See Parts List 130 54 300 149 See Parts List 130 54 300 149 See Parts List 130 54 300 149 See Parts List 130 54 300 149...

Page 41: ...y 10 if Bottom Only return 8 Gray area is above maximum temperature rise range NOTE 1 Gray area is above maximum temperature rise range CFM Cubic feet per minute airflow L s Liters per second Filter r...

Page 42: ...rn air inlet Airflow performance includes 1 25 4mm washable 600 FPM 3 0 m s max filter media N8MPN L125J20 8MPN L125J20 2 5 8 Denotes Brand Exterrnal Static Pressure in wc Pa Air Delivery in CFM L s F...

Page 43: ...43 441 01 2613 06 Specifications are subject to change without notice Wiring Diagram N8MPN L 8MPN L...

Page 44: ...njury or property damage Consult a qualified installer service agency local gas supplier or your distributor or branch for information or assistance The qualified installer or agency must use only fac...

Reviews: