background image

Page  7

© 

ICP Group 

| All rights reserved.

BASIC

1.3 INSTALLATION REQUIREMENTS


  Only qualified personnel may install / mount the receiver.


•  Incorect installation can endanger the user, bystanders or others (depending on  


  the application) causing injuries or damage to personal property and the receiver  


   itself.


•  When installing / mounting the receiver, ensure that the work / assembly


  environment is clean, tidy and dry.


  • Unplug the receiver from a connected power source before installation 


  and assembly.


•  Install the receiver in sight of the user, if possible.

•  DO NOT install the receiver in the immediate vicinity of motors, relays or power cables.

•  DO NOT install the receiver on the inside of a metal casing (this limits the connection range).

•  Always observe a supplied wiring diagram before use.

•  Always use adequately thick and correctly insulated cables that are suitable for the application.

•  Connect the wires to the correct cable connectors and do not use any insulation tape. Improper  connections can  

  cause fire and / or electric shock and lead to personal injuries and may damage the product.

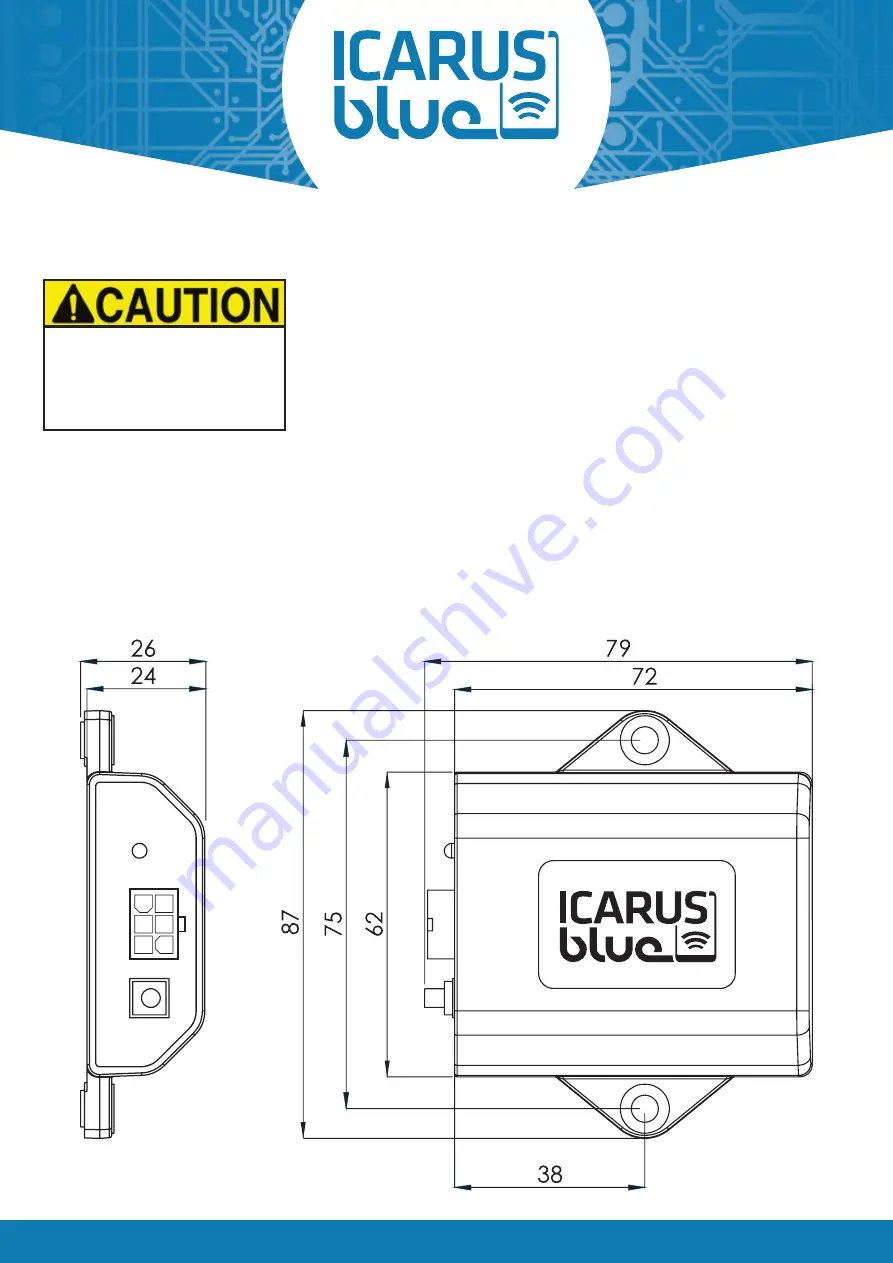
•  The receiver must be attached / mounted with two screws (M5) through the corresponding assembly holes (see chapter  

  1, fig. 1).

•  Always observe the valid safety instructions.

•  Install the receiver with the connector facing down for maximum water resistance!

It is strictly forbidden to install 

and/or operate  the receiver if 

you are tired or under the

influence of drugs (including 

alcohol) or medication.

Follow the safety instructions!

Summary of Contents for ICARUS blue

Page 1: ...manufacturer of this product updates the user manual from time to time When purchasing the product the customer user undertakes to request the latest documentation from the ICP Group ICP Group All rights reserved V 2 12 EN BASIC ...

Page 2: ...itched on and or off The receiver is operated via a corresponding ICARUS blue BASIC app for smartphones and or tablets called the app in the following The app establishes a wireless connection via Bluetooth technology between the receiver and the smart phone tablet The user interface of the app visualizes the respective outputs as well as their status on off and allows the user to configure activa...

Page 3: ...3 INSTALLATION REQUIREMENTS 7 1 4 CONNECTING THE CABLES 8 1 5 ACTIVATING THE PAIRING MODE 9 1 6 STATUS LED 9 2 ICARUS BLUE BASIC APP 10 2 1 DOWNLOAD AND FIRST START 10 2 2 BUTTON LAYOUTS AND DESCRIPTIONS 11 2 3 ADDING A NEW RECEIVER 11 2 4 BUTTON AND OUTPUT SETTINGS 12 2 5 GENERAL APP SETTINGS 13 2 6 CONTROL BUTTON ICONS 13 3 USING THE RECEIVER 14 4 MAINTENANCE AND CLEANING 14 5 SOLVING OF DTCS 14...

Page 4: ...ituation which if not avoided could result in minor or moderate injury Indicates a hazardous situation which if not avoided will result in death or serious injury SAFETY PRECAUTIONS DO NOT leave packaging material lying around This can be hazardous material for children DO NOT open and or disassemble and or alter the receiver to avoid electric shock malfunction or fire This will also expire the wa...

Page 5: ...e or injuries caused by improper use or non compliance of safety provisions In these cases the warranty will become null and void The receiver is not a toy and is not suitable for children Contact an expert if you have any questions about the use operation safety or connection of the receiver Observe the safety regulations the valid laws and warnings of the respective application machine manufactu...

Page 6: ...ASIC RECEIVER Figure 1 ICARUS blue BASIC receiver STATUS LED CONNECTION PLUG ASSEMBLY HOLE M5 PAIRING BUTTON Pin Wire colour Function 4 Black 0Vdc 1 Red 9 36V 2 Green Output 1 5 Yellow Output 2 3 Purple Output 3 6 Grey Output 4 Figure 2 Pin and wire assignment ...

Page 7: ... current max 10A Dimensions 3 11 x 3 42 x 1 02 L x W x H Weight 138g Casing moulded casing IP66 Temperature range 40 F to 131 F Optical feedback Dual colour LED red green Platform Android and iOS Max number of paired devices 24 For min system requirements see https www icarus blue com 1 2 PRODUCT TYPE IDENTIFICATION Each ICARUS blue BASIC receiver is marked on the back with a corresponding product...

Page 8: ...receiver on the inside of a metal casing this limits the connection range Always observe a supplied wiring diagram before use Always use adequately thick and correctly insulated cables that are suitable for the application Connect the wires to the correct cable connectors and do not use any insulation tape Improper connections can cause fire and or electric shock and lead to personal injuries and ...

Page 9: ... to the respective unit part that you want to control 5 Connect the loose end of the red wire of the supplied cable to the power supply Note The voltage range is 9 36 Vdc 6 Check that all cables have been connected correctly 7 Switch the power supply back on Information The LED on the receiver starts to flash green during the start process As soon as the start process has been completed successful...

Page 10: ...x red Overcurrent output 1 7x red Overcurrent output 2 8x red Overcurrent output 3 9x red Overcurrent output 4 1 5 ACTIVATING THE PAIRING MODE The pairing button of the receiver see chapter 1 fig 1 is used to activate the pairing mode pairing smartphones tab lets with the receiver STEP 1 Make sure that the receiver is correctly wired supplied with power and started up see 1 4 STEP 2 Press the pair...

Page 11: ...pp see 2 2 this manual is limited to explaining the essential processes and options 2 1 DOWNLOAD AND FIRST START STEP 1 Open the Play Store only for Android devices or the App Store only for iOS devices on your device STEP 2 Search for ICARUS blue BASIC by ICP Group STEP 3 Download and install the free ICARUS blue BASIC app STEP 4 Start the app STEP 5 Activate the Bluetooth function of your device...

Page 12: ...ne now connects to the selected receiver and synchronises the settings After the connection process has been successfully completed you will get redirected to the Home screen of the smartphone app BUTTON LAYOUT BUTTON NAME AND DESCRIPTION MAIN MENU BUTTON Located at the top left corner of the app screen Opens the main menu when pressed INFORMATION BUTTON Located on the right side of several settin...

Page 13: ...is means that when the button is pressed the corresponding output of the receiver is activated and remains active until the button is pressed again SAFETY FUNCTION When this option is active the corresponding output of the receiver will be turned off after the smartphone app lost focus the Bluetooth connection has been interrupted or the receiver can not be reached If you deactivate the safety fun...

Page 14: ...desired icon by pressing on it A pop up will appear with the message Settings are stored STEP 5 Confirm the pop up message by pressing OK The icon has now been assigned to the selected button OPTION DESCRIPTION RESTORE FACTORY SETTINGS Here you have the possibility to reset all button and output settings of the receiver to the factory state SET PASSWORD Here you can set a password to prevent the r...

Page 15: ... voltage under 32V again and click on reset error in the smartphone app Note Overvoltage can be a result of defect components in the system or external voltage sources which are connected to the system e g battery charger Make sure that those sources are removed before resetting the error FLASHING 5X OVERCURRENT OF ALL OUTPUTS COMBINED This error appears if the total current of the receiver is too...

Page 16: ... assembly as well as incorrect faulty operation can lead to injuries and damage of materials The manufacturer will not accept liability for injuries and damage to materials and or personal property or any other costs incurred due to incorrect and or faulty assembly incorrect use and or application for which the product was not designed and produced or non observance of maintenance or incorrect ser...

Reviews: