User manual
4-In / 4-Out Recording USB Interface with MIDI & S/PDIF I/O
Page 1: ...User manual 4 In 4 Out Recording USB Interface with MIDI S PDIF I O...
Page 2: ...or grounding type plug A polarized plug has two blades with one wider than the other A grounding type plug has two blades and a third grounding prong These are designated for your safety If the provid...
Page 3: ...c driver installation 8 Mixer control panel 10 Windows driver installation 11 ProDrive 14 Mixer control panel 15 Settings Sample rate and latency settings 17 ProDrive hosting rack 21 Hardware Connecti...
Page 4: ...guided tour through its front and rear panels step by step instructions for its setup and use and full specifications You ll also find a warranty card enclosed please don t forget to fill it out and m...
Page 5: ...with assignable source and individual volume control Flexible channel routing via the software control panel ICON s innovative ProDrive plug ins hosting rack is provided Kilohearts plug ins are provid...
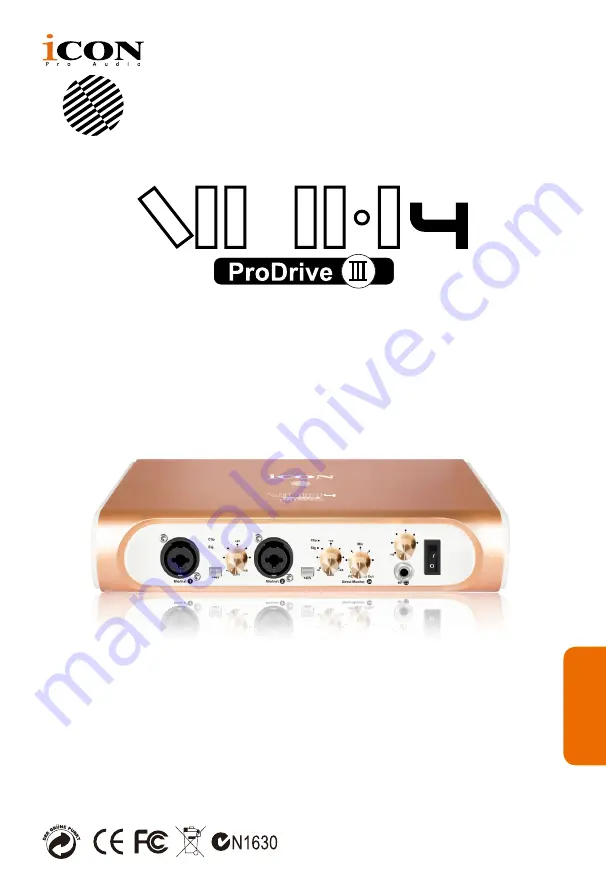
Page 6: ...entiometer controls the input level of its associated analog Mic Instrument Line input 6 Hardware PC Monitoring Control Hardware direct monitoring Clockwise Direct Out eliminates the latency or delay...
Page 7: ...gital output will be sent to the coaxial 3 MIDI I O connectors MIDI input and output on standard 5 pin DIN connectors 4 USB 2 0 connector Connect it with the provided USB cable to your Mac PC iOS devi...
Page 8: ...ot connect the VH4 digital audio interface to your Mac yet 2 Class compliant device VH4 is class compliant on macOS so no driver installation is needed 3 Copy the software control panel shortcut logo...
Page 9: ...c s USB port Note VH4 audio interface only support USB2 0 Your Mac must have a USB2 0 port Diagram 4 VH4 Core Audio VH4 Output VH4 Core Audio VH4 Bit Accurate 6 Audio MIDI setup Open the Audio MIDI se...
Page 10: ...sponding channel 7 0dB switch Switch to instantly adjust the corresponding channel to 0dB level 8 Gain control fader Slide to adjust the gain level for the corresponding channel 9 Inputs Outputs Matri...
Page 11: ...r yet 2 Insert the Driver CD into your CD Rom After you have inserted the provided Driver CD into your CD Rom an Installation screen should appear as shown in Diagram 6 then click Windows for the driv...
Page 12: ...that you select all components 6 Preparing installation files Once the installation process has started the process may take some time depending on your computer performance Please be patient and wait...
Page 13: ...agram 14 9 Launch the software control panel You may click the ICON ProAudio logo on the system tray to launch the software control panel Page 15 10 Connect your VH4 digital audio interface Now connec...
Page 14: ...in host and virtual signal router ProDrive runs either in standalone mode or with your favorite digital audio workstation DAW Pull up your guitar modeling and play or plug in your midi controller and...
Page 15: ...DM For example WDM Out 1 2 linked to VC In1 2 VC Out1 2 linked to WDM In1 2 4 VH4 Loopback channels LB 1 2 3 4 and 5 6 These are the ASIO loop back channels Mixer control panel On the mixer control pa...
Page 16: ...tput level metering Shows the ASIO 5 6 VC output level VC Out 5 6 11 Loopback 1 2 Shows the ASIO loop back 1 2 channel s level metering 12 Loopback 3 4 Shows the ASIO loop back 3 4 channel s level met...
Page 17: ...button to launch the settings window Sample rate setting Select your desired sampling rate from 44 1KHz to 192KHz on the pull down window shown in Diagram 21 Settings Sample rate and latency settings...
Page 18: ...s Diagram 22 Safe maximum latency Extra Large Normal Small Very Small Minimum minimum latency Custom There are six standard latency settings to select If you would like to customize your own latency v...
Page 19: ...tings you can adjust to customize your own latency settings These values include 1 ASIO buffer Size You may adjust the value ranging from 32 64 128 256 512 1024 2048 and 4096 2 Streaming buffer Size A...
Page 20: ...windows please select a larger latency setting Note If a clicking sound occurs you should change to a larger buffer size for the settings If the largest buffer size has been selected and there is sti...
Page 21: ...21 ProDrive hosting rack With the ProDrive Rack you can use any of your plug ins with your DAW Or you may use your device as a standalone plug ins effector without the need to run a DAW...
Page 22: ...ces to the VH4 s analog inputs Connect your S PDIF digital devices to the coaxial digital I O MIC LINE 27 27 GAIN 6dB 60dB MIC LINE 27 27 GAIN 6dB 60dB MIC LINE 27 27 GAIN 6dB 60dB MIC LINE 27 27 GAIN...
Page 23: ...23 Hardware Connections Continues MIDI USB Sound Module MIDI Out MIDI In MIDI In MIDI Out Master MIDI Controller or 1 2...
Page 24: ...2 balanced Frequency Response 22Hz to 22kHz 0 1dB Dynamic Range 114dB A weighted Signal to Noise Ratio 114dB A weighted THD N 100dB Crosstalk 100dB 1kHz Nominal Output Level Balanced 4dBu typical Maxi...
Page 25: ...he ICON tech support center or the local return authorization See our service centers and distributor service points at the link below If you are located in Hong Kong Send the product to ASIA OFFICE U...
Page 26: ...om iconproaudio www instagram com iconproaudio www facebook com iconproaudio Twitter Instagram Facebook Youtube Website iconproaudio com dashboard Dashboard Support support iconproaudio com www iconpr...