5
5
SAFETY PRECAUTIONS
Only skilled and instructed persons should carry out work with the radar product. Experience and safety procedures in the
following areas may be relevant:
•
Working with mains power
•
Working with modern electronic and electric equipment
•
Working at height
•
Working at the roadside or highways
Please follow these safety precautions:
-
Make sure the electricity supply is within the range shown on the label and the manual of the product.
-
All connections must be made whilst the power supply is switched off.
-
Ensure the wiring is correct as shown in the manual before switching on the power supply.
-
Never use a damaged radar.
-
Opening the outer casing is deemed dangerous and will void all warranties.
-
Ensure the radar is mounted correctly and the screws and bolts of both radar and bracket are firmly tightened. The
radar needs to point to the region of interest for proper detection.
-
Ensure the radar is configured properly.
6
THEORY OF OPERATION
1.
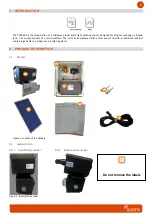
Unpack the unit and check the following items are in the box (please refer to Figure 1, p. 4):
A.
Radar/lidar with rear side connectors and mounting bracket
B.
Additional cabinet with solar regulator and modem
C.
USB AB cable
D.
Battery 100 Ah (optional)
E.
Solar panel 85 W with mounting bracket (optional)
F.
User’s guide
G.
Power supply & communication cable
2.
Place the unit on the field and align it to the traffic (see title 9, p. 6).
3.
Install the additional cabinet (B) on the same pole.
4.
Place the battery (D) in the cabinet and connect it.
5.
Mount the solar panel (E) according to the instructions (see title 15, p. 18).
6.
Connect the cable from the radar to the additional cabinet.
7.
Connect the cable from the solar panel to the additional cabinet.
7
LED indicator
The LEDs blink at power up and are then shut off.


