background image

19

6

VOR NAVIGATION (IC-A24 ONLY)

VOR functions


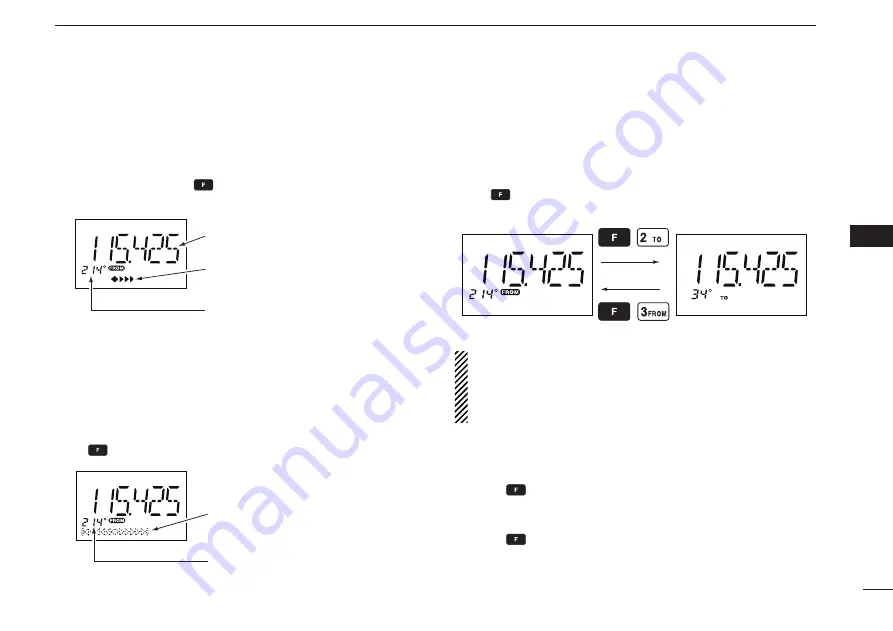
To select the CDI mode


ï

To show the deviation between your flying course and the 
desired course, push 

, then push [4•

CDI

] to select the 

CDI mode.

To select the DVOR mode


ï

When entering the NAV band, 108.000–117.975 MHz, the 
IC-A24 selects the DVOR mode automatically.

To show your aircraft’s direction to (or from) the VOR station, 
push 

, then push [1•

DVOR

] to select the DVOR mode.

‘TO’ or ‘FROM’ flag selection


ï

The to-from flag indicators indicate whether the VOR naviga-
tion information is based on a course leading to the VOR 
station or leading away from the VOR station.

Push 

, then push [3•

FROM

] or [2•

TO

] to change the flag 

from ‘TO’ to ‘FROM’ or vice versa, respectively.

NOTE:

•  When using the ‘TO’ flag and passing through the VOR station, 

the ‘TO’ flag changes to the ‘FROM’ flag automatically.

•  When turning power ON, the ‘FROM’ flag is selected automati-

cally.

 Selecting the next VOR station when using 


ï

CDI mode 

(when using the course deviation needle)

q

 Push 

, then push [1•

DVOR

] to select the DVOR mode.

w

  Push the keypad or rotate [DIAL] to set the next VOR sta-

tion’s frequency.

e

 Push 

, then push [4•

CDI

] to select the CDI mode.

  • Select ‘TO’ or ‘FROM’ flag, if desired.

Operating  frequency  can  not  be 
changed.
Each  course  deviation  arrow 
indicates a two-degree deviation.

Course  indicator  is  fixed,  but  it 
can  be  changed  with  the  tuning 
[DIAL] or keypad.

Course deviation needle does not 
appear.

Course  indicator  shows  your 
direction  to  (or  from)  the  VOR 
station.

2
3

1

4
5
6
7

9
10

8

12
13

11

14

Summary of Contents for IC-A6

Page 1: ...TRUCTION MANUAL iA6 iA24 VHF AIR BAND TRANSCEIVER This device complies with Part 15 of the FCC Rules Operation is subject to the condition that this device does not cause harmful inter ference IC A24 IC A6 ...

Page 2: ...ceiver Qty q Antenna 1 w Belt clip 1 e Handstrap 1 r Battery pack or battery case 1 t Wall charger 1 y Carrying case 1 u Headset adapter 1 Not supplied or the shape may be different depending on the version WORD DEFINITION RWARNING CAUTION NOTE Personal injury fire hazard or electric shock may occur RDANGER Personal death serious injury or an explo sion may occur If disregarded inconvenience only ...

Page 3: ...sceiver to an AC outlet or to a power source of more than 11 5 V DC Such a connection will damage the transceiver CAUTION NEVER connect the transceiver to a power source that is DC fused at more than 5 A Accidental reverse connection will be protected by this fuse higher fuse values will not give any protection against such accidents and the transceiver will be ruined DO NOT allow children to play...

Page 4: ...Y OPERATION 12 15 Memory channel selection 12 Transferring memory contents 12 Programming a memory channel 13 Memory names 14 Clearing the memory contents 14 5 SCAN OPERATION 16 17 Scan types 16 COM band scan 16 Memory scan 16 Weather channel scan U S A version only 17 TAG channel setting 17 6 VOR NAVIGATION IC A24 ONLY 18 24 VOR indicators 18 VOR functions 19 Flying to a VOR station 20 Entering a...

Page 5: ...s as below NOTE Use the supplied screws only Battery pack replacement ï ï Before replacing the battery pack push PWR for 2 seconds to turn the power OFF Slide the battery release button forward then pull the battery pack upward with the transceiver facing away from you Supplied screws NOTE About water resistant construction The water resistant construction provides reliable opera tion in wet condi...

Page 6: ...2 2 PANEL DESCRIPTION Panel description e r t u y i o Microphone Speaker 6 5 7 q w 1 0 2 3 4 WX ALERT IC A24 7 WX ALERT 7 IC A6 ...

Page 7: ...WX ALERT p 9 Push SQL WX ALERT then rotate DIAL to select the squelch level 24 squelch levels and squelch open 0 are available Push then push SQL WX ALERT to turn the WX alert function ON or OFF i POWER SWITCH PWR pp 9 25 Hold down for 2 seconds to turn the power ON or OFF While holding down MR MW push PWR to enter the cloning function mode o EXTERNAL SPEAKER AND MICROPHONE JACKS MIC SP p 33 If de...

Page 8: ...tery pack or to operate by external power see right il lustration 5 MEMORY MODE KEY MR MW pp 12 15 Push to select the memory channel mode Push then push MR MW to program the contents into the memory channels 6 ENTER KEY ENT WX pp 8 14 Push to store the numeral input Enters con secutive zero digits p 8 Push then push ENT WX to enter the weather channel selection mode U S A ver sion only p 8 Push to...

Page 9: ... 3 FROM to change the course indicator characteristics to a FROM flag in the DVOR display in the NAV band p 19 1 Corrects the deviation while using the FROM flag 1 Push then push 4 CDI to select the CDI dis play from the CDI display in the NAV band p 19 1 Push then push 5 DUP W to set the duplex frequency in the NAV band for U S A version only p 24 1 Push then push 6 DUP to turn the duplex functio...

Page 10: ...EX INDICATOR IC A24 only p 24 DUP appears when the duplex function is activated in the NAV mode DUP blinks while setting the duplex frequency t LOW BATTERY INDICATOR p 10 Appears when the battery is nearing exhaustion The attached battery pack requires recharging Appears and flashes when battery replacement is nec essary y LOCK INDICATOR p 11 Appears while the lock function is in use i q w e r t y...

Page 11: ... 1 OVERFLOW INDICATOR IC A24 only pp 18 22 Appears when the deviation between the desired course and flying course is over 10 degrees 2 ANL INDICATOR p 9 Appears while the ANL Automatic Noise Limiter function is in use 3 COURSE DEVIATION NEEDLES IC A24 only pp 18 22 Indicates every 2 degree deviation between the desired course and your actual flying course every 2 degrees 4 COURSE INDICATORS IC A2...

Page 12: ... 120 0917 MHz Push When operating on only 25 kHz channel spacing 111 225 MHz Push 117 250 MHz Push 120 000 MHz Push 125 300 MHz Push Using the tuning dial ï ï q Push PWR for 2 seconds to turn power ON then push CLR DEL to select the frequency mode when memory CH number or WX CH number appears on the function display w Rotate DIAL to set the desired frequency To select the 1 MHz tuning step push th...

Page 13: ...channel spacing to only 8 33 kHz or only 25 kHz the optional CS A24 02 cloning software and the optional cloning cable are required See Cloning using PC p 25 for details Setting a squelch level The transceiver has a noise squelch circuit to mute unde sired noise while receiving no signal q Push SQL WX ALERT then rotate DIAL to select the squelch level SQL 0 is open squelch and SQL 24 is tight sque...

Page 14: ...ush then push CLR DEL for 2 seconds to delete it e g When the r0 recall channel which is stored 120 450 MHz is deleted the r1 recall channel which is stored 123 450 MHz move up to r0 Replaces the stored recall channel ï ï q Push or to select the recall channel to be re placed w Push then push or to replace it Replaces the selected channel into the previous channel when is pushed and then is pushed...

Page 15: ...turn the lock function ON appears w To turn the function OFF repeat step q above disappears Side tone function When using an headset other manufacture s products the transceiver outputs your transmitted voice to the headset for monitoring Connect the optional headset with the trans ceiver when using this function OPC 499 HEADSET ADAPTER and headset are required p 33 Setting the side tone level ï ï...

Page 16: ...to exit the BANK selection mode e Push 2 appropriate digit key 00 to 19 to select the de sired memory CH number If no memory CH is programmed in the selected BANK no memory CH selection is available NOTE Comments appear first when programmed how ever the transceiver can be programmed by your dealer to show the operating frequency first Push MR MW to display the comment in this case Transferring me...

Page 17: ...he memory writ ing mode M Memory BANK and memory channel number are blink r Rotate DIAL to select the desired memory channel number Push then push 0 BANK and rotate DIAL to select the BANK number if desired Push CLR DEL ENT WX or push then push 0 BANK to exit the BANK selection mode t Push ENT WX to program the information into the chan nel and return to the frequency mode Weather channel U S A ve...

Page 18: ...rase a character overwrite with a space displayed as _ To move the cursor forwards or backwards use DIAL y Push ENT WX to program the name The memory name stops flashing When no name is programmed the display shows the operat ing frequency To clear the entered memory names push CLR DEL before pushing ENT WX NOTE When programming the memory name to the pro grammed memory channel do the following q ...

Page 19: ...otate DIAL or rotate DIAL EXAMPLE Programming 125 000 MHz into memory BANK 1 memory channel 17 with AIR 23 as a comment NOTE Push then push 0 BANK and then rotate DIAL to select the BANK number if desired Push CLR DEL to exit the BANK selection mode 2 3 1 4 5 6 7 9 10 8 12 13 11 14 ...

Page 20: ... SQL WX ALERT then rotate DIAL to set the squelch level to the point where noise is just muted e Push then push ANL SCAN to start the scan When a signal is received the scan pauses until it disappears To change the scanning direction rotate DIAL r To stop the scan push CLR DEL NOTE Program 2 or more memory channels to start the memory scan WEATHER CHANNEL SCAN Repeatedly scans all TAG weather chan...

Page 21: ...ctively The TAG channel function is only available dur ing the scan operation q Push MR MW to select the memory mode or push then push ENT WX to select a weather channel w Select the desired memory channel to be a TAG chan nel Push then push 0 BANK and rotate DIAL to select the BANK number if desired Push CLR DEL to exit the BANK se lection mode e Push then push 9 TAG to set a TAG TAG appears Non ...

Page 22: ...DE Function display of the IC A24 General VOR equipment To from flag indicator CDI MODE Course indicator Course indicator Course deviation needles Overflow indicator Push F then push 4 CDI Push F then push 1 DVOR To from flag indicator Course indicator Course deviation needle To from flag indicator Two degree deviation marks ...

Page 23: ...ange the flag from TO to FROM or vice versa respectively NOTE When using the TO flag and passing through the VOR station the TO flag changes to the FROM flag automatically When turning power ON the FROM flag is selected automati cally Selecting the next VOR station when using ï ï CDI mode when using the course deviation needle q Push then push 1 DVOR to select the DVOR mode w Push the keypad or ro...

Page 24: ...cator shows OF when the desired VOR signal cannot be received NOTE When the CDI mode is selected the operating fre quency cannot be changed To set the operating fre quency select the DVOR mode in advance r The course deviation needle appears when your aircraft is off course from the VOR station Ω or appears to indicate your aircraft is off course to the right or left respectively Correct your cour...

Page 25: ...50 60 70 80 90 100 110 120 130 140 150 160 170 180 190 200 210 220 230 240 250 260 270 280 290 300 310 320 330 340 350 N Magnetic north Aircraft should be heading 40 Aircraft heading 46 6 off course Flown course 123 65 VORTAC SEATTLE 116 8 Ch 115 SEA THE AIRCRAFT IS OFF COURSE NOTE The course deviation indica tor appears when the aircraft is off course In this example the aircraft is 6 degrees off...

Page 26: ...s 10 degrees to the desired course if the overflow indica tor appears on the left side select a heading minus 10 degrees Crosschecking position q Select 2 VOR stations on your aeronautical chart w Push the keypad or rotate DIAL to set the frequency of one of the VOR station in the DVOR mode The course indicator shows course deviation from the VOR ra dial Note the radial you are on e Push the keypa...

Page 27: ...0 170 180 190 200 210 220 230 240 250 260 270 280 290 300 310 320 330 340 350 N Magnetic north VOR station 0 10 20 30 40 50 60 70 80 90 100 110 120 130 140 150 160 170 180 190 200 210 220 230 240 250 260 270 280 290 300 310 320 330 340 350 113 4 Ch 81 OLM VORTAC OLYMPIA 116 8 Ch 115 SEA 123 65 VORTAC SEATTLE CROSSCHECKING POSITION 2 3 1 4 5 6 7 9 10 8 12 13 11 14 ...

Page 28: ...ng dial push ENT WX after setting a frequency The displayed frequency returns to the NAV band frequency Operating the duplex function ï ï q Set the desired frequency in the NAV band NAV band frequency range 108 000 117 975 MHz w Push then push 6 DUP to turn the duplex function ON DUP appears on the function display e Hold down PTT to transmit at the pre programmed transmit frequency r Release PTT ...

Page 29: ...ansceiver s display r When cloning is finished turn power OFF then ON again to exit the cloning mode NOTE DO NOT transfer the data from a IC A24 to a IC A6 when the data contains the NAV band data In such case a cloning error may occur Cloning using PC ï ï Data can be cloned to and from a PC Microsoft Windows XP using the optional CS A24 02 cloning software and the optional OPC 478 RS 232C type OP...

Page 30: ... batteries still do not retain a charge or very lit tle new battery pack must be purchased Battery charging Prior to using the transceiver for the first time the battery pack must be fully charged for optimum life and operation CAUTION To avoid damage to the transceiver turn the power OFF while charging Recommended temperature range for charging 10 C to 40 C 50 F to 104 F Use the supplied AC adapt...

Page 31: ...ransceiver w Install 6 AA LR6 size Alkaline batteries Be sure to observe the correct polarity CAUTION When installing batteries make sure they are all the same brand type and capacity Also do not mix new and old batteries together Keep battery contacts clean It s a good idea to clean battery terminals once a week To DC 11V IC A24 A6 with the attached battery pack CP 20 for 11 24 V optional To the ...

Page 32: ... spacer Spacer B C push the latch carefully with your finger to remove the spacer Spacer B C from the adapter Spacer A CAUTION DO NOT push or force the latch with a screw driver etc to remove it DO NOT bend the latch when the adapter and spacer are not joined together This will cause weakening of the latch plastic Both cases may break the latch and it may not be able to be reattached BE CAREFUL no...

Page 33: ...10N Turn power OFF The AD 101 charger adapter is installed in the slot IC A24 A6 BP 209N BP 210N AD 101 charger adapters are installed in each slot DC power cable OPC 656 Connect with the DC power supply 13 8 V at least 7 A Turn power OFF AD 99N supplied with AD 101 AC adapter BC 157 Purchase separately The adapter Spacer A only is required for IC A24 A6 When re moving the spacer Spacer B C push t...

Page 34: ... noise ratio More than 35 dB Spurious emissions More than 46 dB except operating frequency 62 5 kHz range Microphone connector 3 conductor 2 5 d mm 1 10 more than 100 kΩ Receiver ï ï Receive system Double conversion superheterodyne Intermediate frequencies 1st 46 35 MHz 2nd 450 kHz Sensitivity VOR AM 6 dB S N 3 dBµ typical COM AM 6 dB S N 6 dBµ typical WX FM 12 dB SINAD 13 dBµ typical Squelch sens...

Page 35: ...18 055 118 0583 8 33 118 060 118 0667 8 33 118 065 118 0750 8 33 118 080 118 0833 8 33 118 085 118 0917 8 33 118 090 118 1000 8 33 118 105 Channel spacing 8 33 kHz 25 kHz Operating Frequency MHz Channel spacing kHz Channel ID Displayed Frequency 118 0000 25 118 000 118 0000 8 33 118 005 118 0083 8 33 118 010 118 0167 8 33 118 015 118 0250 25 118 025 118 0250 8 33 118 030 118 0333 8 33 118 035 118 ...

Page 36: ... same as supplied with the transceiver MB 86 swivel belt clip Belt clip for swivel type MB 96F 96N leather belt hanger MB 96F Attaches with the supplied belt clip Fixed type MB 96N Belt hanger for swivel type DC CABLES ï ï CP 20 cigarette lighter cable Charges the battery pack through a cigarette lighter socket Operates IC A24 A6 through a cigarette lighter socket Both 12 V and 24 V batteries are ...

Page 37: ...ted voice to the headset for monitoring See Side tone function p 11 when setting the side tone level PTT OPC 499 IC A24 A6 PTT switch HEADSET Must be purchased separately Use a PTT switch with a 3 5 mm 1 8 diameter plug if required NOTICE Some headsets do not work properly when used with the IC A24 A6 Therefore ask your dealer for details about headsets compatible for operation with the IC A24 A6 ...

Page 38: ...lowing guidelines DO NOT operate the radio without a proper antenna attached as this may damage the radio and may also cause you to exceed FCC RF expo sure limits A proper antenna is the antenna supplied with this radio by the manufacturer or antenna specifically authorized by the manufacturer for use with this radio DO NOT transmit for more than 50 of total radio use time 50 duty cycle Transmitti...

Page 39: ...ns qu une antenne appropriée y soit fixée car ceci risque d endommager la radio et causer une exposition supérieure aux limites établies par la FCC L antenne appropriée est celle qui est fournie avec cette radio par le fabricant ou une antenne spéciale ment autorisée par le fabricant pour être utilisée avec cette radio NE PAS émettre pendant plus de 50 du temps total d utilisation de l ap pareil 5...

Page 40: ...ful interference when the equip ment is operated in a commercial environment This equipment generates uses and can radiate radio frequency energy and if not installed and used in accordance with the instruction manual may cause harmful interference to radio communications Operation of this equipment in a residential area is likely to cause harmful interference in which case the user will be requir...

Page 41: ... low Set squelch to the threshold point Set VOL to a suitable level p 9 p 9 Transmitting impossible WX channels or NAV band is selected The battery is exhausted Set COM band in frequency mode Recharge the battery pack p 8 pp 26 29 Operating frequency or memory channel can not be changed Lock function is activated Push then push 7 p 11 Scan does not start All memory channels in the selected bank ar...

Page 42: ...P 20 fuse replacement 37 Crosschecking position 22 D DC CABLES 32 Deletes the stored recall channel 10 Duplex operation 24 E Entering a desired course 22 EXPLICIT DEFINITIONS i F Flying to a VOR station 20 FOR CLASS A UNINTENTIONAL RADIATORS 36 FOREWORD i Function display 6 G General 30 I IMPORTANT i INDEX 38 L Lock function 11 Low battery indicator 10 M Memory channel selection 12 Memory names 14...

Page 43: ...electing the next VOR station when using CDI mode when using the course deviation needle 19 Setting a frequency 8 Setting a squelch level 9 Setting beep tone 11 Setting the side tone level 11 Setting weather alert function 11 Side tone function 11 SPECIFICATIONS 30 SUPPLIED ACCESSORIES i T TABLE OF CONTENTS iii TAG channel setting 17 TO or FROM flag selection 19 To select the CDI mode 19 To select...

Page 44: ...1 1 32 Kamiminami Hirano ku Osaka 547 0003 Japan Printed on recycled paper with soy ink A 6987D 1EX q Printed in Japan 2011 2012 Icom Inc ...

Reviews: