background image

13

DRIVER UNINSTALLATION

The displayed dialogue boxes or indications may differ slightly from the following instructions according to your 
system conditions, or environment.

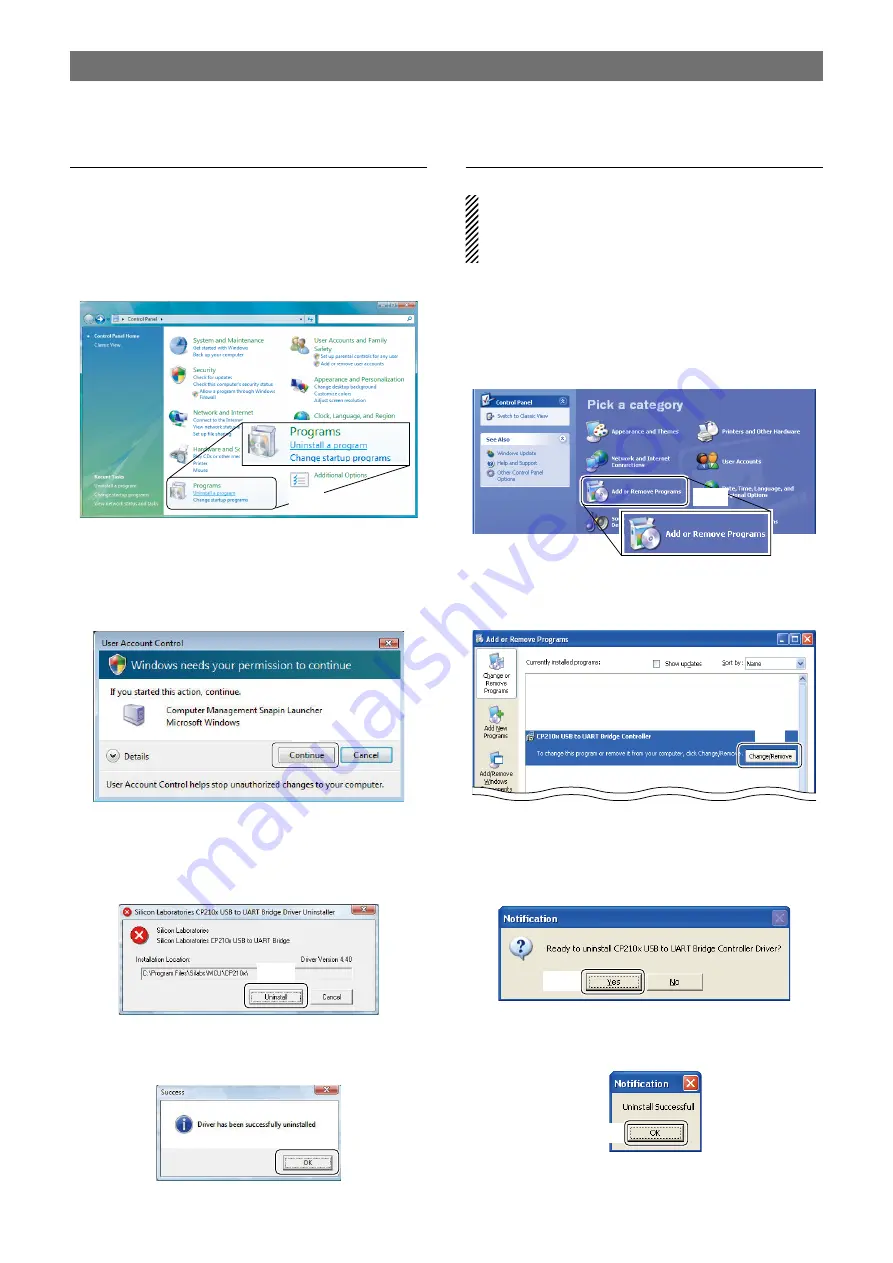
Windows Vista

q

 Start up Windows.

w

 Select the “Control Panel” in the Start menu.

  •  The control panel appears as shown in the next step 

below.

e

 Click the “Uninstall a program.”

  • The “Uninstall or Change a Program” menu appears.

Click

r

  Double-click “Silicon Laboratories CP210x USB to 

UART Bridge (DriverRemoval).”

t  

In case “User Account Control” dialogue box ap-
pears as below, click [Continue].

Click

y

  The “Confirm Uninstall” appears.

   Click [Uninstall] to uninstall the program from the 

PC.

  • The uninstallation starts.

Click

u

 After the uninstall is completed, click [OK].

  • Restarting the PC is recommended.

Click

Windows XP

For Windows 2000: 

Refer  to  the  following  instructions  because  the 
operations of Windows 2000 are similar to Windows 
XP.

q

 Start up Windows.

w

 Select the “Control Panel” in the Start menu.

  •  The control panel appears as shown in the next step 

below.

e

 Click the “Add or Remove Programs.”

  • The “Add or Remove Programs” menu appears.

Click

r

  Select “CP210x USB to UART Bridge Controller,” 

then click [Change/Remove].

Click

t

  The “Ready  to  uninstall  CP210x  USB  to  UART 

Bridge Controller Driver?” appears.

  Click [Yes] to uninstall the program from the PC.

  • The uninstallation starts.

Click

y

 After the uninstall is completed, click [OK.]

  • Restarting the PC is recommended.

Click

Summary of Contents for IC-7200

Page 1: ... Microsoft Windows XP 64 bit Icom is not responsible for whole performance of the PC that supports above OS In this installation guide the above OS are de scribed as Windows Vista Windows XP and Windows 2000 Item requirements USB cable A B type third party A type B type PC with USB 1 1 or 2 0 Installed audio player PC software third party See p 18 for details OVERVIEW USB DRIVER INSTALLATION GUIDE...

Page 2: ...USB driver installation is required for each unit because of the COM port number difference Important Audio from the USB port may cut out or audio con trol with the PC software may get late because of the PC performance including OS environment etc Audio from the USB port may cut out when the CPU load increases The audio device settings of OS may be changed when the transceiver is connected to the...

Page 3: ...he USB driver download service Before installing the USB driver download the follow ing compressed file USB driver File name 7200UsbDrv_v100 zip Icom is not responsible for any damage or lack of data resulting from the use of the USB driver PREPARING ...

Page 4: ...e CP210xVCPInstaller exe to start up the USB driver installer Double click t A program needs your permission to continue dia logue box appears as below Click Continue Click yVerify the installation location then click Install Click u Windows starts scanning for the system then starts installing the USB driver i After the installation is completed click OK Restarting the PC is recommended Click NOT...

Page 5: ...le correctly and not up side down Transceiver PC USB cable third party To USB jack To USB port Type A Type B ACC KEY SEND ALC REMOTE 0Turn the transceiver power ON Installing device driver software appears as below 1 After the dialogue appears as below USB driver installation has been completed Windows Vista Continued DRIVER INSTALLATION ...

Page 6: ...y To USB jack To USB port Type A Type B ACC KEY SEND ALC REMOTE rTurn the transceiver power ON Found New Hardware appears as below t The Welcome to the Found New Hardware Wizard will come up as below Select No not this time then click Next Click Select y Select Install from a list or specific location Advanced then click Next Click Select u Select Search for the best driver in these locations then...

Page 7: ...e driver is found the Hardware Installation dialogue box appears as below Click Continue Anyway to start the installation Click 2Windows starts installing the USB driver 3After the installation is completed click Finish Click 4After clicking Finish the dialogue appears as below 5 The Welcom to the Found New Hardware Wizard will come up again to install the USB serial port driver Select No not this...

Page 8: ...rv_v100 Driver Win Click Select 9Click Next Click 0 The Wizard starts searching for the driver and shows the dialogue below during search 1 After the driver is found the Hardware Installation dialogue box appears as below Click Continue Anyway to start the installation Click 2Windows starts installing the USB driver 3After the installation is completed click Finish Click 4After clicking Finish the...

Page 9: ...not up side down Transceiver PC USB cable third party To USB jack To USB port Type A Type B ACC KEY SEND ALC REMOTE rTurn the the transceiver power ON Found New Hardware appears as below t The Found New Hardware Wizard will come up as below Click Next Click y Select Search for a suitable driver for my device recommended then click Next Click Select uSelect Specify a location then click Next Click ...

Page 10: ...When the driver is found the following dialogue is displayed Click Next to start the installation Click 2After the installation is completed click Finish Click 3The Found New Hardware Wizard appears again Click Next Click 4 Select Search for a suitable driver for my device recommended then click Next Click Select 5Select Specify a location then click Next Click Select Continues to the next page ...

Page 11: ...r then click Open The folder construction 7200UsbDrv_v100 Driver Win Click Select slabw2k inf 8Click OK Click 9 When the driver is found the following dialogue is displayed Click Next to start the installation Click 0After the installation is completed click Finish Restarting the PC is recommended Click ...

Page 12: ...is 8 w q Click Windows XP For Windows 2000 Refer to the following instructions because the operations of Windows 2000 are similar to Windows XP q Start up Windows w Right click My Computer then select Properties My Computer is available in Start menu e System Properties screen appears as below Click Hardware tab and then click Device Man ager Click Click r Device Manager screen appears Click of Po...

Page 13: ... to uninstall the program from the PC The uninstallation starts Click u After the uninstall is completed click OK Restarting the PC is recommended Click Windows XP For Windows 2000 Refer to the following instructions because the operations of Windows 2000 are similar to Windows XP q Start up Windows w Select the Control Panel in the Start menu The control panel appears as shown in the next step be...

Page 14: ...ht click CP210x USB to UART Bridge Controller COMM and then click Properties M is the COM port number that is used for the communication setting with the utility software Click Right click y Click Port Settings tab then click Advanced Click Click u Set the desired COM port number then click OK Click Set i Click OK to close the screen Click When the transceiver is connected to a PC with the USB cab...

Page 15: ... e System Properties screen appears as below Click Hardware tab and then click Device Man ager Click Click r Device Manager screen appears Right click CP210x USB to UART Bridge Controller COMM and then click Properties M is the COM port number that is used for the communication setting with the utility software Click Right click t Click Port Settings tab then click Advanced Click Click y Set the C...

Page 16: ... from the USB jack is listed as below The received audio output The number of data bit 16 bit Sampling rate 8 11 025 16 22 05 32 44 1 48 kHz The number of channel Monaural Stereo The same audio signals are output from both L R The sampling rate other than those above can be used according to the application The received audio output The same audio signals are output from the USB jack and the ACC s...

Page 17: ...GENE 9 AGC MW ANF METER NR NB M CH CI V system Send the command FE FE 76 E0 1A 03 23 03 FD to the transceiver The transceiver s address is described as 76 and the controller s address is described as E0 for examples in this guide When the data mode is ON SSB data or AM data mode is in use Set mode q Push and hold M CH RIT SET for 1 sec twice to enter the set mode w Rotate M CH to select D Mod e Ro...

Page 18: ...el The transceiver s address is described as 76 the controller s address is described as E0 and input modula tion level is described as 0128 50 for examples in this guide The modulation input audio format The modulation input audio format from the USB jack is listed as below Modulation input The number of data bit 16 bit Sampling rate 32 44 1 48 kHz The number of channel Monaural Stereo The audio ...

Page 19: ... bite Start bit 1 Data bit 8 Parity bit No Stop bit 1 Speed 300 1200 4800 9600 19200 bps Received audio output Number of data bit 16 bit Sampling rate 8 11 025 16 22 05 32 44 1 48 kHz Number of channel Monaural Stereo The same audio signals are output from both L R Modulation input Number of data bit 16 bit Sampling rate 32 44 1 48 kHz Number of channel Monaural Stereo The audio signal from L is i...

Reviews: