background image

31

5

SCAN OPERATION

Versatile memory scan

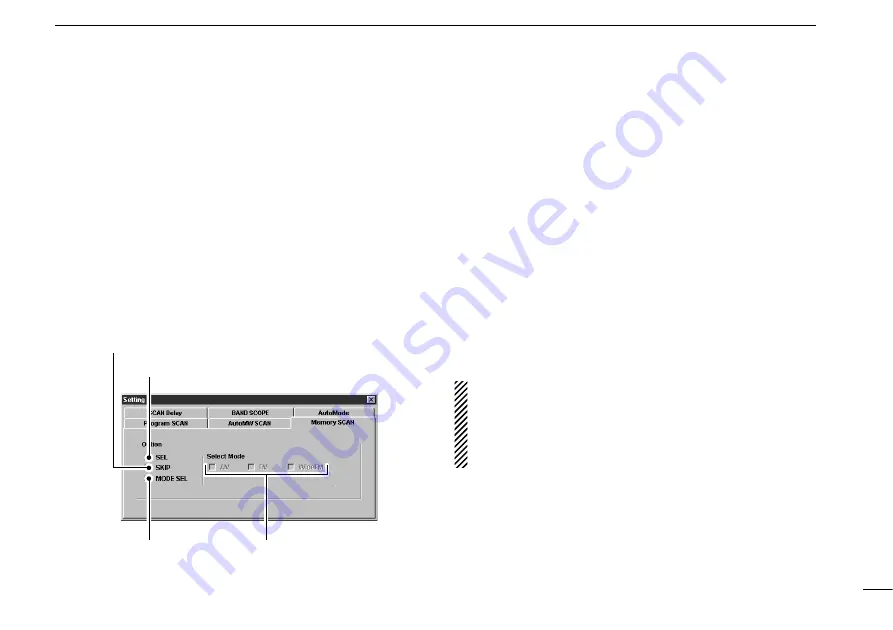
Using the [Memory SCAN] tab in the setting screen you can
set conditions specific only to memory channels during mem-
ory scan.

q

Call up the setting screen if it is not displayed.

• For the multi-function receiver screen, click the [SET] button.
• For the simple function receiver screen, click the [MENU] button

and select the ‘Function Setting (SET).’ When the scan controller
screen is in use, click the [SET] button on the screen.

w

Click the [Memory SCAN] tab.

e

Make sure the desired check boxes are checked (

%

).

• When selecting the [SEL] box (select memory scan), only

memory channels specified as SEL (select) are scanned.

• When selecting the [SKIP] box (memory skip scan),

memory channels specified as SKIP channels are not
scanned.

• When selecting the [MODE SEL] box (mode select mem-

ory scan), only memory channels programmed with the
specified receive mode (in the [Select Mode] check box)
are scanned.

r

Click the close ([

"

]) button.

t

Start the desired memory scan.

• For the multi-function receiver screen, click the [MEMO] button.
• For the simple function receiver screen, click the [MEMO] button

in the scan controller screen.

y

To cancel the scan, click [STOP] or [MEMO].

• All settings can be used simultaneously.

• SEL, SKIP and receive mode are set in the memory list

screen.

• At least 2 memory channels must be programmed with

the desired condition for scan to proceed.

Check for select memory scan

Check for memory skip scan

Check for mode 
select memory scan

Check the desired 
modes for mode select
memory scan

Summary of Contents for COMMUNICATION RECEIVER IC PCR100

Page 1: ...les Operation is sub ject to the following two conditions 1 This device may not cause harmful interference and 2 this device must accept any interference received including interference that may cause...

Page 2: ...radiation which has frequencies of 20 000 Hz 20 kHz and above is called radio frequency RF energy because it is useful in radio transmissions The IC PCR100 receives RF energy from 0 5 MHz to 1300 MHz...

Page 3: ...This equipment gen erates uses and can radiate radio frequency energy and if not in stalled and used in accordance with the instruction manual may cause harmful interference to radio communications Ho...

Page 4: ...8 Receive mode selection 18 Automatic mode selection 19 Setting squelch level 20 IF filter selection 20 Attenuator function 21 Automatic noise limiter 21 4 MEMORY CHANNELS 22 25 General 22 Saving memo...

Page 5: ...1 1 INSTALLATION Hardware installation Refer to the diagram below for connections Ground Supplied antenna to an AC adapter to an RS 232C port External speaker Personal computer...

Page 6: ...ted specifications To obtain maximum performance from the IC PCR100 you must purchase an ex ternal wide band antenna such as an optional Icom AH 7000 25 1300 MHz etc Contact your nearest Icom Dealer o...

Page 7: ...lug MONO for 2 conductor monaural plug e Select the output level as shown at right SP for internal or exter nal speaker LINE for PC sound card or headphones r Connect an appropriate cable between IC P...

Page 8: ...tallation q Boot up Windows Quit all applications when windows is running w Insert the backup disk 1 into the appropriate floppy drive e Select Run from the Start menu r Type the setup program name wi...

Page 9: ...d correctly w Launch the IC PCR100 software e Click the POWER button to temporarily pause the pro gram r Right click the frequency indication to display shortcut menu and select COM Port in the Option...

Page 10: ...e simple function receiver screen t BANK MENU BANK Used for selecting the memory bank y MEMORY LIST SCREEN BUTTON Push to display or to hide the memory list screen u EXTERNAL SPEAKER SETTING BUTTON p...

Page 11: ...E MODE BUTTONS FM WFM AM AUT M pgs 18 19 Select a receive mode The AUT M button automatic mode selects a previously programmed receive mode au tomatically depending on a receive frequency 8 SCAN SPEED...

Page 12: ...filter in use The WID button se lects a wider filter the NAR button selects a narrower fil ter Usable IF filters vary according to receive mode 6 SCAN STOP BUTTON STOP p 26 Push to cancel scan operati...

Page 13: ...audio is NOT output To monitor the frequency push s to pause the function or push to cancel the function 1 MEMORY SCAN BUTTON MEMO p 30 Push to start stop any of the memory scans MEMO flashes while s...

Page 14: ...tes the S meter squelch receive level set via the SQUELCH con trol t BAND SCOPE PAUSE INDICATOR PAUSE p 34 Appears when pausing the band scope y BUSY INDICATOR BUSY Appears when receiving a signal or...

Page 15: ...e diagram the upper and lower limits are 100 kHz and 100 kHz 5 FREQUENCY SPAN INDICATION p 34 Indicates the frequency span selected with the SPAN or SPAN button 6 CENTER FREQUENCY INDICATOR p 34 Indic...

Page 16: ...squelch receive level set via the SQLJ SQLK buttons t FREQUENCY INDICATION p 17 Indicates the receive frequency Double click to display hide the information display Right click to bring up the shortc...

Page 17: ...udio output 1 VOLUME INDICATOR p 16 Indicates the audio output level 2 BUSY INDICATOR BUSY Appears when receiving a signal or when signal noise opens the squelch 3 ATTENUATOR INDICATOR ATT p 21 Appear...

Page 18: ...he squelch removes noise output from the speaker closed condition when no signal is received t IF FILTER BUTTONS NAR WID p 20 Push to change the IF filter in use The WID button se lects a wider filter...

Page 19: ...f Memory list screen Setting screen Band scoop screen Function controller screen Scan controller screen Simple function receiver sub screens The simple function receiver screen has an information disp...

Page 20: ...and holding the control the squelch level scrolls up or down t When a signal is received Squelch opens and audio is emitted from the speaker The S meter shows the relative signal strength DUsing the s...

Page 21: ...frequency When making a mistake while inputting a frequency click CE to clear the input and return to the previous frequency When you want to change the 100 kHz digit and below click first then the n...

Page 22: ...function controller screen to select the desired tuning step The selected tuning step is displayed in the information display if the information display is in use Receive mode selection Receive modes...

Page 23: ...ck the MENU button and select the Function Setting SET to call up the setting screen w Click the Auto Mode tab to display the automatic mode list e Click a cell in the Freq Low column and the desired...

Page 24: ...elch level is displayed in the function display DUsing the simple function receiver screen q Click MENU and select the Function controller when it is not displayed w Click SQLJ or SQLK on the function...

Page 25: ...is not displayed w Click ATT on the function controller to toggle the attenua tor function ON and OFF ATT appears in the information display if the information display is in use Automatic noise limit...

Page 26: ...Memory channel comment Saving memory channels The memory channels can be stored as a PC file DUsing the multi function receiver screen Select Save or Save As on the File menu to back up memory channe...

Page 27: ...BANK button and select a desired memory bank w Click a numeral button 1 5 to select memory channels 1 5 Use the memory list screen to select memory channels 6 to 50 DUsing the memory list screen q Ca...

Page 28: ...screen if it is not displayed For the multi function receiver screen click the memory list screen button or select Memory List from the View menu For the simple function receiver screen click the MEN...

Page 29: ...reviously input name t Push the Enter key to input the name DInserting and deleting channels New blank channels can be inserted into the channel list and channels no longer needed can be deleted from...

Page 30: ...ch 6 ch 49 Not yet programmed ch 50 ch 1 ch 2 ch 3 ch 4 ch 5 ch 6 ch 49 MEMORY SKIP SCAN p 31 Skips unwanted memory channels that inconvenient ly stop scanning This func tion can be turned ON OFF in M...

Page 31: ...nged scan starts from the previously stopped frequency DUsing the simple function receiver screen q Make sure the squelch is set to the threshold point closed condition w Call up the setting screen if...

Page 32: ...to show the program list e Click a start frequency cell in the START column to se lect the data input condition When a cell is clicked the scan edges of the line are automati cally set as scan edges...

Page 33: ...tart auto memory write scan AUTO flashes while scanning u To cancel the scan click STOP or AUTO DUsing the simple function receiver screen q Make sure the squelch is set to the threshold point closed...

Page 34: ...O flashes while scanning u To cancel the scan click STOP or MEMO DUsing the multi function receiver screen q Make sure the squelch is set to the threshold point closed condition w Click the BANK butto...

Page 35: ...cting the SKIP box memory skip scan memory channels specified as SKIP channels are not scanned When selecting the MODE SEL box mode select mem ory scan only memory channels programmed with the specifi...

Page 36: ...n from DELAY Timing a Pause until Signal disappears Scan pauses when receiving a signal and remains paused until the signal disappears b Delay Volume When setting a delay time using the DELAY control...

Page 37: ...ed click the SPEED control with the main mouse button to decrease the scan speed When clicking and holding the control the scan speed scrolls up or down DUsing the simple function receiver screen q Ca...

Page 38: ...can also select the frequency by clicking the waveform The current receive frequency is marked by a dotted line and the previous receive frequency is displayed at center t Click the sweep stop button...

Page 39: ...tab on the setting screen q Call up the setting screen if it is not displayed For the multi function receiver screen click the SET button For the simple function receiver screen click the MENU button...

Page 40: ...er screen q Click MENU and select the Function Controller when it is not displayed w Click the FM button in the function controller screen to se lect FM mode e Click the TSQL button to bring up the TO...

Page 41: ...n to obtain a suitable level Click the SQUELCH control with the main mouse button or click the SQLK button to open the squelch Pause or cancel the band scope function Check the tone squelch frequency...

Page 42: ...Current drain at 13 8 V DC Standby software OFF 0 1 A Receive squelched 0 6 A Receive max audio 0 7 A Usable temp range 0 C to 50 C 32 F to 122 F Intermediate frequencies 1st 266 7 MHz 2nd 10 7 MHz 3r...

Page 43: ...4 5 D mm 55 32 W 15 16 H 63 32 D in Weight approx 0 5 kg 1 lb 2 oz Supplied accessories Accessories included with the receiver Qty q Wire antenna 1 w RS 232C cable OPC 743 1 e AC adapter BC 123A E or...

Page 44: ...Count on us 6 9 16 Kamihigashi Hirano ku Osaka 547 0002 Japan A 5548H 1EX q Printed in Japan 1998 Icom Inc...

Reviews: