background image

EN-18

You can make or receive phone calls with Bluetooth-enabled phones 

through the unit. You can also listen to music from a Bluetooth-

enabled device.

Pair the Bluetooth-enabled Devices

To connect your Bluetooth device to the unit, you need to pair the 

device to the unit. Pairing needs only to be done once. You can pair 

up to five devices. 

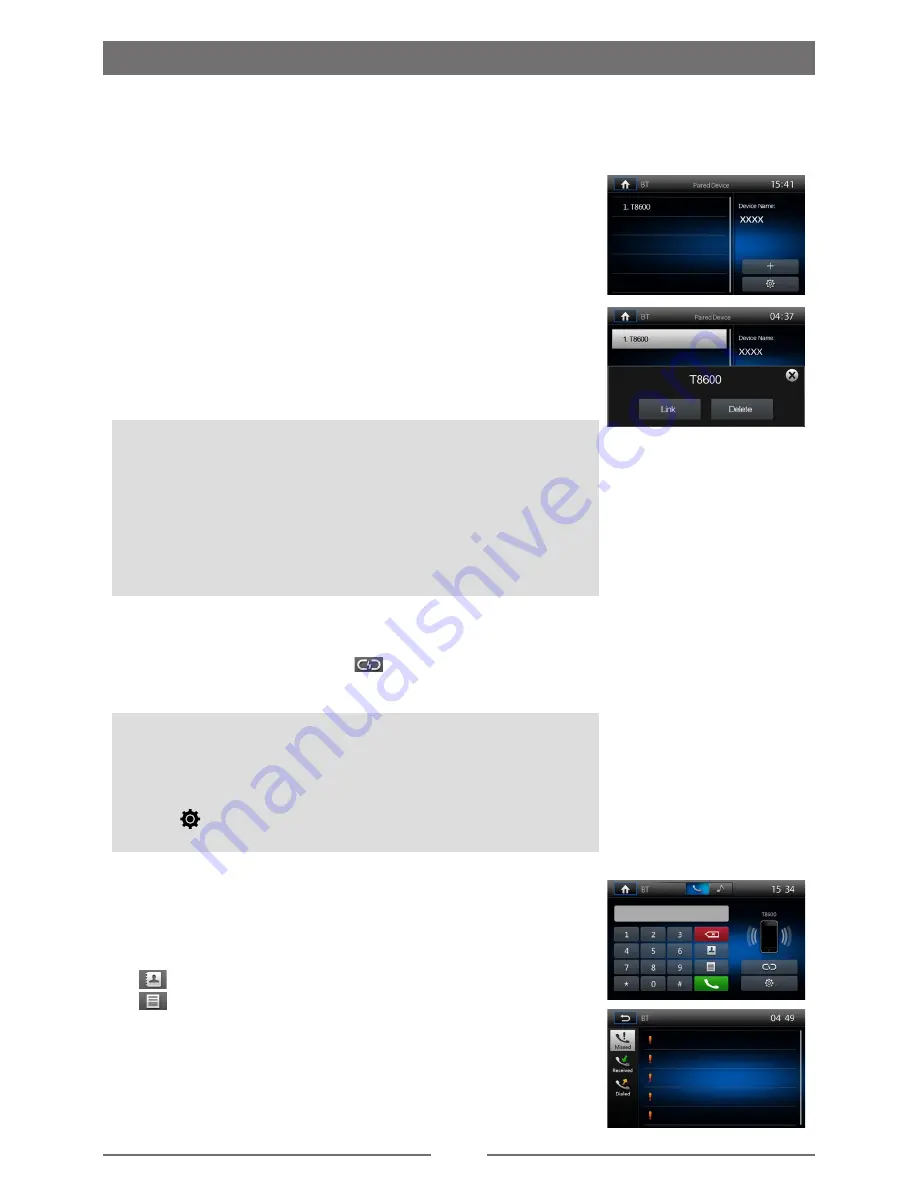
You also can search for Bluetooth devices by 

mobile phone.

1. Turn on the Bluetooth function on the device.

2. Touch [ 

+

 ] to search for Bluetooth device with the device.

3. Select 

the Bluetooth device ID in the pairing list.

4.

Touch [ Link ].

4. Enter default password “0000”.


Tip:

•  The operational range between this unit and a Bluetooth device is

approximately 5 meters .

•  Before you connect a Bluetooth device to this unit, familiarize

yourself with the Bluetooth capabilities of the device.

• Compatibility with all Bluetooth device is not guaranteed.

• Any obstacle between this unit and a Bluetooth device can

reduce the operational range.

• Keep this unit away from any other electronic device that may

cause interference.

Disconnect Bluetooth Device

To disconnect one device, touch [ 

 ] .

Tip

•  The device will also be disconnected when the device is moved

beyond the operational range.

•  If you want to reconnect the device to the unit, place it within the

operational range.

• If you do not want to reconnect the device to the unit automatically,

touch  [ 

 ], then set [ Auto Connect ] to [ Off ]. 

     For details, see the “Adjust Bluetooth Settings” section.

Make a Call

1. Select Bluetooth function in the home menu.

2. Pair the phone with the unit.

3. Search for phone number from the following list:

[

 ]: Phone Book

[

 ]: Call Log

[Missed calls]

[Received calls]

[Dialed calls]

Or touch the number pad directly.

Bluetooth Mode

Summary of Contents for AURORA 2

Page 1: ...1 DIN DVD MULTIMEDIA STATION BUILT IN NAVIGATION BLUETOOTH AURORA GX735 DE Bedienungsanleitung EN User manual Benutzerhandbuch AURORA 2 Deutsch English...

Page 2: ...s an einem Ort an dem es die Verkehrssicherheit beeintr chtigen kann Um nicht gegen die Verkehrsregeln zu versto en und Unf lle zu vermeiden darf die Video Funktion niemals w hrend der Fahrt betrieben...

Page 3: ...rmalisiert hat bevor Sie das Ger t einschalten 5 berm ige Nutzung der Heizung bei kalten Temperaturen kann Feuchtigkeit verursachen 6 In ge ffneter Stellung darf der LCD Monitor keinen starken Schl ge...

Page 4: ...Time 12 PTY Funktion 12 DAB Modus optional 13 Wiedergabe 14 Diskladen 14 Diskauswerfen 14 Benutzung der Bedienungsoberfl che 14 Wiedergabebedienung 15 USB Ger tanschlie en 15 USB Ger t entfernen 15 SD...

Page 5: ...n um die Lautst rke einzustellen Dr cken zum Stummschalten Erneut dr cken um die Stummschaltung wieder aufzuheben Gedr ckt halten um das Ger t an auszuschalten 5 Reset Taste Dr cken um das Ger t auf W...

Page 6: ...uf Vorlauf Wiedergabe 10 W hlen Anrufentgegennehmen 11 Eingabe 12 Men cursor 13 Stopp Zur ck 14 Zahlenbereich 15 Hauptmen ffnen 16 POWER StromversorgungEin Aus 17 Winkel DVD 18 DVD Untertitel 19 A B W...

Page 7: ...Sollte die Fernbedienung nicht funktionieren wechseln Sie bitte die Batterie 5 Verwenden Sie nur eine Knopfzellen Lithium Batterie CR2025 3V 6 Die Batterie bitte nicht aufladen zerlegen oder ins Feue...

Page 8: ...n Halten Sie den VOL MUTE Drehknopf auf dem Bedienteil gedr ckt oder dr cken Sie die POWER Taste auf der Fernbedienung Tastent ne Bei jeder Aktion auf dem Touchscreen oder der Fernbedienung gibt das G...

Page 9: ...Z Stufung 15 to 15 Wertebereich 0 50 0 75 1 00 1 25 HPF Frequenzbereich 10 12 5 15 17 5KHZ Stufung 15 to 15 Wertebereich 1 00 Grundfunktionen Fader Balance einstellen Sie k nnen Sie Verteilung der Aus...

Page 10: ...Sie TIME Zeit 2 Ber hren Sie die Uhrzeit auf dem Bildschirm ein Untermen wird angezeigt 3 Ber hren Sie um die Stunden und Minuten einzustellen Zeitdarstellung ndern 1 Ber hren Sie Desk Timer Zeitanze...

Page 11: ...pfangen wird stoppt der Suchlauf und der Sender wird abgespielt Manuelle Sendersuche W hrend der manuellen Sendersuche ndert sich die Frequenz in Schritten Dr cken Sie die Tasten der Fernbedienung kur...

Page 12: ...kale Suche Ber hren Sie das LOC Symbol um Lokal oder Fernradio zu w hlen Wenn das LOC Symbol Rot leuchtet werden nur Sender mit ausreichender Signalst rke erkannt EQ Auswahl Dr cken Sie um zu den EQ E...

Page 13: ...Funktion aktiviert ist und eine Verkehrsmeldung empfangen wird wird die aktuelle Abspielquelle durch die Verkehrsdurchsage deaktiviert jedoch nur wenn im FM Frequenzband des Ger tes der Empfang von V...

Page 14: ...sw hlen Dr cken Sie BAND um zwischen DAB1 DAB2 und DAB3 zu wechseln Suche W hlen Sie eine der folgenden vier Suchmethoden aus 1 voreingestellte Suche eingestellte Sender suchen 2 aktuelle Suche Sender...

Page 15: ...auszuschalten L_Band Service Link Dr cken Sie Service Link um zwischen DAB DAB DAB RDS DAB ALL oder OFF zu wechseln Wiedergabe Disk laden Sie k nnen Video Audio oder Bilder von folgenden Disks abspie...

Page 16: ...hren Sie die Tasten auf dem Bildschirm um den vorherigen n chsten Titel oder das Kapitel zu berspringen Suche nach einem Ordner F r Video Dateien 1 Ber hren sie um alle verf gbaren Video Ordner anzuze...

Page 17: ...dschirm um das Bedienmen aufzurufen 2 Ber hren Sie f r das zweite Men 3 Ber hren Sie das A B Symbol Wiederholung A Beginn der Wiederholung Wiederholung A B Ende der Wiederholung Der ausgew hlte Abschn...

Page 18: ...2 3 DVD TTL 1 8 CHP 5 12 F r VCD 1 Disktyp 2 VCD Titelinformationen Beispiel 1 8 Die VCD verf gt ber 8 Titel aktuell wird Titel 1 wiedergegeben 1 2 VCD 1 8 verstrichene Zeit 1 bereits verstrichene Wi...

Page 19: ...tooth Funktion des Ger ts Kompatibilit t mit allen Bluetooth Ger ten wird nicht garantiert Jedes Hindernis zwischen Ihrem Ger t und einem Bluetooth Ger t kann die Reichweite vermindern Halten Sie dies...

Page 20: ...ect Um die automatische Verbindungsfunktion zu aktivieren oder deaktivieren Auto answer Um die automatische Anrufannahme ein oder auszuschalten Pairing password Kopplungscode einstellen Phone Book Tel...

Page 21: ...Sie den Rekorder neu positionieren wollen erneuern Sie den Klebestreifen Videodateien exportieren Computer microSD W hlen Sie auf der linken Seite eine Datei aus und dr cken dann das Symbol zum export...

Page 22: ...gen vorzunehmen Abschalt Timer Ber hren Sie Auto off time automatische Abschaltung um den Abschalt Timer zu aktivieren G SENSOR Empfindlichkeit Ber hren Sie G SENSOR sensitivity G Sensor Empfindlichke...

Page 23: ...nktioniert oder empfindlich genug ist sollten Sie den Touchscreen kalibrieren Kalibrieren Sie die Benutzeroberfl che wie folgt 1 Ber hren Sie Calibration Kalibrierung im Einstellungsmen 2 Ber hren Sie...

Page 24: ...ischaltung an ausschalten Standardm ig ist die Videofreischaltung nicht aktiviert Es wird bei der Wiedergabe ein SIcherheitshinweis angezeigt Disk Alterseinstufung 1 Ber hren Sie Disc Disk 2 W hlen Si...

Page 25: ...V IN1 AV IN2 DVBT 3 Ber hren Sie oder um die Werte von 0 12 einzustellen Die Lautst rke beginnt dann automatisch bei dem eingestellten Wert der jeweiligen Funktion Werkseinstellungen 1 Ber hren Sie Re...

Page 26: ...ice mit dem Radio es gibt zwei Arten Siri zu aktivieren 1 Im Bluetooth Men Ber hren Sie zum ein oder ausschalten B ber Ihr Lenkrad 1 Programmieren Sie die Siri funktion auf eine Taste Ihres Lenkrades...

Page 27: ...herBereich 80dB Klirrfaktor Ausgang 0 1 Frequenzgang 3dB 20Hz 20KHz Maximale Ausgangsleistung 4 45W Belastungs Impedanz 4 AUX IN Klirrfaktor 0 5 Frequenzgang 3dB 20Hz 20KHz Audio Eingangspegel 0 5Vrms...

Page 28: ...z 48 kHz Unterst tzte Daten bertragungsraten 32 320kbps und variable Daten bertragungsrate Unterst tzte Videoformate DVD MP4 Regionen Code Die Welt ist in sechs DVD Regionen aufgeteilt Eine DVD Disc k...

Page 29: ...us am Stecker TFT Bildschirm es wird ein Warnhinweis angezeigt Videofreischaltungskabel nicht verbunden Verbinden Sie das BRAKE Kabel mit der Handbremse schlechte Bildwiedergabe Farbsystem der DVD nic...

Page 30: ...r Einbauschritte 1 Bauen Sie den Einbaurahmen in den Schacht ein a Verbauen Sie alle ben tigten Adapter falls notwendig b Achten Sie darauf dass beim Einbau des Einbaurahmens und bei der Verlegung der...

Page 31: ...in der Radio ffnung des Fahrzeugs so dass dieser nicht nicht mehr bewegen l sst So ist eine optimale Befestigung des Ger ts m glich Hinweis F r die Funktionst chtigkeit der CD Funktion darf das Ger t...

Page 32: ...BUS RADIO ANT RADIO ANT R ckfahrkamera SWC schwarz gelb rot GND schwarz ACC B GND ACC BATT rot gelb BRAKE Gr n Wei Pink REVERSE Kamera schwarz schwarz gelb schwarz schwarz schwarz schwarz gelb blau w...

Page 33: ...CLASS 1 LASER PRODUCT P N 127075005424...

Page 34: ...1 DIN DVD MULTIMEDIA STATION BUILT IN NAVIGATION BLUETOOTH AURORA GX735 DE Bedienungsanleitung EN User manual User manual AURORA 2 Deutsch English...

Page 35: ...negative grounding MUTE OK MUTE OK Never install this unit where the operation condition for safety driving is restrained Never use the video display function in the front when driving to prevent the...

Page 36: ...before operating the unit 5 Using the car heater in low temperature environment may result in moisture inside the unit DO NOT use the unit in this situation Eject the disc and wipe off the moisture o...

Page 37: ...B Mode 13 Playback Mode 14 Load a Disc 14 Eject a Disc 14 Touch Screen Controls 14 Controlling Playback 15 Connect a USB Device 15 Remove a USB Device 15 Insert Remove a SD Card 15 Play Pause 15 Previ...

Page 38: ...activate the MUTE function Press again to resume normal listening Press to turn the unit ON Press and hold to turn the unit OFF 5 Reset Button Press to reset system settings to factory default except...

Page 39: ...11 Enter 12 Menu cursor 13 Stop Return 14 Digit area 15 Enter Source Menu 16 Power on off 17 Playback disc in different angle for a scene 18 DVD language selection for subtitle 19 Setup to repeat play...

Page 40: ...emote control won t work please change the battery 5 Use button shaped lithium battery CR2025 3V only 6 DO NOT recharge disassemble heat or expose the battery in fire 7 Insert the battery in proper di...

Page 41: ...irms each function selection The Beep tone can be disabled through the Setup menu Playing Source Selection Press the MENU button on the front panel or the SRC button on the remote to change between av...

Page 42: ...o 15 Q Value range 0 50 0 75 1 00 1 25 HPF Frequency range 10 12 5 15 17 5KHZ Grading range 15 to 15 Q Value range 1 00 Basic Operations Adjust Fader Balance You can adjust front back left right balan...

Page 43: ...switch clock mode Set Time 1 Touch Time 2 Touch the time on the screen a submenu is displayed 3 Touch or to set hour and minute Set Desk Timer 1 Touch Desk Timer 2 Touch Simulate Timer or Numeral Time...

Page 44: ...control or touch the icon on the user interface to tune in a higher lower station Method 2 1 Touch the numeric keypad icon Numeric keyboard is displayed touch number to input frequency 2 Touch to del...

Page 45: ...tions with sufficient signal strength will be detected EQ Selection Press the icon and enter the EQ setup RDS Basics RDS transmits data to the radio which displays information such as station identifi...

Page 46: ...Function The TA Traffic Announcement flag function lets the unit receive traffic announcements automatically no matter what media source is playing back The TA function can be activated by a TP Traff...

Page 47: ...d Touch Band icon on the screen to select one radio band among DAB1 DAB2 and DAB3 Tune There are four search mode You can select search mode from the followings 1 Preset Search Search preset service o...

Page 48: ...Touch L L_Band to turn on L BAND function Service Link To select Service Link mode touch Service Link to choose DAB DAB DAB RDS DAB ALL or OFF DAB Mode optional Playback Mode Load a Disc You can play...

Page 49: ...rts automatically Remove 1 Select other source on the main menu 2 Press the card unit you hear a click sound 3 Remove the SD card Play Pause 1 Once a disc USB is inserted play starts automatically For...

Page 50: ...ay the 2nd menu if necessary 3 Touch A B repeatedly to mark Repeat A the start of the section to repeat Repeat A B the end of the section to repeat The selected section plays repeatedly 4 To exit A B...

Page 51: ...D 1 Disc type 2 VCD Track information 1 8 indicates that this VCD has 8 tracks and the track playing back now is the first title 1 2 VCD 1 8 Elapsed Time 1 Elapsed time of the current track 2 Total ti...

Page 52: ...familiarize yourself with the Bluetooth capabilities of the device Compatibility with all Bluetooth device is not guaranteed Any obstacle between this unit and a Bluetooth device can reduce the operat...

Page 53: ...code Phone Book To synchronize phone book touch Download on the sub menu popped out Phonebook sync may take several minutes to load on initial setup Music Mode A2DP A2DP is short for Advanced Audio Di...

Page 54: ...temperature range is 15 40 C 3 If you need to re install the recorder replace the 3M double sided tape by a new one How to export the video file Computer Plug in microSD Choose the file on left side w...

Page 55: ...uch Frame rate to select the desired frame rate Time setup Touch Time setup to set the time Auto off time Touch Auto off time to set the auto off time G SENSOR sensitivity Touch G SENSOR sensitivity t...

Page 56: ...key Calibration When the touch operation is not sensitive or valid you should calibrate the touch screen through calibration setting function Adjust the response positions of the touch panel as follo...

Page 57: ...mode the screen will display WARNING if you play the video disc The above warning screen will prevent the driver watching images Adjust Disc Rating 1 Touch Disc 2 Touch an option repeatedly to select...

Page 58: ...on a source Media Radio Bluetooth AV IN1 AV IN2 DVBT 3 Touch or to assign value 0 to 12 When switches to the source the volume increases automatically Adjust Reset Settings 1 Touch Reset 2 Touch an o...

Page 59: ...the steering wheel control 2 Access to Bluetooth mode press the button programmed Siri on the steering wheel control the unit will access to voice mode and press the button again to exit 3 If the mai...

Page 60: ...DVD Player Signal Noise Ratio 80dB Dynamic Range 80dB Distortion line out 0 1 Frequency Response 3dB 20Hz 20KHz Maximum Output Power 4 45W Load Impedance 4 AUX IN Distortion 0 5 Frequency Response 3d...

Page 61: ...z Supported Bit rates 32 320Kbps and variable bit rate Supported Video Formats DVD MP4 Region Code According to DVD sale region the whole world is divided into six regions A DVD disc can be played bac...

Page 62: ...ring is not correct Check wiring and correct Flashing image or interference appears on screen The color system of DVD disc does not match the monitor Adjust the color system of the DVD disc playing ba...

Page 63: ...cate the series of bend tabs along the top bottom and sides of the mounting sleeve With the sleeve fully inserted into the dashboard opening bend as many of the tabs outward as necessary so that the s...

Page 64: ...rd cavity Some US domestic vehicle dashes will accept a Double DIN chassis but there is usually a small gap between the radio and dash piece after installation is complete In this case use the trim ri...

Page 65: ...EN 31 Wire Connections connect to TMC DAB BUS RADIO ANT RADIO ANT CAMERA IN SWC BLACK YELLOW RED BLACK GND ACC B GND ACC BATT RED YELLOW Green white BRAKE Pink REVERSE CAMERA...

Page 66: ...CLASS 1 LASER PRODUCT P N 127075005424...

Reviews: