background image

myDVR1640/940 Operational Guide 


Preliminary 

Content subject to change without notice. 


15


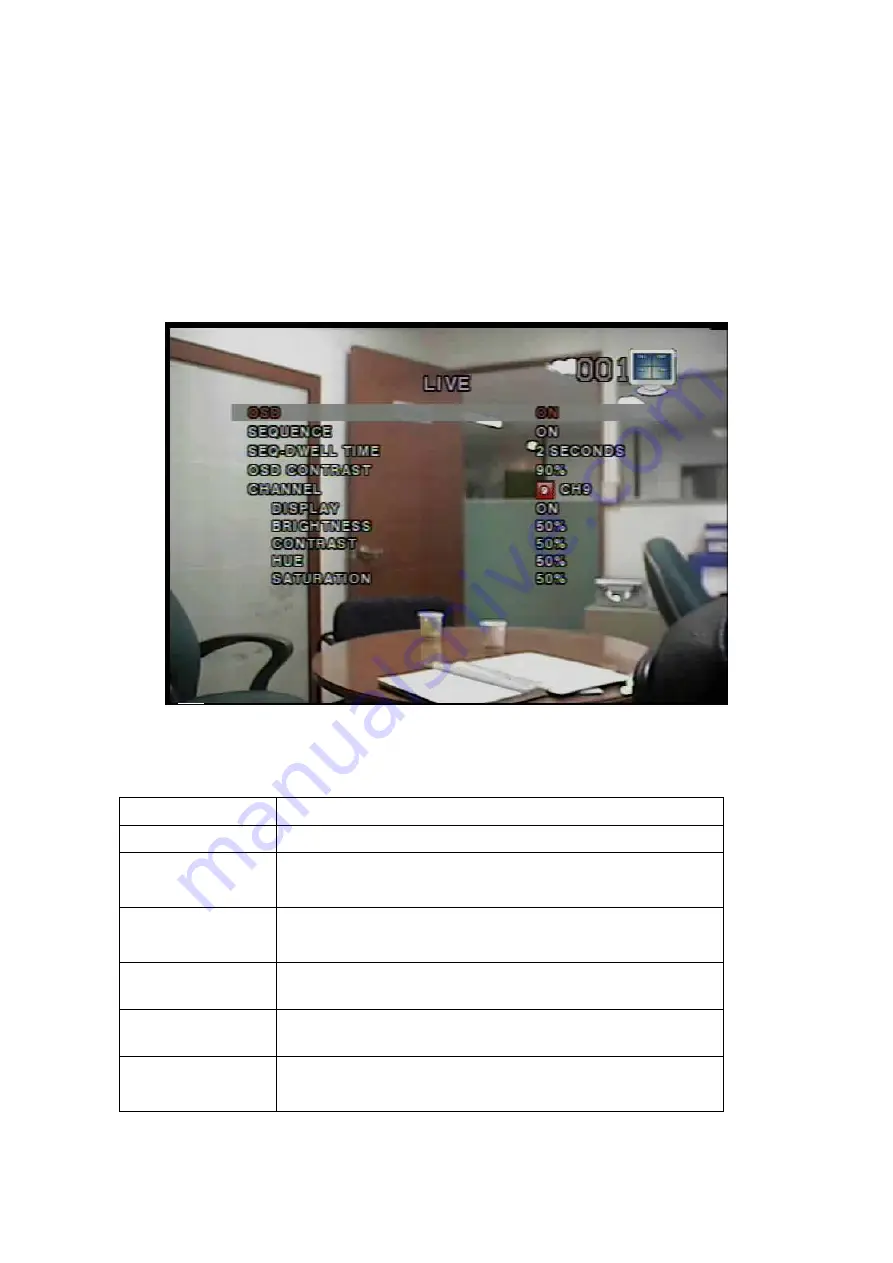
3-2. Setup – Live 


- Used for setting up the live display mode. 

Navigate through menu items using the 

Up/Down 

buttons. Change the values using 

the 

Left/Right 

buttons 


Figure 3.2.1. Live mode setup screen 


Table 3.2.1. Menu items in LIVE mode setup 

Item Description 

OSD 

Enables/disables on-screen-display. 

SEQUENCE 

Enables/disables sequential video channels display in full 

screen mode. 

SEQ-DWELL 

TIME 

Sets dwell time for each channel in sequential display 

mode. 

OSD CONTRAST

Sets the contrast level of On Screen Display (OSD) 

CHANNEL 

Selects channels to apply settings 

DISPLAY 

Enables/disables video channel description in live display 

mode 

Summary of Contents for myDVR1640/940

Page 1: ...myDVR1640 940 Operational Guide Preliminary The contents of this document can be changed without prior notice...

Page 2: ...Main Screen 14 3 2 Setup Live 15 3 3 Setup Recording Mode 16 3 3 1 Setting up Motion Zones 17 3 3 2 Record Schedule 19 3 4 Setup Device Mode 21 3 4 1 ALARM OUT 22 3 4 2 PTZ Control 22 3 4 3 SPOT OUT...

Page 3: ...tional Guide Preliminary Content subject to change without notice 3 6 Firmware Upgrade 46 6 1 Preparing USB memory with upgrade firmware 46 7 Network Client Remote Monitoring and Playback 47 8 Remote...

Page 4: ...ideration should be given to installing the equipment in an environment compatible with the maximum ambient temperature Tma specified by the manufacturer B Reduced Air Flow Installation of the equipme...

Page 5: ...Full triplex capability ensures uninterrupted recording MyDVR1640 940 supports simultaneous 1 Video Recording 2 Live Video Monitoring Locally via the front panel controls and monitor output Remotely v...

Page 6: ...8ch 120fps 9 16ch 120fps MAX 60fps 704x480 1 8ch 30fps 9 16ch 30fps NTSC MAX 120fps 704x240 1 8ch 30fps 9 16ch 30fps MAX 200fps 352x288 1 8ch 100fps 9 16ch 100fps MAX 50fps 704x576 1 8ch 25fps 9 16ch...

Page 7: ...mera control 1 RS 485 422 4 Terminal Block Dynamic IP support Yes Network Interface 10 100 base T Ethernet RJ 45 Network DDNS Support Yes Network Client Functions Monitor Live Video Remote Video Playb...

Page 8: ...o change without notice 8 Batteries Screws for mounting HDD Preinstalled when unit is shipped with HDD HDD connection cables 2 ea Preinstalled when unit is shipped with HDD s HDD Mounting Bracket 2 ea...

Page 9: ...LED illuminates when alarm sensor s is are triggered or detects video motion must configure video motion detector first NETWORK LED illuminates when client connects via network port POWER LED illumin...

Page 10: ...From Playback Mode Pressing fast forwards footage at 1x 2x 4x and 8x speeds PLAY PAUSE From Live Display Mode Press to enter SEARCH menu or From Playback Mode Press to play or pause video REC Press t...

Page 11: ...SPOT Composite video output for spot monitoring VIDEO Composite video output in NTSC or PAL format S VHS S VHS output VGA Connector for VGA monitor AUDIO IN 4 RCA style connectors for audio input AUDI...

Page 12: ...0 seconds forwards FREEZE CAP Freeze Capturers FF Fast Forward ALARM Silence Ignore alarm operation SETUP Setup menu screens ARCHIVE Displays archive list AUDIO Disable Mute or Highlighted channel onl...

Page 13: ...hone As an example press key pad 2 continuously for changing the input value to 2 A B C a b c 2 This mode is useful for assigning channel name DDNS or ADSL configuration information Following table de...

Page 14: ...e default password by pressing the Up button 4 times followed by the SELECT button In order to prevent tampering change the password Refer to section 3 6 for instructions After assigning a new passwor...

Page 15: ...1 Live mode setup screen Table 3 2 1 Menu items in LIVE mode setup Item Description OSD Enables disables on screen display SEQUENCE Enables disables sequential video channels display in full screen m...

Page 16: ...tributes Navigate through the menu items using Up Down buttons Change values using Left Right buttons Figure 3 3 1 Recording mode setup screen Table 3 3 1 Menu items in Recording mode setup Menu item...

Page 17: ...ING Configures Alarm Sensor Inputs for triggered recording In total there are 16 sensors 9 for myDVR940 A maximum of 4 sensor alarm inputs may be assigned to an individual channel PRE RECORD Enables d...

Page 18: ...myDVR1640 940 Operational Guide Preliminary Content subject to change without notice 18...

Page 19: ...four Direction keys and the Select key to navigate through the menu system Each vertical bar corresponds to one hour See Figure 3 3 3 for a menu example Rules 1 Choosing ALL myDVR globally applies th...

Page 20: ...ording setting PLAY PAUSE Use to enable Motion detection triggered recording FF Use to enable Sensor triggered recording UP Move up in menu item RIGHT Move right in menu item DOWN Move down in menu it...

Page 21: ...UT Set the sensor motion video loss ABC and options for each alarm PTZ Sets the camera s pan speed number type and ID SPOT OUT Configures the spot monitor output type channel etc KEY TONE Enable disab...

Page 22: ...eras From multi Channel the video loss occurrence simultaneously one initial Channel is notified with e mail address of network set ALARM DURATION Sets the alarm dwell time from 1 to 60 seconds Figure...

Page 23: ...ft or Right buttons Table 3 4 2 1 Menu item in PTZ Setup screen Item Description CH Select the channel number for the PTZ device setup NAME Navigate through the list of PTZ cameras by using the LEFT a...

Page 24: ...he display mode either full or quad view for the spot monitor output SPOT ON EVENT Enable disable spot monitor upon events SPOT EVENT DWELL TIME Set the dwell time for spot event monitor from 1 to 10...

Page 25: ...ithout notice 25 3 5 Setup System Mode Configures system parameters Navigate through the menu items by pressing the UP or DOWN arrow buttons Change the value of menu items by pressing the LEFT or RIGH...

Page 26: ...ESCRIPTION Displays system information Firmware Version Storage Size IP Address and MAC Address LANGUAGE Select a language for the OSD on screen display LOAD FACTORY DEFAULT Choose OFF or ON To load d...

Page 27: ...myDVR1640 940 Operational Guide Preliminary Content subject to change without notice 27 Figure 3 5 3 DVR information display screen...

Page 28: ...ight Savings time Use the LEFT or RIGHT buttons to enable disable After selecting ON move the cursor to the BEGIN MM DD HH field Press the SELECT button to set the DLS start time Scroll to the END MM...

Page 29: ...1111 The Admin Password affords access to all DVR features USER PASSWORD Sets the user password Once selected the DVR will prompt for the current password and new password Follow the prompts The pass...

Page 30: ...g IP Static IP address GATEWAY Gateway IP address SUBNET MASK Network Subnet mask DNS DNS server IP address Valid DNS address is needed for E mail transmission and use of DDNS DDNS Domain name for the...

Page 31: ...ure 3 7 1 Network setup screen 3 7 1 Ports Port Forward for access from a WAN When one or more DVRs are connected through a IP sharing device i e router to a larger network i e the internet in order t...

Page 32: ...requires different settings LAN To use the LAN option when connecting the DVR to a network the following information is required If you do not have this information see your network administrator Tabl...

Page 33: ...tion must have an RJ45 jack to connect to the DVR USB Networking is not supported Sharing an ADSL connection with other devices requires an IP sharing device router In this case select LAN as the NETW...

Page 34: ...disk information LOAD SETUP FROM A USB Loads DVR set up parameters from the USB memory SAVE SETUP TO A USB Stores DVR setup values to USB memory This feature is useful when copying the set up paramete...

Page 35: ...legend Figure 4 1 1 Live window Table 4 1 1 Indicator ICONS in Live window Icon Description Continuous recording in progress Manual recording in progress Motion recording in progress Sensor recording...

Page 36: ...menu SEQ Enables disables automatic sequential switching in full or quad modes Quad mode also follows these settings PLAY PAUSE Launches the SEARCH window Direction Buttons Select a channel by using t...

Page 37: ...1 pops up Select either EVENT SEARCH or TIMELINE SEARCH to initiate a search for recorded video The other two menu fields are used to display the log data LOG or archived data for storage via the USB...

Page 38: ...myDVR1640 940 Operational Guide Preliminary Content subject to change without notice 38 Figure 4 2 2 Search mode screen Figure 4 2 3 Search mode screen...

Page 39: ...ion from ALL to any of the 16 9 available channels 4 Press the SEL button to move to the TYPE selector 5 Use the LEFT RIGHT buttons to choose the type of recording Options are ALL MOTION SENSOR MANUAL...

Page 40: ...screen or exits from the setup menu REW Rewind Pressing repeatedly adjusts playback speeds Reverse playback speeds are indicated as 1X 2X 4X and 8X for normal twice 4 and 8 times normal speed The spee...

Page 41: ...FT or RIGHT buttons Channels displayed in quad or 9 split mode are designated by settings in SETUP menu SEL Press to switch between current display mode and full screen mode CAP USB Press to launch th...

Page 42: ...Operational Guide Preliminary Content subject to change without notice 42 ZOOM FOCUS Select menu and use the Up Down keys for zoom control Left Right keys control focus Initialize Initializes the sel...

Page 43: ...n live mode pressing the CAP USB button twice initiates capturing a still image See Figure 6 1 1 for an example Figure 6 1 1 Archive mode screen The still image is stored on the hard disk drive and ma...

Page 44: ...RCHIVE screen which prompts with a calendar for date selection Figure 5 2 1 Archive menu screen Press the SEL button to retrieve a list of archived images or video clips for the selected date Select a...

Page 45: ...ide Preliminary Content subject to change without notice 45 Figure 5 2 2 List of archived files The DivX or comparable codec must be installed for proper playback DivX codec may be downloaded from htt...

Page 46: ...heck the name of the firmware file It should be app9 bin 9 channel DVR or app16 bin 16 channel DVR Steps to complete Upgrade 1 Press the Setup button and enter the password Default password is 1111 2...

Page 47: ...the Network via the Ethernet Port on the back panel 4 myNVR features are explained in a separate manual When recording is in progress myDVR streams transmits video identical to the quality settings ap...

Page 48: ...via Microsoft Internet Explorer Only IE Exploer is supported we do not support other third party browsers i e FireFox Before loading the admin page the browser prompts for the USER ID and Password Th...

Page 49: ...myDVR1640 940 Operational Guide Preliminary Content subject to change without notice 49 Figure 8 1 Live Control Setup Page...

Page 50: ...myDVR1640 940 Operational Guide Preliminary Content subject to change without notice 50 Figure 8 2 Record Setup Page Figure 8 3 System Setup Page...

Page 51: ...myDVR1640 940 Operational Guide Preliminary Content subject to change without notice 51 Figure 8 4 Device Setup Page...

Page 52: ...myDVR1640 940 Operational Guide Preliminary Content subject to change without notice 52 Figure 8 5 Network Configuration Page Figure 8 6 Storage Setup Page...

Page 53: ...myDVR1640 940 Operational Guide Preliminary Content subject to change without notice 53 Figure 8 7 Save Setup Page...

Reviews: