


MARGIN
GUIDES
Stay within the yellow
box. Do not let text go
beyond, instead move
to the next column or
start a new page.
4
|
www.icrealtime.com
Figure 2-9
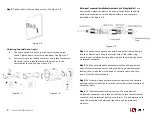
Waterproof connector installation for network port (if applicable):
For a
device with a plastic enclosure, you can directly rotate the dome
enclosure clockwise, cover the dome enclosure and complete
installation. See figure 2-9.
.
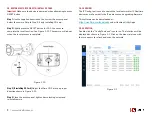
Step 5:
Tighten down the mounting screws. See Figure 2-5.
Adjusting Sunshield and Angle:
●
Use the supplied wrench to loosen set screw and adjust
shade. Tighten down Screw when finished. See Figure 2-7.
●
To Adjust Angle, loosed the set screw and rotate the camera.
Be careful not to rotate the camera too much as it can
compromise the cabling. See Figure 2-8.
Step 1:
Keep the convex groove outward and install the rubber ring
into the network port, keep the smaller hole of the rubber ring
outward and install the fixing rubber ring into the main body of the
waterproof connector.
Step 2:
Pull the network cable without crystal head through main
body of waterproof connector, fixing rubber ring and waterproof
locking cover, make the crystal head of network cable, and then
insert it into the network cable
Step 3:
Put the main body of waterproof connector on the network
port and rotate it clockwise to lock the network port and waterproof
connector firmly
Step 4:
Put the waterproof locking cover on the main body of
waterproof connector and rotate it clockwise to lock the waterproof
connector and waterproof locking cover firmly. It is recommended to
wrap the assembly with electrical tape for an extra protective
measure.
Figure 2-5
Figure 2-7
Figure 2-8


