background image

10

11

7. Tips for quick installation

OSD KEY

EXTRA VIDEO 

OUTPUT

RS485+

RS485-

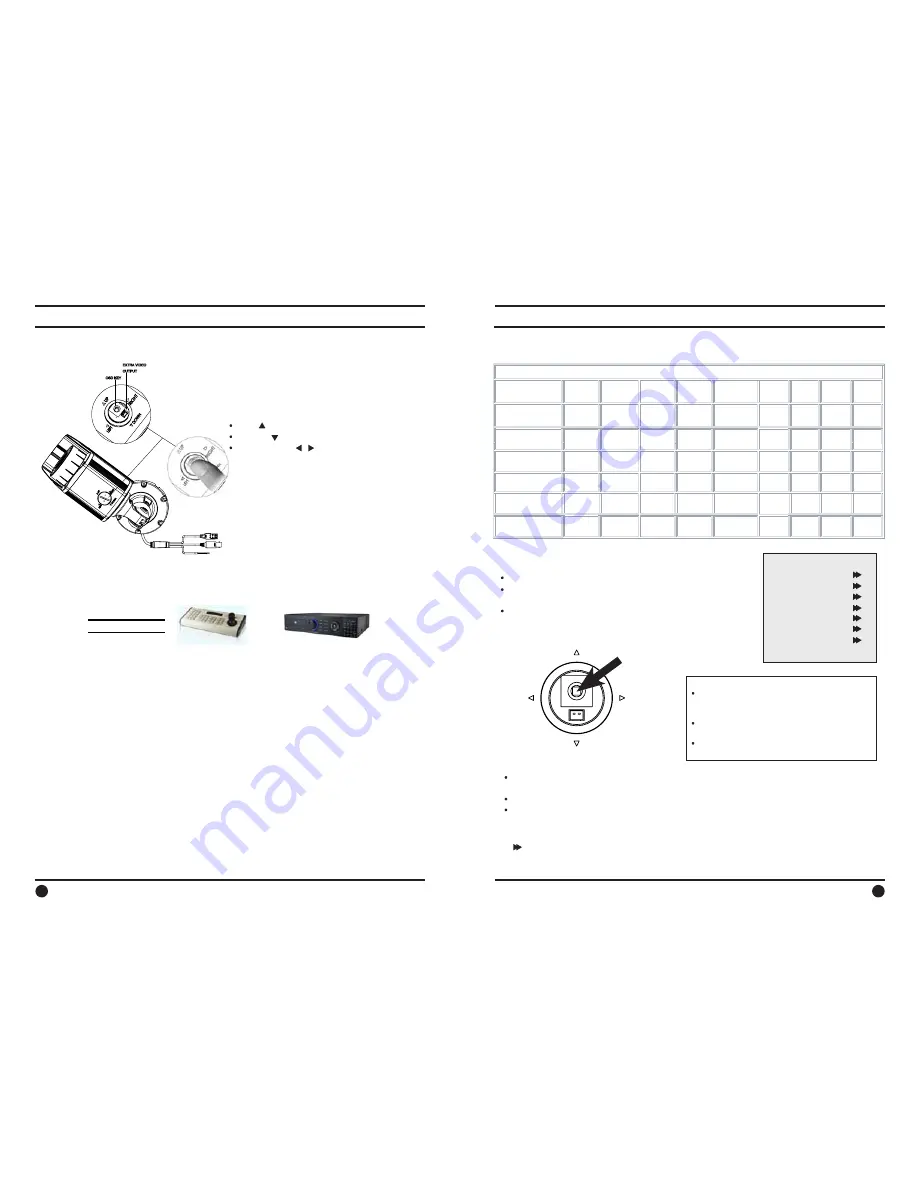
7-1. Quick control to Zoom & Focus

8-1. On Screen Menu (OSD) menu.

8-2. Setting up the menu

7-2. RS485 Connection

7-3. Quick setting of Smart Zoom

- Push up or down the Tact SW (OSD Key) 
   by finger for a second without pressing 
   the switch.
  ·  Up (   ) - Zoom in
  ·  Down (   ) - Zoom out
  ·  Left / Right (   ,   ) - Focus in/out

RS485 + 
RS485  -

or

Keypad controller

DVR

You can access to the OSD menu via the remote controller or the DVR as in the 
drawing.

8. Functions and operation

FOCUS

MODE

DISTANCE

EXPOSURE

MODE

AGC

SHUT
SPEED

BLUE
GAIN

LENS
REFRESH

IRIS

DSS

HOME
POSITION

E.ZOOM

WHITE
BALANCE

MODE

RED
GAIN

DNR

HR

MIRROR

OBJECT
DET

SHARP
NESS

INTELLIGENCE

IMAGE

PRIVACY

MOTION
DET

SPECIAL
FUNC

SCENE
MODE

COMM

EFFECT

DISPLAY

INIT
SEL

DISP SEL

SET
TITLE

SET INIT 
MSG

LANGUAGE

MAIN MENU

FLICKER
LESS

BRIGHT
NESS

WDR/
BLC

DAY &
NIGHT

FREEZE

SETUP
STATUS

· Press the Tact SW to enter <MAIN MENU>.
· Move the arrow to a specific menu
  by pushing the Tact SW up or down.
· Adjust the selected feature by pushing the 
  Tact SW left or right

 · When the adjustment is completed, move the indicator to “SAVE” in the menu and 
   press the button to save your settings. 

· And then move the indicator to “EXIT” to exit the menu (or sub-menu) setting.

 · If you select “DFLT (default)” in the menu, the settings in the menu will be restored 
   to the factory default.

UP

DOWN

RIGHT

Tact SW (OSD button)

LEFT

How to use OSD button (Tact SW)

· Press
-to enter the menu
-to save settings
· Push up or down
-to select functions
· Push left or right
-to adjust a level or mode of sub-menu

[MENU]

[EXIT]

[SAVE] [DFLT]

FOCUS
EXPOSURE
WHITE BALANCE
IMAGE
INTELLIGENCE
SPECIAL FUNC
DISPLAY

Note

· If ‘

‘ indica

Ɵ

on appears on a selected sub-menu, press the Tact SW to get into a following menu.

· If ‘

‘indica

Ɵ

on appears on any sub-menu, it means the fun

ĐƟ

on with this mark is deac

Ɵ

vated.

You can set the smart-zooming in the intelligence menu by using the motion detection 
and object detection.

** Smart Zoom with Object Detection (OD)
1. Go into the “INTELLIGENCE” mode and select “OBJECT DET” mode.
2. Enable the MODE to “ON” and select “OD area numbers (1 ~ 9)”.
3. Adjust Sensitivity of OD (1 ~ 5)
4. Select Zoom position to move at “ZOOM PRESET”.

Note

dŚĞĐĂŵĞƌĂŝƐĮdžĞĚĂŶĚnjŽŽŵƉŽƐŝƟŽŶŝƐĐĞŶƚĞƌͲnjŽŽŵĞĚ͘
&ŽƌƐŵĂƌƚnjŽŽŵŝŶŐ͕ƚŚĞƉŽƐŝƟŽŶƐŽĨDĂŶĚKĂƌĞƌĞĐŽŵŵĞŶĚĞĚƚŽďĞŽŶƚŚĞĐĞŶƚĞƌ͘

Refer to the INTELLIENCE menu for details (PAGE. 16)

** Smart Zoom with Motion Detection (MD)
1. Go into the “INTELLIGENCE” mode and select “MOTION DET” mode.
2. Enable the MODE to “ON” and select “MD area numbers (1 ~ 3)”.
3. Activate to “ON” and adjust Sensitivity of MD (1 ~ 20)
4. Select Zoom position to move at “ZOOM PRESET”.

. . .

୔G~Œ•G›ŒG{ˆŠ›Gz~GšG—™ŒššŒ‹SG

    the MAIN MENU appears on 
    the screen.

Note

For a RS-485 controller, refer to the 
page 12 (8-2. Setting up the menu)

Summary of Contents for EL-3000

Page 1: ... Outdoor Camera INSTRUCTION MANUAL EL 3000 Please read this manual carefully before installation and operation of the product 110725 1 EL 3000 12X Smart Zoom Super Night Vision Outdoor Camera Copyright 2011 ICRealtime Inc Made in Korea ...

Page 2: ...e when the equipment is operated in a commercial environment This equipment generates uses and can radiate radio frequency energy and if not installed and used in accordance with the instruction manual may cause harmful interference to radio communications Operation of this equipment in a residential area is likely to cause harmful interference in which case the user will be required to correct th...

Page 3: ...camera to radioactivity It causes a serious damage on the CCD This publication is provided AS IS without warranty of any kind either express or implied including but not limited to the implied warranties of merchantability fitness for any particular purpose or non infringement of the third party s right This publication could include technical inaccuracies or typographical errors Changes are added...

Page 4: ...f an object on the screen This feature is useful when you have to monitor several screens simultaneously DNR Digital Noise Reduction By using both of 2D DNR space based and 3D DNR time based the amount of low illuminance noise has been significantly reduced and the signal to noise ratio S N as well as horizontal resolution has been improved resulting in a clear and sharp image display even in the ...

Page 5: ... ps GX_W ZUGyv h pvuGZ W PAN 360 ROTATION 360 TILT 180 Pan bolt Tilt bolt Rotation bolt Switch cover Extra video output How to use ྙG G G G G G G G GGGG G G G G U ྚGj Gl G G G GsjkG GGGGt G G G G U t G G G G G G UGOk G G G G G G G G P ྙGp G G G G G G G G G G G G G G G GGGG U ྚGj G G G G G GOw Tw Vn Tn PU ྛGi G G G G G G G UG GkjTq G G SG GGGG G GkjTkjG U ྜGj G G G Gyz _ G GOyz _ Rซ y RGVyz _ TGซ y...

Page 6: ...ult in the menu the settings in the menu will be restored to the factory default UP DOWN RIGHT Tact SW OSD button LEFT How to use OSD button Tact SW Press to enter the menu to save settings Push up or down to select functions Push left or right to adjust a level or mode of sub menu MENU EXIT SAVE DFLT FOCUS EXPOSURE WHITE BALANCE IMAGE INTELLIGENCE SPECIAL FUNC DISPLAY ත Note If indicaƟon appears ...

Page 7: ... EXPOSURE EXIT SAVE DFLT MODE AUTO ON OFF AGC SHUT SPEED IRIS DSS OFF FLICKERLESS OFF OFF BRIGHTNESS WDR BLC DAY NIGHT 8 4 EXPOSURE 1 MODE Select exposure mode AUTO SHUT P IRIS P MANUAL 2 AGC Select Auto Gain Control OFF ON AUTO SHUT P or IRIS P Mode 0 2 4 6 8 10 12 14 16 18 20 22 24 26 28 30dB MANUAL Mode 3 SHUT SPEED Can be set in SHUT P or MANUAL mode NTSC x512 x128 x64 x32 x16 x8 x4 x2 1 60 1 ...

Page 8: ...TGk GaGh G G G G G G G Gk Mu G GGGGGGGGGGGGGGGGGGGGGGGGGGGGGGGGGGGGGGG U GGGGGGGGGGGGGGGGGGGGGGGGGGGGGGGGGGGGGGG VGXWVGX VGYWVGY VGZWVGZ VG WVG VG WVG VG WG U GGGGGGGGGGGGGGGGGGGGGGGGGTGi yz GaG G G Gi SG G G G V UGG 8 5 WHITE BALANCE OXPGkuyGaGv G G G G U vmmVGXG GXWVGh v OYPGoyGaGz Go G U GGGGGGGGGGGGTGvmmVGXG G OZPGtpyyvyGaGz G G G U OFF GGGGGGGGGGGGGGGGGGGGGVG GO G G G G G G G G P GGGGGGGGGGGG...

Page 9: ...n enable or disable OFF ON AREA Select OD Area number 1 9 SENSITIVITY Adjust sensitivity 1 5 DEWELL TIME Select the duration time about changing OD mode 1 256 sec ZOOM PRESET Select zoom position to move when alarm is occurred 1 SCENE MODE Select scene preset screen USER NORMAL TRAFFIC BACK LIGHT DAY NIGHT CASINO 2 COMM Set up the camera ID baud rate protocol ID Select the camera ID GGGGGGGGGGGGGG...

Page 10: ...n the screen is dim Is lens stained with dirt Clean your lens with soft clean cloth Set the monitor to proper condition If the camera is exposed to too strong light change the camera position The image on the screen is dark Adjust the contrast feature of the monitor If you have an intermediate device GG G G ȳGVGo T G Please check the impedance The camera is not working properly and the surface of ...

Page 11: ...sor 1 4 SONY Super HAD II Double Scan CCD EīecƟve pixels NTSC 976 H X 494 V PAL 976 H X 582 V H ResoluƟon 650TV Lines Day 700TV Lines Night Synchronizing system Internal Video output 1 0Vp p Composite 75Ohms S N raƟŽ More than 50dB AGC OFF Min IlluminaƟon 0Lux ShuƩer speed NTSC 1 60 100 000 sec PAL 1 50 100 000 sec Gamma control Standard ɶ 0 45 White Balance 1 500 K 10 000 K Auto ATW ONE PUSH Indo...

Reviews: