


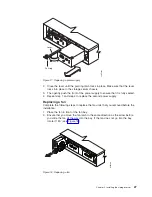

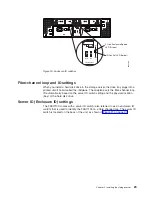


2.
Grasp
the
pull-rings;
then
pull
on
the
levers
and
remove
the
RAID
controller.
3.
Place
the
RAID
controller
on
a
level
surface.
4.
Repeat
step
1
through
step
3
for
the
second
RAID
controller.
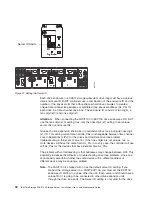
Removing
a
power
supply
Complete
the
following
steps
to
remove
a
power
supply:
1.
Grasp
the
pull-ring
on
the
power
supply
lever
and
squeeze
the
latch
to
release
it.
2.
Pull
the
lever
open
90°
and
remove
the
power
supply,
as
shown
in
3.
Place
the
power
supply
on
a
level
surface.
4.
Repeat
step
1
through
step
3
for
the
second
power
supply.
f10ug033
Figure
11.
Removing
a
RAID
controller
Pull ring
Lever
f10ug054
Figure
12.
Removing
a
power
supply
22
IBM
TotalStorage
FAStT100
Storage
Server:
Installation,
User’s,
and
Maintenance
Guide
Summary of Contents for totalstorage fastt100
Page 2: ......
Page 10: ...viii IBM TotalStorage FAStT100 Storage Server Installation User s and Maintenance Guide ...
Page 14: ...xii IBM TotalStorage FAStT100 Storage Server Installation User s and Maintenance Guide ...
Page 18: ...xvi IBM TotalStorage FAStT100 Storage Server Installation User s and Maintenance Guide ...
Page 30: ...xxviii IBM TotalStorage FAStT100 Storage Server Installation User s and Maintenance Guide ...
Page 68: ...38 IBM TotalStorage FAStT100 Storage Server Installation User s and Maintenance Guide ...
Page 86: ...56 IBM TotalStorage FAStT100 Storage Server Installation User s and Maintenance Guide ...
Page 124: ...94 IBM TotalStorage FAStT100 Storage Server Installation User s and Maintenance Guide ...
Page 132: ...102 IBM TotalStorage FAStT100 Storage Server Installation User s and Maintenance Guide ...
Page 134: ...104 IBM TotalStorage FAStT100 Storage Server Installation User s and Maintenance Guide ...
Page 138: ...108 IBM TotalStorage FAStT100 Storage Server Installation User s and Maintenance Guide ...
Page 159: ......
Page 160: ... Part Number 24P8970 Printed in USA GC26 7641 00 1P P N 24P8970 ...