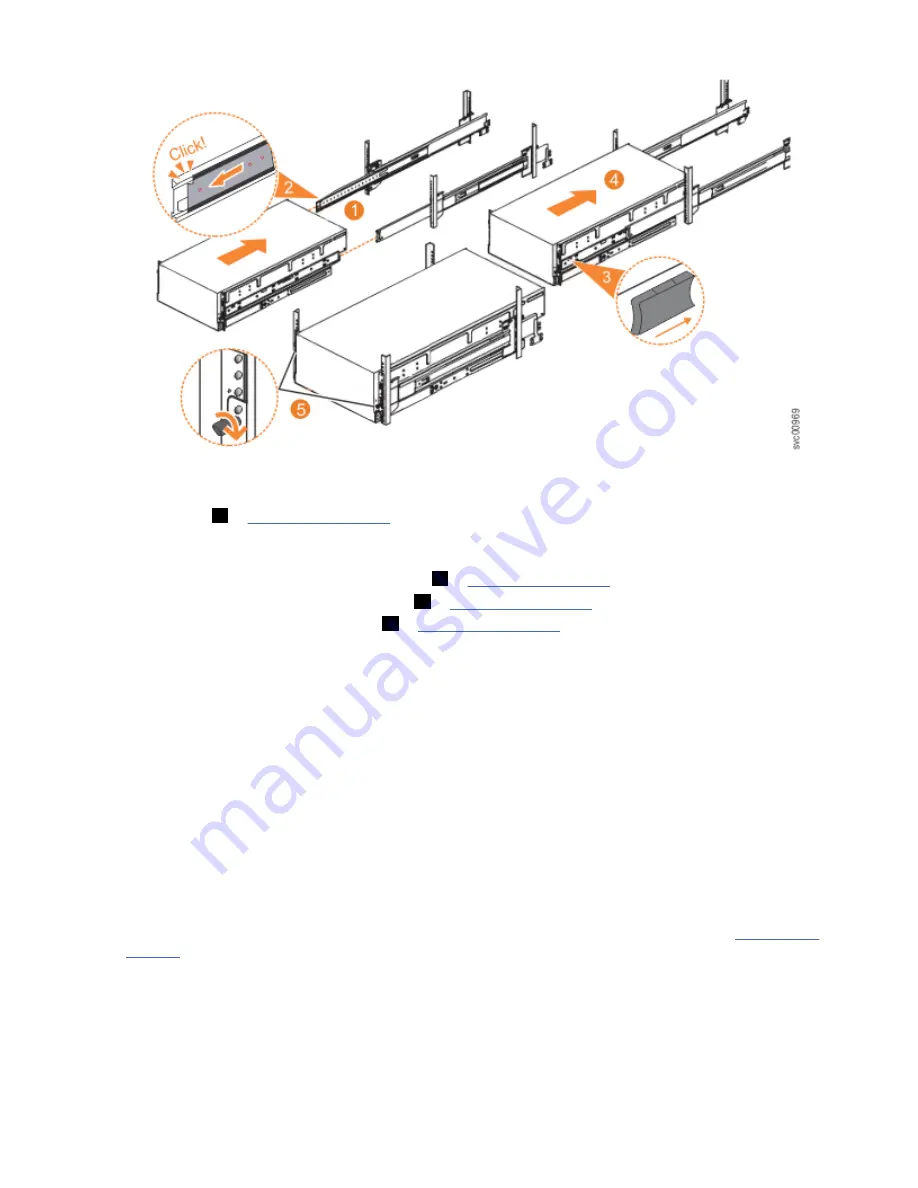
Figure 39. Replacing the 2077-92F enclosure in the rack
2. Ensure that the ball bearing retainer clicks into place inside the front of the left and right drawer
sections (
2
Sliding the enclosure into the rack
3. Locate the left and right blue release tabs near the front of the enclosure. Press both release tabs
forward to unlock the drawer mechanism (
3
4. Push the enclosure firmly into the rack (
4
5. Tighten the locking thumb screws (
5
in Figure 39 on page 48) to secure the enclosure in the rack.
6. Reconnect power to the expansion enclosure.
Installing or replacing an expansion canister: 2077-92F
You can reinstall an expansion canister in a 2077-92F expansion enclosure or replace a faulty expansion
canister with one from FRU stock.
Before you begin
Important: You can replace an expansion canister without powering off the expansion enclosure.
However, to maintain operating temperature, replace the expansion canister within 10 minutes of its
removal. When an expansion canister is removed, the reduction in airflow through the enclosure might
cause the enclosure or its components to shut down to protect from overheating.
About this task
An expansion canister provides SAS connectivity between the 2077-92F expansion enclosure and
Storwize V5000 Gen2 system. The expansion enclosure contains two expansion canisters. Figure 40 on
page 49 shows an example of an expansion canister. If either of the two expansion canisters has a
failure, the other expansion canister assumes the full I/O load.
48 Storwize V5000 Gen2: Quick Installation Guide
Summary of Contents for Storwize V5000 Gen 2 Series
Page 1: ...IBM Storwize V5000 Gen2 Quick Installation Guide IBM...
Page 5: ...Index 149 v...
Page 6: ...vi...
Page 156: ...130 Storwize V5000 Gen2 Quick Installation Guide...
Page 164: ...138 Storwize V5000 Gen2 Quick Installation Guide...
Page 166: ...140 Storwize V5000 Gen2 Quick Installation Guide...
Page 168: ...142 Storwize V5000 Gen2 Quick Installation Guide...
Page 177: ......
Page 178: ...IBM...


