5-4
Installing a ServeRAID M5000 Series Battery Assembly
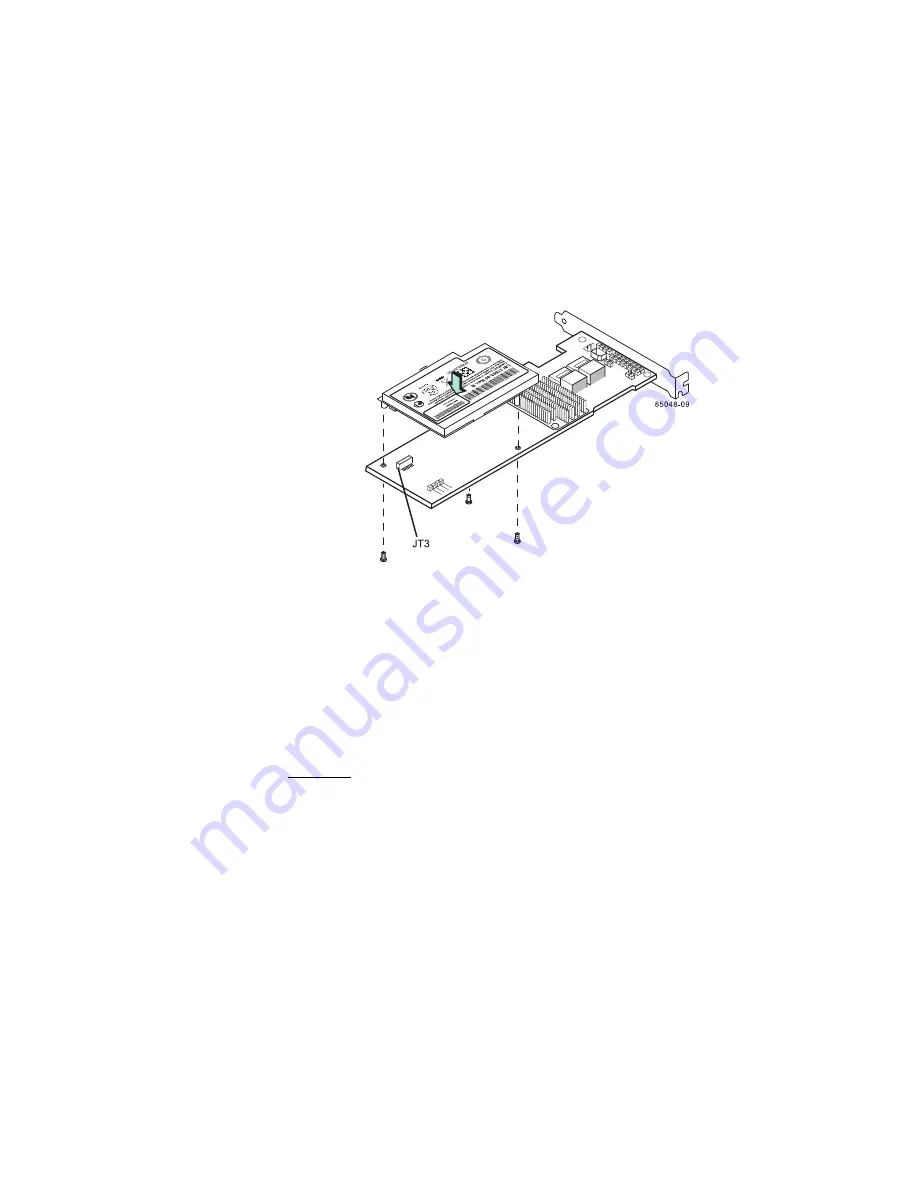
3. Hold the daughtercard so that the battery side is up and the J5
connector lines up with the J1 battery backup connector on the
controller, as shown in the following figure .
Figure 5.2
Installing the ServeRAID M5000 Series Battery
Assembly on the ServeRAID M5014 Controller
4. Carefully press the battery assembly onto the controller, so that the
two connectors are firmly joined.
5. Secure the battery assembly to the controller with the screws and the
standoffs in the three screwholes.
The standoffs are threaded at both ends and a screw goes into each
end.
6. Use the Phillips-head screws that are provided to secure the battery
assembly to the controller.
Attention:
Center the screwdriver carefully to avoid stripping the
screwhead. Do not over-tighten the screws.
7. Install the controller in the computer in the PCI Express slot, as
shown in the following figure.
Press down gently, but firmly, to make sure that the controller is
properly seated in the slot. The bottom edge of the controller must
be flush with the slot.
Summary of Contents for ServeRAID M5014
Page 1: ...ServeRAID M5014 M5015 SAS SATA Controllers USER S GUIDE M a y 2 0 1 2...
Page 7: ...Preface vii...
Page 14: ...xiv Contents...
Page 16: ...xvi Contents...
Page 34: ...1 18 Overview...
Page 54: ...3 10 ServeRAID M5014 M5015 SAS SATA Controller Characteristics...
Page 62: ...5 6 Installing a ServeRAID M5000 Series Battery Assembly...
Page 80: ...7 4 ServeRAID M5000 Series Battery Assembly Specifications...
Page 87: ...IBM Taiwan product service A 5 A 8 IBM Taiwan product service...
Page 88: ...A 6 Getting Help and Technical Assistance...
Page 89: ...ServeRAID M5014 M5015 SAS SATA Controllers User s Guide B 1 Appendix B Notices...
Page 94: ...B 6 Notices...
Page 95: ...Electronic emission notices B 7...
Page 96: ...B 8 Notices...
Page 104: ...C 6 Glossary of Terms and Abbreviations...
Page 105: ......
Page 106: ...Part number 81Y1027...


