Removing and installing cable management finger assemblies
The SAN384B-2 comes equipped with two vertical cable management finger
assemblies. It can continue to operate during the replacement of the cable
management assemblies. Due to the horizontal orientation of the blades, the cable
management assemblies are attached to the uprights of the mounting rack.
Time and items required
The replacement procedure for the cable management fingers takes less than five
minutes. A #1 Phillips screwdriver is required.
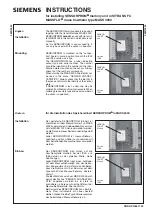
Removing a cable management finger assembly
Complete the following steps to remove the cable management finger assembly.
1.
Remove the chassis door.
2.
Remove the cables from the cable management finger assembly and rearrange
the cables around the assembly.
3.
Unscrew and save the two screws that attach the cable management assembly
to the rack upright (see Figure 32 on page 69). Support the assembly to prevent
it from falling.
4.
Remove the cable management assembly.
5.
If necessary, repeat steps 2-4 for the other cable management assembly.
384b015
Figure 31. Chassis door
68
SAN384B-2 Installation, Service, and User Guide
Summary of Contents for SAN384B-2
Page 2: ......
Page 8: ...vi SAN384B 2 Installation Service and User Guide ...
Page 12: ...x SAN384B 2 Installation Service and User Guide ...
Page 14: ...xii SAN384B 2 Installation Service and User Guide ...
Page 16: ...xiv SAN384B 2 Installation Service and User Guide ...
Page 28: ...xxvi SAN384B 2 Installation Service and User Guide ...
Page 32: ...xxx SAN384B 2 Installation Service and User Guide ...
Page 82: ...50 SAN384B 2 Installation Service and User Guide ...
Page 146: ...114 SAN384B 2 Installation Service and User Guide ...
Page 172: ...140 SAN384B 2 Installation Service and User Guide ...
Page 188: ...156 SAN384B 2 Installation Service and User Guide ...
Page 189: ......
Page 190: ... Part Number 98Y2654 Printed in USA GA32 0894 03 1P P N 98Y2654 ...