background image

Installing the 2145 UPS-1U cable-retention bracket

The 2145 UPS-1U cable-retention bracket ensures that the power cable connection
between the 2145 UPS-1U and the SAN Volume Controller node is stable.

Install the bracket after you install the power and signal cable assembly that was
supplied with the node to connect the 2145 UPS-1U and the node.

You can attach the bracket by performing the following steps:

1.

Install the power cable into the rightmost power outlet on the rear of the 2145
UPS-1U.

2.

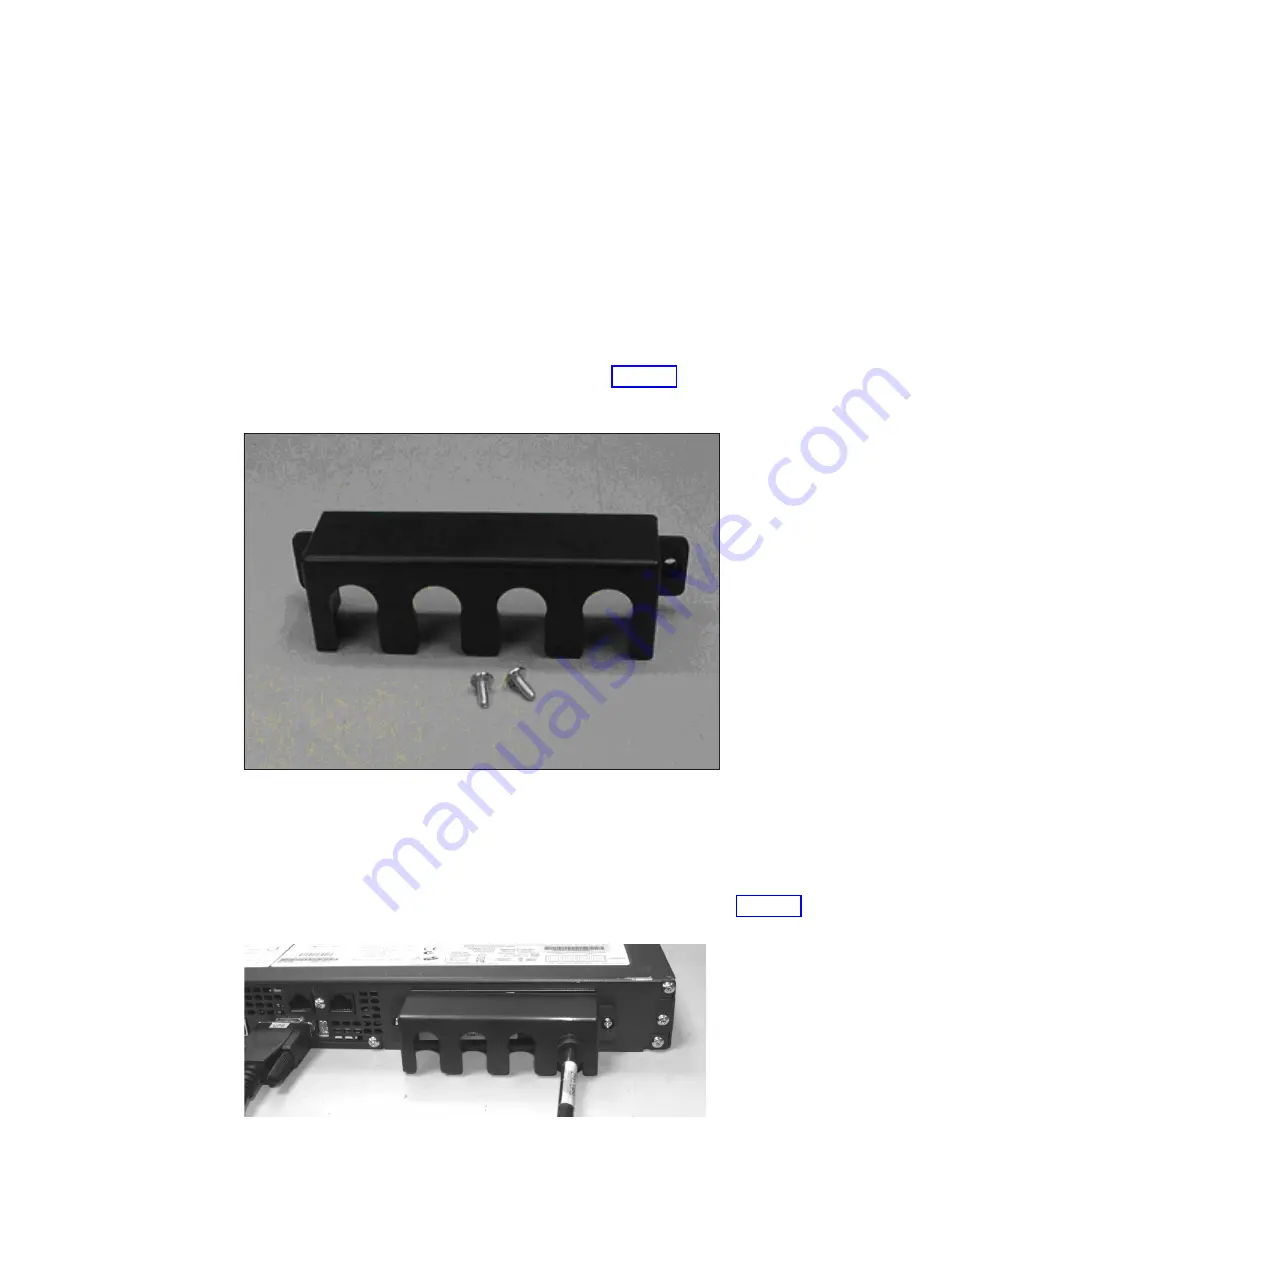
Remove the bracket and the two screws (shown in Figure 37) from the
packaging.

3.

Place the bracket over the power outlets on the right rear of the 2145 UPS-1U,
so that the two screw holes line up.

4.

Position the bracket with the power cable protruding through the rightmost slot
in the bracket.

5.

Secure the bracket in place with one screw on each side, as shown in Figure 38.

svc00201

Figure 37. 2145 UPS-1U power cable-retention bracket hardware

svc00200

Figure 38. 2145 UPS-1U power cable-retention bracket

42

IBM System Storage SAN Volume Controller: Models 2145-8F2 and 2145-8F4 Hardware Installation Guide

1
1

Summary of Contents for SAN Volume Controller 2145-8F2

Page 1: ...IBM System Storage SAN Volume Controller Models 2145 8F2 and 2145 8F4 Hardware Installation Guide V ersion 4 3 1 GC27 2221 00...

Page 2: ......

Page 3: ...IBM System Storage SAN Volume Controller Models 2145 8F2 and 2145 8F4 Hardware Installation Guide V ersion 4 3 1 GC27 2221 00...

Page 4: ...ng version 4 release 3 modification 1 of IBM System Storage SAN Volume Controller software and to all subsequent releases and modifications until otherwise indicated in new editions The information in...

Page 5: ...lume Controller 2145 8F2 rear panel indicators 9 Fibre channel LEDs 10 External connectors on the SAN Volume Controller 2145 8F4 and the SAN Volume Controller 2145 8F2 12 SAN Volume Controller 2145 8F...

Page 6: ...ndix Accessibility 55 Notices 57 Trademarks 59 Electronic emission notices 59 Federal Communications Commission FCC statement 59 Industry Canada compliance statement 60 Avis de conformit la r glementa...

Page 7: ...nnector 26 23 Attaching the mounting plates 32 24 Power cable clips 33 25 Positioning the clips 34 26 Positioned in rack 34 27 Installing the support rails for a 2145 UPS 1U into the rack 36 28 Adjust...

Page 8: ...vi IBM System Storage SAN Volume Controller Models 2145 8F2 and 2145 8F4 Hardware Installation Guide...

Page 9: ...the SAN Volume Controller Web site Go to www ibm com storage support 2145 click the current product documentation link and then click Multi language Inspecting the SAN Volume Controller for unsafe co...

Page 10: ...moke damage 6 Check for worn damaged or pinched cables 7 Ensure that the voltage that is specified on the product information label matches the specified voltage of the electrical power outlet If nece...

Page 11: ...al procedures to perform the test The test is successful if the measured resistance is 0 1 ohm or less Attention Some electrical circuits can be damaged if the external signal cables are present at th...

Page 12: ...er switch from the ground pin of the main input power receptacle to the ground conductor of the output power receptacle and from the ground pin of the backup input power receptacle to the ground condu...

Page 13: ...frame v Do not touch solder joints pins or exposed printed circuitry v Do not leave the device where others can handle and possibly damage the device v While the device is still in its antistatic bag...

Page 14: ...nd require isolation from the exposed OSP cabling The addition of primary protectors is not sufficient protection to connect these interfaces metallically to OSP wiring Note All Ethernet cables must b...

Page 15: ...entative who is responsible for the initial installation of the SAN Volume Controller hardware including the redundant ac power switch and the uninterruptible power supply After the IBM service repres...

Page 16: ...e Controller Planning Guide This guide introduces the SAN Volume Controller and lists the features you can order It also provides guidelines for planning the installation and configuration of the SAN...

Page 17: ...rface CLI SC26 7903 IBM System Storage SAN Volume Controller Host Attachment Guide This guide provides guidelines for attaching the SAN Volume Controller to your host system SC26 7905 IBM System Stora...

Page 18: ...Controller Title Description Order number IBM System Storage Productivity Center Introduction and Planning Guide This guide introduces the IBM System Storage Productivity Center hardware and software...

Page 19: ...pport IBM Publications Center www ibm com shop publications order IBM Redbooks publications www redbooks ibm com Related accessibility information To view a PDF file you need Adobe Acrobat Reader whic...

Page 20: ...ays v E mail Submit your comments electronically to the following e mail address starpubs us ibm com Be sure to include the name and order number of the book and if applicable the specific location of...

Page 21: ...PC is the management environment for SAN Volume Controller clusters For SSPC planning installation and configuration information see the following publications v IBM System Storage Productivity Center...

Page 22: ...ystem Storage Productivity Center Introduction and Planning Guide Hardware installation tasks that an IBM service representative performs To install the SAN Volume Controller hardware an IBM service r...

Page 23: ...nd Configuration Guide describes this procedure which is completed in two phases a Use the Create Cluster option on the front panel of one of the SAN Volume Controller nodes that you have installed to...

Page 24: ...xxii IBM System Storage SAN Volume Controller Models 2145 8F2 and 2145 8F4 Hardware Installation Guide...

Page 25: ...re managed by the nodes in an I O group are cached on both nodes Operating environment for the SAN Volume Controller 2145 8F4 and SAN Volume Controller 2145 8F2 To use the SAN Volume Controller you mu...

Page 26: ...AN Volume Controller 2145 8F2 and 2145 UPS 1U 520 W For each redundant ac power switch add 20 W to the power requirements Circuit breaker requirements The 2145 UPS 1U has an integrated circuit breaker...

Page 27: ...000 ft 20 to 80 noncondensing 27 C 81 F Storing 1 C to 60 C 34 F to 140 F 0 to 2133 6 m 0 to 7000 ft 5 to 80 noncondensing 29 C 84 F Shipping 20 C to 60 C 4 F to 140 F 0 to 10668 m 0 to 34991 ft 5 to...

Page 28: ...e 1 shows the controls and indicators on the front panel of the SAN Volume Controller 2145 8F4 and SAN Volume Controller 2145 8F2 1 Node status LED 2 Front panel display 3 Navigation buttons 4 Serial...

Page 29: ...There are four navigational buttons that you can use to move throughout a menu up down right and left Each button corresponds to the direction that you can move in a menu For example to move right in...

Page 30: ...access to the light path diagnostics panel which provides a method for determining the location of a problem After pressing the release latch on the operator information panel you can slide the light...

Page 31: ...ode in the IBM System Storage SAN Volume Controller Troubleshooting Guide Attention When the node is operational and you press and immediately release the power control button the SAN Volume Controlle...

Page 32: ...ed the configuration and service software displays the number that is printed on the front of the replacement panel Future error reports contain the new number No cluster reconfiguration is necessary...

Page 33: ...the rear panel indicators on the SAN Volume Controller 2145 8F2 back panel assembly 1 Fibre channel LEDs 2 Ethernet port 1 link LED 3 Ethernet port 1 activity LED 4 Ethernet port 2 link LED 5 Ethernet...

Page 34: ...et link LED The Ethernet link LED indicates that there is an active connection on the Ethernet port There is a set of LEDs for each Ethernet connector The top LED is the Ethernet link LED When it is l...

Page 35: ...occurred The light path diagnostics provide more information Ac and dc LEDs The ac and dc LEDs indicate whether the node is receiving electrical current Ac LED The upper LED 1 next to the power suppl...

Page 36: ...d the power supply Figure 7 shows the external connectors on the SAN Volume Controller 2145 8F4 back panel assembly 1 Fibre channel port 1 2 Fibre channel port 2 3 Fibre channel port 3 4 Fibre channel...

Page 37: ...ort These ports are used only during service procedures Figure 9 provides the locations of the service ports 1 Keyboard port 2 Monitor port SAN Volume Controller 2145 8F4 ports not used during normal...

Page 38: ...supply 2 Fibre channel port 4 3 Serial connection 4 Fibre channel port 3 5 Fibre channel port 2 6 Fibre channel port 1 7 Ethernet port 2 svc00530 1 2 3 4 5 Figure 10 Ports not used during normal oper...

Page 39: ...the rear of the SAN Volume Controller 2145 8F4 Figure 15 provides a view of the rear of the SAN Volume Controller 2145 8F2 The physical port numbers identify fibre channel cards and cable connections...

Page 40: ...e front panel to facilitate service controller concurrent replacement and to enable some concurrent upgrade operations The WWPNs are in the form 5005076801QXXXXX where XXXXX is as previously stated an...

Page 41: ...Place the redundant ac power switch in the same rack as the SAN Volume Controller node The redundant ac power switch logically sits between the rack power distribution unit and the 2145 UPS 1U You ca...

Page 42: ...nts Ensure that space is also available in the rack for the side mounting plates on either side of the redundant ac power switch Location Width Reason Left side 124 mm 4 89 in Side mounting plate Righ...

Page 43: ...me Controller node C 8 2145 UPS 1U C 9 SAN Volume Controller node D 10 2145 UPS 1U D 11 Redundant ac power switch 1 12 Redundant ac power switch 2 13 Site PDU X C13 outlets 14 Site PDU Y C13 outlets F...

Page 44: ...two redundant ac power switch units are used and each power switch powers one node in each I O group However for maximum redundancy use one redundant ac power switch to power each node in the cluster...

Page 45: ...ched SAN Volume Controller nodes A SAN Volume Controller node cannot operate without the uninterruptible power supply The uninterruptible power supply must be used in accordance with documented guidel...

Page 46: ...indicator 4 On battery indicator 5 Overload indicator 6 Power on indicator 7 On off button 8 Test and alarm reset button Table 1 identifies which status and error LEDs that display on the 2145 UPS 1U...

Page 47: ...ing red Flashing amber Solid on The ac power output wave is under low limit or above high limit on battery mode Green Either on or off Amber Beeps for four seconds and then stops On battery no ac powe...

Page 48: ...r The load segment 1 indicator on the 2145 UPS 1U is not currently used by the SAN Volume Controller Note When the 2145 UPS 1U is configured by the SAN Volume Controller this load segment is disabled...

Page 49: ...he on off button This places the 2145 UPS 1U in standby mode You must then unplug the 2145 UPS 1U to turn off the unit Attention Do not turn off the uninterruptible power supply before you shut down t...

Page 50: ...orts in conjunction with the SAN Volume Controller or any other application that might be used with the SAN Volume Controller is not supported Figure 21 shows the 2145 UPS 1U ports that are not used 1...

Page 51: ...unit produces the following approximate heat output Model Heat output during normal operation Heat output during battery operation 2145 UPS 1U 10 W 34 Btu per hour 150 W 512 Btu per hour Power cables...

Page 52: ...cco Mozambique Netherlands New Caledonia Niger Norway Poland Portugal Romania Senegal Slovakia Spain Sudan Sweden Syria Togo Tunisia Turkey former USSR Vietnam former Yugoslavia Zaire Zimbabwe 2 8 m 9...

Page 53: ...on type attached plug designed for 200 240 V ac input Part number Liechtenstein Switzerland 2 8 m 9 ft IEC 60884 Stnd Sheet 416534 2 CH Type 12 39M5158 Thailand 2 8 m 9 ft NEMA 6 15P 39M5095 Chapter 3...

Page 54: ...30 IBM System Storage SAN Volume Controller Models 2145 8F2 and 2145 8F4 Hardware Installation Guide...

Page 55: ...information and parts that you require 2 Optionally install and verify the redundant ac power switch if it is to be used and is not already being used for a node 3 Install the uninterruptible power su...

Page 56: ...t ac power switch Attach the mounting plates to the redundant ac power switch before you label the cables Perform the following steps to attach the mounting plates to the redundant ac power switch Att...

Page 57: ...e redundant ac power switch 1 Connect the main input power cable to the redundant ac power switch 2 Connect the backup input power cable to the redundant ac power switch 3 Secure both the redundant ac...

Page 58: ...route from the redundant ac power switch to the power distribution units 2 Route the main input power cable of the redundant ac power switch to the specified power distribution unit and connect it 3...

Page 59: ...switched or remove the specified redundant ac power switch power cable from the outlet of the site PDU Note If at any time there is no power on the output socket ensure that the power distribution soc...

Page 60: ...of the 2145 UPS 1U shipping carton Grip the flaps on either side of the 2145 UPS 1U 2 Lift the 2145 UPS 1U clear of the shipping carton and place it on a flat stable surface with the front facing you...

Page 61: ...p nuts 2 and 3 in Figure 30 to the front of the rack and then attach the rail using just one M6 x 10 screw in the bottom mounting hole 1 8 Repeat steps 6 and 7 for the other rail 9 Tighten the assembl...

Page 62: ...ty controlled indoor environment free of conductive contaminants Ambient temperature must not exceed 40 C 104 F Do not operate near water or excessive humidity 95 maximum 13 CAUTION To avoid any hazar...

Page 63: ...ft and then pulling it forward 4 Remove the protective label from the internal battery connector shown in Figure 33 on page 40 1 svc00008 Figure 31 Mounting screws for the 2145 UPS 1U svc00063 Figure...

Page 64: ...first need to move the sliding section on the front of the 2145 UPS 1U to the closed position 7 At the back of the 2145 UPS 1U plug the 2145 UPS 1U main power connector into the power socket 1 in Fig...

Page 65: ...through a startup sequence while the 2145 UPS 1U conducts a self test When the self test is complete the power on indicator 6 and the load indicators 1 and 2 illuminate to indicate that power is being...

Page 66: ...power outlet on the rear of the 2145 UPS 1U 2 Remove the bracket and the two screws shown in Figure 37 from the packaging 3 Place the bracket over the power outlets on the right rear of the 2145 UPS...

Page 67: ...lume Controller 2145 8F2 You must install the support rails that hold the SAN Volume Controller 2145 8F4 or the SAN Volume Controller 2145 8F2 When you are ready to install the support rails use the c...

Page 68: ...0 5 in The latch lever engages a hole in the back bracket assembly and holds the latch lock carrier in the retracted position 5 Push the back rail bracket 1 Figure 41 toward the front of the rail unti...

Page 69: ...ing flange 8 Push the latch lock 2 Figure 43 on page 46 away from the rail to release the carrier The latch lock carrier slides toward the front of the rack and the locating pins project through the h...

Page 70: ...f the slide rail Store the shipping bracket for further use Installing the SAN Volume Controller in a rack After installing the support rails you can install the SAN Volume Controller in a rack Instal...

Page 71: ...to the redundant ac power switch If a redundant ac power switch is not used you can connect the two uninterruptible power supply units that are powering an I O group to different independent electrica...

Page 72: ...r is now connected to the 2145 UPS 1U Installing the SAN Volume Controller 2145 8F4 cable retention bracket The cable retention bracket ensures that the SAN Volume Controller 2145 8F4 node does not mi...

Page 73: ...2145 8F4 or the SAN Volume Controller 2145 8F2 to the SAN you must connect the Ethernet and fibre channel cables Before you begin this task refer to the user s cable connection table to find out wher...

Page 74: ...es do not tighten the cable straps or bend the cables to a radius smaller than 76 mm 3 in 3 Connect the fibre channel cables to the fibre channel ports as required by the user s configuration 4 Connec...

Page 75: ...ormed Check that all display cells light and that a bar scrolls horizontally and vertically across the display When the display test is complete the check light goes off and a button test is started 3...

Page 76: ...ble connection table that is provided by the customer to verify that the fibre channel link is operating at the expected speed If the operational speed does not match the expected speed go to MAP 5600...

Page 77: ...red language is displayed d Press the select button If the battery needed to be charged the Charging or Recovering message is replaced by the Cluster message when the battery is fully charged The prog...

Page 78: ...54 IBM System Storage SAN Volume Controller Models 2145 8F2 and 2145 8F4 Hardware Installation Guide...

Page 79: ...ombinations to perform operations and initiate many menu actions that can also be done through mouse actions You can navigate the SAN Volume Controller Console and help system from the keyboard by usi...

Page 80: ...56 IBM System Storage SAN Volume Controller Models 2145 8F2 and 2145 8F4 Hardware Installation Guide...

Page 81: ...country or send inquiries in writing to IBM World Trade Asia Corporation Licensing 2 31 Roppongi 3 chome Minato ku Tokyo 106 0032 Japan The following paragraph does not apply to the United Kingdom or...

Page 82: ...uld verify the applicable data for their specific environment Information concerning non IBM products was obtained from the suppliers of those products their published announcements or other publicly...

Page 83: ...re trademarks of Sun Microsystems Inc in the United States other countries or both Linux is a registered trademark of Linus Torvalds in the United States other countries or both Microsoft Windows Wind...

Page 84: ...t be required to take adequate measures European Union EMC Directive conformance statement Ensure that you are familiar with the European Union EU statement This product is in conformity with the prot...

Page 85: ...lern ohne Empfehlung der IBM gesteckt eingebaut werden EN 55022 Klasse A Ger te m ssen mit folgendem Warnhinweis versehen werden Warnung Dieses ist eine Einrichtung der Klasse A Diese Einrichtung kann...

Page 86: ...nited Kingdom telecommunications requirements This apparatus is manufactured to the International Safety Standard EN60950 and as such is approved in the U K under approval number NS G 1234 J 100003 fo...

Page 87: ...scalstr 100 Stuttgart Germany 70569 Tele 0049 0 711 785 1176 Fax 0049 0 711 785 1283 e mail mailto tjahn de ibm com Taiwan Contact Information This topic contains the product service contact informati...

Page 88: ...64 IBM System Storage SAN Volume Controller Models 2145 8F2 and 2145 8F4 Hardware Installation Guide...

Page 89: ...2 14 SAN Volume Controller 2145 8F4 12 contact information European 63 Taiwan 63 controls and indicators on the front panel 2145 UPS 1U alarm 24 illustration 22 Load segment 1 indicator 24 Load segmen...

Page 90: ...upport rails 43 steps SAN Volume Controller 2145 8F2 43 SAN Volume Controller 2145 8F4 43 support rails 2145 UPS 1U 36 SAN Volume Controller 2145 8F2 43 SAN Volume Controller 2145 8F4 43 internal devi...

Page 91: ...on panel release latch 6 overview 1 product characteristics 2 rear panel indicators 9 release latch 6 specifications 2 support rails 43 weight and dimensions 2 SAN Volume Controller 2145 8F4 air tempe...

Page 92: ...ion SAN Volume Controller 2145 8F2 51 SAN Volume Controller 2145 8F4 51 W Web sites xvii who should read this guide xiii 68 IBM System Storage SAN Volume Controller Models 2145 8F2 and 2145 8F4 Hardwa...

Page 93: ...ions and information about products and prices please contact your IBM branch office your IBM business partner or your authorized remarketer When you send comments to IBM you grant IBM a nonexclusive...

Page 94: ...elopment Department 61C 9032 South Rita Road Tucson Arizona 85775 4401 _ _ _ _ _ _ _ _ _ _ _ _ _ _ _ _ _ _ _ _ _ _ _ _ _ _ _ _ _ _ _ _ _ _ _ _ _ _ _ _ _ _ _ _ _ _ _ _ _ _ _ _ _ _ _ _ _ _ _ _ _ _ _ _ _...

Page 95: ......

Page 96: ...Printed in USA GC27 2221 00...

Reviews: