background image

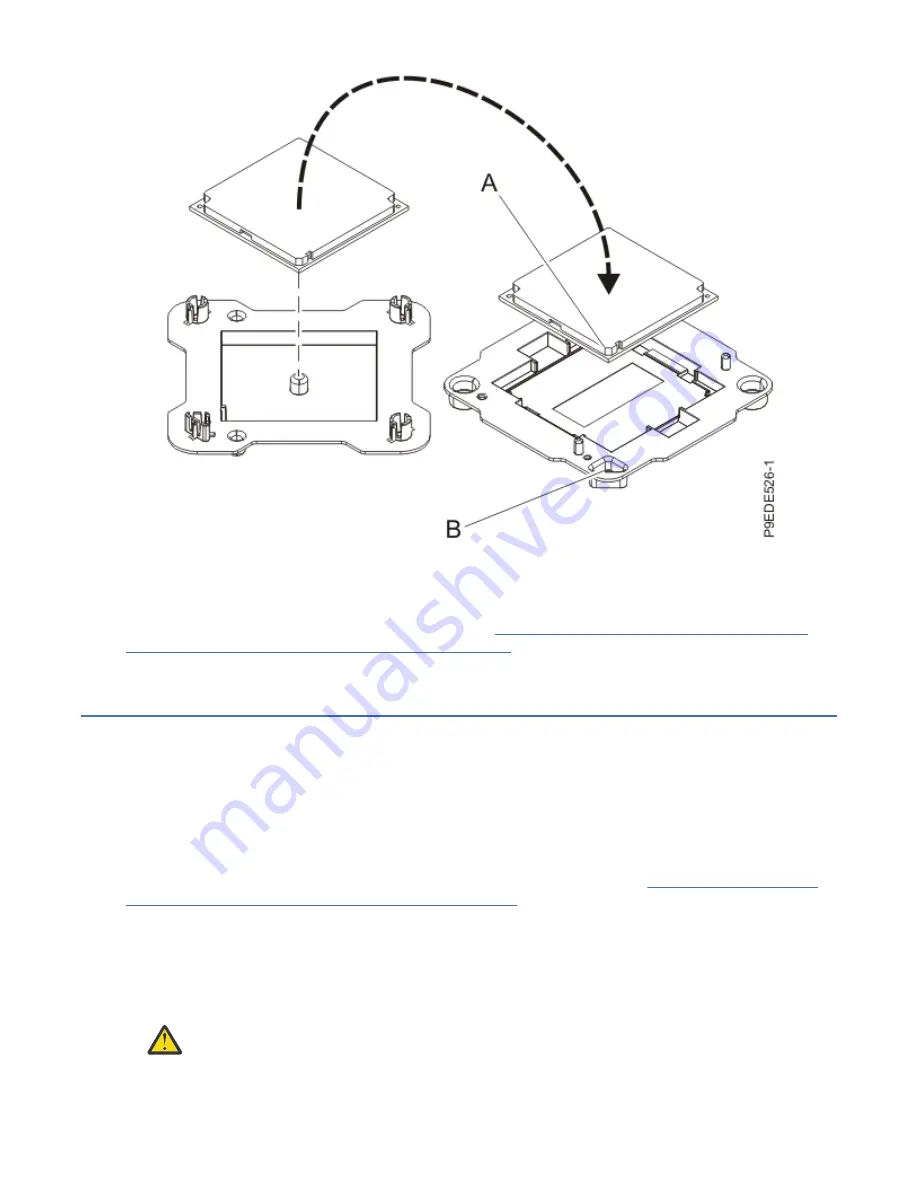
Figure 115. Placing the system processor module into the packaging

What to do next
Prepare the system for operation. For instructions, see “Preparing the 9183-22X system for operation

after you remove and replace internal parts” on page 150.

Removing and replacing the time-of-day battery in the 9183-22X system

Find information about removing and replacing the time-of-day battery in the IBM Power System IC922

(9183-22X) server.

Removing and replacing the time-of-day battery in the 9183-22X system

To remove and replace the time-of-day battery, complete the steps in this procedure.

Before you begin
Power off the system and place it in the service position. For instructions, see “Preparing the 9183-22X

system to remove and replace internal parts” on page 146.

Procedure

1. Attach the electrostatic discharge (ESD) wrist strap.

The ESD wrist strap must be connected to an unpainted metal surface until the service procedure is

completed, and if applicable, until the service access cover is replaced.

Attention:
• Attach an electrostatic discharge (ESD) wrist strap to the front ESD jack, to the rear ESD jack,

or to an unpainted metal surface of your hardware to prevent the electrostatic discharge from

damaging your hardware.

128  Power Systems: Servicing the IBM Power System IC922 (9183-22X)

Summary of Contents for Power System IC922

Page 1: ...Power Systems Servicing the IBM Power System IC922 9183 22X IBM...

Page 2: ...ual G229 9054 and the IBM Environmental Notices and User Guide Z125 5823 This edition applies to IBM Power Systems servers that contain the POWER9 processor and to all associated models Copyright Inte...

Page 3: ...tribution board 63 Power supplies 66 Removing a power supply 66 Replacing a power supply 69 Power switch and cables 70 Removing the power switch and cables 70 Replacing the power switch and cables 74...

Page 4: ...status 156 Removing and replacing covers 156 Removing the service access cover 156 Installing the service access cover 157 Service and operating positions 158 Placing the system into the service posi...

Page 5: ...1 800 300 8751 German safety information Das Produkt ist nicht f r den Einsatz an Bildschirmarbeitspl tzen im Sinne 2 der Bildschirmarbeitsverordnung geeignet Laser safety information IBM servers can...

Page 6: ...nect 1 Turn off everything unless instructed otherwise 2 For AC power remove the power cords from the outlets 3 For racks with a DC power distribution panel PDP turn off the circuit breakers located i...

Page 7: ...devices that attach to the system It is the responsibility of the customer to ensure that the outlet is correctly wired and grounded to prevent an electrical shock R001 part 1 of 2 R001 part 2 of 2 CA...

Page 8: ...that the route that you choose can support the weight of the loaded rack cabinet Refer to the documentation that comes with your rack cabinet for the weight of a loaded rack cabinet Verify that all d...

Page 9: ...position for example when working from a ladder Stability hazard The rack may tip over causing serious personal injury Before extending the rack to the installation position read the installation ins...

Page 10: ...e equipped with multiple AC power cords or multiple DC power cables To remove all hazardous voltages disconnect all power cords and power cables L003 L007 CAUTION A hot surface nearby L007 x Power Sys...

Page 11: ...ing into the other end of a disconnected optical fiber to verify the continuity of optic fibers may not injure the eye this procedure is potentially dangerous Therefore verifying the continuity of opt...

Page 12: ...th platforms without appreciable force so take care not to push or lean Keep riser tilt adjustable angling platform option flat at all times except for final minor angle adjustment when needed Do not...

Page 13: ...itable for connection to intrabuilding or unexposed wiring or cabling only The intrabuilding ports of this equipment must not be metallically connected to the interfaces that connect to the OSP outsid...

Page 14: ...xiv Power Systems Servicing the IBM Power System IC922 9183 22X...

Page 15: ...ther product Do not open or service any power supply assembly Do not connect or disconnect any cables or perform installation maintenance or reconfiguration of this product during an electrical storm...

Page 16: ...the circuit breakers located in the PDP 6 Turn on the devices Sharp edges corners and joints may be present in and around the system Use care when handling equipment to avoid cuts scrapes and pinchin...

Page 17: ...ist strap follow all electrical safety procedures An ESD wrist strap is used for static control It does not increase or decrease your risk of receiving electric shock when using or working on electric...

Page 18: ...he front drive cables and power cables Press the cable connector latchs and disconnect the front drive cables and the power cable from the drive backplane as shown in the following figure Be sure to u...

Page 19: ...he drive backplane 5 Unscrew the two captive thumbscrews A of the drive backplane until fully loose as shown in the following figure If needed use a Phillips 2 screwdriver to loosen the screws Removin...

Page 20: ...ischarge ESD wrist strap on and that the ESD clip is plugged into a ground jack or connected to an unpainted metal surface If not do so now 2 Align and place the drive backplane into the system Insert...

Page 21: ...ng the drive backplane 4 Using your labels connect the power cables and front drive cables as shown in the following figure Push the connectors in until the latches click Removing and replacing parts...

Page 22: ...e drive backplane 5 Fully seat all the front drives into their slots as shown in the following figure Push drive lever A until the front drive is seated and the lever snaps closed 8 Power Systems Serv...

Page 23: ...ng the 9183 22X system for operation after you remove and replace internal parts on page 150 Removing and replacing a hard disk drive or solid state drive in the 9183 22X system Learn how to remove an...

Page 24: ...uct from ESD packaging and installing or replacing hardware touch an unpainted metal surface of the system for a minimum of 5 seconds If at any point in this service process you move away from the sys...

Page 25: ...as you slide it out of the system Do not hold the drive by the handle 5 If you are removing more than one drive repeat the steps in this procedure until all drives are removed Replacing a front hard d...

Page 26: ...kup media Removing and replacing fans in the 9183 22X system Find information about removing and replacing fans in the IBM Power System IC922 9183 22X server Removing and replacing a fan in the 9183 2...

Page 27: ...ting when shorted with metal which might result in splattered metal burns or both L005 L008 CAUTION Hazardous moving parts nearby L008 Procedure 1 Loosen the cover screw B at the rear of the system as...

Page 28: ...r instructions see Placing a 9183 22X system into the service position on page 159 CAUTION Do not place any object on top of a rack mounted device unless that rack mounted device is intended for use a...

Page 29: ...increase or decrease your risk of receiving electric shock when using or working on electrical equipment If you do not have an ESD wrist strap just prior to removing the product from ESD packaging and...

Page 30: ...ft the fan from the system as shown in the following figure Attention When the system is powered on a fan can be unplugged for only 20 seconds before the system shuts down Once you unplug a fan you ha...

Page 31: ...replace a fan lower the fan into the system and align the fan with the slots in the fan cage assembly as shown in the following figure Press the fan down until it snaps into place Removing and replac...

Page 32: ...the cover A on the system unit such that the alignment pins on the cover are aligned to the slots on the chassis Slide the cover to the front of the system until the blue release latches B lock in to...

Page 33: ...Installing the cover 8 Place the system into the operating position For instructions see Placing a 9183 22X system into the operating position on page 160 L012 Removing and replacing parts in the 918...

Page 34: ...cage assembly from the 9183 22X system To remove the fan cage assembly from the system complete the steps in this procedure Before you begin Power off the system and place it in the service position F...

Page 35: ...ures An ESD wrist strap is used for static control It does not increase or decrease your risk of receiving electric shock when using or working on electrical equipment If you do not have an ESD wrist...

Page 36: ...charge ESD wrist strap on and that the ESD clip is plugged into a ground jack or connected to an unpainted metal surface If not do so now 2 Lower the fan cage assembly into the system and align the fa...

Page 37: ...ormation about removing and replacing memory modules in the IBM Power System IC922 9183 22X server Removing and replacing memory modules from the 9183 22X system To remove and replace a memory module...

Page 38: ...dures An ESD wrist strap is used for static control It does not increase or decrease your risk of receiving electric shock when using or working on electrical equipment If you do not have an ESD wrist...

Page 39: ...he air baffle Remove 3 Locate the memory module to remove The following figure shows the location of the memory modules in the system Figure 18 Locating the memory modules Removing and replacing parts...

Page 40: ...shown in the following figure Figure 19 Retracting the retaining pin and removing the left cable holder c Lift the drive cable holder out of the system 5 If the memory socket is covered by a PCIe ris...

Page 41: ...on the right side of the system complete the following steps to remove the power distribution board Removing the power distribution board requires that the power supplies be partially removed from th...

Page 42: ...out of the system d Remove the cables from the top of the power distribution board e To remove the power distribution board unlatch tab A unplug and lift the power distribution board from the system b...

Page 43: ...odule from the slot a Unlock the memory module by pushing the locking tabs away from the memory module in the direction shown in the following figure The lever action of opening the tabs pushes the me...

Page 44: ...f the slot 8 Place the memory module on an ESD mat Replace 9 To replace a memory module complete the following steps a Push the locking tabs to the open position away from the slot in the direction sh...

Page 45: ...ress firmly on each side of the memory module until the locking tab locks in place with an audible click 10 If you removed a PCIe riser replace the PCIe riser by using the following procedure a Move t...

Page 46: ...m replace the holder by using the following procedure a Replace the drive cable holder in the system Ensure that the alignment pins match the slots in the holder b Reset the retaining pin A to lock th...

Page 47: ...ace the power distribution board by using the following procedure a Replace the power distribution board by plugging it into the system backplane as shown in the following figure Use the alignment pin...

Page 48: ...he power distribution board a Replace the drive cable holder in the system Ensure that the alignment pins match the slots in the holder b Reset the retaining pin A to lock the holder in place as shown...

Page 49: ...ce the drive cables into the drive cable holder 13 Replace the air baffle A straight down into the chassis as shown in the following figure Ensure that the pins inside the system side walls align prop...

Page 50: ...the system The considerations for installing memory modules in the system follow The system supports up to 32 DDR4 RDIMM memory modules The system supports memory module sizes 16 GB 32 GB and 64 GB fo...

Page 51: ...ystem The following figure shows the locations for memory modules in the 9183 22X system Figure 30 Memory module slot locations The following table shows the order in which memory modules must be plac...

Page 52: ...22X system to remove and replace internal parts on page 146 Note If a CacheVault power module is attached to the adapter remove the CacheVault power module and cable For details see the Broadcom web s...

Page 53: ...n discharge yourself by touching an unpainted metal surface for at least 5 seconds before you continue with the service process 2 Lift the air baffle A straight up as shown in the following figure Pla...

Page 54: ...he cable connector latch and disconnect the front drive cable from the drive backplane as shown in the following figure Be sure to unlatch the cable from the connectors Do not pull in the cables thems...

Page 55: ...rew using a Phillips 1 screwdriver and lift the PCIe adapter from the system backplane as shown in the following figure b If needed label and remove any plugs or cables that extend out from the rear o...

Page 56: ...from a PCIe riser complete the following steps a Label the PCIe riser b Remove the drive cables from the drive cable holders along the sides of the system c Lift the PCIe riser up out of the system as...

Page 57: ...unplug the cables by using the connector e If needed label and remove the cables from the PCIe adapter Press the cable connector latch to unlatch the cable Do not pull in the cables themselves unplug...

Page 58: ...u remove parts from the system you must ensure that PCIe tailstock fillers are present System airflow baffle is present Notes If you are installing or replacing a Broadcom 93xx adapter FC EK41 FC EK43...

Page 59: ...labels insert the cables into the PCIe adapter Push the connector in until the latch clicks b Align the adapter properly and insert it fully into the slot as shown in the following figure c Replace th...

Page 60: ...apter into the PCIe riser d Using your labels replace any plugs or cables that extend out from the rear of the PCIe adapter e Insert the PCIe riser into the system backplane as shown in the following...

Page 61: ...long the sides of the system 5 If you disconnected the drive cables complete the following steps a Using your labels reconnect the front drive cables to the drive backplanes as shown in the following...

Page 62: ...age assembly into the system and align the fan cage assembly with the slots in the chassis Simultaneously rotate the two latches at A down as shown in the following figure until the fan cage assembly...

Page 63: ...bly 6 Replace the air baffle A straight down into the chassis as shown in the following figure Ensure that the pins inside the system side walls align properly with the slots in the cover B Removing a...

Page 64: ...ind information about removing and replacing PCIe risers in the IBM Power System IC922 9183 22X server Removing a PCIe riser from the 9183 22X system To remove a PCIe riser from the system complete th...

Page 65: ...safety procedures An ESD wrist strap is used for static control It does not increase or decrease your risk of receiving electric shock when using or working on electrical equipment If you do not have...

Page 66: ...figure Lift the fan cage assembly from the system Figure 44 Removing the fan cage assembly c Disconnect the front drive cables from the drive backplane Press the cable connector latch and disconnect...

Page 67: ...iser from the system complete the following steps a Label the PCIe riser b Remove the drive cables from the drive cable holders along the sides of the system c Lift the PCIe riser up out of the system...

Page 68: ...lug the cables by using the connector 5 To remove a PCIe adapter from a PCIe riser complete the following steps a Label the PCIe adapter to note the position of the adapter in the riser b If needed la...

Page 69: ...1 Ensure that you have the electrostatic discharge ESD wrist strap on and that the ESD clip is plugged into a ground jack or connected to an unpainted metal surface If not do so now 2 To replace a PC...

Page 70: ...ce any plugs or cables that extend out from the rear of the PCIe adapter f Insert the PCIe riser into the system backplane as shown in the following figure Insert the riser by using the slots and alig...

Page 71: ...long the sides of the system 3 If you disconnected the drive cables complete the following steps a Using your labels reconnect the front drive cables to the drive backplanes as shown in the following...

Page 72: ...age assembly into the system and align the fan cage assembly with the slots in the chassis Simultaneously rotate the two latches at A down as shown in the following figure until the fan cage assembly...

Page 73: ...bly 4 Replace the air baffle A straight down into the chassis as shown in the following figure Ensure that the pins inside the system side walls align properly with the slots in the cover B Removing a...

Page 74: ...about removing and replacing the power distribution board in the IBM Power System IC922 9183 22X server Removing the power distribution board from the 9183 22X system To remove the power distribution...

Page 75: ...orking on electrical equipment If you do not have an ESD wrist strap just prior to removing the product from ESD packaging and installing or replacing hardware touch an unpainted metal surface of the...

Page 76: ...out of the system 4 Remove the cables from the top of the power distribution board 5 To remove the power distribution board unlatch tab A unplug and lift the power distribution board from the system b...

Page 77: ...p on and that the ESD clip is plugged into a ground jack or connected to an unpainted metal surface If not do so now 2 If present reconnect the power cables to the front of the power distribution boar...

Page 78: ...able holder on the right side of the system by using the following procedure a Replace the drive cable holder in the system Ensure that the alignment pins match the slots in the holder b Reset the ret...

Page 79: ...ce the drive cables into the drive cable holder 6 Replace the air baffle A straight down into the chassis as shown in the following figure Ensure that the pins inside the system side walls align prope...

Page 80: ...n the 9183 22X system Find information about removing and replacing power supplies in the IBM Power System IC922 9183 22X server Removing a power supply from the 9183 22X system To remove a power supp...

Page 81: ...when using or working on electrical equipment If you do not have an ESD wrist strap just prior to removing the product from ESD packaging and installing or replacing hardware touch an unpainted metal...

Page 82: ...product might be equipped with multiple AC power cords or multiple DC power cables To remove all hazardous voltages disconnect all power cords and power cables L003 L005 68 Power Systems Servicing th...

Page 83: ...3 c on page 69 for the other power supply Figure 59 Removing the power supplies from the system Replacing a power supply in the 9183 22X system To replace a power supply in the system complete the st...

Page 84: ...er System IC922 9183 22X system About this task The power switch includes the front USB port Removing the power switch and cables from the 9183 22X system To remove the power switch and cables complet...

Page 85: ...lectric shock when using or working on electrical equipment If you do not have an ESD wrist strap just prior to removing the product from ESD packaging and installing or replacing hardware touch an un...

Page 86: ...B from the system backplane as shown in the following figure Feed the power switch cable and the USB cable through the opening in the side of the chassis as shown in the following figure If needed mo...

Page 87: ...gure 63 Disconnecting the power switch and front USB cables 5 Remove the two screws A and B that secure the power switch as shown in the following figure Removing and replacing parts in the 9183 22X 7...

Page 88: ...Procedure 1 Ensure that you have the electrostatic discharge ESD wrist strap on and that the ESD clip is plugged into a ground jack or connected to an unpainted metal surface If not do so now 2 Faste...

Page 89: ...le and the USB cable through the opening in the side of the chassis as shown in the following figure Connect the power switch cable A and the front USB cable B to the system backplane as shown in the...

Page 90: ...the power switch and front USB cables against the outside of the system b Put the side channel back into place covering the cables Ensure the tab at A is inserted into the slot c Secure the side chann...

Page 91: ...l 5 Replace the air baffle A straight down into the chassis as shown in the following figure Ensure that the pins inside the system side walls align properly with the slots in the cover B Removing and...

Page 92: ...e system backplane in the IBM Power System IC922 9183 22X server Preparing the 9183 22X system to remove the system backplane To prepare the system to remove a system backplane complete the steps in t...

Page 93: ...s not increase or decrease your risk of receiving electric shock when using or working on electrical equipment If you do not have an ESD wrist strap just prior to removing the product from ESD packagi...

Page 94: ...lder out of the system 4 Remove the drive cable holder on the right side of the system by using the following procedure a Remove the drive cables from the drive cable holder b Retract the retaining pi...

Page 95: ...lane replacement procedure This process keeps the parts safe during the system backplane replacement As part of the system processor module replacement the heat sink is removed If the system processor...

Page 96: ...22X system on page 70 5 Label and remove the PCIe adapters and PCIe risers from the system backplane and set them on an ESD surface For instructions see Removing a PCIe adapter from the 9183 22X syste...

Page 97: ...Figure 72 Removing the system backplane b Using the two blue touch points B slide the system backplane forwards about 6 cm 25 in Removing and replacing parts in the 9183 22X 83...

Page 98: ...arge ESD wrist strap on and that the ESD clip is plugged into a ground jack or connected to an unpainted metal surface If not do so now 2 Remove the replacement system backplane from the static protec...

Page 99: ...Figure 73 Replacing the system backplane 4 Replace the 3 screws A to secure the system backplane to the system Removing and replacing parts in the 9183 22X 85...

Page 100: ...emove the heat sink by lifting it upward Set the heat sink aside with the module side face up Note If you plan to remove dust or debris from the heat sink this operation must be completed in another r...

Page 101: ...present use the supplied air pump to clean the system processor module area Blow small bursts of air from the center toward the sides of the system processor module as shown in the following figure I...

Page 102: ...cover from a system processor socket 10 Prepare the system processor module for removal a Open the latches that hold the system processor module in the supplied removal tool A Push down on the ring B...

Page 103: ...l tool latches b Lower the tool over the system processor module while ensuring that the two guide pins A insert into the alignment holes B on each side of the tool See the following figure Removing a...

Page 104: ...p of the system processor module push down on the ring A to close the latches C and lock the system processor module into the tool Make sure that both of the tool jaws are locked on the system process...

Page 105: ...backplane socket 12 Remove the dust covers from the system processor module sockets on the new system backplane 13 Install the system processor module a If dust or debris is present on the system proc...

Page 106: ...r the tool evenly without tilting the tool See the following figure Note Do not attempt to slide the tool and the system processor module in any direction while the system processor module is touching...

Page 107: ...rocessor module c Open the latches that hold the system processor module in the supplied removal tool A Push down on the ring B while pressing in on the tabs C See the following figure Removing and re...

Page 108: ...he system processor module 14 Inspect the thermal interface material TIM for visible signs of damage as shown in the following figure If you see folds tears bends or if you have doubts about the TIM r...

Page 109: ...reuse the existing heat sink a Open the TIM packaging and carefully remove the TIM holding it by the edges of the carrier strip and holding it away from the shipping container b Remove the protective...

Page 110: ...Figure 84 Installing a new TIM onto the system processor module d Place the heat sink on the TIM as shown in the following figure 96 Power Systems Servicing the IBM Power System IC922 9183 22X...

Page 111: ...ing undamaged TIM and heat sink a Using the tweezers move the old TIM from the clean dry surface and center it onto the new system processor module The TIM has no preferred up side The TIM can be plac...

Page 112: ...Figure 86 Replacing the TIM onto the system processor module b Place the heat sink on the TIM as shown in the following figure 98 Power Systems Servicing the IBM Power System IC922 9183 22X...

Page 113: ...load arms are engaged as shown by A in the following figure b Tighten the center load screw clockwise by using the supplied hex key as shown by B in the following figure until a firm stop is reached...

Page 114: ...system backplane to the new system backplane For instructions see Removing and replacing the time of day battery in the 9183 22X system on page 128 24 Transfer the memory modules from the old system b...

Page 115: ...ce the drive cable holder on the right side of the system by using the following procedure a Replace the drive cable holder in the system Ensure that the alignment pins match the slots in the holder b...

Page 116: ...assembly in the system For instructions see Replacing the fan cage assembly in the 9183 22X system on page 22 Preparing the system for operation after replacing the system backplane in the 9183 22X s...

Page 117: ...product power scale out_lc b In the search field enter your machine type and model Then click the correct product support entry for your system c From the Downloads list click Scale out LC system VPD...

Page 118: ...d heat sink on hand Procedure 1 Attach the electrostatic discharge ESD wrist strap The ESD wrist strap must be connected to an unpainted metal surface until the service procedure is completed and if a...

Page 119: ...e 92 Opening the system processor module packaging 3 Lift the air baffle A straight up as shown in the following figure Place the air baffle on a clean area Removing and replacing parts in the 9183 22...

Page 120: ...ves freely See the following figure b Hold the heat sink B on opposing sides and remove the heat sink by lifting it upward Set the heat sink aside with the module side face up Note If you plan to remo...

Page 121: ...ink 5 Using tweezers carefully remove the TIM from the top of the system processor module and place it in a clean dry area as shown in the following figure The TIM can tear easily Removing and replaci...

Page 122: ...use the supplied air pump to clean the system processor module area Blow small bursts of air from the center toward the sides of the system processor module as shown in the following figure If your a...

Page 123: ...ea 7 Prepare the system processor module for removal a Open the latches that hold the system processor module in the supplied removal tool A Push down on the ring B while pressing in on the tabs C See...

Page 124: ...atches b Lower the tool over the system processor module while ensuring that the two guide pins A insert into the alignment holes B on each side of the tool See the following figure 110 Power Systems...

Page 125: ...l on top of the system processor module push down on the ring A to close the latches C and lock the system processor module into the tool Make sure that both of the tool jaws are locked on the system...

Page 126: ...e them at an angle in the top cover of the system processor module packaging as shown in the following figure Note Set the tool and system processor module at an angle on the top cover of the system p...

Page 127: ...top cover of the packaging 9 Open the latches that hold the system processor module in the supplied removal tool A Push down on the ring B while pressing in on the tabs C See the following figure Rem...

Page 128: ...ound jack or connected to an unpainted metal surface If not do so now 2 Remove dust and debris from the system processor socket area If dust or debris is present use the supplied air pump to clean the...

Page 129: ...l tool latches b Lower the tool over the system processor module while ensuring that the two guide pins A insert into the alignment holes B on each side of the tool See the following figure Removing a...

Page 130: ...p of the system processor module push down on the ring A to close the latches C and lock the system processor module into the tool Make sure that both of the tool jaws are locked on the system process...

Page 131: ...tool out of the system processor module tray 5 Install the system processor module a If dust or debris is present on the system processor socket use the supplied air pump to clean the socket Blow sma...

Page 132: ...r the tool evenly without tilting the tool See the following figure Note Do not attempt to slide the tool and the system processor module in any direction while the system processor module is touching...

Page 133: ...rocessor module c Open the latches that hold the system processor module in the supplied removal tool A Push down on the ring B while pressing in on the tabs C See the following figure Removing and re...

Page 134: ...the system processor module 6 Inspect the thermal interface material TIM for visible signs of damage as shown in the following figure If you see folds tears bends or if you have doubts about the TIM r...

Page 135: ...g heat sink a Open the TIM packaging and carefully remove the TIM holding it by the edges of the carrier strip and holding it away from the shipping container b Remove the protective film from the cle...

Page 136: ...Figure 109 Installing a new TIM onto the system processor module d Place the heat sink on the TIM as shown in the following figure 122 Power Systems Servicing the IBM Power System IC922 9183 22X...

Page 137: ...ing undamaged TIM and heat sink a Using the tweezers move the old TIM from the clean dry surface and center it onto the new system processor module The TIM has no preferred up side The TIM can be plac...

Page 138: ...Figure 111 Replacing the TIM onto the system processor module b Place the heat sink on the TIM as shown in the following figure 124 Power Systems Servicing the IBM Power System IC922 9183 22X...

Page 139: ...ngaged as shown by A in the following figure b Tighten the center load screw clockwise by using the supplied hex key as shown by B in the following figure until a firm stop is reached If the heat sink...

Page 140: ...sink 11 Replace the air baffle A straight down into the chassis as shown in the following figure Ensure that the pins inside the system side walls align properly with the slots in the cover B 126 Powe...

Page 141: ...you replaced by the edges Lift it off the packaging cover Align the beveled corner of the module A to the corner of the packaging with triangle B and place it in the packaging as shown in the followi...

Page 142: ...tery complete the steps in this procedure Before you begin Power off the system and place it in the service position For instructions see Preparing the 9183 22X system to remove and replace internal p...

Page 143: ...the system it is important to again discharge yourself by touching an unpainted metal surface for at least 5 seconds before you continue with the service process 2 Lift the air baffle A straight up a...

Page 144: ...lot on the system backplane as shown in the following figure Insert the bottom of the battery into bottom of the holder then rotate the battery into the holder Ensure to insert the battery with the co...

Page 145: ...system backplane 5 Replace the air baffle A straight down into the chassis as shown in the following figure Ensure that the pins inside the system side walls align properly with the slots in the cover...

Page 146: ...about removing and replacing the trusted platform module TPM card in the IBM Power System IC922 9183 22X server Removing the trusted platform module card from the 9183 22X system To remove a trusted...

Page 147: ...rking on electrical equipment If you do not have an ESD wrist strap just prior to removing the product from ESD packaging and installing or replacing hardware touch an unpainted metal surface of the s...

Page 148: ...lder c Lift the drive cable holder out of the system 4 To remove the TPM card pull the lever A to release the TPM card Lift the TPM card straight up from the system backplane as shown in the following...

Page 149: ...that you have the electrostatic discharge ESD wrist strap on and that the ESD clip is plugged into a ground jack or connected to an unpainted metal surface If not do so now 2 To replace the TPM card a...

Page 150: ...em by using the following procedure a Replace the drive cable holder in the system Ensure that the alignment pins match the slots in the holder b Reset the retaining pin A to lock the holder in place...

Page 151: ...ce the drive cables into the drive cable holder 4 Replace the air baffle A straight down into the chassis as shown in the following figure Ensure that the pins inside the system side walls align prope...

Page 152: ...What to do next Prepare the system for operation For instructions see Preparing the 9183 22X system for operation after you remove and replace internal parts on page 150 138 Power Systems Servicing t...

Page 153: ...AC power disconnect all power cords from their AC power source For racks with a DC power distribution panel PDP disconnect the customer s DC power source to the PDP When connecting power to the produc...

Page 154: ...2 DANGER Observe the following precautions when working on or around your IT rack system Heavy equipment personal injury or equipment damage might result if mishandled Always lower the leveling pads...

Page 155: ...air flow is compromised Ensure that air flow is not blocked or reduced on any side front or back of a unit used for air flow through the unit Consideration should be given to the connection of the equ...

Page 156: ...e product might be equipped with multiple AC power cords or multiple DC power cables To remove all hazardous voltages disconnect all power cords and power cables L003 L005 142 Power Systems Servicing...

Page 157: ...ovider of your parts or next level of support If you are installing a feature contact one of the following service organizations The provider of your parts or next level of support In the United State...

Page 158: ...constant green light indicates that the drive is present a flashing green light indicates activity An amber light indicates a problem On the power supplies a constant green light indicates that the sy...

Page 159: ...to turn on the blue identify LED to help you find the system that needs servicing Procedure You can activate the blue system identify LED by pressing the Identify LED button on the control panel for a...

Page 160: ...ntifying the system that contains the part to replace on page 143 3 Attach the electrostatic discharge ESD wrist strap The ESD wrist strap must be connected to an unpainted metal surface until the ser...

Page 161: ...em on page 153 5 Disconnect the power source from the system by unplugging the system For instructions see Disconnecting power cords from the 9183 22X system on page 161 Note The system might be equip...

Page 162: ...attered metal burns or both L005 6 If the power distribution board needs to be removed if the system backplane needs to be removed or if DIMM 0 needs to be installed removed or replaced partially remo...

Page 163: ...tions see Placing a 9183 22X system into the service position on page 159 CAUTION Do not place any object on top of a rack mounted device unless that rack mounted device is intended for use as a shelf...

Page 164: ...ectrostatic discharge ESD wrist strap on and that the ESD clip is plugged into a ground jack or connected to an unpainted metal surface If not do so now 2 Replace the service access cover For instruct...

Page 165: ...Restart the system For instructions see Starting the 9183 22X system on page 152 8 If you installed or replaced a PCIe adapter update the adapter firmware See Getting firmware fixes for vendor I O ada...

Page 166: ...d verify the following items All system power cables are connected to a power source The power on LED as shown in the following figure is flashing A flashing light indicates standby power to the unit...

Page 167: ...s the system to shut down and then power off The indicates the time in minutes before the shutdown occurs Drive commands for the 9183 22X system Learn about the storage drive commands for the system S...

Page 168: ...orce storcli cx set bios state on off Mode SOE PE IE SME abs on off DeviceExposure value storcli cx show bios storcli cx show safeid storcli cx show rehostinfo storcli cx show ASO storcli cx add vd r...

Page 169: ...set config file fileName storcli cx cv show storcli cx cv show all storcli cx px show storcli cx px show all To show a summary of the drive and controller status storcli show To show a list of all co...

Page 170: ...v Sensors that have a status of present and functional do not require a service action Sensors that have a status of present and not functional require a service action Some occurrences of errors in...

Page 171: ...e cover before you power on the system Figure 135 Removing the cover Installing the service access cover on a 9183 22X system To replace the service access cover complete the steps in this procedure A...

Page 172: ...tem until the blue release latches B lock in to place Figure 136 Installing the cover 2 Fasten the cover screw C at the rear of the cover Service and operating positions for the 9183 22X system Find i...

Page 173: ...les at the rear of the system unit do not catch or bind as you pull the system unit forward in the rack When the slide rails are fully extended the rail safety latches lock into place This action prev...

Page 174: ...m in the operating position ensure that the cables at the rear of the system do not catch or bind as you push the system unit back into the rack Procedure 1 Press in the rail safety latches A on both...

Page 175: ...nfasten the hook and loop fasteners that tie the power cords to the power supply handle Note how the power is looped you need to make that same loop when you reattach the power cords Figure 139 Routin...

Page 176: ...o connect a power cord complete the steps in this procedure Procedure 1 Open the rear rack door on the system unit that you are servicing 2 Using your labels reconnect the power cords to the system un...

Page 177: ...oped be sure to maintain at least a 5 cm 2 in diameter loop Use the hook and loop fastener to tie the power cord to the power supply handle Figure 142 Routing the power cord loop in the cable manageme...

Page 178: ...164 Power Systems Servicing the IBM Power System IC922 9183 22X...

Page 179: ...duct s and or the program s described in this publication at any time without notice Any references in this information to non IBM websites are provided for convenience only and do not in any manner s...

Page 180: ...information technology content successfully Overview The IBM Power Systems servers include the following major accessibility features Keyboard only operation Operations that use a screen reader The IB...

Page 181: ...rovide you as the customer the ability to collect personally identifiable information from end users via cookies and other technologies you should seek your own legal advice about any laws applicable...

Page 182: ...ngen der EU Richtlinie 2014 30 EU zur Angleichung der Rechtsvorschriften ber die elektromagnetische Vertr glichkeit in den EU Mitgliedsstaatenund h lt die Grenzwerte der EN 55022 EN 55032 Klasse A ein...

Page 183: ...elle Informationen Das Ger t erf llt die Schutzanforderungen nach EN 55024 und EN 55022 EN 55032 Klasse A Japan Electronics and Information Technology Industries Association JEITA Notice This statemen...

Page 184: ...radio frequency energy and if not installed and used in accordance with the instruction manual may cause harmful interference to radio communications Operation of this equipment in a residential area...

Page 185: ...luding the fitting of non IBM option cards German Notice Deutschsprachiger EU Hinweis Hinweis f r Ger te der Klasse B EU Richtlinie zur Elektromagnetischen Vertr glichkeit Dieses Produkt entspricht de...

Page 186: ...Schutzanforderungen nach EN 55024 und EN 55032 Klasse B Japan Electronics and Information Technology Industries Association JEITA Notice This statement applies to products less than or equal to 20 A p...

Page 187: ...or television interference caused by using other than recommended cables and connectors or by unauthorized changes or modifications to this equipment Unauthorized changes or modifications could void...

Page 188: ...ermined by IBM the above instructions are not being properly followed You may not download export or re export this information except in full compliance with all applicable laws and regulations inclu...

Page 189: ......

Page 190: ...IBM...

Reviews: