background image

62

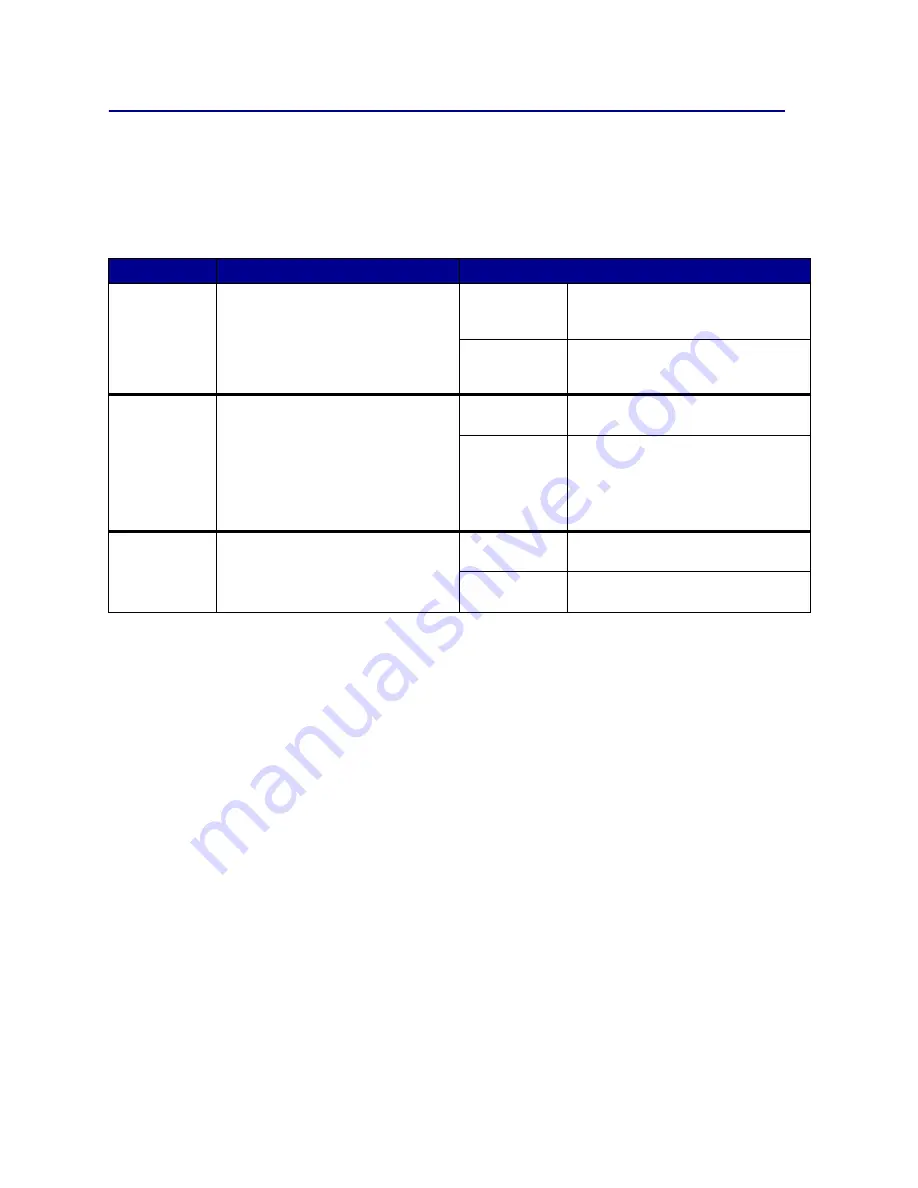
PostScript Menu

Use the PostScript Menu to change printer settings that only affect jobs using the PostScript emulation 
printer language. 

Note: Values marked by an asterisk (*) are the factory default settings.

Menu Item

Purpose

Values

Font Priority

To establish the font search order.

Note: Font Priority is only displayed 
when a formatted flash or hard disk is 
installed, is neither defective nor Read/
Write or Write protected, and Job 
Buffer Size is not set to 100%.

Resident*

Printer searches printer memory for 
the requested font before searching 
flash memory or hard disk.

Flash/Disk

Printer searches the hard disk and 
flash memory for the requested font 
before searching printer memory.

Image 
Smoothing

To enhance the contrast and 
sharpness of low resolution bitmapped 
images (such as images downloaded 
from the World Wide Web) and smooth 
their color transitions.

Note: Image Smoothing has no effect 
on images that are 300 dpi or higher 
resolution.

Off*

Uses default resolution when printing 
all images.

On

Enhances low resolution images, such 
as graphics with a resolution of 72 dpi.

Print PS 
Error

To print a page defining the PostScript 
emulation error when an error occurs.

Off*

Discards the print job without printing 
an error message.

On

Prints an error message before it 
discards the job. 

Summary of Contents for Infoprint Color 1354

Page 1: ...Infoprint Color 1354 User Reference Guide G510 2700 00 ...

Page 2: ......

Page 3: ...Infoprint Color 1354 User Reference Guide G510 2700 00 ...

Page 4: ...inter operator panel 14 Sending a job to print 15 Canceling a print job 16 Loading the trays 17 Loading the multipurpose feeder 22 Printing on specialty media transparencies labels other 24 Linking trays 25 Linking bins 25 Holding a job in the printer 26 Tips for successful printing 29 Understanding fonts 31 Printing sample fonts 38 Chapter 4 Paper and specialty media specifications 39 Chapter 5 U...

Page 5: ...Clearing image transfer unit jams 98 Clearing finisher jams Areas 1 6 104 If you still need help 104 Chapter 8 Maintenance 105 Determining the status of supplies 106 Conserving supplies 106 Ordering supplies and maintenance items 107 Replacing print cartridges 108 Replacing the fuser 111 Replacing the toner waste container 113 Replacing the image transfer unit and transfer roller 115 Removing memo...

Page 6: ...6 Solving mailbox problems 137 Solving option problems 138 Solving paper feed problems 138 Solving print quality problems 138 Solving color quality problems 143 Restoring factory default settings 147 Aligning the image transfer unit 148 Using the Coverage Estimator 149 Configuring printer alerts 150 Size sensing 151 Index 152 ...

Page 7: ...ation developed exclusively at private expense Trademarks Lexmark MarkNet and MarkVision are trademarks of Lexmark International Inc registered in the United States and or other countries PCL is a registered trademark of the Hewlett Packard Company PCL is Hewlett Packard Company s designation of a set of printer commands language and functions included in its printer products This printer is inten...

Page 8: ...notype Corporation plc is a product of Agfa Corporation Chicago Apple Computer Inc Clarendon Linotype Hell AG and or its subsidiaries Eurostile Nebiolo Geneva Apple Computer Inc GillSans The Monotype Corporation plc Helvetica Linotype Hell AG and or its subsidiaries Hoefler Jonathan Hoefler Type Foundry ITC Avant Garde Gothic International Typeface Corporation ITC Bookman International Typeface Co...

Page 9: ... information The power cord must be connected to a properly grounded electrical outlet that is near the product and easily accessible CAUTION Do not set up this product or make any electrical or cabling connections such as the power cord or telephone during a lightning storm Refer service or repairs other than those described in the operating instructions to a professional service person This prod...

Page 10: ...nual may cause harmful interference to radio communications Operation of this equipment in a residential area is likely to cause harmful interference in which case the user will be required to correct the interference at his own expense The manufacturer is not responsible for any radio or television interference caused by using other than recommended cables or by unauthorized changes or modificati...

Page 11: ...frequency energy and if not installed and used in accordance with the instructions may cause harmful interference to radio communications However there is no guarantee that interference will not occur in a particular installation If this equipment does cause harmful interference to radio or television reception which can be determined by turning the equipment off and on the user is encouraged to t...

Page 12: ... This apparatus is approved under the approval number NS G 1234 J 100003 for the indirect connections to the public telecommunications systems in the United Kingdom Noise emission levels The following measurements were made in accordance with ISO 7779 and reported in conformance with ISO 9296 Laser notice The printer is certified in the U S to conform to the requirements of DHHS 21 CFR Subchapter ...

Page 13: ...11 2 Printer overview The following illustration shows the color laser printer Standard output bin Front door Standard tray Upper right access door redrive area Lower right access door fuser area ...

Page 14: ... duplex unit and three optional 500 sheet drawers The following illustration shows the printer configured with a duplex unit one optional 500 sheet drawer and one optional 2000 sheet drawer Duplex unit 500 sheet drawers 500 sheet drawer 2000 sheet drawer Duplex unit ...

Page 15: ...job to print Canceling a print job Loading the trays Loading the multipurpose feeder Printing on specialty media transparencies labels other Linking trays Linking bins Holding a job in the printer Tips for successful printing Understanding fonts Printing sample fonts ...

Page 16: ...the printer is offline press Menu to scroll through the menus and menu items List the menu items in the Job Menu during Busy state For menu items that have numerical values such as Copies press and hold Menu to scroll through the list of values Release the button when the number you want appears If you see a Menus Disabled message you will not be able to change default settings You can still clear...

Page 17: ...to print or the number of copies Note Click Properties or Setup to adjust printer settings not available from the first screen and click OK 5 Click OK or Print to send the job to the selected printer Stop Press Stop at the Ready Busy or Waiting message to temporarily take the printer offline The message changes to Not Ready No data is lost Press Go to return the printer to the Ready Busy or Waitin...

Page 18: ...3 Press Delete on your keyboard From a Windows desktop 1 Minimize all programs to reveal the contents of the desktop 2 Double click My Computer 3 Double click Printers A list of available printers appears 4 Double click the printer you selected when you sent the job A list of print jobs appears 5 Select the job you want to cancel 6 Press Delete on your keyboard From a Macintosh computer When you s...

Page 19: ... the sheets and then fan them Do not fold or crease the print media Straighten the edges of the stack on a level surface Never remove paper trays while a print job is printing It could damage the tray or the printer Loading 500 sheet trays Follow these instructions to load any of the 500 sheet trays 1 Remove the tray ...

Page 20: ...de guide lever and slide the guide to the correct position for the size paper you are loading Icons along the back of the tray indicate paper sizes 4 Flex the sheets back and forth to loosen them and then fan them Do not fold or crease the paper Straighten the edges of the stack on a level surface ...

Page 21: ... cause jams 6 Squeeze the front guide lever and slide the guide until it firmly touches the stack of paper 7 Reinstall the tray Make sure the tray is pushed completely into the printer 8 If you are loading a different type of media than was previously loaded in the tray change the Paper Type setting for that tray on the operator panel See Paper Type on page 60 for more information ...

Page 22: ... paper in the 2000 sheet tray 1 Pull open the tray 2 Squeeze the side guide lever lift the guide and place it into the appropriate slot for the size paper you are loading 3 Squeeze the two front guide levers and slide the guide to the correct position for the size paper you are loading LT LG LT LG EX EX A4 A4 B5 B5 A5 A5 ...

Page 23: ...Do not fold or crease the paper Straighten the edges of the stack on a level surface 6 Place the paper against the back left corner of the tray print side down Do not load bent or wrinkled print media 7 Close the tray Make sure the tray is pushed completely into the printer Note Do not exceed the maximum stack height Overfilling the tray may cause paper jams ...

Page 24: ...int job to the feeder while specifying the type and size of media from your computer The printer then prompts you to load the appropriate print media before it prints To load the multipurpose feeder 1 Open the multipurpose feeder 2 Squeeze the paper guide lever and slide the guide all the way toward the front of the printer 3 Flex the sheets back and forth to loosen them and then fan them Do not f...

Page 25: ...as far as it will easily go Do not force the media Note Do not exceed the maximum stack height Overfilling the feeder may cause jams 6 Squeeze the paper guide lever and slide the guide until it lightly touches the side of the stack 7 If you are loading a different type of media than was previously loaded in the tray change the Paper Type setting for that tray on the operator panel See Paper Type o...

Page 26: ...ize appears on the second line of the display c Press Select if you want to change the Tray 1 Type or Tray 1 Size setting or press Menu to scroll to another source d Press Menu to scroll through a list of possible paper types or sizes e When you see the correct paper type or size press Select to save the type as the default f Press Go to return the printer to the Ready state 3 From the computer so...

Page 27: ... Menu To change the Configure Bins setting 1 Press Menu until you see Paper Menu and then press Select 2 Press Menu until you see Configure Bins and then press Select Mailbox appears on the second line of the display 3 Press Menu until you see the value you want and then press Select to save the value as the bin configuration default 4 Press Go to return the printer to the Ready state For more inf...

Page 28: ...fied in the driver when you sent the job See Confidential jobs for more information From either the Confidential Job or the Held Jobs menu items you have five choices Print All Jobs Print A Job Delete All Jobs Delete A Job Print Copies Accessing held jobs from the operator panel 1 To access held jobs from the operator panel If the printer is Busy press Menu and the Job Menu appears If the printer ...

Page 29: ...sent to the printer If formatting errors are a recurring problem with held jobs your printer may require more memory Repeat Print If you send a Repeat Print job the printer prints all requested copies of the job and stores the job in memory so you can print additional copies later You can print additional copies as long as the job remains stored in memory Note Repeat Print jobs are automatically d...

Page 30: ...four digit PIN associated with your confidential job The numbers next to the button names identify which button to press for each digit 1 6 As you enter the PIN asterisks are displayed on the operator panel to ensure confidentiality If you enter an invalid PIN the message No Jobs Found Retry appears Press Go to reenter the PIN or press Stop to exit the Confidential Job menu When you enter a valid ...

Page 31: ...ectly on the floor If you store individual packages of paper out of the original carton make sure they rest on a flat surface so the edges do not buckle or curl Do not place anything on top of paper packages Storing supplies Choose a cool clean storage area for your printer supplies Store supplies right side up in their original packaging until you are ready to use them Do not expose supplies to D...

Page 32: ...ximum height indicated Push all trays firmly into the printer after loading them Make sure the guides in the trays are properly positioned for the size paper you have loaded Do not send jobs to staple hole punch or offset for transparencies labels or card stock We recommend that transparencies labels card stock and envelopes not be sent to the optional mailbox or optional finisher These specialty ...

Page 33: ...u can select the resident fonts from your software application or from the operator panel if you are using PCL 6 emulation PCL 6 emulation PostScript 3 emulation Albertus Medium AlbertusMT AlbertusMT Italic AlbertusMT Light Albertus Extra Bold Antique Olive AntiqueOlive Roman Antique Olive Italic AntiqueOlive Italic Antique Olive Bold AntiqueOlive Bold AntiqueOlive Compact Arial ArialMT Arial Ital...

Page 34: ... Helvetica Bold Helvetica Bold Helvetica Bold Italic Helvetica BoldOblique Helvetica Narrow Helvetica Narrow Helvetica Narrow Italic Helvetica Narrow Oblique Helvetica Narrow Bold Helvetica Narrow Bold Helvetica Narrow Bold Italic Helvetica Narrow BoldOblique CG Times Intl CG Times CG Times Italic Intl CG Times Italic CG Times Bold Intl CG Times Bold CG Times Bold Italic Intl CG Times BoldItalic U...

Page 35: ...Bold Italic Palatino BoldItalic SymbolPS Symbol Symbol Times Roman Times Roman Times Italic Times Italic Times Bold Times Bold Times Bold Italic Times BoldItalic Times New Roman TimesNewRomanPSMT Times New Roman Italic TimesNewRomanPS ItalicMT Times New Roman Bold TimesNewRomanPS BoldMT Times New Roman Bold Italic TimesNewRomanPS BoldItalicMT Univers Univers Oblique Univers Bold Univers BoldObliqu...

Page 36: ...d Helvetica Condensed BoldObl Helvetica Condensed Oblique StempelGaramond Bold StempelGaramond BoldItalic StempelGaramond Italic StempelGaramond Roman Apple Chancery Chicago Geneva Monaco NewYork Oxford Taffy MonaLisa Recut Candid Bodoni Bodoni Italic Bodoni Bold Bodoni BoldItalic Bodoni Poster Bodoni PosterCompressed CooperBlack CooperBlack Italic Copperplate ThirtyTwoBC Copperplate ThirtyThreeBC...

Page 37: ...GillSans ExtraBold Goudy Goudy Italic Goudy Bold Goudy BoldItalic Goudy ExtraBold HoeflerText Regular HoeflerText Italic HoeflerText Black HoeflerText BlackItalic HoeflerText Ornaments JoannaMT JoannaMT Italic JoannaMT Bold JoannaMT BoldItalic LubalinGraph Book LubalinGraph BookOblique LubalinGraph Demi LubalinGraph DemiOblique PCL 6 emulation PostScript 3 emulation These fonts only available in P...

Page 38: ...skTop ISO German ISO 60 Norwegian version 1 Legal ISO Spanish ISO 61 Norwegian version 2 MC Text ISO 2 IRV Int l Ref Version ISO 69 French Microsoft Publishing ISO 4 United Kingdom ISO 84 Portuguese Russian GOST ISO 6 ASCII ISO 85 Spanish Ukrainian ISO 10 Swedish ISO 8859 1 Latin 1 ECMA 94 PCL ITC Zapf Dingbats ISO 11 Swedish for Names ISO 8859 2 Latin 2 PS ITC Zapf Dingbats ISO 14 JIS ASCII ISO 8...

Page 39: ...cable fonts for both the PostScript and PCL emulations Twelve of the PCL symbol sets support the euro character including all seven Windows symbol sets Hebrew and Arabic fonts A variety of downloadable fonts for Hebrew and Arabic are included on the CD that shipped with the printer PC 775 Baltic PC 8 Latin 6 PC 911 Katakana Windows 98 Greek PC 850 Multilingual PC 1004 OS 2 Windows 98 Latin 1 PC 85...

Page 40: ... Menu until you see Utilities Menu and then press Select 3 Press Menu until you see Print Fonts and then press Select 4 Press Menu to display either PCL Fonts or PS Fonts Select PCL Fonts to print a listing of the fonts available in PCL 6 emulation Select PS Fonts to print a listing of the fonts available in PostScript 3 emulation 5 Press Select The message Printing Font List remains on the displa...

Page 41: ...IS B5 Paper 2000 sheets of 20 lb paper Multipurpose feeder Letter A4 A5 Legal Executive JIS B5 Folio1 Statement1 Universal2 3 Paper transparencies labels card stock 100 sheets of 20 lb paper 75 transparencies5 40 sheets of labels or card stock4 5 7 9 10 DL C5 B5 other6 Envelopes 10 envelopes 1 Supported as selected paper with tray size sensing turned off in the appropriate trays 2 When selected th...

Page 42: ...Estimator Setup Menu Printer Language Printer Usage Power Saver Resource Save Download Target Print Timeout Auto Continue Wait Timeout Jam Recovery Page Protect Display Language Alarm Control Hole Punch Alarm Staple Alarm Toner Alarm Job Accounting Print Area Black White Lock PCL Emul Menu Font Source Font Name Point Size Pitch Symbol Set Orientation Lines per Page A4 Width Auto CR after LF Auto L...

Page 43: ...ver Cyan 5 4 3 2 1 0 1 2 3 4 5 5 is maximum decrease 5 is maximum increase Magenta Yellow Black Reset Defaults Sets values for Cyan Magenta Yellow and Black to 0 zero Color Correction To adjust the printed color to better match the colors of other output devices or standard color systems Note Due to the differences between additive and subtractive colors certain colors that appear on your monitor ...

Page 44: ...B Display color conversion tables sRGB Vivid Prints RGB samples using sRGB Vivid color conversion tables Off RGB Prints RGB samples using Off or no color conversion tables Vivid Prints RGB samples using Vivid color conversion tables US CMYK Prints CMYK samples using US CMYK color conversion tables Euro CMYK Prints CMYK samples using Euro CMYK color conversion tables Off CMYK Prints CMYK samples us...

Page 45: ...brighter more saturated colors RGB Text sRGB Display sRGB Vivid Off Vivid RGB Graphics CMYK US CMYK default for 120V machines Applies a color conversion table to approximate SWOP color output Euro CMYK default for 220V machines Applies color conversion table to approximate EuroScale color output Vivid CMYK Increases color saturation for the US CMYK color conversion table Off No color conversion is...

Page 46: ... job Print Prints application generated blank pages as part of your job Collation To keep the pages of a print job stacked in sequence when printing multiple copies of the job Off Prints each page of a job the number of times specified by the Copies menu item For example if you set Copies to 2 and send three pages to print the printer prints page 1 page 1 page 2 page 2 page 3 page 3 On Prints enti...

Page 47: ...rder around each page image Solid Prints a solid line border around each page image Multipage Order To determine the positioning of multiple page images when using Multipage Print The positioning depends on the number of images and whether the images are portrait or landscape in orientation Horizontal Vertical Rev Horizontal Rev Vertical For example if you select 4 Up multipage printing and portra...

Page 48: ...ation is On a blank page is inserted between each collated copy of the job Between Jobs Inserts a blank sheet between jobs Between Pages Inserts a blank sheet between each page of a job This is useful if you are printing transparencies or want to insert blank pages in a document for notes Separator Source To specify the paper source that holds separator sheets Tray x Tray 1 Selects separator sheet...

Page 49: ...to a computer or network Moving Guide Provides helpful information about how to pack up the printer before moving it Print Defects Provides guidelines for solving repetitive print defects Jam Clearance Provides directions about how to clear jams Menu Item Purpose Values Cancel Fax To cancel outgoing faxes before they are transmitted or to cancel incoming faxes before they finish printing R Cancels...

Page 50: ... confidential jobs associated with your PIN Press Select to specify the job you want to print Press Menu to increase or decrease the number of copies and then press Select Held Jobs To print Reserve Print Repeat Print or Verify Print jobs stored in printer memory Print All Jobs Prints all held jobs Print A Job Prints the specified held job Press Menu to scroll through the list of held jobs Press S...

Page 51: ...re the printer to process Macintosh binary PostScript print jobs On Printer processes raw binary PostScript print jobs from computers using the Macintosh operating system Note This setting often causes Windows print jobs to fail Off Printer filters PostScript print jobs using standard protocol Auto Printer processes print jobs from computers using either Windows or Macintosh operating systems Netw...

Page 52: ...s PostScript emulation to process the job if PS SmartSwitch is On or uses the default printer language specified in the Setup Menu if PS SmartSwitch is Off PS SmartSwitch To configure the printer so it automatically switches to PostScript emulation when a print job received through the network port requires it regardless of the default printer language On Printer examines data on the network inter...

Page 53: ...e printing Note Changing this menu item automatically resets the printer Off Does not buffer print jobs to the hard disk On Buffers print jobs to the hard disk Auto Buffers print jobs only if the printer is busy processing data from another input port MAC Binary PS To configure the printer to process Macintosh binary PostScript print jobs On Printer processes raw binary PostScript print jobs from ...

Page 54: ... PCL SmartSwitch To configure the printer so it automatically switches to PCL emulation when a print job received through the parallel port requires it regardless of the default printer language On Printer examines data on the parallel interface and selects PCL emulation if the data indicates that is the required printer language Off Printer does not examine the incoming data The printer uses Post...

Page 55: ... command On Printer performs a line feed after a carriage return control command Font Name To choose a specific font from the specified font source R0 Courier 10 The font name and font ID for all fonts in the selected font source are displayed The font source abbreviation is R for resident F for flash K for disk and D for download Font Source To determine the set of fonts displayed in the Font Nam...

Page 56: ...ymbol Set To choose a symbol set for a specified font name 10U PC 8 country region specific factory default values A symbol set is a set of alphabetic and numeric characters punctuation and special symbols used when printing with a selected font Symbol sets support the different requirements for languages or specific applications such as math symbols for scientific text Only the symbol sets suppor...

Page 57: ...Bin Envelope Bin Letterhead Bin Preprinted Bin Colored Bin Custom x Bin where x represents 1 through 6 Disabled Configure Bins To determine which output bin s the printer uses for a particular job Mailbox Sends print jobs to the output bin designated for that user Link Links two or more bins together as though they were one large bin When one linked bin is full the printer starts filling the next ...

Page 58: ...Note If a user defined name is available it is displayed instead of Custom Type x The user defined name is truncated to 14 characters If two or more custom types share the same name the name only appears once in the Custom Types value list Card Stock Transparency Glossy Paper Labels Envelope Output Bin To specify the default bin for printed material Standard Bin Note If a user defined name is avai...

Page 59: ...ng Custom x Loading Ltrhead Loading Preprint Loading Bond Loading 2 Select a value Duplex Notifies the printer that the specified paper type is loaded properly for duplex printing If the printer receives a single sided job using that paper type the printer inserts blank pages as necessary to print the job properly on preprinted forms This setting may slow single sided printing Off Printer assumes ...

Page 60: ...her Envelope 7 3 4 Envelope DL Envelope non US C5 Envelope Universal Select Universal when you load paper that does not match any of the other available sizes The printer automatically formats the page for the maximum possible size You can then set the actual page size from your application software Paper Source To identify the default paper source Tray x Tray 1 If you loaded the same size and typ...

Page 61: ...r specific paper 1 Select a paper type Plain Texture Card Stock Text Trnsprncy Text Preprint Texture Colored Texture Custom x Texture Labels Texture Bond Texture Envelope Texture Ltrhead Texture Glossy Texture 2 Select a value Smooth Note The default for Bond Texture is Rough instead of Normal If a user defined name is available for a custom Type then the name is displayed instead of Custom x Text...

Page 62: ... Pap Type MP Feeder Type Manual Env Type 2 Select a value Plain Paper Card Stock Transparency Labels Bond Letterhead Preprinted Custom Type x Glossy Paper Envelope Colored Paper The Paper Type default for each envelope source is Envelope The Paper Type default for each paper tray is as follows Note If a user defined name is available it is displayed instead of Custom Type x The user defined name i...

Page 63: ...ts the user to load the requested paper size Statement A5 Prints A5 size jobs on statement size paper if only statement size paper is loaded and prints statement size jobs on A5 paper if only A5 paper is loaded Letter A4 Prints A4 size jobs on letter size paper if only letter size paper is loaded and prints letter size jobs on A4 size paper if only A4 size paper is loaded All Listed Substitutes Le...

Page 64: ...ing flash memory or hard disk Flash Disk Printer searches the hard disk and flash memory for the requested font before searching printer memory Image Smoothing To enhance the contrast and sharpness of low resolution bitmapped images such as images downloaded from the World Wide Web and smooth their color transitions Note Image Smoothing has no effect on images that are 300 dpi or higher resolution...

Page 65: ...is one of the handshaking signals for most serial interface cables The serial interface uses DSR to distinguish data sent by the computer from data created by electrical noise in the serial cable This electrical noise can cause stray characters to print Select On to prevent stray characters from printing Off All data received by the serial port is treated as valid data On Only data received while ...

Page 66: ...amine the incoming data The printer uses PostScript emulation to process the job if PS SmartSwitch is On or uses the default printer language specified in the Setup Menu if PS SmartSwitch is Off PS SmartSwitch To configure the printer so it automatically switches to PostScript emulation when a print job received through the serial port requires it regardless of the default printer language On Prin...

Page 67: ...face DTR Hardware handshaking DTR DSR Hardware handshaking XON XOFF Software handshaking XON XOFF DTR Combined hardware and software handshaking XONXOFF DTRDSR Combined hardware and software handshaking Menu Item Purpose Values Alarm Control To establish whether the printer sounds an alarm when the printer requires operator intervention Off Printer does not sound an alarm Single Printer sounds thr...

Page 68: ...ored in flash memory Disk All downloaded resources are automatically stored on the hard disk Hole Punch Alarm To specify how the printer responds when the hole punch box becomes full Off Hole Punch Waste Full is displayed until someone empties the hole punch box If an Auto Continue value is selected from the Setup Menu the printer resumes printing after the specified timeout value Single Printer s...

Page 69: ...hat an entire page is processed before it prints Power Saver To specify the amount of time in minutes the printer waits after a job is printed before it goes into a reduced power state Disabled This value does not appear unless Energy Conserve is set to Off See Disabling Power Saver for more information 1 240 Specifies the amount of time after a print job before the printer goes into Power Saver m...

Page 70: ...e of values Printer Language To establish the default printer language used to communicate data from the computer to the printer Note Setting a printer language as the default does not prevent a software application from sending print jobs that use the other language PCL Emulation PCL emulation compatible with Hewlett Packard printers PS Emulation PostScript emulation compatible with Adobe PostScr...

Page 71: ...cartridge If an Auto Continue value is selected from the Setup Menu the printer resumes printing after the specified timeout value Single Printer stops printing displays an error message and sounds three quick beeps Continuous Printer stops printing displays an error message and repeats three beeps every 10 seconds until the toner cartridge is replaced Wait Timeout To specify the amount of time in...

Page 72: ...nd then stop until the container is replaced Near Full The toner waste container is nearly full Menu Item Purpose Values Job Buffering To temporarily store jobs on the printer hard disk before printing Note Changing the Job Buffering menu item automatically resets the printer Off Does not buffer print jobs to the hard disk On Buffers print jobs to the hard disk Auto Buffers print jobs only if the ...

Page 73: ...martSwitch To configure the printer so it automatically switches to PostScript emulation when a print job received through the USB port requires it regardless of the default printer language On Printer examines data on the USB interface and selects PostScript emulation if the data indicates that is the required printer language Off Printer does not examine the incoming data The printer uses PCL em...

Page 74: ... defragment the flash memory Factory Defaults To return your printer settings to the factory default values Restore All menu items are returned to the factory default values except Display Language All settings in the Parallel Menu Serial Menu Network Menu and USB Menu All downloaded resources fonts macros and symbol sets in printer memory RAM are deleted Resources residing in flash memory or on t...

Page 75: ...d formatted and Job Buffer Size is not set to 100 Print Fonts To print a sample of all the fonts available for the selected printer language PCL Fonts Prints a sample of all printer fonts available for PCL emulation PS Fonts Prints a sample of all printer fonts available for PostScript emulation Print Menus To print a listing of the current user default values the installed options the amount of i...

Page 76: ...rogress and the user is being prompted for a series of alignment values The values range from A to L Enter the alignment value and then press Select to continue to the next alignment value Press Go or Return to cancel the alignment procedure See also Aligning the image transfer unit Activating Menu Changes The printer is activating changes made to the printer settings Wait for the message to clear...

Page 77: ...inisher front door to clear the message Close Tray X Door The 2000 sheet drawer is open Close the 2000 sheet drawer to clear the message Copying The printer is processing a copy job originating from a scanner Wait for the message to clear Defragmenting The printer is defragmenting the flash memory to reclaim storage space occupied by deleted resources Wait for the message to clear Warning Do not t...

Page 78: ...Flushing Buffer The printer is flushing corrupted print data and discarding the current print job Wait for the message to clear Formatting Disk yyy The printer is formatting the hard disk When formatting takes longer than usual the second line of the display shows the percent complete Wait for the message to clear Warning Do not turn the printer off while this message is displayed Formatting Flash...

Page 79: ...ot receive and process jobs until valid code is programmed into the internal print server Download valid code to the printer internal print server Note You can download network code while this message is displayed Invalid Standard Network Code ITU Fuser Maint The counters that track wear on the image transfer unit and fuser have reached their limit Replace the image transfer unit and fuser See als...

Page 80: ...ter or INA is being reset Wait for the message to clear Network x A network interface is the active communication link Wait for the message to clear Network x y A network interface is the active communication link where x represents the active communication link and y represents the channel Wait for the message to clear No DRAM Installed No DRAM is installed in the printer Turn the printer off ins...

Page 81: ... disk Wait for the message to clear See also Print Directory Printing Font List The printer is processing or printing a list of all available fonts for the specified printer language Wait for the message to clear See also Print Fonts Printing Job Accounting Stat The printer is processing or printing all job accounting statistics stored on the hard disk Wait for the message to clear See also Job Ac...

Page 82: ... to print All data sent to the printer is printed in hexadecimal and character representation Control strings are printed not executed Turn the printer off and then on to exit Hex Trace mode and return to Ready status Reattach device The specified device is either not fully connected to the printer or is experiencing a hardware failure Reestablish communication by removing the specified device and...

Page 83: ...nu See also Holding a job in the printer Restoring Held Jobs The printer is restoring held jobs from the hard disk Wait for the message to clear See also Holding a job in the printer Serial x A serial interface is the active communication link Wait for the message to clear Setup Required When you unpacked the printer you left a piece of packing material inside A hardware component such as an optio...

Page 84: ...om one printer to another The printer automatically clears the message in 30 seconds and then disables the download emulator on the firmware card 2 xx Paper Jam The printer detects a paper jam Clear the paper path See also Understanding jam messages Clearing the entire paper path 30 ITU Missing The image transfer unit ITU is not installed or is installed incorrectly Turn the printer off correctly ...

Page 85: ...ications 35 Res Save Off Deficient Memory The printer lacks the memory needed to enable Resource Save This message usually indicates too much memory is allocated for one or more of the printer link buffers Press Go to disable Resource Save and continue printing To enable Resource Save after you get this message Make sure the link buffers are set to Auto and exit the menus to activate the link buff...

Page 86: ...u to open the Job Menu and cancel the current job To avoid this error in the future Simplify the print job by reducing the amount of text or graphics on a page and deleting unnecessary downloaded fonts or macros Install additional printer memory See also Canceling a print job 39 Complex Page The page may not print correctly because the print information on the page is too complex Press Go to clear...

Page 87: ...rror The printer has detected a serial interface error on a serial port Make sure the serial link is set up correctly and you are using the appropriate cable Press Go to clear the message and continue printing The job may not print correctly Press Menu to open the Job Menu and reset the printer 54 Standard Serial Error 54 Network x Software Error The printer cannot establish communications with an...

Page 88: ...drawers or reconfigure the offending option Plug in the printer and turn it on See also Setup Guide 58 Output Config Error Too many output options have been attached to the printer Turn off and unplug the printer Remove the additional output option s Plug in the printer and turn it on See also Setup Guide 58 Too Many Disks Installed Too many hard disks are installed on the printer The printer only...

Page 89: ...he code Retransmit the microcode data from the host computer 82 Waste Bottle Nearly Full The toner waste container is almost full Press Go to clear the message and continue printing Replace the toner waste container See also 82 Waste Toner Bottle Full Replacing the toner waste container 82 Waste Toner Bottle Full The toner waste container is full Replace the toner waste container and press Go to c...

Page 90: ...d If you do not have a replacement cartridge on hand order one now More pages may be printed before the cartridge is totally exhausted Replace the specified print cartridge Press Go to clear the message and continue printing The Supplies message is displayed until you replace the specified print cartridge See also Replacing print cartridges 89 ITU Maintenance The ITU NVRAM is invalid Press Go to c...

Page 91: ...anding jam messages Access doors and trays Clearing the entire paper path Clearing mailbox or output expander jams Area M Clearing fuser jams Clearing image transfer unit jams Clearing finisher jams Areas 1 6 If you still need help ...

Page 92: ...Paper Jam fuser area K L Follow the instructions for clearing Area K and Area L If the jam message persists paper may be caught in the fuser See Clearing fuser jams for instructions 230 Paper Jam duplex area E J Follow the instructions for clearing Area E and Area J 24 x Paper Jam trays 2 4 C T x Follow the instructions for clearing Area C and Area T x 250 Paper Jam multipurpose feeder A Follow th...

Page 93: ...wer 24 x Paper Jam Areas 1 6 Finisher 28 x Paper Jam Area D Front access door 201 Paper Jam Area T1 Standard tray Tray 1 200 Paper Jam Area E Duplex mechanism 230 Paper Jam Area T x Paper input options 500 sheet trays or 2000 sheet tray 24 x Paper Jam Area M Mailbox 27 x Paper Jam Area L Upper right access door redrive area 201 Paper Jam 202 Paper Jam Area K Lower right access door fuser area 201 ...

Page 94: ...ure all printer covers doors and trays are closed and then press Go to resume printing Area A 1 If you are using the multipurpose feeder release the levers on each side of the feeder to lay it flat 2 Remove any jams and return the feeder to its working position Area B 1 Open the left access door 2 Pull down the lever until it stops 3 Remove the jam 4 Return the lever to its upright position 5 Clos...

Page 95: ...ed correctly and pushed all the way down into the tray b Close the door 2 If you have an optional 2000 sheet drawer a Open the 2000 sheet drawer access door Pull the jam down and out of the rollers b Close the door Area D 1 Open the front access door 2 Hold down the lever in the upper left corner Remove jams in the rollers under the image transfer unit Note Unfused toner may be present ...

Page 96: ...Also look up inside as some jams may be above the rollers 2 Reinstall the duplex mechanism in the printer Area T x 1 If you cannot clear all the 500 sheet drawer jams from Area C a Carefully open trays 2 through 4 all 500 sheet trays and remove jams Note Make sure the paper is pushed all the way down into the tray b Close trays 2 through 4 2 If you cannot clear the 2000 sheet drawer jam from Area ...

Page 97: ...tray 2 Remove any jams and then reinstall the tray Area K 1 Open the lower right access door 2 Remove any jams and then close the door Area L 1 Open the upper right access door 2 Remove jams from the rollers and then close the door ...

Page 98: ...96 Clearing mailbox or output expander jams Area M 1 Open the rear door of the 5 bin mailbox 2 Pull the jam straight out and then close the door ...

Page 99: ...oth the upper right and the lower right access doors Areas K and L CAUTION The fuser assembly may be hot Let it cool before continuing 3 Pull down the latches They slide toward the center to release the fuser 4 Pull the fuser out and set it on a clean flat surface 5 Unsnap the housing and set it aside ...

Page 100: ...se the fuser roller cover 8 Snap the housing back onto the fuser 9 Insert the fuser back into the printer 10 Slide the latches out and then pull up to refasten them 11 Close the doors Clearing image transfer unit jams 1 Turn the printer off Open the front cover ...

Page 101: ...ightly on the cartridge handhold b Pull the cartridge straight out and use the handle to lift it off the guides c Place the cartridges on a clean flat surface out of direct light 3 Release the latches to open the multipurpose feeder area A all the way ...

Page 102: ...100 4 Remove the image transfer unit a Raise the lever to unlock the image transfer unit b Pull down on the handle ...

Page 103: ... image transfer unit out and place it on a clean flat surface Warning Do not touch the transfer belt Touching the belt will damage the image transfer unit 5 Look inside the printer Remove all torn paper or other jams ...

Page 104: ...102 6 Insert the image transfer unit back into the printer a Align the guides with the insertion grooves b Push the handle up using both hands and gently slide the unit in ...

Page 105: ...103 c Lower the lever to lock the image transfer unit into place 7 Return the multipurpose feeder to its working position Reinstall all the print cartridges ...

Page 106: ...ns to a Ready state Clearing finisher jams Areas 1 6 Refer to the Finisher Setup User s Guide for instructions on clearing finisher jams If you still need help 1 Turn the printer off and then back on 2 Contact your administrator or Help desk if you need more assistance ...

Page 107: ... of supplies Conserving supplies Ordering supplies and maintenance items Replacing print cartridges Replacing the fuser Replacing the toner waste container Replacing the image transfer unit and transfer roller Removing memory and option cards ...

Page 108: ... Color Menu Reduces the amount of toner used to print graphics and images while keeping text at the default toner level Color Saver Paper and specialty media Multipage Print in the Finishing Menu Prints two or more page images on one side of a sheet Values for Multipage Print are 2 Up 3 Up 4 Up 6 Up 9 Up 12 Up and 16 Up Combined with the duplex setting Multipage Print lets you print up to 32 pages...

Page 109: ...isplay you should order a new web oiler Ordering an image transfer unit and transfer roller When the 83 ITU Maintenance message appears on the display you should order a new image transfer unit and transfer roller See Replacing the image transfer unit and transfer roller for more information Ordering a print cartridge When the 88 color Toner Low message appears on the display you should order a ne...

Page 110: ...108 Replacing print cartridges 1 Turn the printer off 2 Open the front cover 3 Pull up slightly on the handhold Pull the cartridge straight out and use the handle to lift the cartridge off the guides ...

Page 111: ...rest of the packing materials in place for now Note To recycle the cartridge save all the packing materials Follow the recycling instructions in the box 5 Shake the cartridge in all directions to distribute the toner 6 Remove the cardboard shim and print cartridge detensioner ...

Page 112: ...ridge 8 Place the cartridge on the guides of its color coded opening and then slide it into the printer The cartridge drops slightly and clicks into place 9 Close the front cover Warning If the front cover does not close completely reopen the door Press in firmly on the cartridges to make sure they are correctly seated 10 Turn the printer on ...

Page 113: ...g the printer 2 Open the upper right and lower right access doors CAUTION The fuser may be hot Let it cool before continuing 3 Pull down the latches They slide toward the center to release the fuser 4 Pull the fuser straight out and set it aside ...

Page 114: ...de the latches to each side and then pull up to lock the fuser in place 8 Close the doors 9 Reset the fuser maintenance counter a Plug in the printer b Press and hold Select and Return while turning the printer on c When Performing Self Test appears release the buttons Config Menu appears d Press Menu until you see Reset Fuser Cnt and then press Select ...

Page 115: ...enu Changes appears then Performing Self Test appears When you see the Ready message you can resume sending print jobs to the printer Replacing the toner waste container 1 Unpack the new toner waste container 2 Open the toner waste container door and remove the old waste container Note Keep the old waste container upright or toner may spill out ...

Page 116: ...114 3 Place the old waste container in the plastic sleeve and dispose of it properly 4 Insert the new toner waste container 5 Close the toner waste container door ...

Page 117: ...tions to replace an image transfer unit a transfer roller or both We recommend that you replace both the image transfer unit and the transfer roller at the same time 1 Turn off and unplug the printer 2 Open the front cover 3 Remove all the print cartridges a Pull up slightly on the handhold ...

Page 118: ...flat surface in the upright position Warning When removing cartridges from the printer be careful not to touch the photoconductor on the bottom of the cartridge 4 Release the latches to open the multipurpose feeder all the way 5 Remove the old image transfer unit a Raise the lever to unlock the image transfer unit ...

Page 119: ...the handle c Slide the unit out and place it on a clean flat surface 6 Perform one of the following If you are not installing a new transfer roller skip to step 10 If you are installing a new transfer roller go to step 7 ...

Page 120: ...t hand reach through the front of the printer and push the rear end of the transfer roller down and toward the rear until the front end of the roller lifts upward b While holding the rear section down use your left hand to grab the front end of the roller ...

Page 121: ... roller in your left hand rotate and move the rear end of the roller to the right until the roller gear is free from the printer d Pull the roller completely and discard it 8 Unwrap the new transfer roller Remove and discard all the packaging ...

Page 122: ...tate and move the rear of the roller to the left and into the notched opening as shown b Using your right hand insert the small end of the new roller into the notched opening as shown c Push the roller down into place at the back of the printer ...

Page 123: ...w the recycle instructions in the box 11 Remove the protective cover and detensioner Gently but firmly pull the material up and off the new unit Warning Do not touch the transfer belt when removing the protective cover and detensioner Touching the transfer belt will damage the image transfer unit Detensioner Protective cover ...

Page 124: ...ith the insertion grooves Warning Do not touch the transfer belt when installing the unit Touching the transfer belt will damage the image transfer unit b Push the handle up using both hands and gently slide in the new unit It will drop down when correctly seated ...

Page 125: ...sfer unit into place 13 Return the multipurpose feeder to its working position 14 Reinstall all the print cartridges a Align the cartridge with its color coded opening b Slide it into the printer The cartridge drops slightly and clicks into place ...

Page 126: ...transfer unit a Make sure the printer is on and the Ready message appears b Press Menu until you see Utilities Menu and then press Select c Press Menu until you see Color Alignment and then press Select Several test pages print d For each alignment group on the test pages locate the number next to the alignment pattern that comes closest to forming a perfectly straight line For example in this sam...

Page 127: ...ilities Menu appears Press Go The printer returns to the Ready state Removing memory and option cards To remove memory or option cards use the following illustration to locate the connector for the card you want to remove Accessing the printer system board 1 Turn the printer off 2 Unplug the printer power cord 3 Disconnect all cables from the back of the printer 4 Locate the access cover on the ba...

Page 128: ...ing metal on the printer before you touch a memory card 1 Remove the system board access cover See Accessing the printer system board 2 Locate the memory card you want to remove 3 Push open the latches on both ends of the connector away from the card 4 Pull the card straight out of the connector 5 Place the card in its original packaging or wrap the card in paper and store it in a box 6 Reinstall ...

Page 129: ...move the screw that secures the card to the system board connector slot 4 Gently pull the card out of the connector 5 If you saved the metal plate that covers the connector slot and you do not plan to insert another card attach the plate a Slide the clip side of the plate in first making sure the clip end covers the groove on the system board b Use the screw to secure the other end of the metal pl...

Page 130: ... printer system board 2 Locate the hard disk 3 Gently pull the three posts on the hard disk mounting plate out of the holes on the system board 4 Gently pull the ribbon cable connector out of the connector on the system board 5 Place the disk in its original packaging or wrap the disk in paper and store it in a box 6 Replace the system board access cover See Reinstalling the system board access co...

Page 131: ...re card 1 Remove the system board access cover See Accessing the printer system board 2 Grasp the firmware card gently and pull it straight out in one motion Do not pull one side and then the other 3 Place the card in its original packaging or wrap the card in paper and store it in a box 4 Replace the system board access cover See Reinstalling the system board access cover ...

Page 132: ...near the top of the printer 2 Slide the cover up under the top cover lip as far as it will go and then tighten the screws at the top of the cover 3 Insert and tighten the four screws to the bottom of the cover 4 Reconnect all cables on the back of the printer 5 Plug in the printer power cord 6 Turn the printer on ...

Page 133: ...erator panel menus Enabling the menus Printing multi language PDFs Solving printing problems Solving mailbox problems Solving option problems Solving paper feed problems Solving print quality problems Solving color quality problems Restoring factory default settings Aligning the image transfer unit Using the Coverage Estimator Configuring printer alerts Size sensing ...

Page 134: ... is working The printer is turned on The printer cable is securely attached to the printer and the host computer print server option or other network device Once you have checked each of these possibilities turn the printer off and back on This often fixes the problem Printing a menu settings page Print the menu settings page to review the printer settings and to verify that printer options are in...

Page 135: ... item you need and then press Select An asterisk appears beside the current default setting for that menu item A value can be An On or Off setting A phrase or word that describes a setting A numerical value that you can increase or decrease When you press Select an asterisk appears beside the new value to indicate that it is now the default setting The Saved message appears then the previous list ...

Page 136: ...en Config Menu is displayed 6 Press Menu until you see Exit Config Menu and then press Select Activating Menu Changes briefly appears followed by Performing Self Test The printer returns to the Ready message Now you can select the Disabled value from the Power Saver menu item Note You can also disable Power Saver by issuing a Printer Job Language PJL command Disabling the operator panel menus A ne...

Page 137: ...ve Print Repeat Print or Verify Print you can still access these jobs through the Job Menu Enabling the menus To enable the menus repeat the steps in Disabling the operator panel menus However in step 5 on page 134 select Enable instead of Disable After you press Select Enabling Menus is displayed Printing multi language PDFs Symptom Cause Solution Some maintenance and troubleshooting documents do...

Page 138: ...03 and using a Windows 98 Me Windows 2000 Windows XP or Windows Server 2003 compatible printer driver Your MarkNet print server is not set up properly or is not connected properly Verify that you have properly configured the printer for network printing You are using the wrong interface cable or the cable is not securely connected Make sure you are using a recommended interface cable Refer to the ...

Page 139: ...y x Size value in the Paper Size menu item in the Paper Menu is the same for all linked trays Large jobs do not collate Collate is not set to On Set Collation to On in the Finishing Menu or through the printer driver The job is too complex Reduce the complexity of the print job by eliminating the number and size of fonts the number and complexity of images and the number of pages in the job The pr...

Page 140: ... many envelopes Make sure the stack of paper you load does not exceed the maximum stack height indicated at the back of the tray or on the multipurpose feeder Guides in the selected tray are not set to the appropriate position for the size paper loaded Move the guides in the tray to the correct position See Loading the trays for detailed instructions The paper has absorbed moisture due to high hum...

Page 141: ... occur every 101 0 mm 3 98 in Marks occur down the page repeatedly in all colors Replace the transfer roll if the defects occur every 59 7 mm 2 35 in Replace the fuser if the defects occur every 148 0 mm 5 83 in Marks occur on every third or sixth page in any color Replace the image transfer unit Color misregistration Color has shifted outside of the appropriate area or has been superimposed over ...

Page 142: ...Load paper from a fresh package in the paper tray Avoid textured paper with rough finishes Make sure the printer s paper type setting matches the type of paper you are using Replace the image transfer unit and transfer roller Replace the fuser Print too light The Toner Darkness setting is too light You are using paper that does not meet the printer specifications The print cartridges are low on to...

Page 143: ... in the paper path Replace the print cartridges Replace the transfer roller Replace the image transfer unit Replace the fuser Call for service Toner rubs off the paper easily when you handle the sheets The Texture setting is wrong for the type of paper or specialty media you are using The Weight setting is wrong for the type of paper or specialty media you are using The fuser is worn or defective ...

Page 144: ...is inappropriately slanted Guides in the selected tray are not in the correct position for the paper size loaded in the tray Move the guides in the tray to the proper positions for the size loaded Blank pages An incorrect media type is loaded in the tray being printed from or the Paper Type setting does not match the type of media loaded in the tray The print cartridges are defective or empty The ...

Page 145: ...scribing colors by indicating the amount of cyan magenta yellow and black needed to reproduce a particular color How is color specified in a document to be printed Software applications typically specify document color using RGB or CMYK color combinations Additionally they commonly let users modify the color of each object in a document Since the procedures to modify colors vary depending upon the...

Page 146: ...decreases to both magenta and yellow could potentially improve color preference Is it possible to increase the gloss in the printed output Obtain additional gloss by printing using the 1200 dpi Print Resolution setting My color transparencies seem dark when projected Is there anything I can do to improve the color This problem most commonly occurs when projecting transparencies with reflective ove...

Page 147: ... conversion tables in the printer Selecting any of the Color Samples options will generate a multi page printout consisting of hundreds of colored boxes Either a CMYK or RGB combination will be located on each box depending upon the table selected The observed color of each box is obtained by passing the CMYK or RGB combination labeled on the box through the selected color conversion table The use...

Page 148: ...em will adjust the RGB or CMYK combinations specified in the application through color management The resulting printed color may not be an exact match of the Color Samples pages Color specification of object being printed Classification of object being printed Printer Color Correction setting Color Samples pages to print and use for color matching RGB Text Auto sRGB Vivid Off Off RGB Manual Manua...

Page 149: ...on actions are available on the operator panel while Restoring Factory Defaults appears All downloaded resources fonts macros and symbol sets in printer memory RAM are deleted Resources residing in flash memory or on the optional hard disk are unaffected All menu settings are returned to the factory default values except The operator panel Display Language setting in the Setup Menu All settings in...

Page 150: ...omes closest to forming a perfectly straight line For example in this sample group pattern 3 comes closest to forming a straight line It is helpful to write all twelve alignment values in the lines provided on the test pages before going on to step 5 You must select a value for all twelve settings 5 When you see A 10 or other number press Menu until you find the number value you want to use and th...

Page 151: ...ility can be turned off from the operator panel or by turning the printer off The Coverage Estimator utilizes an algorithm that counts pixels for each toner color black cyan magenta and yellow Once the utility is turned on the printer prints the percent coverage for each color on each page of the job The Coverage Estimator is only intended to estimate the coverage on a given page For all toner col...

Page 152: ...like Tray x Missing or 88 Toner Low appear on the display For example you can create an Action that sends an e mail to the administrator when the printer runs out of paper Actions can be set up to occur automatically as well as conditionally or repeatedly For more information about MarkVision Messenger refer to the drivers CD that shipped with your printer Menu item Function Value Result Alarm Con...

Page 153: ...e printer self test completes Config Menu appears 4 Press Menu until you see Size Sensing and then press Select Note Only paper trays that support auto size sensing are displayed on the operator panel 5 Press Menu until you see Tray x Sensing where x represents the number of the tray for which you want to disable size sensing and then press Select Repeat for other trays if necessary 6 Press Menu u...

Page 154: ...nce Color Menu 41 Color Correction Color Menu 41 Color Menu 41 Color Adjust 41 Color Balance 41 Color Correction 41 Color Samples 42 Manual Color 43 Print Mode 43 Print Resolution 43 Toner Darkness 44 Color Samples Color Menu 42 color Toner Supplies Menu 70 color toner status 70 complex page errors 67 Confidential Job Job Menu 48 Configure Bins Paper Menu 55 Configure MP Paper Menu 56 Copies Finis...

Page 155: ...ay 20 500 sheet trays 17 multipurpose feeder 22 locking menus 134 M MAC Binary PS Network Menu 49 MAC Binary PS Parallel Menu 51 MAC Binary PS USB Menu 70 Manual Color Color Menu 43 maximum stack height multipurpose feeder 23 trays 1 2 3 19 21 memory Print and Hold function 26 memory option removing 126 Menu buttons 14 menu map 40 menu settings page printing 132 menus disabling 134 enabling 135 en...

Page 156: ...forming Self Test 78 Power Saver 79 Print Jobs on Disk 79 Printer Calibrating 79 Printing Alignment Page 79 Printing Directory List 79 Printing Font List 79 Printing Job Accounting Stat 79 Printing Menu Settings 79 Prog Engine Code 79 Prog System Code 79 Program Flash 79 Programming Disk 79 Programming Error P x 80 Queuing and Deleting Jobs 80 Queuing Jobs 80 Ready 80 Ready Hex 80 Reattach device ...

Page 157: ...Auto CR after LF 53 Auto LF after CR 53 Font Name 53 Font Source 53 Lines per Page 53 Orientation 54 Pitch 54 Point Size 54 Symbol Set 54 Tray Renumber 54 PCL emulation A4 width 53 automatic carriage return 53 automatic line feed 53 font name 53 font sample print 73 font source 53 font support 38 lines per page 53 orientation 54 pitch 54 point size 54 resident fonts 31 symbol set 54 tray renumber ...

Page 158: ...nu 64 PS SmartSwitch USB Menu 71 PS SmartSwitch setting See also printer language 68 network port 50 parallel port 52 serial port 64 USB port 71 R removing firmware card 129 flash memory option 126 option cards 127 printer memory option 126 replacing fuser 111 image transfer unit 115 print cartridges 108 toner waste container 113 transfer roller 115 Reset Active Bin Job Menu 49 Reset Printer Job M...

Page 159: ... 44 toner waste container replacing 113 transfer roller ordering 107 replacing 115 transparencies 39 tray linking 25 Tray Renumber PCL Emul Menu 54 U Universal Setup Paper Menu 61 unlocking menus 135 USB Buffer USB Menu 71 USB Menu 70 Job Buffering 70 MAC Binary PS 70 NPA Mode 71 PCL SmartSwitch 71 PS SmartSwitch 71 USB Buffer 71 USB port configuring buffer size 71 NPA mode 71 PCL SmartSwitch 71 P...

Page 160: ......

Page 161: ...ry Satisfied Satisfied Neutral Dissatisfied Very Dissatisfied Accurate h h h h h Complete h h h h h Easy to find h h h h h Easy to understand h h h h h Well organized h h h h h Applicable to your tasks h h h h h Please tell us how we can improve this book Thank you for your responses May we contact you h Yes h No When you send comments to IBM you grant IBM a nonexclusive right to use or distribute...

Page 162: ...stems Depatment H7FE Building 004M PO Box 1900 Boulder CO 80301 9817 _ _ _ _ _ _ _ _ _ _ _ _ _ _ _ _ _ _ _ _ _ _ _ _ _ _ _ _ _ _ _ _ _ _ _ _ _ _ _ _ _ _ _ _ _ _ _ _ _ _ _ _ _ _ _ _ _ _ _ _ _ _ _ _ _ _ _ _ _ _ _ _ _ _ _ _ _ _ _ _ _ _ _ _ _ _ _ _ _ _ _ _ _ _ _ _ _ _ _ _ _ _ _ _ _ _ _ _ _ _ _ _ _ _ _ _ _ _ _ _ _ _ _ _ _ _ _ _ _ _ _ _ _ _ _ _ _ _ _ _ _ _ _ _ _ _ _ _ _ _ _ _ _ _ _ _ _ _ _ _ _ _ _ _ _ _...

Page 163: ......

Page 164: ... Part Number 75P5243 Printed in USA G510 2700 00 1P P N 75P5243 ...

Reviews: