background image

General


safety


information


Always


observe


the


following


precautions


to


reduce


the


risk


of


injury


and


property


damage.


Service


Do


not


attempt


to


service


a


product


yourself


unless


instructed


to


do


so


by


the


IBM


Support


Center.


Use


only


an


IBM


authorized


service


provider


who


is


approved


to


repair


your


particular


product.


Note:


Some


parts


can


be


upgraded


or


replaced


by


the


customer.


These


parts


are


referred


to


as


Customer


Replaceable


Units,


or


CRUs.


IBM


expressly


identifies


CRUs


as


such,


and


provides


documentation


with


instructions


when


it


is


appropriate


for


customers


to


replace


those


parts.


You


must


closely


follow


all


instructions


when


performing


such


replacements.


Always


make


sure


that


the


power


is


turned


off


and


that


the


product


is


unplugged


from


any


power


source


before


you


attempt


the


replacement.


If


you


have


any


questions


or


concerns,


contact


the


IBM


Support


Center.


Power


cords


and


power


adapters


Use


only


the


power


cords


and


power


adapters


supplied


by


the


product


manufacturer.


Never


wrap


a


power


cord


around


the


power


adapter


or


other


object.


Doing


so


can


stress


the


cord


in


ways


that


can


cause


the


cord


to


fray,


crack


or


crimp.


This


can


present


a


safety


hazard.


Always


route


power


cords


so


that


they


will


not


be


walked


on,


tripped


over,


or


pinched


by


objects.


Protect


the


cord


and


power


adapters


from


liquids.


For


instance,


do


not


leave


your


cord


or


power


adapter


near


sinks,


tubs,


toilets,


or


on


floors


that


are


cleaned


with


liquid


cleansers.


Liquids


can


cause


a


short


circuit,


particularly


if


the


cord


or


power


adapter


has


been


stressed


by


misuse.


Liquids


can


also


cause


gradual


corrosion


of


the


power


cord


terminals


and/or


the


connector


terminals


on


the


adapter


which


can


eventually


result


in


overheating.


Always


connect


power


cords


and


signal


cables


in


the


correct


order


and


ensure


that


all


power


cord


connectors


are


securely


and


completely


plugged


into


receptacles.


Do


not


use


any


power


adapter


that


shows


corrosion


at


the


ac


input


pins


and/or


shows


signs


of


overheating


(such


as


deformed


plastic)


at


the


ac


input


or


anywhere


on


the


power


adapter.


Do


not


use


any


power


cords


where


the


electrical


contacts


on


either


end


show


signs


of


corrosion


or


overheating


or


where


the


power


cord


appears


to


have


been


damaged


in


any


way.


©


Copyright


IBM


Corp.


2004


vii

Summary of Contents for E400

Page 1: ...IBM E400 PROJECTOR User s Guide...

Page 2: ......

Page 3: ...IBM E400 PROJECTOR User s Guide...

Page 4: ...d the information in Ap ndice D Service and Support na p gina D 1 and Ap ndice E IBM Statement of Limited Warranty Z125 4753 07 11 2002 na p gina E 1 Second Edition February 2004 Copyright Internation...

Page 5: ...ntrole Remoto 4 2 Intervalo de Opera o 4 3 Bot es do Projetor e do Controle Remoto 4 3 Cap tulo 5 Controles de Menu do On Screen Display 5 1 Navegando no OSD 5 1 Definindo o Idioma do OSD 5 1 Menu Qua...

Page 6: ...iv IBM E400 PROJECTOR User s Guide...

Page 7: ...a Safety Information Avant d installer ce produit lisez les consignes de s curit Vor der Installation dieses Produkts die Sicherheitshinweise lesen Prima di installare questo prodotto leggere le Infor...

Page 8: ...L s s kerhetsinformationen innan du installerar den h r produkten vi IBM E400 PROJECTOR User s Guide...

Page 9: ...adapter or other object Doing so can stress the cord in ways that can cause the cord to fray crack or crimp This can present a safety hazard Always route power cords so that they will not be walked o...

Page 10: ...the power outlet you are using is properly wired easily accessible and located close to the equipment Do not fully extend power cords in a way that will stress the cords Connect and disconnect the eq...

Page 11: ...ents v Ventilation slots fans and or heat sinks are provided with the product for safety comfort and reliable operation These features might inadvertently become blocked by placing the product on a be...

Page 12: ...x IBM E400 PROJECTOR User s Guide...

Page 13: ...k is valuable to us in developing products and services that are important to you as well as in developing better ways to communicate with you Register your option on the IBM Web site at http www ibm...

Page 14: ...xii IBM E400 PROJECTOR User s Guide...

Page 15: ...t m o seguinte 1 Projetor com compartimento para l mpada e capa da lente inclu dos 2 Controle remoto 3 Duas baterias AAA 4 Cabo USB 5 Cabo de S v deo 6 Cabo de v deo DVI DB15 para VGA 7 Cabo de udio M...

Page 16: ...p www ibm com Aten o v Evite utilizar o projetor em ambientes sujos v N o obstrua as aberturas de ventila o do projetor v Deixe o cabo de alimenta o conectado 2 a 5 minutos at o projetor retornar temp...

Page 17: ...os recursos do projetor 1 Lente foco 2 Receptor IR 3 Conectores 4 Conector do cabo de alimenta o 5 Base de nivelamento 6 Base de eleva o 7 Bot o de ajuste da base de eleva o Figura 1 1 Vista Frontal D...

Page 18: ...Zoom 2 Foco 3 Energia 4 LEDs de Status do Sistema 5 Bot es de controle 6 Bot o Source 7 Bot o Menu 8 Bot o Auto 9 Alto falante Figura 1 2 Vista Superior do Projetor 1 2 IBM E400 PROJECTOR User s Guid...

Page 19: ...y LED 3 Keystone Cursor para cima 4 Volume Cursor para a direita 5 Bot o Enter 6 Keystone Cursor para baixo 7 Volume Cursor para esquerda 1 Entrada de udio 2 RS 232 3 DVI I 4 Soquete AC 5 V deo compos...

Page 20: ...1 Tampa da l mpada de proje o 2 Base de eleva o 3 Base de nivelamento 4 Orif cios de suporte para teto Figura 1 5 Vista Inferior do Projetor 1 4 IBM E400 PROJECTOR User s Guide...

Page 21: ...ure se de que o LED Lamp ready esteja aceso e na cor mbar est vel em seguida pressione o bot o Power para ligar o projetor A tela inicial do projetor exibida e os dispositivos conectados s o detectado...

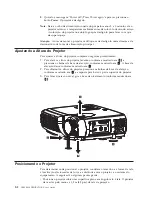
Page 22: ...rojetor levante o conforme mostrado em 1 e pressione os bot es da base de eleva o conforme mostrado em 2 A base de eleva o desce conforme mostrado em 3 2 Para diminuir a altura do projetor pressione o...

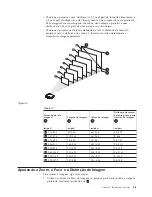
Page 23: ...m pol Largura da Imagem m p s Altura da imagem m p s Dist ncia do centro da lente para a parte inferior da imagem m p s 1 1 10 43 3 88 2 88 66 2 16 1 5 4 92 2 1 47 57 8 1 17 3 83 88 2 88 2 6 56 3 1 76...

Page 24: ...Volume Para ajustar o volume siga estas etapas 1 Pressione os bot es do Volume no projetor ou no controle remoto O controle de volume aparece no OSD 2 Utilize os bot es do Volume para ajustar o n vel...

Page 25: ...E400 Conectando Dispositivos Os computadores e dispositivos de v deo podem ser conectados ao projetor ao mesmo tempo Verifique o manual do usu rio do dispositivo de conex o para confirmar se ele tem o...

Page 26: ...3 2 IBM E400 PROJECTOR User s Guide...

Page 27: ...aos olhos n o olhe diretamente para a luz laser do controle remoto e n o aponte a luz laser para os olhos de qualquer outra pessoa O controle remoto equipado com um laser Classe II que emite radia o A...

Page 28: ...ateria deslizando a na dire o da seta conforme mostrado 2 Insira as baterias fornecidas anotando a polaridade conforme mostrado 3 Recoloque a tampa conforme mostrado Nota v Utilize apenas baterias alc...

Page 29: ...o para a imagem projetada Bot es do Projetor e do Controle Remoto O projetor pode ser operado utilizando se o controle remoto ou os bot es na parte superior do projetor Todas as opera es podem ser exe...

Page 30: ...4 4 IBM E400 PROJECTOR User s Guide...

Page 31: ...ioma do OSD Voc poder querer consultar o OSD no projetor enquanto l esta se o Defina o idioma do OSD para sua prefer ncia antes de continuar seguindo estas etapas 1 Pressione o bot o Menu O menu Quali...

Page 32: ...ne o bot o do cursor para a esquerda para a direita para ajustar o brilho Intervalo 0 a 100 50 Contrast Pressione o bot o do cursor para a esquerda para a direita para ajustar o contraste Intervalo 0...

Page 33: ...ativo apenas quando a origem de entrada for V deo S video YPbPr Intervalo 0 a 100 50 Gamma Pressione o bot o do cursor para a esquerda para a direita para ajustar a corre o de gama do v deo Entrada Ga...

Page 34: ...o Horizontal Position Pressione o bot o do cursor para a esquerda para a direita para mover a imagem para a esquerda ou para a direita Intervalo 0 a 100 50 Vertical Position Pressione o bot o do curso...

Page 35: ...mover se para cima e para baixo no menu Options A tabela a seguir mostra as op es que voc ver no menu Options e o padr o Item Descri o Padr o Blank Screen Pressione o bot o do cursor para a esquerda p...

Page 36: ...ireita para posicionar o OSD na tela Intervalo Esquerda Direita Centro Para Baixo Para Cima Centro Menu Display Pressione o bot o do cursor para a esquerda para a direita para determinar o retardo no...

Page 37: ...ra a esquerda para a direita para selecionar o padr o de v deo Video Type est ativo apenas quando a origem de entrada for V deo ou S video Intervalo Autom tico NTSC PAL SECAM Autom tico Video AGC Auto...

Page 38: ...para a direita para ajustar o rel gio de amostragem do A D Frequency est ativo apenas quando a origem de entrada for RGB An logo Intervalo 0 a 100 Autodetectado Tracking Pressione o bot o do cursor p...

Page 39: ...scri o Video Information Exibe a resolu o e a taxa de atualiza o do dispositivo de v deo conectado Active Source Informa es sobre a origem ativa Software Version Informa es sobre revis es de software...

Page 40: ...5 10 IBM E400 PROJECTOR User s Guide...

Page 41: ...lar Se voc n o pretende utilizar o projetor imediatamente recoloque a tampa das lentes Substituindo a L mpada de Proje o Utilize somente uma l mpada de substitui o com o mesmo tipo e a mesma qualidade...

Page 42: ...onforme mostrado 4 Levante a al a do m dulo conforme mostrado 5 Puxe firmemente a al a do m dulo para remover o m dulo da l mpada conforme mostrado 6 Inverta as etapas 1 a 5 para instalar o novo m dul...

Page 43: ...para a esquerda para a direita para mover se para o menu Information 3 Pressione o bot o do cursor para cima para baixo para mover se para baixo em Lamp Hour Reset 4 Pressione o bot o Enter Aparece u...

Page 44: ...A 4 IBM E400 PROJECTOR User s Guide...

Page 45: ...o Keystone no controle remoto ou no projetor para corrigir o problema A imagem est invertida ou de cabe a para baixo Verifique a defini o Projection no menu Setup do OSD A imagem est riscada v Ajuste...

Page 46: ...ist ncia t cnica N o h som v Ajuste o volume no controle remoto v Ajuste o volume na origem de udio v Verifique a conex o dos cabos de udio v Teste a sa da de udio de origem com outros alto falantes v...

Page 47: ...Power Explica o 3 Superaquecimento do sistema 4 Erro da interface do sistema 5 Erro da l mpada 6 Erro do ventilador Consulte o LED Lamp ready para determinar em qual ventilador 7 Tampa de abertura da...

Page 48: ...B 4 IBM E400 PROJECTOR User s Guide...

Page 49: ...m funcionamento Umidade desligado Umidade relativa de 5 a 90 sem condensa o Umidade relativa de 5 a 95 sem condensa o Dimens es L x P x A 280 x 205 x 97 mm 11 02 x 8 07 x 3 82 pol Peso 2 09 kg 4 61 lb...

Page 50: ...C 2 IBM E400 PROJECTOR User s Guide...

Page 51: ...y step installation assistance are available for a nominal fee To assist the technical support representative have available as much of the following information as possible v Option name v Option num...

Page 52: ...re 1800 840 9911 Columbia 980 912 3021 Spain 91 662 49 16 Denmark 45 20 82 00 Sweden 08 477 4420 Ecuador 1 800 426911 option 4 Switzerland 058 333 09 00 Finland 09 459 69 60 Taiwan 886 2 2725 9799 Fra...

Page 53: ...ise Many features conversions or upgrades involve the removal of parts and their return to IBM A part that replaces a removed part will assume the warranty service status of the removed part Unless IB...

Page 54: ...basic input output system code called BIOS utility programs device drivers and diagnostics delivered with an IBM Machine and other software updates from an IBM Internet Web site or from other electro...

Page 55: ...include shipping the Machine for such processing to other IBM service locations around the world and c ensure that such processing complies with any laws applicable to such Personal Data Limitation o...

Page 56: ...aws of the country in which you acquired the Machine to govern interpret and enforce all of your and IBM s rights duties and obligations arising from or relating in any manner to the subject matter of...

Page 57: ...is Section The warranties specified in this Section are in addition to any rights you may have under the Trade Practices Act 1974 or other similar legislation and are only limited to the extent permit...

Page 58: ...ollowing replaces laws of the country in which you acquired the Machine in the first sentence laws of Hong Kong Special Administrative Region of China INDIA Limitation of Liability The following repla...

Page 59: ...ed or limited The Consumer Guarantees Act 1993 will not apply in respect of any goods which IBM provides if you require the goods for the purposes of a business as defined in that Act Limitation of Li...

Page 60: ...seller How to Obtain Warranty Service If you purchase a Machine in Austria Belgium Cyprus Denmark Estonia Finland France Germany Greece Iceland Ireland Italy Latvia Liechtenstein Lithuania Luxembourg...

Page 61: ...Namibia Lesotho and Swaziland Jurisdiction The following exceptions are added to this section 1 In Austria the choice of jurisdiction for all disputes arising out of this Statement of Limited Warrant...

Page 62: ...d Conciliation of the International Arbitral Center of the Federal Economic Chamber in Vienna Vienna Rules by three arbitrators appointed in accordance with these rules The arbitration will be held in...

Page 63: ...OR FOR ANY ECONOMIC CONSEQUENTIAL DAMAGES 3 LOST PROFITS EVEN IF THEY ARISE AS AN IMMEDIATE CONSEQUENCE OF THE EVENT THAT GENERATED THE DAMAGES OR 4 LOSS OF BUSINESS REVENUE GOODWILL OR ANTICIPATED S...

Page 64: ...added to this section During the warranty period transportation for delivery of the failing Machine to IBM will be at IBM s expense Limitation of Liability The following paragraph is added to this se...

Page 65: ...warranty The following sentence is added to the end of item 2 IBM s liability under this item is limited to the violation of essential contractual terms in cases of ordinary negligence HUNGARY Limitat...

Page 66: ...ult Items for Which IBM is Not Liable Save with respect to any liability referred to in item 1 above under no circumstances is IBM its suppliers or resellers liable for any of the following even if IB...

Page 67: ...or 2 125 of the total purchase price payable or the charges for the Machine directly relating to the Default These limits also apply to IBM s suppliers and resellers They state the maximum for which...

Page 68: ...Customer Replaceable Unit CRU Service IBM will ship CRU parts to you for your replacement If IBM instructs you to return the replaced CRU you are responsible for returning it to IBM in accordance wit...

Page 69: ...rs are subject to change without notice For the latest phone number list go to www ibm com pc support and click Support Phone List Country or Region Telephone Number Country or Region Telephone Number...

Page 70: ...hone Number Country or Region Telephone Number Japan Consumer customers 0120 887 870 Business customers 0120 887 874 Venezuela 0 800 100 2011 Luxembourg 298 977 5063 Vietnam 848 8295 160 E 18 IBM E400...

Page 71: ...s information could include technical inaccuracies or typographical errors Changes are periodically made to the information herein these changes will be incorporated in new editions of the publication...

Page 72: ...ul interference to radio communications However there is no guarantee that interference will not occur in a particular installation If this equipment does cause harmful interference to radio or televi...

Page 73: ...E zu f hren Verantwortlich f r die Konformit tserkl rung nach Paragraph 5 des EMVG ist die IBM Deutschland Informationssysteme GmbH 70548 Stuttgart Informationen in Hinsicht EMVG Paragraph 3 Abs 2 2 D...

Page 74: ...rmidad lectromagn tica Este producto satisface los requisitos de protecci n del Consejo de la UE Directiva 89 336 CEE en lo que a la legislatura de los Estados Miembros sobre compatibilidad electromag...

Page 75: ...nevole protezione da interferenze mediante dispositivi di comunicazione in concessione in ambienti residenziali tipici Japanese statement of compliance for products less than or equal to 20 A per phas...

Page 76: ...F 6 IBM E400 PROJECTOR User s Guide...

Page 77: ......

Page 78: ...N mero da Pe a 73P2776 Impresso em Brazil 1P P N 73P2776...

Reviews: