background image

__


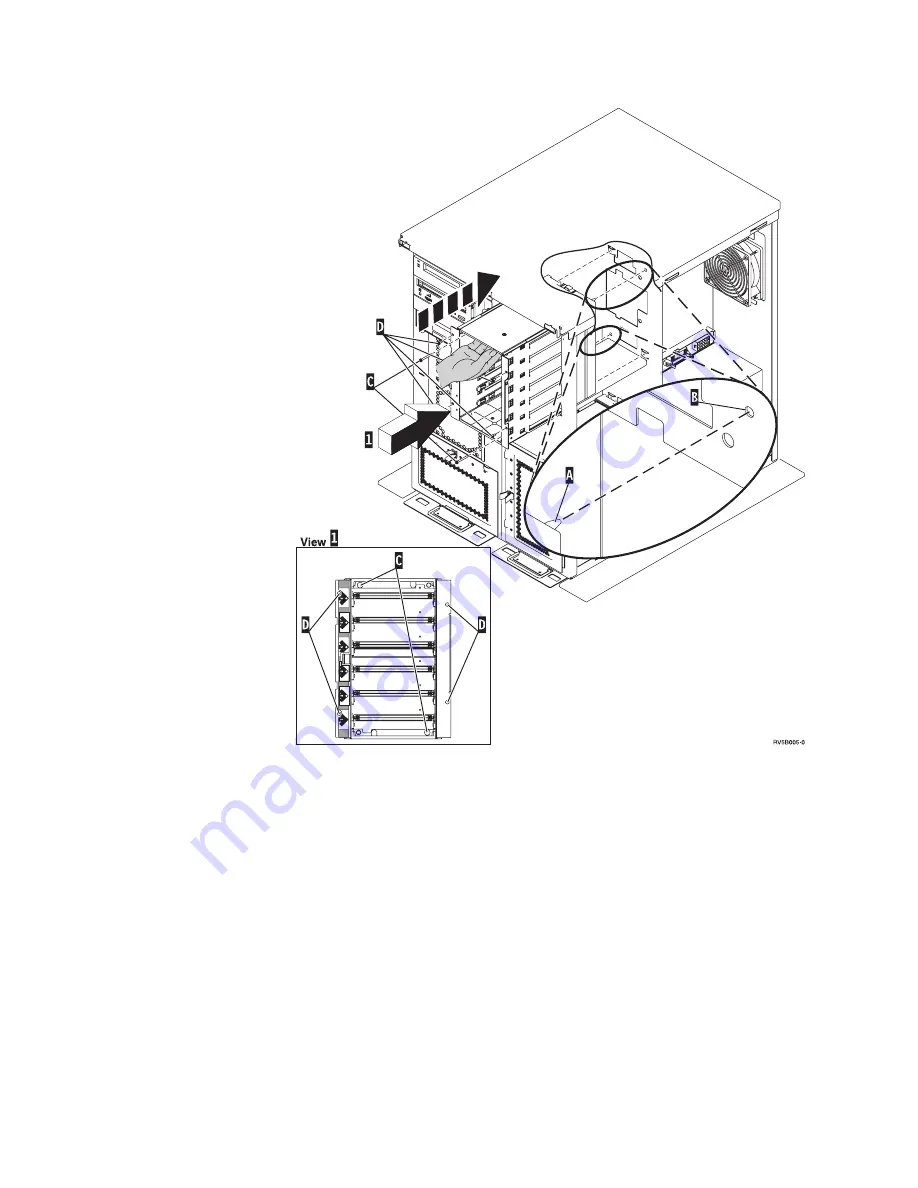
16.


Align


the


guide


pin


A


on


the


disk


unit


enclosure


with


B


in


the


expansion


unit.


__


17.


Start


installing,


but


do


not


tighten,


the


four


screws


D


to


secure


the


disk


unit


enclosure


to


the


expansion


unit.


__


18.


Install


the


two


screws


C


inside


the


disk


unit


enclosure.


Use


the


tool


that


was


shipped


with


the


disk


unit


enclosure


to


install


these


two


screws


shown


in


View


1

.


__


19.


Finish


tightening


the


four


screws


D

.


__


20.


Connect


A


power


cables,


B


disk


unit


data


cable


(part


number


04N2273),


and


C


power


control


cable


to


the


disk


unit


enclosure.


56


43xx


Disk


Unit,


71xx


Disk


Expansion


Unit,


71xx


Disk


Unit


Enclosure


V5R3

Summary of Contents for E Server i Series

Page 1: ...iSeries 43xx Disk Unit 71xx Disk Expansion Unit 71xx Disk Unit Enclosure Version 5 ERserver...

Page 2: ......

Page 3: ...iSeries 43xx Disk Unit 71xx Disk Expansion Unit 71xx Disk Unit Enclosure Version 5 ERserver...

Page 4: ...product number 5722 SS1 and to all subsequent releases and modifications until otherwise indicated in new editions This version does not run on all reduced instruction set computer RISC models nor do...

Page 5: ...nit 34 820 system unit 35 825 system unit 36 830 system unit 37 840 system unit 38 870 and 890 system unit 38 5065 5074 and 5094 expansion unit 39 Select the optimal disk unit position 39 5075 and 509...

Page 6: ...iv 43xx Disk Unit 71xx Disk Expansion Unit 71xx Disk Unit Enclosure V5R3...

Page 7: ...refer to Backup and Recovery Select the instructions for the task you want to perform v Chapter 2 Replace 43xx disk units on page 3 v Chapter 3 Install 43xx disk units on page 15 v Install the 7104 ex...

Page 8: ...cessful Go to Logical partitions in the Information Center Then return to these instructions __ 6 If you encounter difficulties during the procedure contact your authorized service provider or your au...

Page 9: ...our hardware If you do not have a wrist strap touch a metal surface of the system or expansion unit before installing or replacing hardware If you received the 2209 Disposable Wrist Strap follow these...

Page 10: ...ect Work with Disk Unit Recovery from the Work with Disk Units display Press Enter 3 Select Suspend mirrored protection from the Work with Disk Unit Recovery display Press Enter 4 Select the option to...

Page 11: ...om of the disk unit assembly as you slide it completely out Do not hold the disk unit by the handle __ 17 The light will stop blinking and remain off when the disk unit is removed __ 18 Return to the...

Page 12: ...t the time delay for one minute 01 Do not press Enter at this time Note Locate the light in the numbered arrow by the disk unit you are replacing When you press Enter after a one minute delay this lig...

Page 13: ...turn to the Work with disk units display __ h Press F3 Exit to return to the System service tools display __ i Press F3 Exit to return to the exit SST display and press Enter The replacement procedure...

Page 14: ...On display Press Enter Note The service tools password is case sensitive __ d Select Work with disk units from the System Service Tools SST display Press Enter __ e Select Display Disk Configuration...

Page 15: ...ble wrist strap View video __ b When you unroll the strap remove the liner from the copper foil at the end __ c Attach the adhesive part of the copper foil to an exposed unpainted metal surface on the...

Page 16: ...____ before you install it Attention Disk units are fragile Handle with care __ 11 Squeeze and pull the handle out toward you before you install the disk unit If the handle is not all the way out the...

Page 17: ...hazardous voltage on metal parts of the system or the products that attach to the system It is the customer s responsibility to ensure that the outlet is correctly wired and grounded to prevent an el...

Page 18: ...tep __ No Do the following __ a Press the Mode Select button until the Normal mode indicator OK lights up __ b Press the Increment Decrement push button until 02 appears in the Function Data display _...

Page 19: ...latches __ 5 Install or close the system unit or expansion unit front cover __ 6 Press F5 to refresh the display until the Percent complete shows 5 __ 7 When the display shows at least 5 complete you...

Page 20: ...ation status on the Display Disk Configuration display Mirrored status will show Resuming When complete the Mirrored status will show Active This process may take several minutes to complete You can e...

Page 21: ...ware If you do not have a wrist strap touch a metal surface of the system or expansion unit before installing or replacing hardware If you received the 2209 Disposable Wrist Strap follow these steps _...

Page 22: ...Press Enter __ 8 Select Device Concurrent Maintenance from the Hardware Service Manager display Press Enter __ 9 Type the Physical Location Frame ID and position where you will be installing the new...

Page 23: ...the disk unit all the way in and lock it in place by closing the latch __ 18 The light stops blinking and remains on when you have installed the disk unit properly __ 19 Return to the console and wai...

Page 24: ...th the next step __ No Go to step 34 __ 31 The following conditions must be met before you can start device parity protection Including the disk unit in device parity protection may fail for one or mo...

Page 25: ...ted the wrong ASP press F12 to change your options Press the Enter key to continue The add process will take several minutes to complete __ 44 When the message Selected units have been added successfu...

Page 26: ...list where you can reference it in the future __ 57 The installation of the disk unit is complete __ 58 For information on disk unit configuration go to the Disk management topic in the Information C...

Page 27: ...l 43xx disk units with system power off to install the new disk unit Details Install 43xx disk units with system power off Attention Disk units are fragile Handle with care __ 1 Find the package that...

Page 28: ...another disk unit to install __ No Continue with the next step __ Yes Repeat this procedure to install the next disk unit __ 7 Install the disk unit covers Align the tabs on the disk unit enclosure c...

Page 29: ...ement push button until B appears in the Function Data display __ d Press the Enter push button on the control panel __ e Press the Increment Decrement push button until M appears in the Function Data...

Page 30: ...20 __ 18 Look at the Function Data display on the control panel __ 19 Does 01 B V S appear in the Function Data display and the Manual mode indicator a small hand illuminated __ Yes Continue with the...

Page 31: ...nsure that the disk unit is properly installed __ h Return to the Work with Disk Configuration display press F12 two times __ 22 Are you adding a disk unit to an existing device parity set If you need...

Page 32: ...Work with device parity protection display Press F12 __ 31 Select Display disk configuration on the Work with disk configuration display Press Enter __ 32 Select Display disk configuration status on t...

Page 33: ...representative may refer to the configuration list in the future __ a You need to sign on with service authority __ b Type strsst on the Main Menu command line Press Enter __ c Type your service tool...

Page 34: ...28 43xx Disk Unit 71xx Disk Expansion Unit 71xx Disk Unit Enclosure V5R3...

Page 35: ...810 in a rack on page 31 v 825 front cover on page 30 v 830 840 870 890 5074 5079 5094 or 5095 on page 32 270 800 810 820 or 5075 front cover Remove the system unit or expansion unit front cover by g...

Page 36: ...825 front cover Remove the front cover by gripping the sides of the cover and pulling the cover toward you View video 30 43xx Disk Unit 71xx Disk Expansion Unit 71xx Disk Unit Enclosure V5R3...

Page 37: ...270 800 or 810 in a rack Open or remove the front cover 31...

Page 38: ...830 840 870 890 5074 5079 5094 or 5095 Use A to open the front cover If needed use latch B to remove the front cover 32 43xx Disk Unit 71xx Disk Expansion Unit 71xx Disk Unit Enclosure V5R3...

Page 39: ...270 800 or 810 system unit on page 33 v 7104 or 7116 expansion unit on page 34 v 820 system unit on page 35 v 825 system unit on page 36 v 830 system unit on page 37 v 840 system unit on page 38 v 87...

Page 40: ...7104 or 7116 expansion unit 34 43xx Disk Unit 71xx Disk Expansion Unit 71xx Disk Unit Enclosure V5R3...

Page 41: ...820 system unit Disk unit locations 35...

Page 42: ...825 system unit 36 43xx Disk Unit 71xx Disk Expansion Unit 71xx Disk Unit Enclosure V5R3...

Page 43: ...830 system unit Note Disk unit plug sequence for optimum performance D31 D36 D46 D32 D37 D47 D50 add second adaptor D01 D11 D21 D02 D25 add third adaptor D06 D16 D26 D07 D30 Disk unit locations 37...

Page 44: ...sequence for optimum performance D31 D36 D46 D32 D37 D47 D50 add second adaptor D01 D11 D21 D02 D25 add third adaptor D06 D16 D26 D07 D30 870 and 890 system unit 38 43xx Disk Unit 71xx Disk Expansion...

Page 45: ...dently Note for 5094 users The 5094 consists of two independent expansion units 5094 001 and 5094 002 Installation rules and procedures apply to each expansion unit independently Note If you are insta...

Page 46: ...c Fill the slot 3 s D03 D13 D23 __ d Fill the slot 4 s D04 D14 D24 __ e Fill the slot 5 s D05 D15 D25 __ 3 Your expansion unit requires a third high speed disk unit controller before you can install...

Page 47: ...buting the disk units on the disk controllers Evenly distributing the disk units will optimize them for maximum performance Note for 5079 users The 5079 consists of two independent expansion units 507...

Page 48: ...__ 2 Your expansion unit requires a second high speed disk unit controller before you can install disk units into the following positions Contact IBM or an authorized dealer if your expansion unit do...

Page 49: ...e unit v A constant light indicates that the unit is on and working B Power Push button C Processor Activity D System Attention E Function Data Display F Increment Decrement buttons G Enter Push butto...

Page 50: ...Power Push button C Processor Activity D System Attention E Function Data Display F Increment Decrement buttons G Enter Push button H Mode Selects J Electronic Keystick Slot K Secure L Auto M Normal N...

Page 51: ...Increment Decrement push button until 02 appears in the Function Data display __ k Press the Enter push button on the control panel __ l Press the Increment Decrement push button until B appears in t...

Page 52: ...on the frame of the unit Note Follow the same precautions you would use without the wrist strap The 2209 Disposable Wrist Strap is for static control It will not increase or decrease your risk of rece...

Page 53: ...plan to remove or install the card __ b Go to step 18 on page 48 __ 17 Open the latch at the card position where you plan to remove or install the card Move the latch counterclockwise and then swing t...

Page 54: ...adapter card you want to install in this position __ 21 Align the adapter card with the card holders inside the system unit and push until it is connected securely __ 22 Swing the latch in and move t...

Page 55: ...st engage in the slots on the right side of the system unit frame __ 28 Slide the expansion unit back engaging the connector hooks until the units are aligned __ 29 Install the two thumbscrews B to se...

Page 56: ...735 __ 32 Connect A disk unit data cables to the next available port on the 2757 2763 2782 4748 4778 5703 5705 or 9767 cards in position C01 or C02 in the system unit 50 43xx Disk Unit 71xx Disk Expan...

Page 57: ...ard the plug F __ 38 Connect D from expansion unit and E __ 39 Is there a second disk unit enclosure installed in the upper position of the expansion unit __ No Continue with the next step __ Yes Do t...

Page 58: ...isk unit data cable to the next available port on the 2757 2763 2782 4748 4778 5703 5705 or 9767 cards in position C01 or C02 in the system unit 52 43xx Disk Unit 71xx Disk Expansion Unit 71xx Disk Un...

Page 59: ...g the power cord into the back of the 7104 or 7116 expansion unit __ 45 Install the new back cover if you have one __ 46 You may want to store the old covers from the 270 800 or 810 unit for possible...

Page 60: ...54 43xx Disk Unit 71xx Disk Expansion Unit 71xx Disk Unit Enclosure V5R3...

Page 61: ...possible use a wrist strap to prevent electrostatic discharge from damaging your hardware If you do not have a wrist strap touch a metal surface of the system or expansion unit before installing or r...

Page 62: ...18 Install the two screws C inside the disk unit enclosure Use the tool that was shipped with the disk unit enclosure to install these two screws shown in View 1 __ 19 Finish tightening the four scre...

Page 63: ...__ 21 Route the disk unit enclosure data cable through the opening A following the route of the existing data cable Install the 7123 or 7136 disk unit enclosure 57...

Page 64: ...__ 22 Connect the disk unit data cable to the next available port on the 2757 2763 2782 4748 4778 or 9767 cards 58 43xx Disk Unit 71xx Disk Expansion Unit 71xx Disk Unit Enclosure V5R3...

Page 65: ...ews __ 24 Install the left side cover two screws __ 25 Install the front cover __ 26 Install the back cover __ 27 Go to Install 43xx disk units with system power off on page 20 to install disk units I...

Page 66: ...60 43xx Disk Unit 71xx Disk Expansion Unit 71xx Disk Unit Enclosure V5R3...

Page 67: ...you do not have a wrist strap touch a metal surface of the system or expansion unit before installing or replacing hardware If you received the 2209 Disposable Wrist Strap follow these steps __ a Atta...

Page 68: ...__ 15 Slide the disk unit enclosure into the opening that guides the cables through the frame openings 62 43xx Disk Unit 71xx Disk Expansion Unit 71xx Disk Unit Enclosure V5R3...

Page 69: ...F in the system unit __ 18 Start installing but do not tighten the four screws G that secure the disk unit enclosure to the system unit __ 19 Install the two screws H Use the tool that was shipped wit...

Page 70: ...e of the existing disk unit data cable __ 22 Connect the disk unit controller cable to the next available port on the 4748 2757 2763 2782 4778 5703 or 5705 card Figure 4 Connecting the cables to the s...

Page 71: ...y __ 1 You will install the power supply into the next available area Refer to Figure 5 on page 66 __ 2 Pull out on the button to remove the power supply filler plate __ 3 Pull the handle down on the...

Page 72: ...ce __ 6 Install the side covers __ 7 Install the back cover __ 8 To install disk units in your disk expansion unit go to Install 43xx disk units with system power off on page 20 Figure 5 Installing th...

Page 73: ...own the system by typing pwrdwnsys immed on a command line and press Enter __ 4 When the iSeries is completely powered down disconnect all PCs from the system unit Power off all devices such as printe...

Page 74: ...68 43xx Disk Unit 71xx Disk Expansion Unit 71xx Disk Unit Enclosure V5R3...

Page 75: ...you have one and lift up and out __ 2 Remove the right side cover by removing the thumbscrews and sliding the cover from front to back until it stops __ 3 Remove the left side cover by removing the s...

Page 76: ...70 43xx Disk Unit 71xx Disk Expansion Unit 71xx Disk Unit Enclosure V5R3...

Page 77: ...ANTIES OF NON INFRINGEMENT MERCHANTABILITY OR FITNESS FOR A PARTICULAR PURPOSE Some states do not allow disclaimer of express or implied warranties in certain transactions therefore this statement may...

Page 78: ...dresses used by an actual business enterprise is entirely coincidental If you are viewing this information softcopy the photographs and color illustrations may not appear The drawings and specificatio...

Page 79: ...Publications or any portion thereof without the express consent of IBM Commercial Use You may reproduce distribute and display these Publications solely within your enterprise provided that all propri...

Page 80: ...is equipment generates uses and can radiate radio frequency energy and if not installed and used in accordance with the instruction manual may cause harmful interference to radio communications Operat...

Page 81: ...e the user may be required to take adequate measures VCCI Statement Japan The following is a summary of the VCCI Japanese statement in the box above This is a Class A product based on the standard of...

Page 82: ...der Deutschen Bundespost noch nicht ver ffentlicht worden Electronic Emission Notices The following Statement applies to this IBM product The statement for other IBM products intended for use with th...

Page 83: ...ments of the Canadian Interference Causing Equipment Regulations Avis de conformit la r glementation d Industrie Canada Cet appareil num rique de la classe B respecte toutes les exigences du R glement...

Page 84: ...recommended cables and connectors 78 43xx Disk Unit 71xx Disk Expansion Unit 71xx Disk Unit Enclosure V5R3...

Page 85: ......

Page 86: ...Printed in USA...

Reviews: