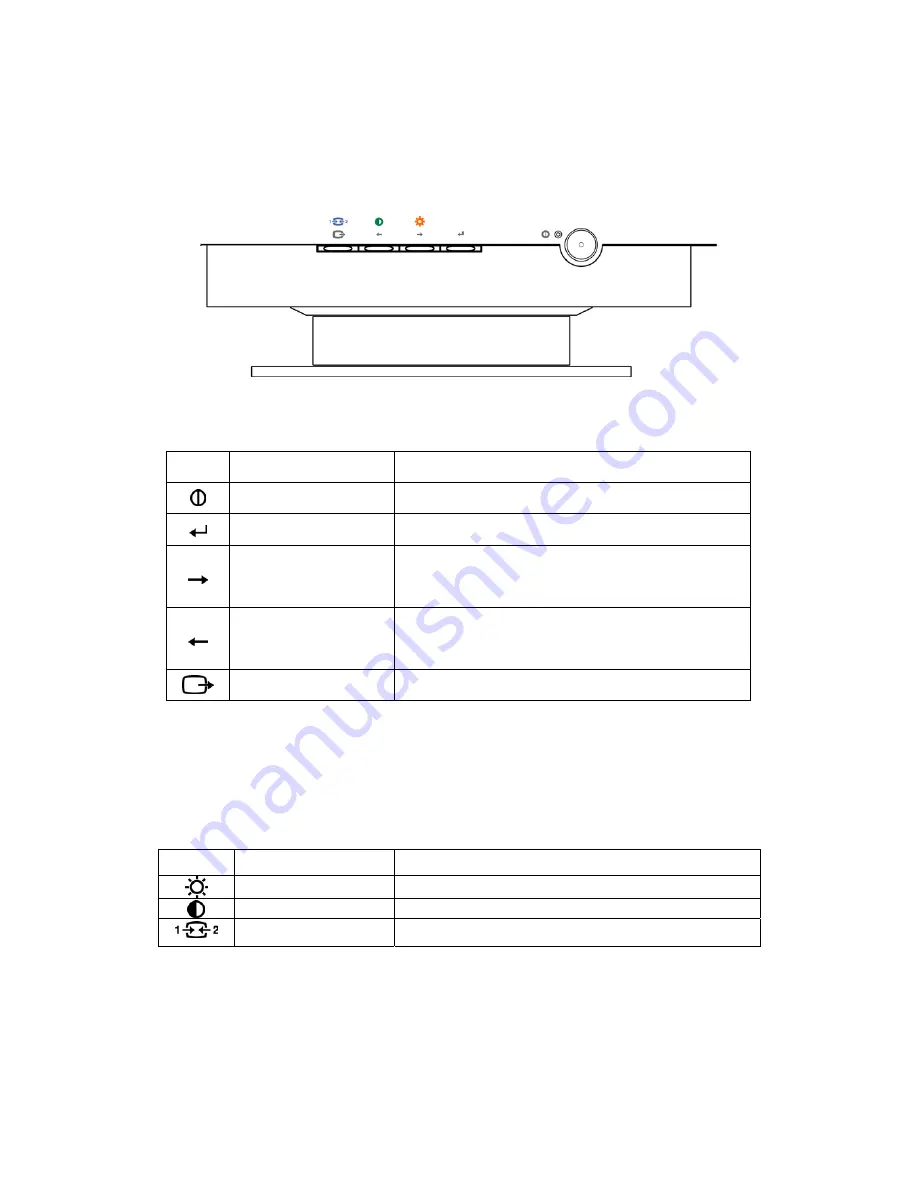
IBM C220p User Manual Download Page 12

User controls 

The image is already optimized for many display modes. However, the controls can be used 

to adjust the image to your liking. 


OSD key function 

Icon Control 

Description 


Power switch 

Switches the monitor on and off. 


OSD/OK 

Activates the On-Screen-Display/Select control 
icon/Save Adjustment 


Move right; 
Brightness adjustment 
selection 

Moves the highlight to the icon to the right, or on 
adjustment screens it increases the effect of the 
adjustment. 


Move left; 
Contrast adjustment 
selection 

Moves the highlight to the icon to the left, or on 
adjustment screens it decreases the effect of the 
adjustment. 


Hotkey

Exit 

Hotkey

 for signal input selection, or exit OSD control.  


Hotkey 

functions


Brightness and contrast can be adjusted as follows, without the need to display the OSD: 
Select the function and use the buttons to adjust. If adjustment is not made within 15 seconds, 
the current settings will be saved and the control screen will disappear automatically. 


Icon


Control


Description 


Brightness 

Adjusts the background brightness 


Contrast 

Adjusts the contrast between foreground and background 


Signal input selection 

Select the video signal input, D-Sub or DVI-A. 


11

Summary of Contents for C220p

Page 1: ...Color Monitor C220p User s Guide English ...

Page 2: ...First Edition December 2003 Note For important information refer to the Monitor Safety and Warranty manual that comes with this monitor 1 ...

Page 3: ...device driver for Windows 95 or Windows 98 8 Installing the device driver for Windows 2000 or Windows Me 9 Installing the device driver in Windows XP 10 User controls 11 On Screen Display 12 Activating the On Screen Display 12 Main OSD menu controls 12 OSD functions 12 Further information 16 Display modes 16 Power Management 16 Troubleshooting 17 Further help 18 Specifications 20 Service Informati...

Page 4: ...Safety Read first 3 ...

Page 5: ... completely plugged into receptacles Do not use any power adapter that shows corrosion at the ac input pins and or shows signs of overheating such as deformed plastic at the ac input or anywhere on the power adapter Do not use any power cords where the electrical contacts on either end show signs of corrosion or overheating or where the power cord appears to have been damaged in any way Ensure tha...

Page 6: ...e or store these batteries in a discharged state Computers generate heat when turned on and when batteries are charging Notebook PCs can generate a significant amount of heat due to their compact size Always follow these basic precautions Do not leave the base of your computer in contact with your lap or any part of your body for an extended period when the computer is functioning or when the batt...

Page 7: ...the signal cable to the video port on the back of your computer Your computer may have a video adapter card installed In this case attach the signal cable to the connector on the video adapter card 2 Connect the power cord to the monitor first and then firmly insert the plug into a properly grounded electrical outlet 3 Turn on the monitor and then the computer If your monitor does not seem to be w...

Page 8: ...t have to twist your body Tilt the monitor to a comfortable viewing angle Working practices Rest Take regular breaks Vary your posture and stand up and stretch occasionally as prolonged use of computer workstations can be tiring Back Sit back in the chair and use the backrest Hands Use a light touch on the keyboard keeping your hands and fingers relaxed Allow a space in front of the keyboard to re...

Page 9: ...lay Properties window by clicking Start Settings Control Panel and then double clicking on the Display icon 5 Click the Settings tab 6 If you are using Windows 95 do the following 1 Click the Change Display Type button 2 Click the Change Monitor Type button If you are using Windows 98 do the following 1 Click the Advanced button 2 Click the Monitor tab 3 Open the Upgrade Device Wizard window by cl...

Page 10: ...Display icon 5 Click the Settings tab 6 Click the Advanced button 7 Click the Monitor tab 8 Click the Properties button 9 Click the Driver tab 10 Open the Upgrade Device Driver Wizard window by clicking on Update Driver and then click the Next button 11 Select Display a list of the known drivers for this device so that I can choose a specific driver and then click the Next button 12 Insert the IBM...

Page 11: ...ngs tab 6 Click the Advanced button 7 Click the Monitor tab 8 Click the Properties button 9 Click the Driver tab 10 Open the Hardware Update Wizard window by clicking on Update Driver and then click the Next button 11 Select Install from a list or Specific location Advanced and then click the Next button 12 Insert the IBM Monitor CD into the CD drive and click the Have Disk button 13 Click OK 14 E...

Page 12: ...ent selection Moves the highlight to the icon to the left or on adjustment screens it decreases the effect of the adjustment Hotkey Exit Hotkey for signal input selection or exit OSD control Hotkey functions Brightness and contrast can be adjusted as follows without the need to display the OSD Select the function and use the buttons to adjust If adjustment is not made within 15 seconds the current...

Page 13: ...ity Adjusts Brightness Contrast Moiré Convergence Purity and Degauss Image Position Size Adjusts Horizontal Vertical Position Horizontal Vertical Size Zoom and Rotation Image Shape Adjusts Parallelogram Trapezoid Pincushion Pincushion balance and Geometry reset Color Adjusts Preset color point Custom and Reset User color Options Adjusts Information Menu Languages Accessibility Factory Default Menu...

Page 14: ...t Top Right Bottom Left Bottom Right Purity Improves the image quality in the corners Save Degauss Demagnetizes screen to reduce image distortion Yes No Option Image Position Size Image Position Size Sub menu Icon Control Function Sub menu function Left Horizontal Position Moves image left or right Right Left Vertical Position Moves image up or down Right Left Horizontal Size Adjusts image width R...

Page 15: ... image sides Pincushion balance Moves image center left or right Geometry reset Resets image shape to original settings Yes No Option Color Color Sub menu Icon Control Function Sub menu function Preset Color Point Select from standard white color With three choices 9300K 6500K 5500K Custom Adjusts red green and blue intensity Red Green Blue Save Reset User Color Resets custom color to original val...

Page 16: ...u English French Italian German Spanish Button repeat rate Off Default Slow Option Accessibility Changes Menu timings Menu time out 5 10 15 20 25 30 second options Factory Default Resets monitor to original settings Yes No Option Horizontal Vertical Menu Position Adjusts menu location Save Input Signal Select video signal Input 1 2 Exit Closes the OSD menu 15 ...

Page 17: ...ure Resolution Refresh Rate Horizontal Frequency 640 x 480 60Hz 31 5kHz 720 x 400 70Hz 31 5kHz 1024 x 768 85Hz 68 6kHz 1280 x 1024 85Hz 91 1kHz 1600 x 1200 85Hz 106 3kHz 1920 x 1440 75Hz 112 5kHz 1920 x 1440 85Hz 128 5kHz 2048 x 1536 75Hz 120 5kHz Table1 Factory Preset Mode Power Management To benefit from power management the monitor must be used in conjunction with a computer that implements the...

Page 18: ...Display mode of the computer is outside the range of the monitor Reconfigure the computer to use a supported display mode Further information starting on page 16 CHECK SIGNAL CABLE message is displayed Video cable connection Check that the signal cable is firmly connected to the computer Check no pins are bent in the signal cable connector The monitor is in Power Management Standby Suspend or Off ...

Page 19: ...n of monitor components has built up Degauss the monitor using OSD manual demagnetize function This function can only be used once in a 30 minute period Further help If you are unable to correct the problem yourself you may seek further help as follows Call IBM HELPCENTER In the US call 1 800 426 7378 In Canada Toronto only call 416 383 3344 All other areas call 1 800 565 3344 In other countries c...

Page 20: ...nical support representative might want to go through the problem with you during the call More help late breaking news and details of the latest accessories for these products may be found on the World Wide Web at http www pc ibm com us accessories 19 ...

Page 21: ... Input Supply Voltage Max Supply Current 90 264 V ac 47 63 Hz 1 8A at 100 V ac Video Input Input Signal Horiz Addressability Vert Addressability Clock Rate Analog Direct Drive 75 ohm 0 0 7 V 2048 pels maximum 1536 lines maximum 360 MHz Communications VESA DDC 2B Synchronization Range Horiz Frequency Vert Frequency 30 kHz 130 kHz 50 Hz 160 Hz Power Consumption Typical Normal Operation Off 130 W 1 W...

Page 22: ...r service use only Part Number Machine type 6735 Description 73P2300 6735 K0N Two Tone 73P2301 6735 60N Black 73P2302 6735 K0N Two Tone 73P2303 6735 60N Black 73P2304 6735 70N Black 73P2305 6735 K0S Two Tone 73P2306 6735 60S Black 73P2307 6735 K0S Two Tone 73P2308 6735 60S Black 73P2316 Tilt Swivel Black 73P2317 Tilt Swivel Pearl White 21 ...

Page 23: ...y to the United Kingdom or any country where such provisions are inconsistent with local law INTERNATIONAL BUSINESS MACHINES CORPORATION PROVIDES THIS PUBLICATION AS IS WITHOUT WARRANTY OF ANY KIND EITHER EXPRESS OR IMPLIED INCLUDING BUT NOT LIMITED TO THE IMPLIEDWARRANTIES OF NON INFRINGEMENT MERCHANTABILITY OR FITNESS FOR A PARTICULAR PURPOSE Some states do not allow disclaimer of express or imp...

Page 24: ...elpCenter and IBM ENERGY STAR and the ENERGY STAR logo are U S Govt registered trademarks Microsoft Windows and Windows NT are trademarks of Microsoft Corporation in the United States other countries or both Other company product and service names may be trademarks or service marks of others Copyright International Business Machines Corporation 2003 All rights reserved ...

Reviews: