background image

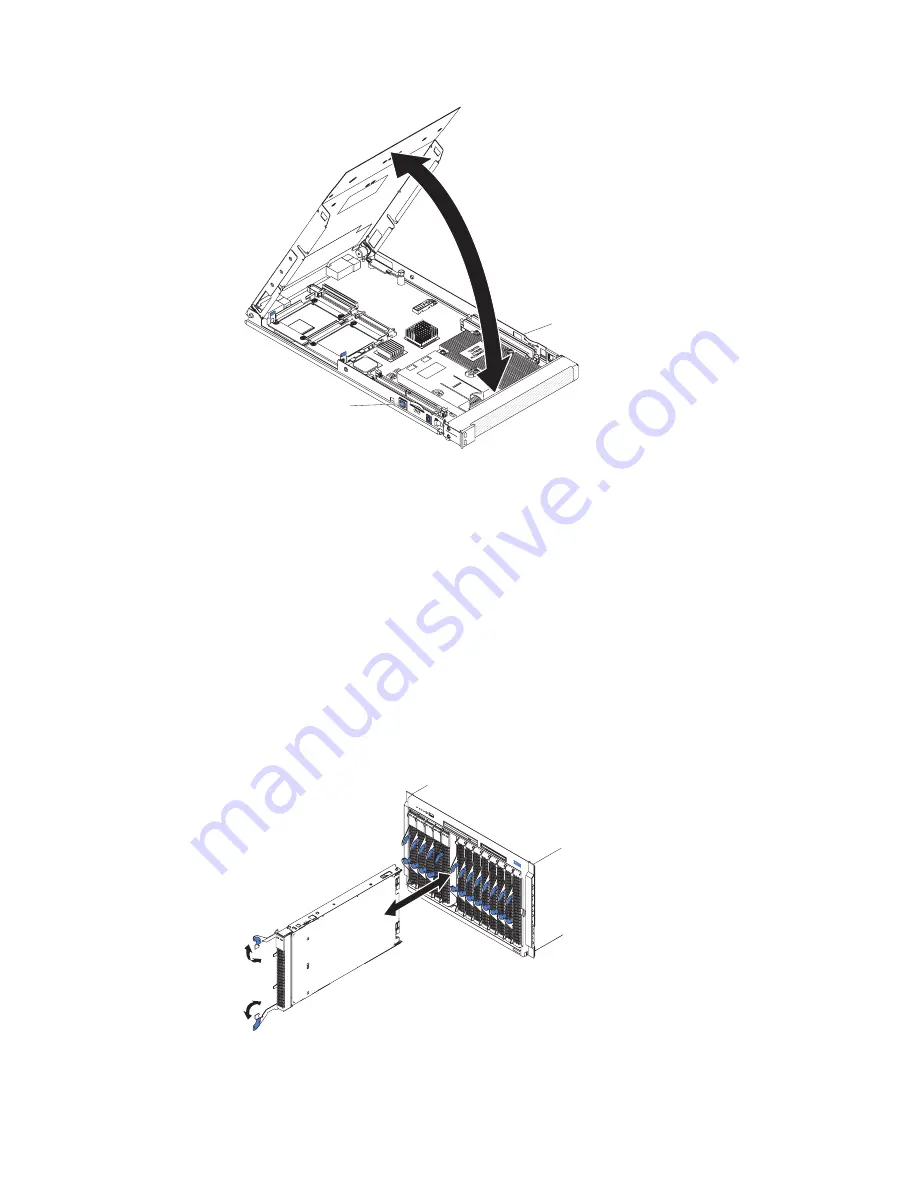
Blade-cover
release

Blade-cover
release

To


close


the


blade


server


cover,


complete


the


following


steps:


1.


Read


the


safety


information


beginning


on


page


v


and


“Installation


guidelines”


on


page


15.


2.


If


you


removed


the


blade


bezel


assembly,


replace


it


now


(see


“Installing


the


blade


server


bezel


assembly”


on


page


29


for


instructions).


3.


Lower


the


cover


so


that


the


slots


at


the


rear


slide


down


onto


the


pins


at


the


rear


of


the


blade


server,


as


shown


in


the


illustration.


Before


closing


the


cover,


check


that


all


components


are


installed


and


seated


correctly


and


that


you


have


not


left


loose


tools


or


parts


inside


the


blade


server.


4.


Pivot


the


cover


to


the


closed


position,


as


shown


in


the


illustration,


until


it


clicks


into


place.

Installing


the


blade


server


in


a


BladeCenter


unit


The


following


illustration


shows


how


to


install


the


blade


server


into


BladeCenter


type


8677.


The


appearance


of


your


BladeCenter


unit


might


be


different,


see


the


documentation


for


your


BladeCenter


unit.


To


install


a


blade


server


in


a


BladeCenter


unit,


complete


the


following


steps.


30


AMD


Opteron


LS20


Type


8850


for


IBM


BladeCenter:


Installation


and


User’s


Guide

Summary of Contents for AMD Opteron LS20 Type 8850

Page 1: ...e to register and profile your blade server on the IBM Support Web site Before installing the BladeCenter LS20 Type 8850 blade server in a BladeCenter unit complete the following procedures Install and configure the rack according to the documentation that came with the rack Install the BladeCenter unit into the rack and configure it according to the documentation provided with the BladeCenter uni...

Page 2: ... that all optional devices you installed are on the ServerProven list at http www ibm com servers eserver serverproven compat us Is the server working correctly Is the problem solved Hardware or software problem View support telephone numbers at http www ibm com planetwide View information about IBM Support Line at or view support telephone numbers at http www ibm com services sl products http www...

Page 3: ...AMD Opteron LS20 Type 8850 for IBM BladeCenter Installation and User s Guide ...

Page 4: ...e Warranty and Support Information document for your blade server type on the Documentation CD Second Edition April 2006 Copyright International Business Machines Corporation 2006 All rights reserved US Government Users Restricted Rights Use duplication or disclosure restricted by GSA ADP Schedule Contract with IBM Corp ...

Page 5: ...he blade server bezel assembly 18 Installing a SCSI hard disk drive 19 Removing a SCSI hard disk drive 20 Installing memory modules 20 Installing an additional microprocessor 22 Installing an I O expansion card 26 Installing a small form factor expansion card 26 Installing a standard form factor expansion card 27 Completing the installation 29 Installing the blade server bezel assembly 29 Closing ...

Page 6: ...ral Communications Commission FCC statement 48 Industry Canada Class A emission compliance statement 49 Australia and New Zealand Class A statement 49 United Kingdom telecommunications safety requirement 49 European Union EMC Directive conformance statement 49 Taiwanese Class A warning statement 50 Chinese Class A warning statement 50 Japanese Voluntary Control Council for Interference VCCI statem...

Page 7: ...talleert eerst de veiligheidsvoorschriften Ennen kuin asennat tämän tuotteen lue turvaohjeet kohdasta Safety Information Avant d installer ce produit lisez les consignes de sécurité Vor der Installation dieses Produkts die Sicherheitshinweise lesen Prima di installare questo prodotto leggere le Informazioni sulla Sicurezza Les sikkerhetsinformasjonen Safety Information før du installerer dette pro...

Page 8: ...he caution or danger statement in the IBM Safety Information book For example if a caution statement begins with a number 1 translations for that caution statement appear in the IBM Safety Information book under statement 1 Be sure to read all caution and danger statements in this documentation before performing the instructions Read any additional safety information that comes with the server or ...

Page 9: ...equipment when there is evidence of fire water or structural damage v Disconnect the attached power cords telecommunications systems networks and modems before you open the device covers unless instructed otherwise in the installation and configuration procedures v Connect and disconnect cables as described in the following table when installing moving or opening covers on this product or attached...

Page 10: ... fiber optic devices or transmitters are installed note the following v Do not remove the covers Removing the covers of the laser product could result in exposure to hazardous laser radiation There are no serviceable parts inside the device v Use of controls or adjustments or performance of procedures other than those specified herein might result in hazardous radiation exposure DANGER Some laser ...

Page 11: ... power control button on the device and the power switch on the power supply do not turn off the electrical current supplied to the device The device also might have more than one power cord To remove all electrical current from the device ensure that all power cords are disconnected from the power source 1 2 Safety ix ...

Page 12: ... 13 DANGER Overloading a branch circuit is potentially a fire hazard and a shock hazard under certain conditions To avoid these hazards ensure that your system electrical requirements do not exceed branch circuit protection requirements Refer to the information that is provided with your device for electrical specifications Statement 21 CAUTION Hazardous energy is present when the blade is connect...

Page 13: ... on the Documentation CD You can obtain up to date information about the blade server at http www ibm com support If firmware and documentation updates are available you can download them from http www ibm com support The blade server might have features that are not described in the documentation that comes with the blade server and the documentation might be updated occasionally to include infor...

Page 14: ...identifying information on a label and place the label on the BladeCenter unit bezel See the documentation for your BladeCenter unit for recommended label placement Important Do not place the label on the blade server or in any way block the ventilation holes on the blade server The LS20 Type 8850 blade server has one of the bezels shown in the following illustration Note The illustrations in this...

Page 15: ... on the Documentation CD In addition to the documentation in this library be sure to review the IBM BladeCenter Planning and Installation Guide for your BladeCenter unit for information to help you prepare for system installation and configuration To check for updated documentation and technical updates complete the following steps Note Changes are made periodically to the IBM Web site The actual ...

Page 16: ...dditional documents under it Click the plus sign to display the additional documents When you select a document a description of the document appears under Topic Description To select more than one document press and hold the Ctrl key while you select the documents Click View Book to view the selected document or documents in Acrobat Reader or xpdf If you selected more than one document all the se...

Page 17: ...kill DIMMs only Chipkill is not supported for 512 MB DIMMs v Supports 512 MB 1 GB and 2 GB DIMMs as of the date of this publication Drives Support for two internal small form factor SCSI drives Integrated functions v Dual channel Gigabit Ethernet controller v Expansion card interface v Intelligent Platform Management Interface IPMI v Baseboard management controller BMC with IPMI firmware v ATI Rad...

Page 18: ...rs support Wake on LAN technology v I O expansion The blade server comes with connectors on the system board for an optional expansion card such as the Fibre Channel expansion card for adding more network communication capabilities to the blade server v Large system memory As of the date of this publication the memory bus in the blade server supports up to 8 GB of system memory typically 4 GB per ...

Page 19: ...reater v Customer upgradeable basic input output system BIOS code v Customer support center 24 hours per day 7 days a week1 v Diagnostic support of Ethernet controllers v Error codes and messages v ECC protection on the L2 cache v ECC memory v Failover Ethernet support v Light path diagnostics feature v Power on self test POST v Predictive Failure Analysis PFA alerts v Service processor that commu...

Page 20: ...tegration into leading workgroup and enterprise systems management environments v Ease of use training and setup IBM Director also provides an extensible platform that supports advanced server tools that are designed to reduce the total cost of managing and supporting networked systems By deploying IBM Director you can achieve reductions in ownership costs through the following benefits v Reduced ...

Page 21: ...nit and remove the cover to see the components The following illustration shows the major components of the LS20 Type 8850 blade server Microprocessor heat sink filler Microprocessor 1 and heat sink Bezel assembly Heat sink Microprocessor 2 DIMMs SCSI hard disk drives Chapter 1 Introduction 9 ...

Page 22: ...10 AMD Opteron LS20 Type 8850 for IBM BladeCenter Installation and User s Guide ...

Page 23: ...ver is configured through the management module to do so v You can turn on the blade server remotely by means of the service processor in the management module v If the operating system supports the Wake on LAN feature and the blade server power on LED is flashing slowly the Wake on LAN feature can turn on the blade server if the Wake on LAN feature has not been disabled through the management mod...

Page 24: ...e keyboard video and mouse control from one blade server to another You can also press keyboard keys in the following sequence to switch keyboard video and mouse control between blade servers NumLock NumLock bay_number Enter bay_number is the two digit number of the blade bay in which the blade server is installed Although the keyboard that is attached to the BladeCenter unit is a PS 2 style keybo...

Page 25: ...rver Activity LED When this green LED is lit it indicates that there is activity on the hard disk drive or network Location LED When this blue LED is lit it has been turned on by the system administrator to aid in visually locating the blade server The location LED on the BladeCenter unit will be lit also The location LED can be turned off through the management module Web interface or through IBM...

Page 26: ...et 2 and heat sink filler Battery BH1 Control panel connector SCSI connector 1 J12 SCSI connector 0 J11 I O expansion option connector J13 I O expansion option connector J10 The following illustration shows the jumpers on the system board 4 4 2 2 3 3 1 1 Normal operation Start from backup BIOS image 4 4 2 2 3 3 1 1 Normal operation Disable WOL BIOS backup page J16 WOL bypass J15 14 AMD Opteron LS2...

Page 27: ...en or close a latch v Orange on a component or an orange label on or near a component indicates that the component can be hot swapped which means that you can remove or install the component while the BladeCenter unit is running Orange can also indicate touch points on hot swap components See the instructions for removing or installing a specific hot swap component for any additional procedures th...

Page 28: ...e and install it directly into the blade server without setting it down If it is necessary to set down the device put it back into its static protective package Do not place the device on the blade server cover or on a metal surface v Take additional care when handling devices during cold weather Heating reduces indoor humidity and increases static electricity Removing the blade server from the Bl...

Page 29: ...te The recessed spring loaded doors will move out of the way as you insert the blade or filler blade Opening the blade server cover The following illustration shows how to open the cover on a blade server Blade cover release Blade cover release To open the blade server cover complete the following steps 1 Read the safety information beginning on page v and Installation guidelines on page 15 2 If t...

Page 30: ...To remove the blade server bezel assembly complete the following steps 1 Read the safety information beginning on page v and Installation guidelines on page 15 2 Open the blade server cover see Opening the blade server cover on page 17 for instructions 3 Press the bezel assembly release on each side of the blade server and pull the bezel assembly away from the blade server approximately 1 2 cm 0 5...

Page 31: ...l an optional standard form factor expansion card The standard form factor expansion card occupies the same area as the second hard disk drive To install a SCSI hard disk drive complete the following steps 1 Read the safety information beginning on page v and Installation guidelines on page 15 2 Shut down the operating system turn off the blade server and remove the blade server from the BladeCent...

Page 32: ...r are 512 MB 1 GB and 2 GB Depending on the memory configuration set in blade server BIOS as of the date of this publication the blade server can support a minimum of 1 GB and a maximum of 8 GB of system memory v For optimum performance one pair of DIMMs is associated with each microprocessor The blade server comes with two DIMMs installed for each microprocessor Pair DIMM connectors Microprocesso...

Page 33: ...connectors on the system board see the above illustration Determine the connectors into which you will install the DIMMs 7 Touch the static protective package that contains the DIMM option to any unpainted metal surface on the BladeCenter unit or any unpainted metal surface on any other grounded rack component in the rack you are installing the DIMM option in for at least 2 seconds then remove the...

Page 34: ...information that you must consider when installing a microprocessor v If the blade server has two microprocessors they must have the same cache size and type the same clock speed same number of cores and identical internal and external clock frequencies including system bus speed v If only one microprocessor is installed it must be installed in the microprocessor 1 socket v For a list of microproc...

Page 35: ...erver cover see Opening the blade server cover on page 17 for instructions 5 Remove the bezel assembly see Removing the blade server bezel assembly on page 18 for instructions 6 Locate the microprocessor socket on the system board 7 Unlatch and remove the heat sink filler 8 Install the microprocessor a Remove the protective cover tape or label from the surface of the microprocessor socket if one i...

Page 36: ...npainted metal surface on any other grounded rack component in the rack you are installing the microprocessor in for at least 2 seconds then remove the microprocessor from the package Attention Do not use excessive force when pressing the microprocessor into the socket d Center the microprocessor over the microprocessor socket Align the triangle on the corner of the microprocessor with the triangl...

Page 37: ...rmly on the heat sink c Align the four captive screws on the heat sink with the holes on the heat sink retention module d Press firmly on the captive screws and tighten them alternating between screws until they are tight Do not overtighten the screws by using excessive force If you are using a torque wrench tighten the screws to 1 00 to 1 26 Newton meters Nm 0 74 to 0 93 foot pounds Attention If ...

Page 38: ...d an I O expansion card you must make sure that the I O modules it is mapped to both support the expansion card network interface type The blade server supports a number of I O expansion cards types such as v Gigabit Ethernet expansion card v Fibre Channel expansion card v Myrinet expansion card The following sections describe how to install an I O expansion card in the blade server Installing a s...

Page 39: ...d form factor expansion card installed in the blade server If you are removing the SCSI disk drive backup any information on it that you want to keep to another storage device If the SCSI hard disk drive that is installed in SCSI connector 1 is part of a RAID array delete the SCSI RAID array before removing the drive When you delete the RAID array the array configuration information is removed and...

Page 40: ...sion card tray Secure the tray to the system board with the screws from the option kit or from the removed drive tray b Orient the expansion card and slide the notch in the narrow end of the card into the raised hook on the tray then gently pivot the wide end of the card into the expansion card connectors For device driver and configuration information to complete the installation of the expansion...

Page 41: ... server configuration on page 32 Note If you have just connected the power cords of the BladeCenter unit to electrical outlets you must wait until the power on LED on the blade server flashes slowly before pressing the power control button Installing the blade server bezel assembly See the illustration in Removing the blade server bezel assembly on page 18 for information about installing the beze...

Page 42: ...efore closing the cover check that all components are installed and seated correctly and that you have not left loose tools or parts inside the blade server 4 Pivot the cover to the closed position as shown in the illustration until it clicks into place Installing the blade server in a BladeCenter unit The following illustration shows how to install the blade server into BladeCenter type 8677 The ...

Page 43: ...ust install it in the same blade bay from which you removed it Some blade server configuration information and update options are established according to bay number Reinstalling a blade server into a different blade bay from the one from which it was removed could have unintended consequences and you might have to reconfigure the blade server 4 Make sure that the release levers on the blade serve...

Page 44: ... the documentation that comes with each option for information about installing device drivers The blade server comes with at least one microprocessor If more than one microprocessor is installed the blade server can now operate as a symmetric multiprocessing SMP server You might have to upgrade the operating system to support SMP See Chapter 5 Installing the operating system on page 41 and your o...

Page 45: ...rmation about purchasing the software go to http www ibm com servers eserver xseries systems_management For information about setting up the network configuration for remote management such as with the IBM Director products see the IBM BladeCenter Planning and Installation Guide for your Bladecenter unit type You can obtain the planning guides from http www ibm com support Using the Configuration ...

Page 46: ...ettings directly in the system information Product Data Select this choice to view the machine type and model of the blade server the serial number and the revision level or issue date of the BIOS diagnostics and BMC code stored in electrically erasable programmable ROM EEPROM v Devices and I O Ports Select this choice to view or change assignments for devices and input output I O ports You can al...

Page 47: ... can enable a virus detection test that checks for changes in the boot record when the blade server starts This choice is on the full Configuration Setup menu only v Advanced Setup Select this choice to change settings for advanced hardware features Important The blade server might malfunction if these options are incorrectly configured Follow the instructions on the screen carefully Memory Settin...

Page 48: ...e to cancel the changes you have made in the settings and restore the factory settings v Exit Setup Select this choice to exit from the Configuration Setup Utility program If you have not saved the changes you have made in the settings you are asked whether you want to save the changes or exit without saving them Using passwords From the System Security choice you can set change and delete a power...

Page 49: ... v Continuous health monitoring and control v Configurable notification and alerts v Event logs that are timestamped and saved in nonvolatile memory and can be attached to e mail alerts v Remote graphics console redirection v Point to point protocol PPP support v Remote power control v Remote firmware update and access to critical server settings v Around the clock access to the blade server even ...

Page 50: ...the other blade servers for information You do not have to set any jumpers or configure the controllers for the blade server operating system However you must install a device driver to enable the blade server operating system to address the Ethernet controllers For device drivers and information about configuring the Ethernet controllers see the Broadcom NetXtreme Gigabit Ethernet Software CD tha...

Page 51: ...bay by performing the same test and using a controller on the expansion card and a compatible switch module or pass thru module in I O module bay 3 or 4 Configuring a SCSI RAID array Configuring a SCSI RAID array applies to a blade server in which two SCSI hard disk drives are installed Two SCSI hard disk drives in the blade server can be used to implement and manage RAID level 1 mirror arrays in ...

Page 52: ...ess Enter If you select Device Properties and Mirroring Properties additional screens are displayed Using the ServeRAID configuration programs The IBM ServeRAID Support CD contains the ServeRAID Manager program which you can use to configure the hard disk drives for use with the LSI SCSI controller For details about using these programs see the documentation that comes on the IBM ServeRAID Support...

Page 53: ...ystems_management v Download the latest operating system installation instructions at http www ibm com support and install the operating system Local deployment for supported Microsoft Windows operating systems such as Windows 2000 might require an integrated CD that contains the Windows operating system with service packs applied Instructions for creating a Windows Integrated CD are contained in ...

Page 54: ...series systems_management Downloading operating system installation instructions After you configure the blade server hardware complete the following steps to download the latest operating system installation instructions from the IBM Support Web page 1 Go to the IBM Support Web page at http www ibm com support 2 From the Support by product list select Servers 3 Under Select your product from the ...

Page 55: ...l the blade server in the BladeCenter unit and then restart the blade server Note Microprocessors can only be removed by a trained service technician If the blade server does not start up after verifying the above actions see the Problem Determination and Service Guide on the Documentation CD The following tools are available to help you diagnose and solve hardware related problems v POST beep cod...

Page 56: ...es systems_management Instructions for using the diagnostic programs are in the Problem Determination and Service Guide for your blade server v Light path diagnostics Use light path diagnostics LEDs on the system board to identify system errors If the system error LED on the system LED panel on the front or rear of the BladeCenter unit is lit one or more error LEDs on the BladeCenter unit componen...

Page 57: ...NG BUT NOT LIMITED TO THE IMPLIED WARRANTIES OF NON INFRINGEMENT MERCHANTABILITY OR FITNESS FOR A PARTICULAR PURPOSE Some states do not allow disclaimer of express or implied warranties in certain transactions therefore this statement may not apply to you This information could include technical inaccuracies or typographical errors Changes are periodically made to the information herein these chan...

Page 58: ...at Inc in the United States and other countries Other company product or service names may be trademarks or service marks of others Important notes Processor speeds indicate the internal clock speed of the microprocessor other factors also affect application performance CD ROM drive speeds list the variable read rate Actual speeds vary and are often less than the maximum possible When referring to...

Page 59: ... Information on IBM product recycling offerings can be found on IBM s Internet site at http www ibm com ibm environment products prp shtml Notice This mark applies only to countries within the European Union EU and Norway This appliance is labeled in accordance with European Directive 2002 96 EC concerning waste electrical and electronic equipment WEEE The Directive determines the framework for th...

Page 60: ...al of batteries outside the United States go to http www ibm com ibm environment products batteryrecycle shtml or contact your local waste disposal facility In the United States IBM has established a return process for reuse recycling or proper disposal of used IBM sealed lead acid nickel cadmium nickel metal hydride and battery packs from IBM equipment For information on proper disposal of these ...

Page 61: ...ention This is a Class A product In a domestic environment this product may cause radio interference in which case the user may be required to take adequate measures United Kingdom telecommunications safety requirement Notice to Customers This apparatus is approved under approval number NS G 1234 J 100003 for indirect connection to public telecommunication systems in the United Kingdom European Un...

Page 62: ...se Class A warning statement Chinese Class A warning statement Japanese Voluntary Control Council for Interference VCCI statement 50 AMD Opteron LS20 Type 8850 for IBM BladeCenter Installation and User s Guide ...

Page 63: ...pport 6 documentation CD 3 drive internal install 19 E electronic emission Class A notice 48 environment 5 Ethernet controller enumeration 38 Ethernet controller 6 configuring 38 failover 38 redundant network connection 38 event log 37 F FCC Class A notice 48 features blade server 6 Fibre Channel card I O expansion card 26 filler blade 17 microprocessor heat sink 15 firmware updates 1 37 forgotten...

Page 64: ...ver 17 operating system install using RDM 42 installing 41 operating systems supported 41 option installing 15 P password power on 36 placement of labels 2 port input output 32 POST beep codes and error messages 43 power throttling 6 power on password 36 Preboot eXecution Environment PXE option 35 disabling 35 enabling 35 problems hardware 43 solving 43 product data 1 R RDM using 42 reliability fe...

Page 65: ...ink 25 trademarks 45 troubleshooting Diagnostic programs 44 Light path diagnostics 44 POST beep codes and error messages 43 Problem isolation tables 43 turning off the blade server 11 turning on the blade server 11 U United States electronic emission Class A notice 48 United States FCC Class A notice 48 updating firmware 37 using jumpers 14 utility Configuration Setup Utility program 33 W Web site...

Page 66: ...54 AMD Opteron LS20 Type 8850 for IBM BladeCenter Installation and User s Guide ...

Page 67: ......

Page 68: ... Part Number 31R1747 Printed in USA 1P P N 31R1747 ...

Reviews: