


a.
Restart
the
server
and
press
F1
when
prompted
to
start
the
Configuration/Setup
Utility
program.
b.
Select
Devices
and
I/O
Ports
;
then,
make
sure
that
the
values
are
set
as
follows:
v
Serial
Port
A
:
Auto-configure
v
Serial
Port
B
:
Auto-configure
c.
Select
Remote
Console
Redirection
;
then,
make
sure
that
the
values
are
set
as
follows:
v
Remote
Console
Active
:
Enabled
v
Remote
Console
COM
Port
:
COM
1
v
Remote
Console
Baud
Rate
:
19200
v
Remote
Console
Data
Bits
:
8
v
Remote
Console
Parity
:
None
v
Remote
Console
Stop
Bits
:
1
v
Remote
Console
Text
Emulation
:
ANSI
v
Remote
Console
Keyboard
Emulation
:
ANSI
v
Remote
Console
Active
After
Boot
:
Enabled
v
Remote
Console
Flow
Control
:
Hardware
d.
Press
Esc
twice
to
exit
the
Remote
Console
Redirection
and
Devices
and
I/O
Ports
sections
of
the
Configuration/Setup
Utility
program.
Note:
Do
not
use
Planar
Ethernet
1
for
PXE/DHCP
booting
or
installation.
e.
Select
Start
Options
;
then,
set
Planar
Ethernet
PXE/DHCP
to
one
of
the
following
settings:
v
Disabled
v
Planar
Ethernet
2
.
If
you
set
Planar
Ethernet
PXE/DHCP
to
Planar
Ethernet
2
,
you
must
also
set
Run
PXE
only
on
selected
Planar
NIC
to
Enabled
.
f.
Press
Esc
to
exit
the
Start
Options
section
of
the
Configuration/Setup
Utility
program.
g.
Select
Save
Settings
;
then,
press
Enter.
h.
Press
Enter
to
confirm.
i.
Select
Exit
Setup
;
then,
press
Enter.
j.
Make
sure
that
Yes,
exit
the
Setup
Utility
is
selected;
then,
press
Enter.
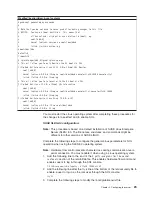
Linux
configuration
For
SOL
operation
on
the
server,
you
must
configure
the
Linux
®
operating
system
to
expose
the
Linux
initialization
(booting)
process.
This
enables
users
to
log
in
to
the
Linux
console
through
an
SOL
session
and
directs
Linux
output
to
the
serial
console.
See
the
documentation
for
your
specific
Linux
operating-system
type
for
information
and
instructions.
Use
one
of
the
following
procedures
to
enable
SOL
sessions
for
your
Linux
operating
system.
You
must
be
logged
in
as
a
root
user
to
perform
these
procedures.
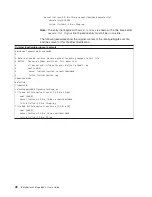
Red
Hat
Enterprise
Linux
ES
2.1
configuration:
24
IBM
xSeries
346
Type
8840:
User’s
Guide
Summary of Contents for 8840 - eServer xSeries 346
Page 1: ...IBM xSeries 346 Type 8840 User s Guide ERserver...
Page 2: ......
Page 3: ...IBM xSeries 346 Type 8840 User s Guide ERserver...
Page 24: ...12 IBM xSeries 346 Type 8840 User s Guide...
Page 59: ......
Page 60: ...Part Number 31R1192 Printed in USA 1P P N 31R1192...