background image

1-5

10

Customizing Your Monitor

Using the SCREEN On-screen
Display

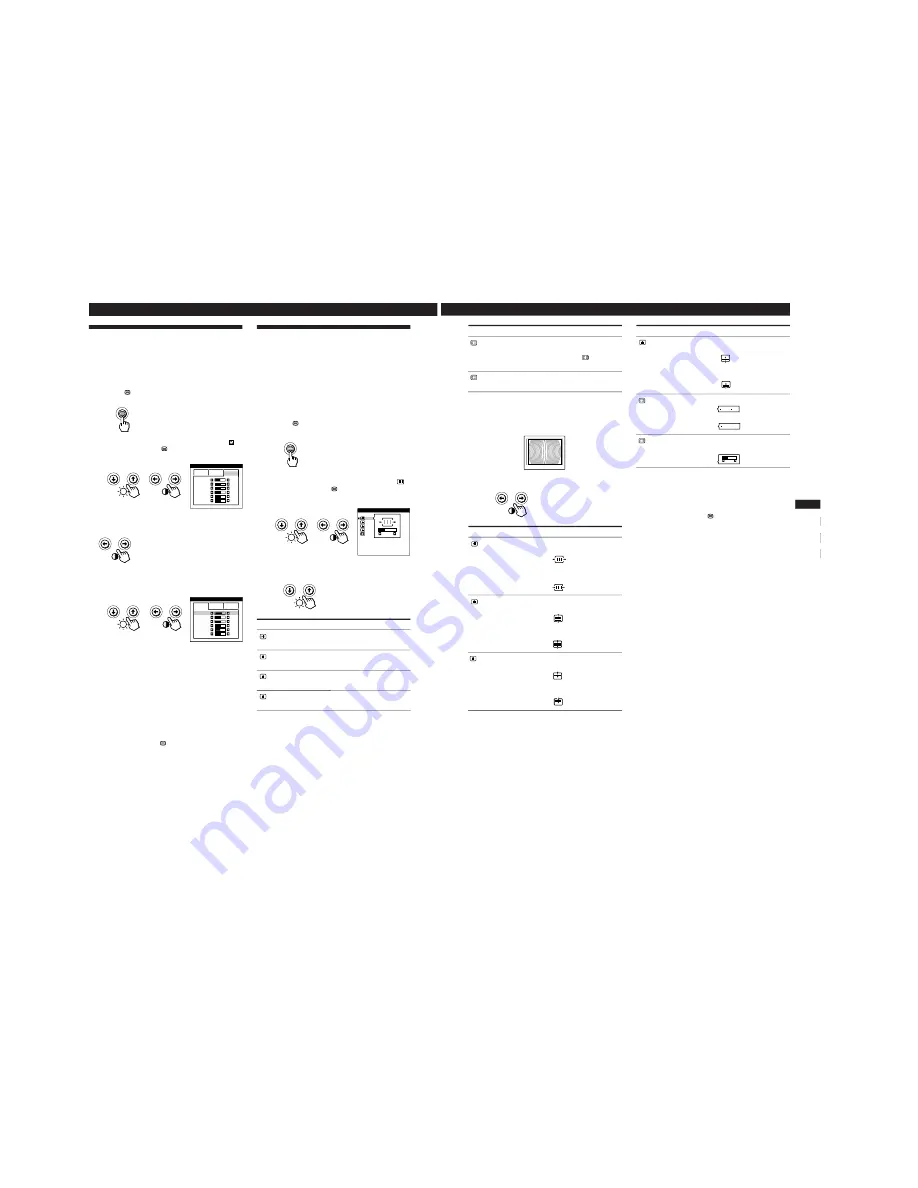
You can adjust convergence settings to eliminate red or blue
shadows that may appear around objects on the screen.
Adjust the CANCEL MOIRE function to eliminate wavy or
elliptical patterns that may appear on the screen.
Once CANCEL MOIRE is adjusted, it will be stored in
memory for the current input signal. All other adjustments
will be stored in memory for all input signals received.

1

Press the 

 button.

The MENU OSD appears.

2

Press the 

¨

.

/

>

 and 

>

?

/

/

 buttons to select “

SCREEN,” and press the 

 button again.

The SCREEN OSD appears.

3

Press the 

¨

.

/

>

 buttons to select the item you want

to adjust.

Select


H CONVERGENCE


V CONVERGENCE


TOP

V CONVER TOP


BOT

V CONVER BOTTOM

To

adjust the horizontal convergence

adjust the vertical convergence

adjust the screen’s upper vertical
convergence

adjust the screen’s lower vertical
convergence

COLOR

6500K

9300K

G  B I AS

50

B  B I AS

50

R  GAIN

50

G  GAIN

50

B  GAIN

50

R  B I AS

76

1

Using the COLOR On-screen Display

You can change the monitor’s color temperature. For
example, you can adjust or change the colors of a picture on
the screen to match the actual colors of the printed picture.
Once the setting is adjusted, it will be stored in memory for
all input signals received.

1

Press the 

 button.

The MENU OSD appears.

2

Press the 

¨

.

/

>

 and 

>

?

/

/

 buttons to select “

COLOR,” and press the 

 button again.

The COLOR OSD appears.

3

Press the 

>

?

/

/

 buttons to select the color

temperature.

There are three color temperature
modes in the OSD.
The preset adjustments are:
5000K, 6500K, 9300K

4

Fine tuning the color temperature

Press the 

¨

.

/

>

 buttons to select an item and adjust by

pressing the 

>

?

/

/

 buttons.

Select 

R (red), G (green), or B (blue) BIAS

 to adjust the

black level of each color’s signal.

Select 

R (red), G (green), or B (blue) GAIN

 to adjust the

white level of each color’s signal.

The “5000K,” “6500K” or “9300K” disappears and the
new color settings are memorized for each of the three
color modes.
The color temperature modes change as follows:
5000K

n

 1, 6500K

n

 2, 9300K

n

 3

The OSD automatically disappears after about 30 seconds.
To close the OSD, press the 

 button again.

To reset,  press the 

?

 (reset) button while the OSD is on.

The selected item is reset to the factory settings.

COLOR

R  B I AS

5000K

6500K

50

G  B I AS

50

B  B I AS

50

R  GAIN

50

G  GAIN

50

B  GAIN

50

9300K

SCREEN

TOP
BOT

H   CONVERGENCE

26

11

Getting Started

F

EN

ES

C

Customizing Your Monitor

*

Moire is a type of natural interference which produces soft or
wavy lines on your screen. It may appear due to interference
between the regulated pattern of the picture from the input
signal and the phosphor pitch pattern of the CRT.

Example of moire:

4

Press the 

>

?

/

/

 buttons to adjust the settings.

Note

The picture may become fuzzy when CANCEL MOIRE is set to
“ON.”

The OSD automatically disappears after about 30 seconds.
To close the OSD, press the 

 button again.

To reset,  press the 

?

 (reset) button while the OSD is on.

The selected item is reset to the factory setting.

ON

OFF

ON

OFF

50

 For


BOT

V CONVER BOTTOM


CANCEL MOIRE


ADJ

MOIRE ADJUST

Press

/

 . . . to shift red shadows up and blue

shadows down

?

 . . . to shift red shadows down and

blue shadows up

/

 . . . to turn CANCEL MOIRE “ON”

?

 . . . to turn CANCEL MOIRE “OFF”

/

 or 

?

 . . . to adjust the screen until the

moire is at a minimum

 Select


CANCEL MOIRE *


ADJ

MOIRE ADJUST

To

turn the moire cancellation function
“ON” or “OFF.” CANCEL MOIRE
must be “ON” for “

ADJ (MOIRE

ADJUST)” to appear on the screen.

adjust the degree of moire
cancellation

For


H CONVERGENCE


V CONVERGENCE

TOP

V CONVER TOP

Press

/

 . . . to shift red shadows to the right

and blue shadows to the left

?

 . . . to shift red shadows to the left

and blue shadows to the right

/

 . . . to shift red shadows up and blue

shadows down

?

 . . . to shift red shadows down and

blue shadows up

/

 . . . to shift red shadows up and blue

shadows down

?

 . . . to shift red shadows down and

blue shadows up

Summary of Contents for 655743N - P 92 - 19" CRT Display

Page 1: ...dots Vertical Max 1200 lines Standard image area Approx 330 264 mm w h 13 10 1 2 inches or Approx 352 264 mm w h 13 7 8 10 1 2 inches Deflection frequency Horizontal 30 to 94 kHz Vertical 50 to 160 H...

Page 2: ...set to the customer 1 Check the area of your repair for unsoldered or poorly sol dered connections Check the entire board surface for solder splashes and bridges 2 Check the interboard wiring to ensu...

Page 3: ...d the monitor automatically resumes its normal operation mode Recovery time Approx 3 sec Approx 3 sec Approx 15 sec max u indicator Green Green and orange alternate Green and orange alternate Orange O...

Page 4: ...431 0 406 0 316 H SYNC 3 813 1 556 1 138 1 219 1 016 1 067 1 077 1 016 0 948 H BP 1 589 2 222 2 702 2 235 2 201 1 837 1 508 1 422 1 501 H ACTIV 26 058 17 778 14 222 13 003 10 836 9 481 8 62 8 127 7 90...

Page 5: ...ure Tube Removal 2 4 3 SAFETY RELATED ADJUSTMENT 3 1 4 ADJUSTMENTS 4 1 5 DIAGRAMS 5 1 Block Diagrams with Frame Schematic Diagram 5 1 5 2 Circuit Boards Location 5 4 5 3 Schematic Diagrams and Printed...

Page 6: ...n with sharp or abrasive items such as a ballpoint pen or screwdriver This type of contact may result in a scratched picture tube Transportation When you transport this monitor for repair or shipment...

Page 7: ...W3 HD15 13W3 HD15 Pin No 4 5 6 7 8 9 10 A1 A2 A3 1 2 3 4 5 6 7 8 9 10 5 Getting Started Getting Started F EN ES C AutomaticallyAdjustingtheSize andCenteringofthePicture By pressing the button the size...

Page 8: ...rom the interrupted signal to the constant signal If this happens manually select the desired signal 7 Getting Started F EN ES C Customizing Your Monitor UsingtheCENTEROn screen Display The CENTER set...

Page 9: ...ss the reset button while the OSD is on The horizontal and vertical sizes are both reset to the factory settings SIZE 26 73 9 Getting Started F EN ES C Customizing Your Monitor 4 Press the buttons to...

Page 10: ...el of each color s signal The 5000K 6500K or 9300K disappears and the new color settings are memorized for each of the three color modes The color temperature modes change as follows 5000Kn 1 6500Kn 2...

Page 11: ...MIN OPTION ZZ ON MANUAL DEGAUSS UNLOCK 1 MIN OPTION ZZ ZZ OSD H POSITION UNLOCK 1 MIN OPTION ZZ OSD V POSITION UNLOCK OPTION 1 13 Getting Started F EN ES C Customizing Your Monitor Lockingthecontrols...

Page 12: ...indicator Green Green and orange alternate Green and orange alternate Orange Off Power consumption 140 W 100 W 15 W 5 W 0 W Power consumption mode Normal operation Standby 1st mode Suspend 2nd mode Ac...

Page 13: ...st result INFORMATION OUT OF SCAN RANGE INPUT 1 17 Getting Started F EN D ES I Additional Information Symptom Check these items You cannot adjust the monitor with the buttons on the front panel White...

Page 14: ...or is working properly If the u indicator is still flashing there is a potential monitor failure Count the number of seconds between orange flashes of the u indicator and inform your service represent...

Page 15: ...RD REMOVAL 2 1 Seven screws BVTT 3 x 8 5 Side cover 8 Video shield 10 Four screws BVTT 3 x 8 7 Screw BVTT 3 x 8 9 EMI shield 6 4 Two screw covers Cabinet 3 Four screws BVTP 4 x 16 2 1 Two screw covers...

Page 16: ...3P 6 Two screws Ext tooth washer screw M4 2 Three screws BVTT 3 x 8 7 Two screws KTP 3 x 8 5 Rear shield 3 I O terminal board 8 Screw Ext tooth washer screw M4 4 A board 1 GND GND Connector 9pin GND...

Page 17: ...6557 03N 03S 43N 43S 2 5 SERVICE POSITION 2 6 H BOARD REMOVAL 2 3 CN601 D board AC inlet 3P Four screws Tapping screw 5 CN801 H board Two screws BVTAP 3 x 12 Bezel 2 3 Claw 1 4...

Page 18: ...t turn the foot of rubber over hardly The shatter hook terminal will stick out or hurt the rubber REMOVAL OF ANODE CAP NOTE Short circuit the anode of the picture tube and the anode cap to the metal c...

Page 19: ...of C639 and GND Connect a variable resistor 20 k or more and an ammeter in series between FBT pin and 15 V line side of C637 Decrease gradually the resis tance of the variable resistor form maximum t...

Page 20: ...er 6 Attach the sensor of the landing adjustment unit on the CRT surface 7 Adjust the DY position and purity and the DY tilt and land ing of the center and 4 corners with the landing checker Purity Ad...

Page 21: ...l Position and Size Specification Focus adjustment Adjust the focus volume 1 and 2 for the optimum focus Convergence Specification 4 2 IBM AT Computer as a Jig 1 690 391 21 1 A 1500 819 A Interface Un...

Page 22: ...6557 03N 03S 43N 43S 4 3 MEMO...

Page 23: ...ATA CONT CLP BLK 16 15 4 1 2 3 5 8 11 DAMP_DATA DAMP_CLK V BLK IC408 RGB INPUT SELECT V BLK Q402 Q401 CN404 CN403 IC402 1 4 IC402 2 4 IC402 3 4 IC402 4 4 V BLK DAMP_CLK DAMP_DATA OSD_SEL S C ENABLE AU...

Page 24: ...T 100 10V 10 10 10 25V 0 1 PT 220 100V 2200 10V 2200 10V 220 100V 2200 25V 2200 25V 1 4 7 100V 47 25V 47 25V 0 01 PT 220 100V 1 400V 100p 1kV 220 450V 0 01 PT 2 2 47p CH CHIP 0 01 B CHIP 220 16V 220p...

Page 25: ...5 9 5 10 D BOARD Conductor Side D BOARD Component Side D POWER SUPPLY U COM DEFLECTION 1 2 3 4 5 A B C D E F G 1 2 3 4 5 A B C D E F G...

Page 26: ...1 D 1 IC402 D 2 IC403 C 1 C 2 IC404 C 1 IC405 A 2 IC406 A 2 A 1 IC407 B 1 B 2 IC408 D 3 TRANSISTOR Q101 A 1 A 2 Q102 A 1 A 2 Q103 C 1 1 Q201 A 1 A 2 Q202 A 1 A 2 Q203 C 1 1 Q301 A 1 A 3 Q302 A 1 A 3 Q...

Page 27: ...0 CHIP 39k CHIP 47k CHIP 2 2k CHIP 100k CHIP 39k CHIP 22k CHIP 2 2M CHIP 22 CHIP 100k CHIP 1k CHIP 22 CHIP 390 CHIP 39k CHIP 2 2k CHIP 100k CHIP 1k CHIP 100k CHIP 39k CHIP 22k CHIP 22 CHIP 100k CHIP 1...

Page 28: ...S806 S804 S803 S802 S801 S800 R809 R810 R800 R801 R802 R803 R804 R805 R806 R807 R808 R812 C800 D806 CN801 R811 Q803 Q802 47 25V SPB 26MVWF 3 3k 330 330 470 470 680 1k 1k 5 6k 1k 1k 330 10P XA 220 2SC3...

Page 29: ...3050F DTA114GKAT146 DTA143ESA DTA144EKA T146 DTC114GKA DTC114GKAT146 DTC124EK DTC124EKA T146 2SA1036K Q 2SA1036K T 146 Q 2SA1037K T 146 QR 2SA1162G 2SA1462 Y33 2SA1738 TX 2SC1623 L5L6 2SC2412K T 146...

Page 30: ...N D1NL20U TR D1NL40 TA D1NS4 EGP10GPKG23 ERA38 06 RD11ES B1 RD12ES B2 RD13ES B2 RD16ES B2 RD16ES B3 RD22ES B2 RD24ES B2 RE24ES B3 RD3 3ES B2 RD5 1ES B2 RD6 2ES B2 RD6 8ES B1 RD6 8ES B3 1SS119 25TD 1SS...

Page 31: ...6 4 046 797 01 SCREW 3X12 BVTAP 7 4 365 808 01 SCREW 5 TAPPING 8 4 394 972 21 CAP POWER 9 8 933 313 00 D BOARD COMPLETE 10 X 4035 425 1 TRANSFORMER ASSY FLYBACK NX 4500 J1E4 11 1 694 402 11 TERMINAL B...

Page 32: ...W M4 EXT TOOTH WASHER 59 X 4035 241 2 STAND ASSY 03N 03S 60 63 59 X 4035 411 1 STAND ASSY 43N 43S 60 63 60 4 060 340 01 STOPPER A 61 4 060 339 01 RING TILT SWIVEL 62 4 047 474 01 FOOT RUBBER 63 4 041...

Page 33: ...43N 43S 107 4 063 796 01 INFORMATION DISK IBM 108 1 783 507 11 CORD SET POWER 10A 125V 43N NH model 108 1 783 507 21 CORD SET POWER 10A 125V 03N NH model 108 1 783 533 11 CORD SET POWER 7A 125V 03N 43...

Page 34: ...ERAMIC CHIP 0 22MF 10 25V C252 1 126 933 11 ELECT 100MF 20 16V C303 1 164 232 11 CERAMIC CHIP 0 01MF 10 50V C304 1 164 004 11 CERAMIC CHIP 0 1MF 10 25V C306 1 164 232 11 CERAMIC CHIP 0 01MF 10 50V C30...

Page 35: ...62 51 DIODE 1PS226 115 D401 8 719 109 85 ZENER DIODE RD5 1ESB2 D406 8 719 911 19 DIODE 1SS119 25 D407 8 719 052 12 DIODE 1SS376TE 17 D413 8 719 911 19 DIODE 1SS119 25 D414 8 719 109 66 ZENER DIODE RD3...

Page 36: ...9 91 RES CHIP 1K 5 1 10W R218 1 216 689 11 RES CHIP 39K 5 1 10W R221 1 216 081 00 RES CHIP 22K 5 1 10W R224 1 216 061 00 RES CHIP 3 3K 5 1 10W R225 1 216 039 00 RES CHIP 390 5 1 10W R226 1 216 039 00...

Page 37: ...SG401 1 517 499 21 GAP SPARK SG402 1 519 422 11 GAP SPARK 8 933 313 00 D BOARD COMPLETE 2 371 561 00 BUSHING P INSULATING IC502 4 060 842 01 SHEET INSULATING IC502 4 060 844 01 SHEET INSULATING IC1504...

Page 38: ...0 001MF 2KV C515 1 106 383 00 MYLAR 0 047MF 10 200V C517 1 137 368 11 FILM 0 0047MF 5 50V C518 1 137 368 11 FILM 0 0047MF 5 50V C520 1 104 664 11 ELECT 47MF 20 25V C521 1 164 182 11 CERAMIC CHIP 0 003...

Page 39: ...16 1 164 232 11 CERAMIC CHIP 0 01MF 10 50V C917 1 163 017 00 CERAMIC CHIP 0 0047MF 10 50V C918 1 164 004 11 CERAMIC CHIP 0 1MF 10 25V C919 1 137 368 11 FILM 0 0047MF 5 50V C920 1 117 626 31 FILM 2000P...

Page 40: ...22 8 719 029 04 DIODE D5L60 D623 8 719 911 19 DIODE 1SS119 25 D624 8 719 110 46 ZENER DIODE RD16ESB3 D625 8 719 911 19 DIODE 1SS119 25 D627 8 719 304 63 DIODE RM11C D901 8 719 404 49 DIODE MA111 D902...

Page 41: ...TC124EK Q527 8 729 033 25 TRANSISTOR DTC114GKA Q528 8 729 204 91 TRANSISTOR 2SA1049 GR Q529 8 729 178 43 TRANSISTOR 2SC2784 E Q530 8 729 207 89 TRANSISTOR 2SA1358 Y Q531 8 729 207 82 TRANSISTOR 2SC342...

Page 42: ...6 1 216 033 00 RES CHIP 220 5 1 10W R507 1 216 093 00 RES CHIP 68K 5 1 10W R508 1 216 073 00 RES CHIP 10K 5 1 10W R509 1 249 421 11 CARBON 2 2K 5 1 4W R510 1 216 033 00 RES CHIP 220 5 1 10W R511 1 216...

Page 43: ...1 215 484 00 METAL 430K 1 1 4W R638 1 247 807 31 CARBON 100 5 1 4W R639 1 247 863 91 CARBON 22K 5 1 4W R640 1 247 863 91 CARBON 22K 5 1 4W R641 1 215 482 00 METAL 360K 1 1 4W R642 1 215 485 00 METAL 4...

Page 44: ...1 249 383 11 CARBON 1 5 5 1 4W F R1515 1 216 089 91 RES CHIP 47K 5 1 10W R1516 1 215 885 00 METAL OXIDE 68 5 2W F R1517 1 216 071 00 RES CHIP 8 2K 5 1 10W R1518 1 216 077 00 RES CHIP 15K 5 1 10W R1519...

Page 45: ...19 78 TRANSISTOR 2SC2785 HFE Q803 8 729 119 78 TRANSISTOR 2SC2785 HFE RESISTOR R800 1 247 843 11 CARBON 3 3K 5 1 4W R801 1 249 411 11 CARBON 330 5 1 4W R802 1 249 411 11 CARBON 330 5 1 4W R803 1 249 4...

Page 46: ...ing and mark are critical for safety Replace only with part number specified Les composants identifi s per un tram et une marque sont critiques pour la s curit Ne les remplacer que par une pi ce porta...

Reviews: