


Changing a Value on the Configuration Menu
1. Press Stop. The printer becomes
not ready.
2. Press Menu to display the CONFIGURATION MENU on the
operator panel display.
3. Press Scroll Up
↑
or Scroll Down
↓
until you find the Category you
want.
4. Press Enter to select that Category.
5. Press Scroll Up
↑
or Scroll Down
↓
until you find the Parameter you
want.
6. Press Enter to select that Parameter.
7. Press Scroll Up
↑
or Scroll Down
↓
until you find the Value you
want.
8. Press Enter to select a new Value. An asterisk (*) appears to
indicate the new current Value.
9. To return to the CONFIGURATION MENU, press Return to return
to the Parameter level, and then press Return again.
10. To save changes to a Custom Set, return to the CONFIGURATION
MENU. Select Configuration Storage. Select Save Current Values.
Select a Custom Set.
11. To return the printer to
ready from any level, press Start.
Custom Set in Use Indicator
The current custom set in use is displayed in parentheses <X>.
Where <X> can be:
A
(Custom Set A in use)
C
(Custom Set C in use)
B
(Custom Set B in use)
D
(Custom Set D in use).
E
(Custom Set E in use)
F
(Custom Set F in use)
G
(Custom Set G in use).
H
(Custom Set H in use).
If a change was made in the Configuration Menu and not saved in a
custom set, then the change is static and a blank < > is displayed in the
parentheses.
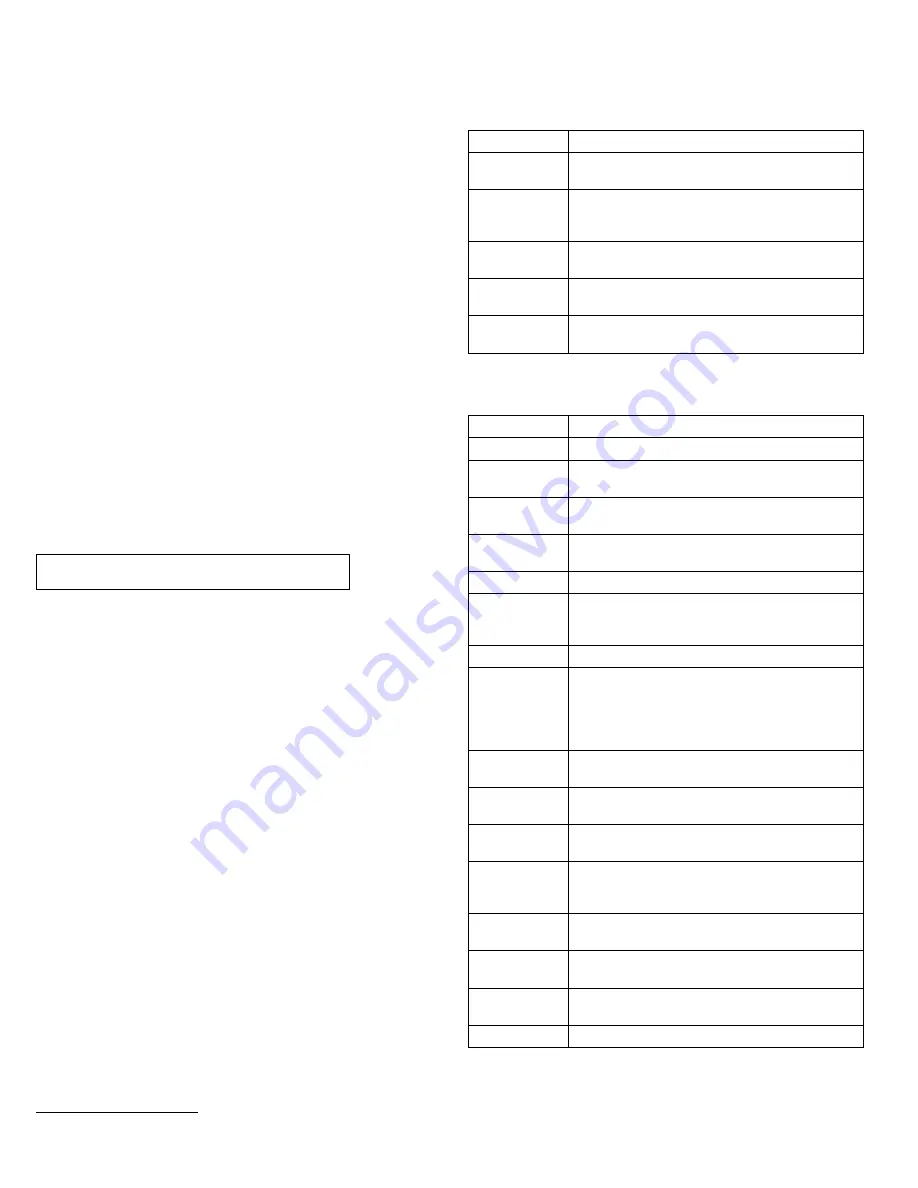
Operator Print Tests
Key Description
TEST
DESCRIPTION
Quick
Reference
Print pages to show operator panel keys and
configuration menu.
Printer
Demonstration
Print pages showing available highlighting, print
speeds, print qualities, text placements, and bar
codes.
Printer
Configuration
Print page showing current values for printer
parameters.
Firmware
Information
Print page to verify code version in your printer.
Printer
Adjustments
Set and verify current adjustment parameters for
the printer.
KEY LABEL
DESCRIPTION
Menu
Enter the CONFIGURATION MENU.
Quiet
Reduces the printer noise level and the
throughput of the printer.
Micro
↑
Scroll
↑
Move the form up 1/144 of an inch, or view the
previous Menu item.
Micro
↓
Scroll
↓
Move the form down 1/144 of an inch, or view the
next Menu item.
READY
<X>
Enter
Select the current Menu item, or begin a Test.
Display
Address
Return
Display the current printer address, or return to
the previous Menu level.
Hex Print
Put the printer in Hex Print mode.
Park/
Path
Moves continuous forms out of the print area in
Front Push, Rear Push, and Push-Pull modes,
ejects the continuous forms in Rear Pull mode, or
ejects cut-sheet forms in ASF or Manual Sheet
modes, or selects the paper path.
Line Feed
Advance the form one print line, as defined by the
current Lines Per Inch (LPI) setting.
Load/
Eject
Load form to the top of form position, eject form
to the tear-off position, or eject the last form.
Form
Feed
Advance the form to the next top of form position.
(Not active for ASF and Manual Sheet modes)
Set Top
of Form
Set the top of form position to the current location
on the form. (Not active for ASF and Manual
Sheet modes)
Start
Change the display from
NOT READY
to
READY
, exit
the CONFIGURATION MENU, or begin a Test.
Stop
Change the display from
READY
to
NOT READY
,
clear errors, turn off the alarm, or stop a Test.
Cancel
Print
Send a Cancel Request to the host computer or
stop a Test and return to
READY
.
Test
Enter the OPERATOR PRINT TESTS menu.
Proprinter is a trademark of the International Business Machines Corporation.
Epson is a trademark of the Seiko Epson Corporation.


