background image

26

1. Double-click the 

My Computer

 icon located on the Windows Desktop screen.

2. In 

My Computer

, double-click the 

Dial-Up Networking

 folder icon. Find

the dial-up profile for any old modem(s). Using your 

right

 mouse button,

click 

once (1 time)

 on the icon to bring up the menu.

3. Select 

Properties

 from the menu to bring up the 

Properties

 screen. In the

Connect using

 box, select your new modem and then click the 

OK

 button.

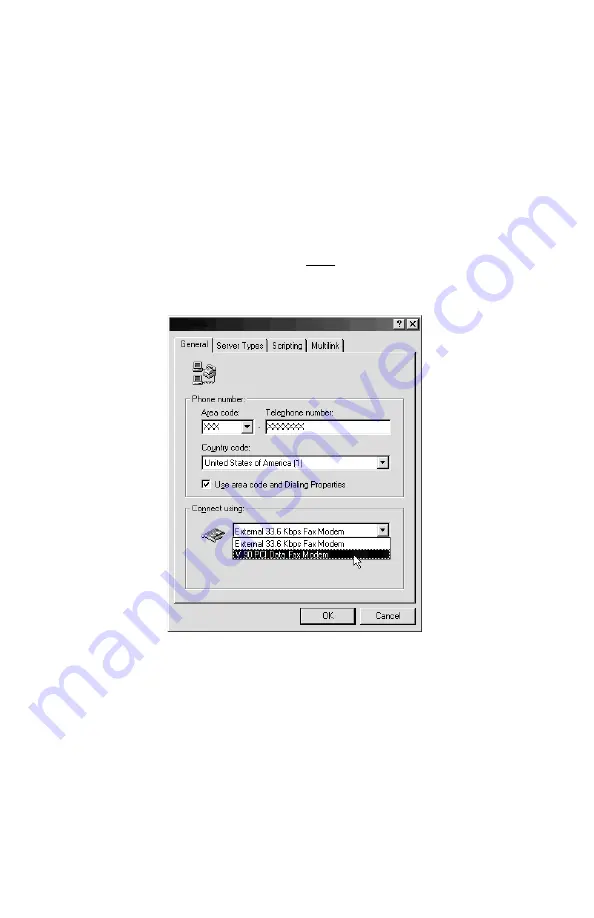
This will reconfigure the dial-up profile to point to the new modem. The

picture below shows a Dial-Up Networking profile being changed from an

older, 33.6 External modem to the newer IBM V.90 PCI Data/Fax Modem.

Be sure to perform this procedure on ALL Dial-Up connections present. Af-

ter you have clicked the 

OK

 button in the 

Properties

 screen, you should

restart the computer. This should clear the “Open COM Port” error.

Summary of Contents for 33L4618

Page 1: ......

Page 2: ...es are periodically made to the information herein these changes will be incorporated in new editions of the publication IBM may make improvements and or changes in the product s and or the program s described in this publication at any time It is possible that this publication may contain reference to or infor mation about IBM products machines and programs programming or services that are not an...

Page 3: ...INSTRUCTIONS IN ENGLISH page 4 INSTRUCTIONS EN FRANÇAIS page 28 INSTRUCCIONES EN ESPAÑOL página 51 ...

Page 4: ...g Windows 98 12 Configuring Windows NT 4 0 13 Configuring DOS 15 Configuring Windows 3 1X 17 Configuring OS 2 Warp 18 Configuring UnixWare 20 AT Commands Affecting ITU T V 90 Operation 22 Help and Service Information 24 General Troubleshooting Tips 24 Reconfiguring a Windows Dial Up Networking Connection 25 If You Need to Call the Help Center 27 Placing the Call to IBM 27 Product Warranty 74 Notic...

Page 5: ...en installing moving or opening the covers of this product or at tached devices The power cord must be used with a properly grounded out let DANGER To avoid a shock hazard do not connect or disconnect any cables or perform installation maintenance or reconfiguration of this product during an elec trical storm To avoid shock hazard The power cord must be connected to a properly wired and earthed re...

Page 6: ...n a cordless type during an electrical storm There may be a remote risk of electrical shock from lightning Do not use the telephone to report a gas leak in the vicinity of the leak CAUTION Do Not connect your modem to a digital PBX switchboard system because you may damage the modem Modems are designed to function with analog telephone lines such as residential lines Do Not connect your modem to a...

Page 7: ...ased PCI modem for the widest range of supported operating systems Modem does not rely on the host CPU to perform any internal functions Package Contents Before you begin the installation of the modem make sure that you have the fol lowing items that were included with your package An internal V 90 PCI Modem RJ 11 to RJ 11 Phone Cord Installation diskette containing drivers This Installation Guide...

Page 8: ... Settings Control Panel and double click the Modems icon This will bring up the Modems Properties screen Find your old modem listed in the General window of Modems Proper ties Click once to highlight the modem and then click the Remove button Click OK when done Shutdown Windows turn off the computer and remove the old modem For DOS Windows 3 1 OS 2 Warp and Unix There are no special system prepara...

Page 9: ...y discharge static electricity by touching a grounded metal structure or by using any commercially available grounding strap Make sure the expansion slot type is PCI which has a smaller slot to fit the PCI modem card If you are not familiar with computers or computer hardware or you cannot tell the difference between an ISA slot or a PCI slot obtain the help of someone who has a through understand...

Page 10: ...iagram Fig 2 Installing The Modem 6 Put the chassis cover back on the computer 7 Be sure that all power switches are in the OFF position then reconnect the power cables to the computer and its peripherals 8 Connect the telephone line cable to the jack on the back of the modem 9 Turn on the computer and proceed to the following sections to configure your modem to the operating system you are using ...

Page 11: ...em will be set to use the PSTN of the coun try you selected Click Quit to exit the country select program and then click Yes Note This program will be copied to your default hard drive generally the C drive in the root directory Double click the FHLOAD EXE icon to launch the program if you wish to change the country setting at a latter date 6 To verify that the modem has been properly installed go...

Page 12: ...e COM Port icon next to the modem and then click the More Info button The ATI responses should be listed This shows that the modem has been correctly installed and is func tioning Configuring Windows 98 1 After you have installed the modem into your machine turn on the power and allow the system to boot normally 2 Windows 98 will immediately display the New Hardware Wizard and iden tify the modem ...

Page 13: ...odems icon At the Modems Proper ties screen click the Diagnostics tab Highlight the COM Port icon next to the modem and then click the More Info button The ATI responses should be listed This shows that the modem has been correctly installed and is func tioning Configuring Windows NT 4 0 1 After you have installed the modem into your machine turn on the power and allow the system to boot normally ...

Page 14: ...ect the manufacturer and model of the modem click the OK button At the next screen click the Next button 14 Windows NT will complete the installation of the modem Remove the in stallation diskette from the floppy disk drive when the installation process is complete 15 If you wish to use the modem to dial a Windows NT Remote Access Server or wish to connect to the Internet you will need to configur...

Page 15: ...modem will be operated Canada at T19 0 1c enter Japan at T19 0 10 enter United States at T19 0 19 enter If the command was properly entered the response will be OK A response of ERROR will indicate an incorrect entry After the command has been entered and accepted the modem will default to this setting every time you turn on the system To find your current country setting issue the command ATI9 en...

Page 16: ...c bat file and the IRQ Number you recorded in Step 4 to set up your DOS applica tions You may also need to assign an unused COM Port to the modem The preferred COM Port setting is COM4 7 After you have setup your applications to use the modem you will need to issue an AT Command to configure the modem to use the PSTN Public Switched Telephone Network of your country The modem can be config ured fo...

Page 17: ... for use 14 If you did not issue the Country Code Command during the DOS installation you will need to issue this AT Command to configure the modem to use the PSTN Public Switched Telephone Network of your country The modem can be configured for Canada Japan and the United States 15 To configure the modem s country setting open Windows Terminal Note It may be necessary to open and close the progra...

Page 18: ...DMCFG enter 4 A message similar to the one shown below will be displayed Actual values will change from system to system Found IBM V 90 PCI Data Fax Modem I O Port FC00 IRQ 11 5 Record these values They will be needed in Step 9 when you modify your config sys file and latter when you configure your applications 6 Be sure the Installation Diskette is still in the floppy disk drive Now type COPY A O...

Page 19: ...e your communications programs at the COM Port you assigned in Step 9 12 After you have setup your applications to use the modem you will need to issue an AT Command to configure the modem to use the PSTN Public Switched Telephone Network of your country The modem can be config ured for Canada Japan and the United States 13 To configure the modem s country setting open a terminal program At the co...

Page 20: ...e looking for a board with ID 0x11c10480 5 Once you find the board press enter to back out to the previous screen Now use the tab key to move the cursor to the Device Name field for that board Press the F2 key to bring up the list of choices 6 In the Device Name Choices screen choose COM Port or asyn then press the enter key to go back to the Hardware Devices Configuration screen 7 Press the F10 k...

Page 21: ...ing Canada Japan or North America Notes If you cannot find a board with the proper ID then exit UnixWare and power down Check that the PCI Modem is correctly seated in the PCI slot Remove and reseat the card if required To find out which COM Port is assigned to the modem choose Software Device Driver Selections from the Main Menu Now choose Commu nications Cards and press F6 to get the information...

Page 22: ...d 75 bits s S37 3 300 bits s S37 4 reserved S37 5 1200 bits s S37 6 2400 bits s S37 7 4800 bits s S37 8 7200 bits s S37 9 9600 bits s S37 10 12000 bits s S37 11 14400 bits s S37 12 16800 bits s S37 13 19200 bits s S37 14 21600 bits s S37 15 24000 bits s S37 16 26400 bits s S37 17 28800 bits s S37 18 31200 bits s S37 19 33600 bits s S38 56K Dial Line Rate default 1 S38 0 Disable all 56K connections...

Page 23: ...6K connections S109 1 K56flex only V 90 disabled default S109 2 V 90 only K56flex disabled Examples at fs38 0s109 0 This will disable ALL 56K connections at fs38 1s109 1s37 14 This will disable V 90 connections The modem will try to connect at K56flex rates with the V 34 upstream rate limited to 21 6K bps at fs38 1s109 2 This will cause the modem to attempt a V 90 connec tion only If V 90 is not a...

Page 24: ...ttention to the IRQ usage of the other peripherals in your system Do not reassign an interrupt that is already in use by an ISA card to the PCI bus Turn off the power and unplug the power cord from the system Check that the PCI Data Fax Modem is properly inserted into the PCI slot Remove the card and reinsert it if necessary Try inserting the PCI Modem into another PCI slot The slot you are using ...

Page 25: ...nes answering machines and especially cordless phone re charger bases Open COM Port Error Message in Windows 95 98 NT You may have Dial Up Networking connections configured for an old mo dem on the same COM Port Reconfigure these to point to the PCI Modem See the next section for instructions If the Dial Up Networking connections have all been reconfigured and the error persists some other program...

Page 26: ... the Properties screen In the Connect using box select your new modem and then click the OK button This will reconfigure the dial up profile to point to the new modem The picture below shows a Dial Up Networking profile being changed from an older 33 6 External modem to the newer IBM V 90 PCI Data Fax Modem Be sure to perform this procedure on ALL Dial Up connections present Af ter you have clicke...

Page 27: ...er and nature of calls received Marketing Installation and configuration support will be withdrawn from the PC Com pany HelpCenter 90 days after the option has been withdrawn from marketing If you call 90 days after the date of withdrawal or your warranty has expired you might be charged a fee Additional support is available through the IBM PC Company automated Fax system the PC Company Web Page t...

Page 28: ...28 INSTRUCTIONS EN FRANÇAIS ...

Page 29: ...et configuration du périphérique 35 Configurer Windows 95 35 Configurer Windows 95 OSR2 35 Configurer Windows 98 36 Configurer Windows NT 4 0 37 Configurer DOS 39 Configurer Windows 3 1X 41 Configurer OS 2 Warp 42 Configurer UnixWare 44 Commandes AT affectant le fonctionnement ITU T V 90 46 En cas de difficultés 48 Conseils pour problèmes d ordre général 48 Reconfigurer une connexion Windows au ré...

Page 30: ...z et déconnectez les câbles comme indiqué ci dessous si vous devez installez et déplacez ce matériel ou les unités connectées ou si vous soulevez un carter Branchez le cordon d alimentation dans une prise de terre DANGER Pour éviter tout risque de choc électrique ne manipulez aucun câble et n effectuez aucune opération d installation de maintenance ou de recon figuration sur ce produit pendant un ...

Page 31: ...n téléphone à l exception des téléphones portables pen dant un orage en raison des risques de chocs électriques susceptibles d être provoqués par des éclairs N utilisez pas le téléphone pour signaler une fuite de gaz en vous tenant à proximité de cette fuite ATTENTION Ne connectez pas votre modem à un sytème PBC standard téléphonique numérique Vous risqueriez de l endommager Les modems sont conçus...

Page 32: ...es articles suivants Un modem interne V 90 PCI Une rallonge téléphonique RJ 11 à RJ 11 Une disquette d installation contenant des gestionnaires Ce manuel d installation Un accord de licence du programme Vérifiez bien qu aucun de ces articles n a été endommagé Conservez votre preuve d achat et le carton d emballage dans l hypothèse où il vous faudrait retourner votre modem V 90 PCI Data Fax Install...

Page 33: ...riphériques auquel il est connecté 2 Retirez le cordon d alimentation de l ordinateur de la prise murale 3 Retirez le carter de l ordinateur Référez vous pour cela aux instructions du manuel de l utilisateur de votre ordinateur 4 Retirez la vis de fixation du carter du logement d extension située au dos de l un des logements d extension PCI disponibles Soulevez le couvercle du logement d extension...

Page 34: ...cédure d installation reste la même Consultez le manuel de l utilisateur de votre ordinateur pour des instructions détaillées sur votre système 5 Insérez le modem fermement mais sans forcer dans le logement d extension PCI disponible Vérifiez que la carte est correctement positionnée avant de remettre la vis retirée à l étape 4 comme indiqué dans le diagramme ci dessous Fig 2 Installation du modem...

Page 35: ...nte et cliquez sur le bouton Sauvé Puis cliquez sur OK Le mo dem sera configuré pour utiliser le réseau téléphonique public PSTN du pays que vous avez sélectionné Cliquez sur Quitter pour sortir du programme de sélection de pays puis sur Oui Remarque ce programme sera copié sur votre disque dur par défaut généralement le lecteur C dans le répertoire racine Double cliquez sur l icône FHLOAD EXE pou...

Page 36: ...allé allez sous Démarrer Réglages Panneau de configuration et double cliquez sur l icône Modems Une fenêtre Propriétés Modems apparaît Cliquez alors sur l onglet Diag nostics Sélectionnez l icône Port COM située à côté du modem puis cliquez sur le bouton Plus d infos Vous verrez une liste de réponses ATI Ceci signifie que le modem est correctement installé et qu il fonctionne Configurer Windows 98...

Page 37: ...pays par la suite 8 Pour vérifier que le modem est correctement installé allez sous Démarrer Réglages Panneau de configuration et double cliquez sur l icône Modems Une fenêtre Propriétés Modems apparaît Cliquez alors sur l onglet Diag nostics Sélectionnez l icône Port COM située à côté du modem puis cliquez sur le bouton Plus d infos Vous verrez une liste de réponses ATI Ceci signifie que le modem...

Page 38: ...emande un chemin d accès entrez A WINNT et cliquez sur le bouton OK 13 Lorsque vous devez sélectionner le constructeur et le modèle de modem cliquez sur le bouton OK À l écran suivant cliquez sur le bouton Suivant 14 Windows NT va finir d installer le modem Retirez la disquette d installation du lecteur de disque lorsque le processus d installation est terminé 15 Si vous désirez utiliser le modem ...

Page 39: ...Tapez ensuite les commandes suivantes correspondant au pays où vous utiliserez le modem Canada at T19 0 1c enter Japon at T19 0 10 enter États Unis at T19 0 19 enter Si la commande a été correctement entrée la réponse sera OK Une réponse ERROR indique une entrée incorrecte Une fois la commande entrée et acceptée le modem prendra ce réglage par défaut chaque fois que vous brancherez le système Pour...

Page 40: ...vez enregistré à l étape 4 pour installer vos applications DOS C est possible que vous frudra attribuer en port COM non utilisé au modem On recommande d utiliser COM4 pour le port 7 Une fois que vous avez installé les applications destinées à utiliser votre mo dem vous devrez taper une Commande AT pour configurer le modem et lui permettre d utiliser le PSTN Public Switched Telephone Network de vot...

Page 41: ...tre modem doit maintenant être correctement installé et prêt à fonctionner 14 Si vous n avez pas entrez la Commande Code Pays pendant l installation sous DOS vous devez taper cette Commande AT pour configurer le modem et lui permettre d utiliser le PSTN Public Switched Telephone Network de votre pays Votre modem peut être configuré pour le Canada le Japon et les États Unis 15 Pour configurer les p...

Page 42: ...s va s afficher Les valeurs effectives changeront d un système à l autre Found IBM V 90 PCI Data Fax Modem I O Port FC00 IRQ 11 5 Inscrivez ces valeurs Vous en aurez besoin à l étape 9 pour modifier le fichier config sys et plus tard pour configurer vos applications 6 Vérifiez que la disquette d installation est toujours dans l unité à disque Tapez ensuite COPY A OS2 COM SYS C OS2 BOOT COM SYS ent...

Page 43: ...z installé les applications destinées à utiliser votre modem vous devrez taper une Commande AT pour configurer le modem et lui permettre d utiliser le PSTN Public Switched Telephone Network de votre pays Votre modem peut être configuré pour le Canada le Japon et les États Unis 13 Pour configurer les paramètres de pays du modem ouvrez un programme terminal À l invite tapez at enter Vous devez obten...

Page 44: ...e carte portant le numéro 0x11c10480 5 Une fois que vous avez trouvé cette carte appuyez sur enter pour revenir à l écran précédent Utilisez cette fois le tabulateur pour déplacer le curseur dans le champ Nom de l unité correspondant à la carte Appuyez sur F2 pour obtenir une liste de sélection 6 Sous la fenêtre Choix de noms d unité choisissez Port COM ou asyn puis appuyez sur enter afin de retou...

Page 45: ...on numéro quittez UnixWare et éteignez tout Vérifiez que le modem PCI est correctement installé dans le logement PCI puis repositionnez la carte au besoin Pour savoir quel port COM a été affecté au modem choisissez Sélections de gestionnaire de logiciel sous Menu Principal Sélectionnez ensuite Cartes de communication et appuyez sur F6 pour obtenir les renseignements concernant le gestionnaire asyn...

Page 46: ...00 bits s et 75 bits s S37 3 300 bits s S37 4 réservé S37 5 1200 bits s S37 6 2400 bits s S37 7 4800 bits s S37 8 7200 bits s S37 9 9600 bits s S37 10 12000 bits s S37 11 14400 bits s S37 12 16800 bits s S37 13 19200 bits s S37 14 21600 bits s S37 15 24000 bits s S37 16 26400 bits s S37 17 28800 bits s S37 18 31200 bits s S37 19 33600 bits s S38 Vitesse de la ligne d appel 56K défaut 1 S38 0 désac...

Page 47: ...es connexions 56K S109 1 K56flex uniquement V 90 désactivé défaut S109 2 V 90 uniquement K56flex désactivé Exemples at fs38 0s109 0 Désactive TOUTES les connexions 56K at fs38 1s109 1s37 14 Désactive les connexions V 90 Le modem va essayer de se connecter à des vitesses K56flex avec une vitesse V 34 en amont limitée à 21 6K bps at fs38 1s109 2 Le modem tentera uniquement une connexion V 90 S il éc...

Page 48: ...à l utilisation de l IRQ par d autres périphériques dans votre système N affectez pas deux fois une interruption déjà utilisée par une carte ISA sur un bus PCI Éteignez l ordinateur et débranchez le cordon d alimentation Vérifiez que le modem PCI Data Fax est correctement inséré dans le logement PCI Retirez la carte et réinsérez la au besoin Essayez d insérer le modem PCI dans un autre logement PC...

Page 49: ...isez le modem notamment téléphones supplémentaires les répondeurs et particulièrement les socles de recharge pour téléphones sans fils Message d erreur Open COM Port Port COM ouvert sous Windows 95 98 NT Vous avez peut être des connexions de réseau commuté configurées pour un ancien modem sur le même port COM Reconfigurez les en fonction du mo dem PCI Voir les instructions dans la partie suivante ...

Page 50: ... pour faire apparaître le menu 3 Sélectionnez Propriétés dans le menu pour afficher l écran Propriétés Dans la boîte Connecter avec sélectionnez votre nouveau modem puis cliquez sur OK Cette procédure reconfigure le profil d appel en fonction du nouveau modem L image ci dessous illustre le changement d un profil d appel passant d un ancien modem externe 33 6 Kbps au nouveau modem IBM V 90 PCI Data...

Page 51: ...51 INSTRUCCIONES EN ESPAÑOL ...

Page 52: ...iguración de Windows 95 59 Configuración de Windows 95 OSR2 59 Configuración de Windows 98 60 Configuración de Windows NT 4 0 61 Configuración de DOS 63 Configuración de Windows 3 1X 65 Configuración de OS 2 Warp 65 Configuración de UnixWare 67 Comandos AT que afectan el funcionamiento de ITU T V 90 69 Información de ayuda y asistencia técnica 71 Informaciones generales para solución de problemas ...

Page 53: ...tados conecte y desconecte los cables tal como se ilustra a continuación El cable de alimentación debe enchufarse a una toma de corriente correctamente conectada a tierra PELIGRO Para evitar peligros de choque eléctrico no conecte o desconecte cables ni realice la instalación mantenimiento o reconfiguración de este producto du rante tormentas eléctricas Para evitar peligros de choque eléctrico El ...

Page 54: ...durante tormentas eléctricas Existe el riesgo remoto de sufrir un choque eléctrico causado por un rayo No utilice el teléfono para denunciar una fuga de gas en las proximidades de la fuga ADVERTENCIA No conecte el módem a un sistema digital PBX conmutador dado que puede dañar al módem Los modems deben funcionar en líneas telefónicas análogas tales como las líneas residenciales No conecte el módem ...

Page 55: ...o en controlador PCI para soportar el margen más amplio de sistemas operativos El módem no depende de la CPU anfitriona para realizar ninguna función interna Contenido del paquete Antes de iniciar la instalación del módem asegúrese de contar con los siguientes elementos incluidos en el paquete Un módem interno V 90 PCI Un cable telefónico RJ 11 a RJ 11 Disco de instalación con controladores Esta G...

Page 56: ...ciar Configuración Panel de control y haga doble clic en el icono Modems Aparecerá la pantalla Propiedades del módem Busque al viejo módem en la ventana General de Propiedades del módem Haga clic para resaltar el módem y luego haga clic en el botón Quitar Luego haga clic en Aceptar Cierre Windows apague la computadora y quite el viejo módem Para DOS Windows 3 1 OS 2 Warp y Unix No hay procedimient...

Page 57: ...tes de tocar el módem La electricidad estática puede descargarse tocando una estructura metálica con conexión a tierra o utilizando una correa de conexión a tierra disponible en los comercios del ramo Asegúrese de que la ranura de expansión sea de tipo PCI que tiene una ranura más pequeña para calzar la tarjeta de módem PCI Si no está familiarizado con computadoras o hardware de computadoras o no ...

Page 58: ...ente diagrama Fig 2 Instalación del módem 6 Coloque la cubierta de la computadora 7 Asegúrese de que todos los interruptores de encendido estén en posición de APAGADO vuelva a conectar los cables de alimentación a la computadora y dispositivos periféricos 8 Conecte el cable telefónico al receptáculo ubicado detrás del módem 9 Encienda la computadora y continúe con las secciones siguientes para con...

Page 59: ... haga clic en el botón Set Establecer Luego haga clic en OK Aceptar El módem estará configurado para usar la red telefónica conmutada pública PSTN del país seleccionado Haga clic en Quit Salir para salir del programa de selección de país y luego haga clic en Yes Sí Nota Este programa será copiado al disco duro predeterminado generalmente la unidad de disco C en el directorio raíz Si con posteriori...

Page 60: ...Para verificar que el módem fue correctamente instalado vaya a Iniciar Configuración Panel de control y haga doble clic en el icono Modems En la pantalla Propiedades del módem haga clic en la ficha Diagnóstico Resalte el icono de puerto COM junto al módem y luego haga clic en el botón Más datos Aparecerá la lista con las respuestas ATI Esto indica que el módem fue correctamente instalado y está en...

Page 61: ...n el directorio raíz Si con posterioridad deseara cambiar la configuración de país haga doble clic en el icono FHLOAD EXE 8 Para verificar que el módem fue correctamente instalado vaya a Iniciar Configuración Panel de control y haga doble clic en el icono Modems En la pantalla Propiedades del módem haga clic en la ficha Diagnóstico Resalte el icono de puerto COM junto al módem y luego haga clic en...

Page 62: ...itará una ruta de acceso escriba A WINNT y haga clic en el botón Aceptar 13 Cuando se le solicite que elija al fabricante y modelo del módem haga clic en el botón Aceptar En la pantalla siguiente haga clic en el botón Siguiente 14 Windows NT completará la instalación del módem Cuando haya finalizado el proceso de instalación quite el disco de instalación de la unidad de disco 15 Si desea utilizar ...

Page 63: ...gún el país donde se usará el módem Canadá at T19 0 1c entrar Japón at T19 0 10 entrar Estados Unidos at T19 0 19 entrar Si se ingresó correctamente el comando la respuesta será OK Una respuesta ERROR indica que se ingresó un comando incorrecto Una vez ingresado y aceptado el comando el módem utilizará dicha configuración de forma predeterminada cada vez que se encienda el sistema Para establecer ...

Page 64: ...DOS Tal vez sea necesario asignar un puerto COM disponible para el módem La configuración preferida del Puerto COM es COM4 7 Una vez configuradas las aplicaciones para usar el módem será necesario emitir un comando AT para que el módem use la red telefónica conmutada pública PSTN del país El módem puede configurarse para Canadá Japón y los Estados Unidos 8 Para configurar la definición de país del...

Page 65: ...el comando de Código de país durante la instalación de DOS deberá emitir el comando AT para que el módem use la red telefónica conmutada pública PSTN del país El módem puede configurarse para Canadá Japón y los Estados Unidos 15 Para configurar la definición de país del módem abra Windows Terminal Nota Tal vez sea necesario abrir y cerrar el programa dos veces antes que reconozca al módem En el in...

Page 66: ... Anote estos valores Serán necesario en el Paso 9 cuando deba modificarse el archivo config sys y posteriormente cuando se configuren las aplicaciones 6 Verifique que el disco de instalación esté en la unidad de disco Escriba COPY A OS2 COM SYS C OS2 BOOT COM SYS entrar Nota Esto reemplazará el archivo residente COM SYS con una nueva versión del mismo OS 2 no solicitará confirmación para reemplaza...

Page 67: ...onfigurar la definición de país del módem abra un programa de termi nal En el indicador de comandos escriba at y presione entrar La respuesta deberá ser OK Luego escriba uno de los siguientes comandos según el país donde se usará el módem Canadá at T19 0 1c entrar Japón at T19 0 10 entrar Estados Unidos at T19 0 19 entrar Si se ingresó correctamente el comando la respuesta será OK Una respuesta ER...

Page 68: ...tivo correspondiente a esa tarjeta Presione la tecla F2 para que aparezca la lista de opciones 6 En la pantalla Device Name Choices Opciones de nombre de dispositivo elija COM Port o asyn luego presione entrar para regresar a la pantalla Hardware Devices Configuration Configuración de dispositivos de hard ware 7 Presione la tecla F10 para regresar al Main Menu Menú principal Elija Apply Changes Ex...

Page 69: ...UnixWare suministra una utilidad que puede usarse como programa de terminal Para usar ese programa regístrese como root raíz u obtenga un su root raíz su para terminal X Luego ejecute usr lib uucp modem dispositivo velocidad en baudios Comandos AT que afectan el funcionamiento del ITU T V 90 Hay 3 registros S que soportan conexiones K56flex V 90 y V 34 S38 configura la máxima velocidad descendente...

Page 70: ...8 50666 bits s S38 19 52000 bits s S38 20 53333 bits s S109 Selección K56flex y V 90 predeterminada 1 Use este registro para desactivar conexiones de 56K o para elegir entre protocolos K56flex y V 90 La configuración predeterminada S109 1 intentará K56flex y después V 34 según el módem del sitio central al que se llame y las condiciones de su línea telefónica S109 0 Desactivar todas las conexiones...

Page 71: ...Configuration o Plug and Play Configuration Avanzada Configuración PNP PCI o Configuración Conectar y usar según el fabricante del BIOS A continuación verifique que por lo menos dos IRQs hayan sido configurados para que el bus PCI tenga acceso a ellos algunos BIOS no permiten la selección individual de interrupciones a ISA Plug N Play o PCI Estas configuraciones pueden llamarse ICU ICU PCI PCI o P...

Page 72: ...rique la configuración de velocidad máxima en la ventana de Propiedades del módem Vaya a Iniciar Configuración Panel de control y haga doble clic en el icono Modems Haga clic en el icono siguiente al del módem para resaltar al módem y luego haga clic en el botón Propiedades Elija la ficha General y verifique la configuración de la casilla Velocidad máxima Asegúrese de que esté configurada para 115...

Page 73: ...a se corrige fácilmente efectuando los siguientes pasos 1 Haga doble clic en el icono Mi PC ubicado en la pantalla del escritorio de Windows 2 En Mi PC haga doble clic en el icono de la carpeta Acceso telefónico a redes Busque el perfil de acceso de cualquier módem viejo Con el botón derecho del ratón haga clic una vez en el icono para que aparezca el menú 3 En el menú elija Propiedades Aparecerá ...

Page 74: ...our use and not for resale from IBM or your reseller The term Machine means an IBM machine its features con versions upgrades elements or accessories or any combination of them Unless IBM specifies otherwise the following warranties apply only in the coun try where you acquire the Machine If you have any questions contact IBM or your reseller Machine IBM V 90 PCI Data Fax Modem Warranty Period Thr...

Page 75: ...umbered Machine and 2 at an engineering change level compatible with the feature conversion or up grade Many of these transactions involve the removal of parts and their return to IBM You represent that all removed parts are genuine and unaltered A part that replaces a removed part will assume the warranty service status of the replaced part If a Machine does not function as warranted during the w...

Page 76: ... to the item replaced The replacement assumes the warranty service status of the replaced item Before IBM or your reseller exchanges a Machine or part you agree to remove all features parts options alterations and attachments not under warranty service You also agree to ensure that the Machine is free of any legal obligations or restrictions that prevent its exchange You agree to 1 obtain authoriz...

Page 77: ...es may arise where because of a default on IBM s part or other liability you are entitled to recover damages from IBM In each such instance regardless of the basis on which you are entitled to claim damages from IBM including fundamental breach negligence misrepresentation or other contract or tort claim IBM is liable only for 1 damages for bodily injury including death and damage to real property...

Page 78: ...ver there is no guarantee that interference will not occur in a particular installation If this equipment does cause harmful interference to radio and television reception the user is encour aged to try to correct the interference by one or more of the following measures Reorient the receiving antenna Increase the separation between the equipment and receiver Connect the equipment into an outlet o...

Page 79: ...eed five 5 0 To find out the total permitted in your area contact your local telephone company If your telephone equipment causes harm to the telephone network the telephone company can discontinue your service temporarily If possible the company will notify you in advance But if advance notice isn t practical you will be notified as soon as possible You will be informed of your right to file a co...

Page 80: ... main tenance facility designated by the supplier Any repairs or alterations made by the user to this equipment or equipment malfunctions may give the telecommunica tions company cause to request the user to disconnect the equipment Users should ensure for their own protection that the electrical ground connec tions of the power utility telephone lines and internal metallic water pipe system if pr...

Page 81: ...n appareil à la suite de réparations ou modifications effectuées par l utilisateur ou en raison d un fonctionnement défectueux Pour sa sécurité personnelle l utilisateur doit s assurer que toutes les sources d alimentation électrique les lignes téléphoniques et les canalisations d eau en métal le cas échéant sont mis à la terre et raccordés Cette précaution est particulièrement importante en zone ...

Page 82: ...ration 500 Columbus Avenue Thornwood NY 10594 U S A Trademarks The following terms used in this publication are trademarks of the IBM Corpora tion in the United States or other countries IBM and IBM OS 2 Warp Windows 3 1 Windows 95 Windows 95 OSR2 Windows 98 and Windows NT are trademarks or registered trademarks of Microsoft Corporation Other company product and service names which may be denoted ...

Reviews: