background image

©Copyright LOTRONIC 2015 

DJM250BT-MKII 

17.


Master Level Display 

The LED display shows the level of the left and right master output 

18.


BOOTH Control 

This knob controls the overall output level leaving the booth unbalanced RCA outputs.


19.


MP3 PLAYER & BLUETOOTH 

   To refer USB / SD / BLUETOOTH PLAYER OPERATION below 


REAR PANEL DESCRIPTION 

20.


Power Switch 

Press down the button to turn on this unit. The LED will illuminate when the power is on. 

21.


AC Connection 

Connect the unit to an appropriate 220-240Vac outlet. 

22.


XLR BALANCE OUTPUT JACKS       

Connect the mixer to a receiver via cables with XLR plugs


23.


BOOTH OUTPUT JACKS 


Connect the mixer to a second amplifier powering speakers in the DJ booth or in a remote location


24.


Master Output 

Master output connects to the main amplifier (DJ final mix after crossfader section), accepts RCA jacks


25.


RECORD OUTPUT JACKS 

Connect the mixer to a recorder to record your mix. The output signal is the same as on the MASTER jacks.


26.


  Phono/Line Inputs Sockets 

These inputs, for ch1-ch2 and accept RCA-plug connectors. Use phono input socket for phonograph 

turntables. Use line socket for CD/MP3 players. Line level musical instruments with stereo outputs such as 
rhythm machines or samplers should also be connected with the line input socket. 

27.


Inputs Switch 

Set these switches based on what is plugged into Phono/ Line input jacks


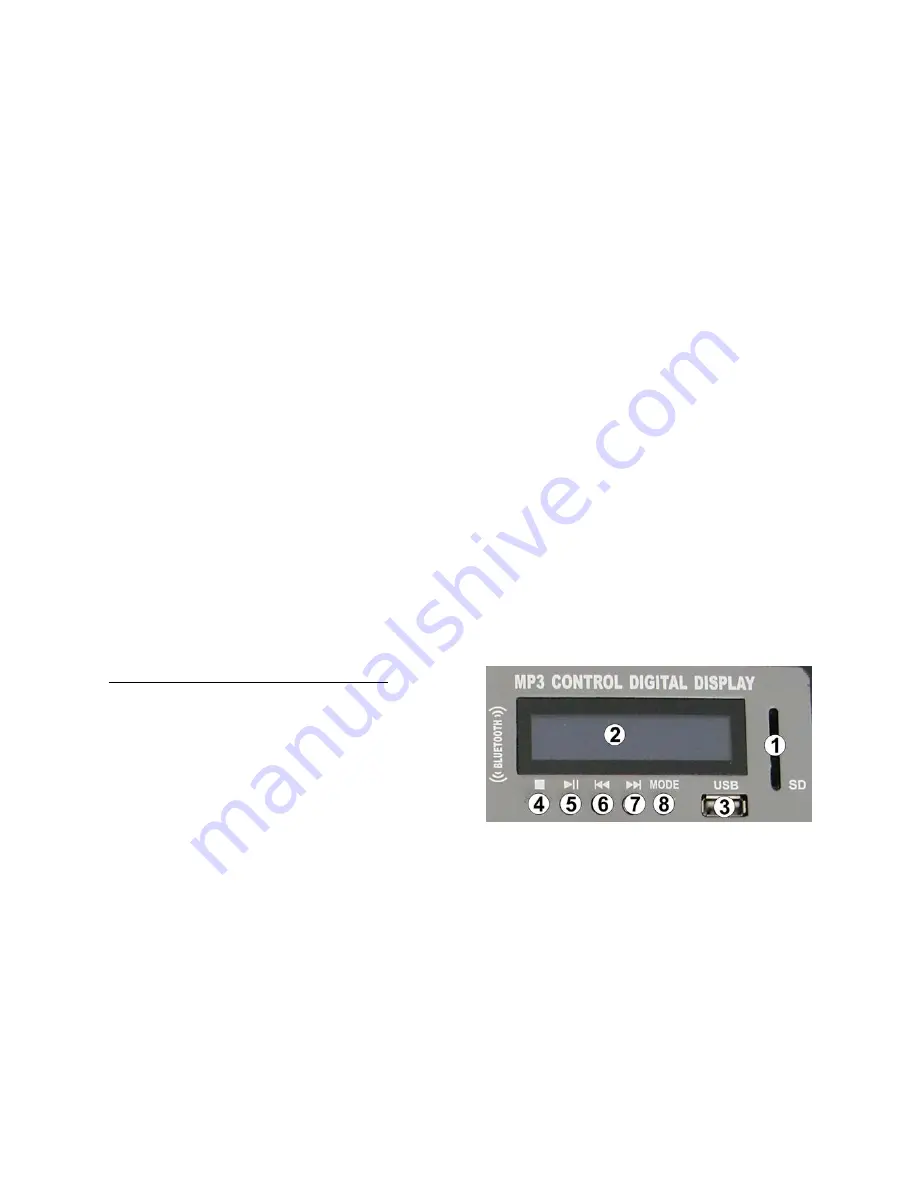
USB / SD / BLUETOOTH PLAYER OPERATION 
1. SD CARD SLOT 

Insert your SD card into this slot.   

Note:  Before you eject the SD card, please set the 
playback in pause mode or select another playback 
support (USB or Bluetooth)   

2. LCD DISPLAY   

The LCD display shows  information as playback 

support, file name, elapsed time, total time, file number, total file number, file system ( MP3 or WMA ) and 
playback mode ( Repeat one, repeat all, or random. )     
Note: In Bluetooth mode, LCD display shows only connection status (connected or disconnected). All playback 
information is on the Bluetooth device.   

3. USB SOCKET   

Connect your USB key to this slot.   

Note: Before you eject the USB key, please set the unit in pause mode or select another playback support (SD 
card or Bluetooth). 

4. STOP: U

se this button to stop playback. 

5. PLAY / PAUSE BUTTON   

This button is used to start the playback or to enter in pause mode. 

Summary of Contents for DJM250BT

Page 1: ...B STEREOMISCHPULT MIXER STEREO USB MESA DE MISTURA STEREO USB STEREO MIKSER USB STEREO MENGPANEEL MEZCLADOR USB ESTEREO Ref DJM250BT MKII USER MANUAL MANUEL D UTILISATION BEDIENUNGSANLEITUNG MANUAL DE...

Page 2: ...unit Locate the amplifier at the bottom of the rack and the preamplifier or other sensitive equipment at the top To prevent electric shock do not remove top or bottom covers No user serviceable parts...

Page 3: ...be attenuated by 14dB so that the microphone can be clearly heard In the OFF position all signals returns to their original level 6 Phono Line Switch Use this switch to select the input to be sent to...

Page 4: ...h1 ch2 and accept RCA plug connectors Use phono input socket for phonograph turntables Use line socket for CD MP3 players Line level musical instruments with stereo outputs such as rhythm machines or...

Page 5: ...tem called IBIZA1 for channel one or IBIZA2 for channel two To link your device to the player you must to enter PIN code 0000 Now your device and the player are linked You must to start playback on yo...

Page 6: ...ource de chaleur ou de flamme nue telle que des bougies allum es ne doit tre plac sur l appareil L appareil est con u pour une utilisation dans des climats mod r s AVERTISSEMENT Afin de r duire le ris...

Page 7: ...R MP3 BLUETOOTH Voir chapitre Fonctionnement du lecteur USB SD Bluetooth DESCRIPTION DE L ARRIERE 20 Interrupteur M A Enfoncez le bouton pour mettre l appareil sous tension La LED s allume lorsque la...

Page 8: ...SB sur cette fente Note Avant d jecter la cl USB mettez le lecteur en pause ou s lectionnez une autre source carte SD ou Bluetooth 4 STOP Arr t de la lecture 5 PLAY PAUSE Bascule entre lecture et paus...

Page 9: ...sich auf und unter dem Ger t Wenn Sie den Verst rker in ein Ger terack einbauen installieren Sie ihn ganz unten im Rack und alle anderen Ger te dar ber Um Stromschlag zu vermeiden nicht das Geh use ff...

Page 10: ...fh rers mit 8 bis 600 Ohm Impedanz 13 Cue Taste W hlt den oder die Kan le die im Kopfh rer vorgeh rt werden sollen 14 Pegelregler f r den Kopfh rer Dient zur Einstellung der Lautst rke im Kopfh rer 15...

Page 11: ...Dateiname abgelaufene Spielzeit Gesamtspielzeit Dateinummer Gesamtzahl von Dateien Dateiformat MP3 oder WMA und Abspielbetriebsart an Einmal wiederholen alles wiederholen Zufallsgenerator Hinweis Im B...

Page 12: ...arat are un camp magnetic puternic care poate induce bruiaj dispozitivelor neecranate care sunt situate in apropiere Campul magnetic este puternic chiar deasupra si dedesubtul unitatii Asezati amplifi...

Page 13: ...ntru a mari sau a reduce SUNETELE MEDII ale semnalului de intrare 3 Control bass Folosit pentru a mari sau a reduce SUNETELE JOASE ale semnalului de intrare 4 Potentiometru de reglaj al canalului Folo...

Page 14: ...ctate la mufa de intrare linie 27 Comutator intrari Setati aceste comutatoare in functie de dispozitivul care este conectat in mufa intrarii Phono Linie FUNCTIONARE USB SD BLUETOOTH PLAYER 1 Slot pent...

Page 15: ...sau IBIZA2 pentru canalul doi Pentru a conecta dispozitivul la player trebuie sa introduceti codul PIN 0000 Acum dispozitivul si aparatul sunt conectate Trebuie sa porniti redarea pe dispozitivul dum...

Page 16: ...do para alertar o utilizador para importantes instru es de utiliza o e manuten o O raio no tri ngulo usado para alertar o utilizador para o risco de electrocuss o Controlos 1 Ficha Mic 1 Ligue o seu m...

Page 17: ...P3 Menciona o leitor USB SD BLUETOOTH abaixo DESCRI O DO PAINEL TRASEIRO 20 Interruptor de alimenta o Pressione o bot o para ligar o aparelho O LED acende quando o aparelho est ligado 21 Liga o AC Lig...

Page 18: ...Stop Use este bot o para parar a reprodu o 5 Play Pause Este bot o usado para iniciar a reprodu o ou para entrar em modo pausa 6 Anterior Use este bot o para seleccionar a faixa anterior 7 Seguinte Us...

Page 19: ...lnik postavite na dnu omare in predoja evalnik ali druge ob utljive opreme na vrh omare Za prepre itev elektri nega udara ne odpirajte zgornjega ali spodnjega pokrova Za servis se obrnite na usposoblj...

Page 20: ...in 600 ohmov na ta priklju ek 13 CUE GUMB Uporabite ta gumb za izbiro kanala ov za kontroliranje s slu alkami 14 KONTROLA NIVOJA SLU ALK Omogo a kontrolo glasnosti slu alk 15 KONTROLA CUE PGM SLU ALK...

Page 21: ...informacije so na napravi Bluetooth 3 USB VRATA Vstavite va USB klju v ta vrata Opomba Preden boste odstranili USB klju vas prosimo nastavite enoto v na inu pavze ali izberite drug vir predvajanja SD...

Page 22: ...ellen in de buurt veroorzaakt De sterkste punten zijn direct boven of beneden het toestel Om elektrische schokken te voorkomen niet de boven of onderafdekking verwijderen Het toestel bevat geen van de...

Page 23: ...eide kanalen hoorbaar 12 Hoofdtelefoon connector Sluit uw hoofdtelefoon met een impedantie tussen 8 en 600 ohm op deze connector aan 13 Cue Button Kies het kanaal dat u in de hoofdtelefoon wilt luiste...

Page 24: ...e modus of kies een andere audio bron USB of Bluetooth 2 LCD DISPLAY De LCD display toont informatie over de speler zoals naam van het bestand afgelopen tijd totale tijd nummer van het bestand aantal...

Page 25: ...bajo del equipo El equipo posee un campo magn tico que puede provocar interferencias en los equipos no blindados que se encuentren cerca Coloque el amplificador en la parte baja del rack y el preampli...

Page 26: ...que usted desee para este canal 7 Ajuste el nivel de altas frecuencias agudos Ajuste el nivel de altas frecuencias del canal de entrada 8 Ajuste el nivel de altas frecuencias medios Ajuste el nivel fr...

Page 27: ...conectar instrumentos musicales de salida a nivel de l nea tales como cajas de ritmos o procesadores de sonido 27 Conmutador de entrada Ajuste este conmutador conforme al tipo de equipo conectado en l...

Page 28: ...el equipo y as poder reproducir sus ficheros a trav s de este CARACTERISTICAS T CNICAS ENTRADAS Micr fono 3mV 2 2 k Pomo 3 2mV 47 k L nea 150mV 47 k SALIDAS General 0 dB 1V 600 Booth 0 dB 1V 600 REC...

Reviews: