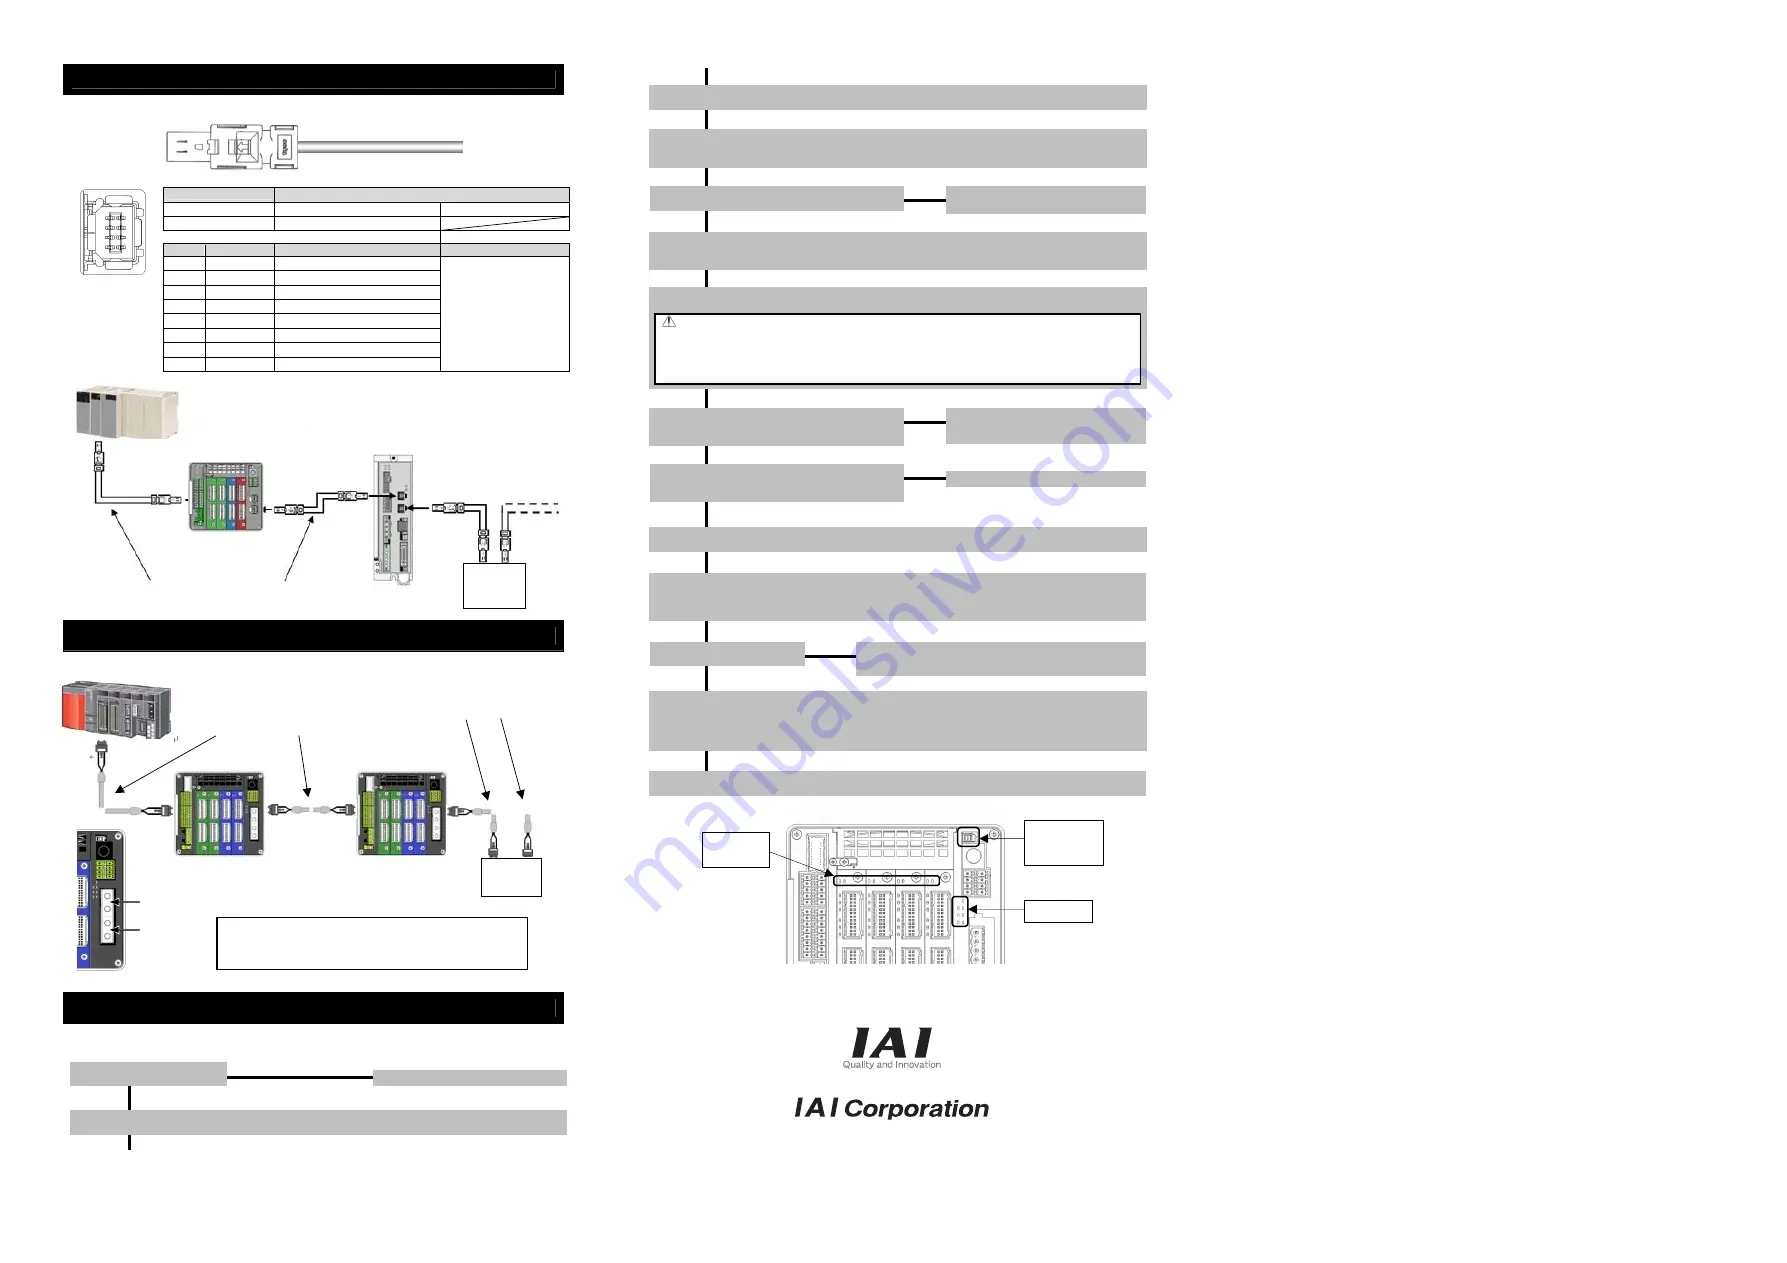
MECHATROLINK-
Ⅲ
Type
Refer to the instruction manuals for fieldbus master unit and mounted PLC for the details.
Connector Name
MECHATROLINK-
Ⅲ
Connector
Cable Side
Industrial Mini I/O Plug
Please prepare separately
Controller Side
Industrial Mini I/O Receptacle
Pin No.
Signal Name
Description
Applicable cable diameter
1
TXD+
Data s
2
TXD -
Data sending -
3
RXD+
Data rec
4
-
Disconnected
5
-
Disconnected
6
RXD-
Data receiving -
7
-
Disconnected
8
-
Disconnected
Use a dedicated cable of
MECHATROLINK-
Ⅲ
.
SSCNET
Ⅲ
/H Type
Refer to the instruction manuals of the fieldbus master unit and mounted PLC for details
Starting Procedures
When using this product for the first time, make sure to avoid mistakes and incorrect wiring by referring to
the procedure below. “PC” stated in this section means “PC software”.
Head Office: 577-1 Obane Shimizu-KU Shizuoka City Shizuoka 424-0103, Japan
TEL +81-54-364-5105 FAX +81-54-364-2589
website: www.iai-robot.co.jp/
Status LED
Status LED
for driver
Operation
mode setting
switch
Manual No.: ME0344-4B
Optical Fiber Cable Dedicated
for SSCNET
/H
MCON-C-SSN
Slave
Unit
Optical Fiber Cable
Dedicated for SSCNET
/H
MCON-C-SSN
* To the two connectors for SSCNET
/H connection,
connect the cable of the network top line to P1 and that of
the network bottom line to P2.
P2 (Port 2)
P2 (Port 1)
Sequencer (SSCNET
/H Controller)
Industrial
Mini I/O
Connector
(Controller
side)
7
1
8
2
PLC
(MECHATROLINK-
Ⅲ
Master Unit)
Cable dedicated for
MECHATROLINK-
Ⅲ
Cable dedicated for
MECHATROLINK-
Ⅲ
Slave
Unit
SCON-CA-ML3
MCON-C-ML3
↓ Yes
No →
Check of Packed Items
Are all the delivered items present?
Contact your local IAI distributor.
Installation and Wiring
Install the controller and actuator and perform wiring according.
↓
↓ Yes
No →
Check Item
Any vibration or abnormal noise?
Check if there is any problem with the installation of the actuator and
the condition of the actuator use exceeds the ranges of the rated
values. Adjust the servo if necessary.
↓
Test Run Adjustment 2
Output an operation command from the host (such as PLC) to check by the system operation.
Establish Link
to Fieldbus
1) Assign MCON as the host controller [Refer to the instruction manual of the master unit].
2) Put the operation mode setting switch on the front panel to AUTO side, and reboot the power.
3) Once the link with the master unit is established, turn ON MON signal in the gateway control signals.
(While MON Signal is ON, control from fieldbus is available.)
↓
Important Check Item
• Is frame ground (FG) connected?
• Has the noise countermeasure been taken?
Power Supply and Alarm Check
Connect the PC software, set the operation mode setting switch to “MANU” side and turn the power ON.
Select [Teaching Mode 1 Safety Speed Activated / Prohibit PIO Startup] in the PC software.
↓
↓ Yes
No →
Check Item
Is SYS in Status LEDs turned ON in green?
Check the details of the alarm in the PC
software to have a counteraction.
↓
Initial Setting
1) Have the fieldbus and operation mode setting conducted with the gateway parameter setting tool.
2) Set up the parameters (operation patterns) for each axis on the PC software.
Servo ON
Turn the servo ON for all the connected axes by operating the PC.
Caution
Please perform this process with the actuator away from the mechanical end or interfering objects as much as
possible. Move the actuator away from interfering surroundings. It may generate an alarm if the actuator hit the
mechanical end or interfering objects when the servo is turned ON.
The slider may get slightly dropped by self-weight if servo ON and OFF is repeatedly performed at the same position.
Be careful not to pinch the hand or damage the work.
↓
↓ Yes
No →
Check Item
Is SYS* on the status LED display for the driver on the axis
number indicated for the servo-on turned ON in green?
If an alarm is generated, check the detail of the
alarm on the PC and have an appropriate
treatment.
↓
↓ Yes
No →
Check of Safety Circuit
Does the emergency stop circuit (drive cutoff circuit) work
properly and turn the servo OFF?
Check the emergency stop circuit.
Setting of Position Data [Except for direct numerical specification mode]
Set the position
(*)
, velocity and acceleration/deceleration in each position table.
* Setting is unnecessary in simple direct mode
↓
Test Run Adjustment 1
1) Cancel the emergency stop, do not put a work piece on, set to low speed and check the operation with commands from
the PC.
2) Put on a work piece, set to the automatic operation speed, and then check the operation with the command from the PC.
↓


