background image


2.


Configuring the XDS-2450 

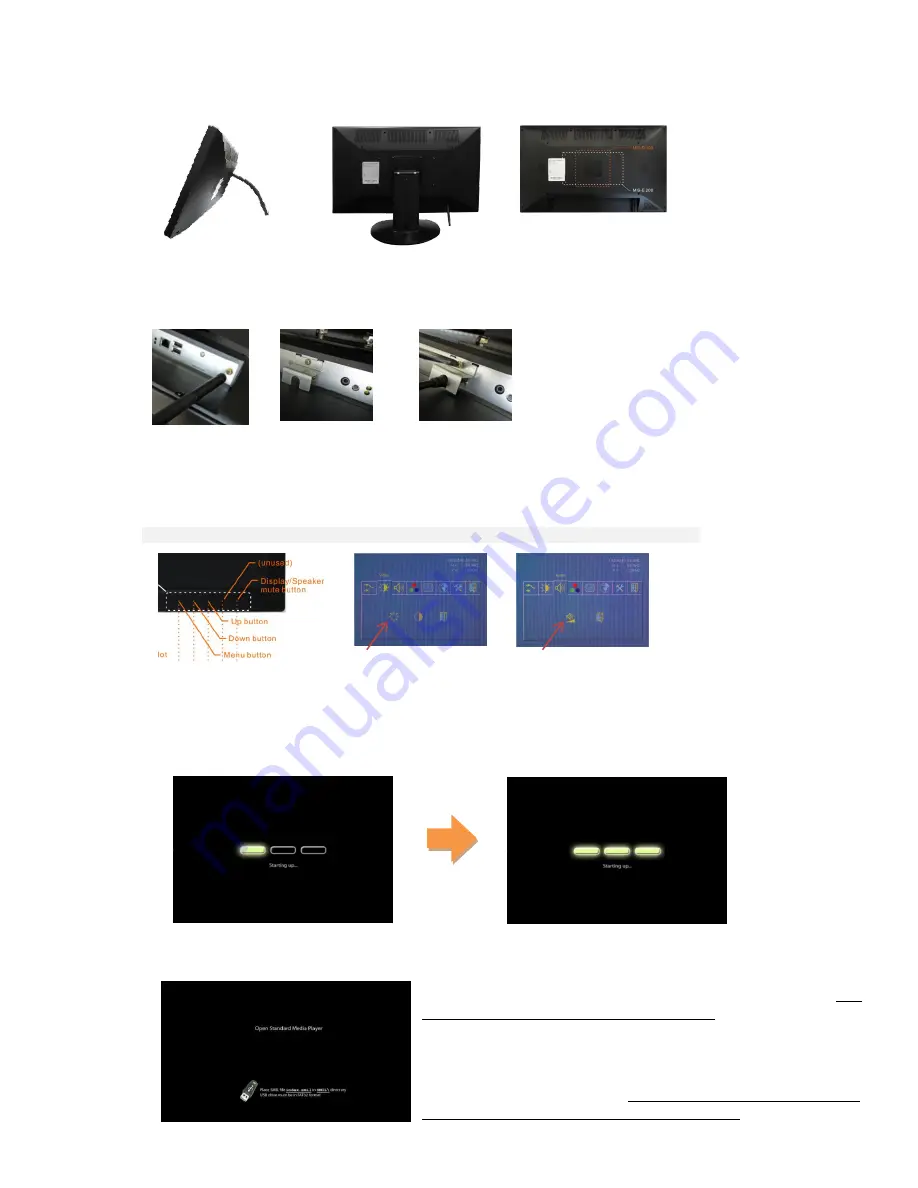
Mounting Options and Hardware Installation 


Option 1

: Supplied 

Monopod Flex Stand 

Option 2

: Optional tabletop 

VESA stand PVK-202 

Option 3

: 3

rd

 party VESA 

MIS-D100/E200 fixtures 

Installing Wi-Fi antenna and power plug 


SCREW-MOUNT

 Wi-Fi 

antenna  

REMOVE

 screw to 

detach metal plate  

ATTACH

 power plug  

RE-ATTACH

 plate and tighten screw 

Adjusting picture and sound (disabling the on-screen key lock) 

Video and audio settings can be adjusted like a regular TV via hidden front-panel touch buttons. 

 Optional remote accessory (PRC-100) is also available for remote adjustment of these settings 


ENTER 

front bezel

-

key combination


MENU-↑-↓-↑-↓-MENU

 to disable key lock 

ADJUST

 brightness in the on 

screen menu using 

/

/

MENU


ADJUST

 volume. Menu auto-locks 

after 5 seconds of inactivity 

Menu setup 

1


Attach the AC power adapter to power on the unit. The following progress bar will be displayed on screen: 


2


Player boot process takes approximately 

60 seconds

 to complete. After boot up, the player will indicate that 

it is ready for content sync via the USB port.  

The player will boot into the “Open Standard Media Player” screen. Plug 
in a USB keyboard to enter configuration menus. The menu and blue 
background will appear in about 30 seconds. 

If you have already loaded media contents into the player

, contents will 

play back immediately after boot up, and the “Open Standard Media 
Player” screen will not be shown. You can still plug in a USB keyboard at 
any time during playback to enter the menu system. 

~ 90 seconds


Summary of Contents for XDS-2450

Page 1: ...XDS 2450 User s Manual...

Page 2: ...ing the menus 3 Connect the XDS 2450 to your network 3 Clock and calendar settings 4 Adjusting picture and sound disabling the on screen key lock 4 Muting the picture and sound 5 Setting a password 5...

Page 3: ...portrait or landscape display Built in wireless b g n 2 4GHz only and Ethernet connectivity Supports advanced content programming via the W3C SMIL open API Box Contents NOT INCLUDED A USB keyboard req...

Page 4: ...to disable key lock ADJUST brightness in the on screen menu using MENU ADJUST volume Menu auto locks after 5 seconds of inactivity Menu setup 1 Attach the AC power adapter to power on the unit The fol...

Page 5: ...the player will scan for wireless signals nearby during boot up If the network requires authentication you will be asked to provide the password via USB keyboard for access To connect via wired networ...

Page 6: ...justed like a regular TV via hidden front panel touch buttons Optional remote accessory PRC 100 is also available for remote adjustment of these settings ENTER front bezel key combination MENU MENU to...

Page 7: ...reset the device See Factory reset Factory reset If modifying settings cause unintended results or if you have forgotten your password please reset the player Local contents will also be removed 1 Pre...

Page 8: ...nvestments are never obsolete Introduction Using SMIL pronounced smile the language created by W3C for multimedia communications the media player understands the language spoken by professional tools...

Page 9: ...p alpha 480p E2 PNG 24bpp alpha 720p E3 PNG 24bpp alpha 1080p Audio codec support POPAI Screen Media Standards S4 MPEG L2 audio S5 MP3 audio 384Kbps Playback control W3C SMIL 3 0 instructions sub set...

Page 10: ...32 104 F Humidity 5 85 40 C 32 104 F non condensing Dimensions WxHxD 576x344x69 mm 22 7x13 5x2 7 inches Weight 5 Kg 11 0 pounds Safety UL approved PSE Japan certified AC adapter Certifications CE FCC...

Page 11: ...commend reserving a safety margin to avoid exceeding the limit i e limiting files to 1850MB How do I manage the playback of contents The media appliance is designed to be interoperable with leading 3r...

Reviews: