


1080P (2MP) Indoor IR HD Analog Dome w/ Motorized Lens
D
MAIN MENU > VIDEO FORMAT
2M30 (default) = NTSC video format.
2M25 = PAL video format.
MAIN MENU > EXPOSURE
EXPOSURE setup contains settings for
EXPOSURE MODE and AGC.
•
EXPOSURE MODE:
Set camera exposure mode
to GLOBAL (default), BLC, WDR, or HLC.
GLOBAL (default)
Global (normal) exposure mode calibrates the image exposure based on the overall
scene brightness.
BLC (Back Light Compensation)
BLC feature optimizes exposure in the foreground and background of the video
image through digital signal processing. BLC corrects image areas with extremely
high or low levels of light to maintain a normal and usable level of light for the
object in focus.
WDR (Wide Dynamic Range)
Wide Dynamic Range uses the image sensor to prevent direct bright light
from washing out the video image. This feature is especially useful in indoor
installations, where the camera’s field of view includes an entryway or a window,
which lets in a lot of natural light. WDR feature is able to normalize the exposure
for the underexposed object in focus inside and overexposed background outside.
HLC (Highlight Compensation)
HLC feature senses strong sources of light in video (e.g. floodlights) and
compensates for exposure in these spots to enhance overall video quality.
•
AGC (AUTOMATIC GAIN CONTROL):
Set camera’s AGC to HIGH (default), MEDIUM,
or LOW. AGC enhances the video quality in low light conditions.
Note: The higher AGC level, the higher the image noise level.
MAIN MENU > DAY/NIGHT
DAY/NIGHT setup contains settings for DAY/
NIGHT MODE, IR LIGHT, SMART IR, LEVEL, DAY
TO NIGHT THRESHOLD, and NIGHT TO DAY
THRESHOLD.
•
MODE:
Set the camera to AUTO (default),
COLOR or B&W mode.
AUTO (default):
When set to AUTO,
the camera will switch between COLOR
and B&W modes depending on the level
of ambient light. The sensitivity can be
configured in D->N THRESHOLD and N->D THRESHOLD settings.
COLOR:
Set the camera to COLOR mode to keep it permanently in the daytime
mode. Note, activating COLOR mode will disable all IR-related features.
B&W:
Set the camera to B&W mode to keep it permanently in the nighttime
(black-and-white) mode.
•
IR LIGHT:
Set the camera’s IR light ON or OFF. Note: Do not turn the IR LIGHT off
when camera is set to B&W mode. Am51 supports IR distance of up to 40 meters
(130 feet).
•
SMART IR:
Smart IR feature prevents video over-/underexposure by adjusting the
brightness of multiple areas of the image.
Set Smart IR feature to MODE1 or MODE2. MODE1 is designed for extreme low light
conditions and, when necessary, can switch the camera into Slow Shutter mode,
reducing the overall video frame rate. MODE2 does not use Slow Shutter mode to
improve the image over-/underexposure.
Note: Do not turn the IR LIGHT off when using SMART IR feature.
•
LEVEL:
Set the SMART IR LEVEL to 0, 1, 2, or 3. The higher the level, the fewer
over-/underexposed areas the B&W video image will have.
•
D->N THRESHOLD:
(available in the AUTO mode only). Set the value from 0
(lowest) to 9 (highest). The higher the value, the sooner the camera will switch from
day (Color) mode to night (B/W) mode as the scene becomes darker.
•
N->D THRESHOLD:
(available in the AUTO mode only). Set the value from 0
(lowest) to 9 (highest). The higher the value, the sooner the camera will switch from
night (B/W) mode to day (Color) mode as the scene becomes lighter.
MAIN MENU > VIDEO SETTINGS
VIDEO SETTINGS setup contains settings for IMAGE MODE, WHITE BALANCE,
BRIGHTNESS, CONTRAST, SHARPNESS, SATURATION, 3DNR, and MIRROR.
•
WHITE BALANCE.
Set white balancing to AUTO or MANUAL
AUTO (default):
Adjusts white balance
automatically in accordance with the change of
lighting environment.
MANUAL:
Set RED GAIN and BLUE GAIN values from
1 to 255 manually, to adjust color balance.
User Manual
i3-TRNG-CAMS-
Am51-UM
.indd
Rev. 200205
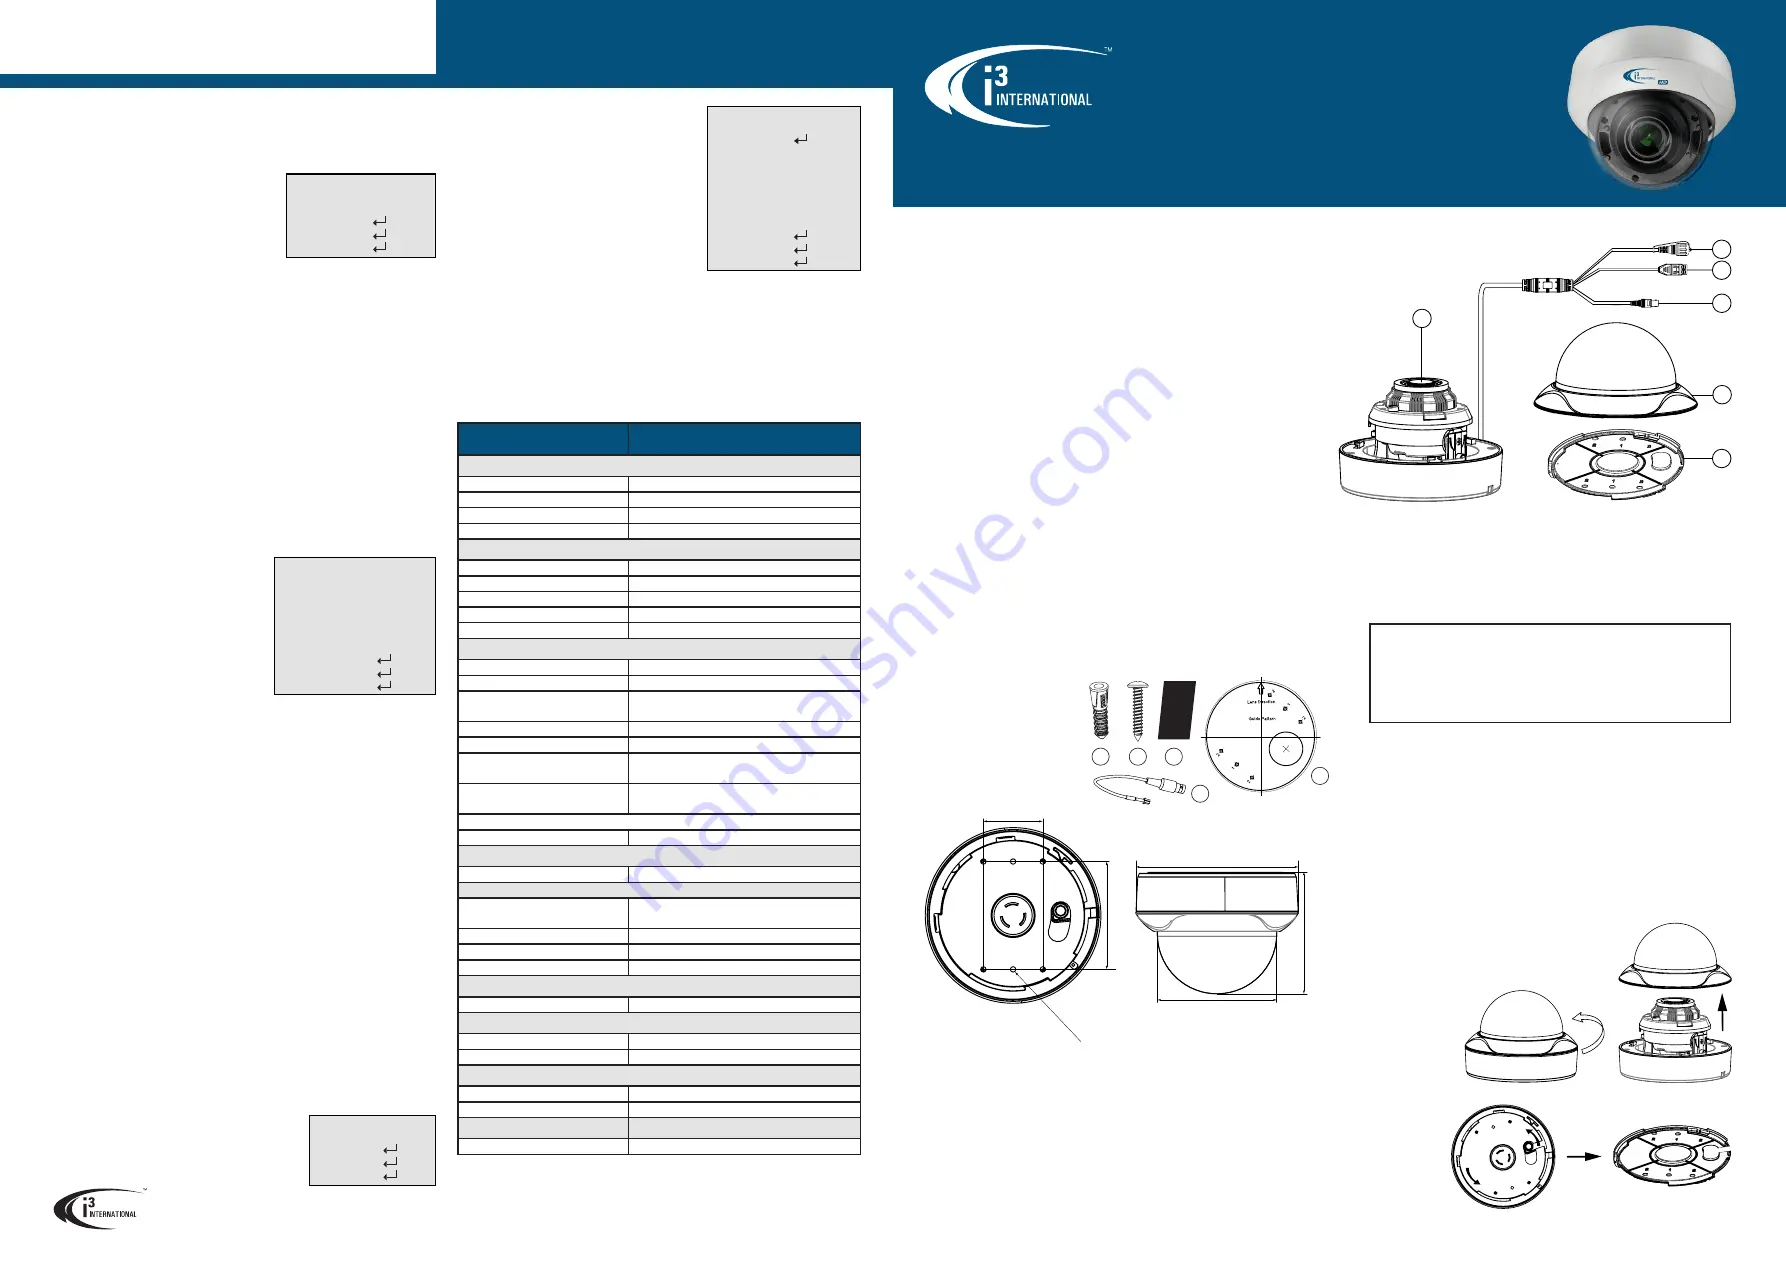
1.
Camera module/lens.
2.
Video format switch. Default video format setting: HD-TVI.
3.
Power connector (DC12V/AC24V).
4.
BNC video connector. Connect to an encoder, DVR/HVR or service monitor.
Four (4) video formats supported: HD-TVI (
default
), HD-AHD, HD-CVI and CVBS.
Use the video format switch (#2) to set video format as required.
5.
Dome bubble, twist-on.
6.
Camera back plate (pre-installed). Use for surface and electrical box mounting.
CHANGING VIDEO FORMAT:
- Unscrew protection cap from the video format switch (#2).
- Press and hold the button for 5 seconds to change the video output format
to the next one in sequence.
Video format sequence:
TVI (default) > AHD > CVI > CVBS.
INSTALLATION
Am51 camera supports easy twist-on surface mounting and is compatible with most
standard North American electrical boxes (with the optional B11 mounting plate).
Prepare the mounting surface
• Depending on the type of installation, additional mounting accessories may need
to be purchased.
• It is the installer’s responsibility to ensure that the mounting surface is suitable
for the chosen installation method.
• Based on installation location and surface type, supplied screws and anchors
may not be adequate. Mounting hardware is site-specific and may need to be
supplied by the installer.
DISASSEMBLY
Am51
Thank you for purchasing i3 International’s Am51 High Definition indoor analog dome
camera. Your camera is equipped with a motorized vari-focal 2.7-13.5mm @ F1.6-2.4
lens. The lens can be controlled through IE interface of the i3 encoders/standalone DVRs,
or through SRX-Pro Server/VPC. This camera features twist-on dome bubble and mounting
back plate for easy installation.
SAFETY
When installing your Am51 camera be sure to avoid:
• excessive heat, such as direct sunlight or heating appliances
• contaminants such as dust and smoke
• strong magnetic fields
• moisture and humidity
• areas with mechanical vibrations
• fluorescent lamps or objects that reflect light and unstable light sources
• temperatures below -40°C (-40°F) and above 50°C (122°F)
POWER
This camera accepts DC12V and AC24V power.
Maximum power consumption: 9.7W.
Ensure the supplied voltage meets the power consumption requirements of this camera
before powering the camera on. Incorrect voltage may cause irreparable damage to the
video camera and will effectively void the camera warranty.
CLEANING & SERVICING
For maximum optical clarity, the camera dome or lens must remain clean. Use a soft, dry
cloth to remove finger prints or dust from the dome cover.
• Use a blower to remove dust from the lens.
• Do not use volatile solvents such as alcohol, benzene, or thinners, as they may
damage the surface finishes.
• To avoid electrical shock and to preserve the product warranty, DO NOT disassemble
the camera. Refer servicing to qualified personnel only.
PACKAGE CONTENTS
Ensure that the items received match those listed on the order form and the packing slip.
In addition to this manual and a fully assembled camera, the dome camera packing box
includes:
A.
Plastic Anchor x4
B.
Round Head Screw
(Tapping Type) x4
C.
Waterproof Tape x1
D.
Surface Mount template x1
E.
Service Monitor BNC cable x1
CAMERA PARTS AND DEFINITIONS
83.5mm (3.29")
46mm (1.81")
6x Ø4.2
mm
(0.17")
DIMENSIONS
Ø99.94mm (3.93")
101.94mm (4.01")
Ø136mm (5.35")
A
B
1
HD
4
3
2
5
6
USER MANUAL
Am51 Analog Dome Camera
•
BRIGHTNESS, CONTRAST, SHARPNESS:
Set video
image brightness/contrast/sharpness value from 1
(lowest) to 9 (highest).
•
3DNR
(Digital Noise Reduction). Set the 3DNR value
from 1 (lowest) to 9 (highest). 3DNR feature analyzes
frames in sequence to differentiate pixels that likely
represent noise. This feature is especially beneficial
in low light conditions. The higher 3DNR value, the
better the video image appearance in poor lighting
conditions.
•
MIRROR:
This function flips the video image on the
screen. Set MIRROR to OFF (keep image as is), H (flip
180º horizontally), V (flip 180º vertically) or HV (flip
image 180º both horizontally and vertically).
MAIN MENU > FACTORY DEFAULTS
Select FACTORY DEFAULTS to reset all camera settings to the factory default.
MAIN MENU > EXIT, SAVE&EXIT
Select EXIT to exit the camera OSD menu without saving any changes.
Select SAVE&EXIT to save changes and exit the camera OSD menu.
EXPOSURE
1. EXPOSURE MODE
◄
GLOBAL
►
2. AGC
◄
HIGH
►
3. BACK
4. EXIT
5. SAVE&EXIT
VIDEO SETTINGS
1. IMAGE MODE
◄
HIGH-SAT
►
2. WHITE BALANCE
3. BRIGHTNESS
◄7 ►
4. CONTRAST
◄5 ►
5. SHARPNESS
◄5 ►
6. SATURATION
◄7 ►
7. 3DNR
◄5 ►
8. MIRROR
◄OFF ►
9. BACK
10. EXIT
11. SAVE&EXIT
DAY/NIGHT
1. MODE
◄
AUTO
►
2. IR LIGHT
◄ON ►
3. SMART IR
◄MODE1 ►
4. LEVEL
◄1 ►
5. D -> N THRESHOLD
◄5 ►
6. N -> D THRESHOLD
◄5 ►
7. BACK
8. EXIT
9. SAVE&EXIT
WHITE BALANCE
1. MODE
◄
AUTO
►
2. BACK
3. EXIT
4. SAVE&EXIT
HIGH DEFINITION ANALOG VIDEO SUPPORT
Your Am51 camera supports the standard CVBS composite analog video stream (720x480)
and a high-definition (2MP) video stream in HD-TVI, HD-AHD, and HD-CVI format.
Note: Am51 camera supports a single video output at-a-time. No separate spot monitor
output is offered.
IMPORTANT:
In order to use high-definition video, your Am51 camera
must be
connected to a video encoder
or standalone DVR/HVR that supports HD-TVI, HD-
AHD, or HD-CVI format.
Note:
i3’s line of encoders and embedded standalone DVRs supports HD-TVI and CVBS
formats only.
To prepare the camera for mounting, remove the camera’s dome
bubble and back plate.
The camera’s back plate can be mounted directly onto a
suitable surface or onto the optional B11 mounting plate,
for mounting onto supported electrical box types.
Removing the twist-
off dome bubble
Rotate the dome bubble
in a counter-clockwise
motion and lift it away
from the main camera
module. Set aside.
Removing the twist-off back plate
Am51 camera’s back
plate is pre-installed
but unlocked for
easy removal.
Lift the back plate
away from the main
camera module.
Set aside.
Specifications
Am51
(HD1080P Indoor IR Dome Camera)
Image System
Image Sensor
2MP CMOS Image Sensor
Signal System
NTSC/PAL
Effective Pixels (HxV)
1920(H) x 1080(V)
OSD
Yes
Optical System
Focal Length (built-in lens)
vari-focal, 2.7-13.5mm
F-stop Range (F-number)
F1.6 (wide); F2.4 (tele)
Horizontal FOV (Field of View)
105.2° - 32.8°
Vertical FOV (Field of View)
55.8° - 18.4°
Day/Night
IR cut filter
Electric
Digital Noise Reduction (DNR)
3D
Wide Dynamic Range (WDR)
True, ≥120 dB
Min. Illumination
0.005 Lux @ (F1.2, AGC ON),
0 Lux with IR
Automatic Gain Control (AGC)
Low/Middle/High/Off
White Balance
Auto/Manual
Electric Shutter
NTSC: 1/30 s to 1/50,000 s
PAL: 1/25 s to 1/50,000 s
Video Output (Selectable)
1x BNC Output
Video formats: CVBS, TVI, AHD, CVI
Note: Use one output at-a-time.
Day/Night Mode
Color/BW/AUTO
Other Features
Other
Sharpness, Brightness, Mirror, Reset
Mechanism
Angle Adjustment
Pan: 0° - 340°, Tilt: 0° - 75°,
Rotation: 0° - 355°
Dimensions
Ø 136mm x 102mm (H) / Ø 5.35“ x 4” (H)
Weight
0.45 kg (1.0 lb)
Protection Class
FCC, CE, UL
IR
IR Distance
up to 40 meters (130 feet)
Power Supply
Power Requirement
DC12V / AC24V
Power Consumption
Max. 9.7W
Environment
Operating Temperature
-40°C - 50°C (-40°F - 122°F)
Operating Humidity
90% or less (non-condensing)
Warranty
Standard Warranty
i3 Superior 5 year warranty
i3 INTERNATIONAL INC.
Page -4-
E
Waterproof tape
e Waterproof tape
pe Waterproof ta
f tape Waterproo
oof tape Waterpr
proof tape Water
C