I-Tech M0116 User Manual Download Page 9

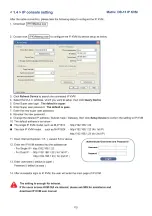
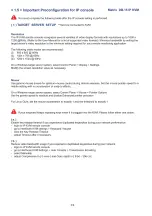
< 1.4 > IP console setting 

Matrix DB-15IPKVM 

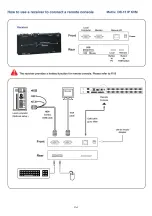
After the cable connection, please take the following steps to configure the IP KVM 

1. Download  IPKVMsetup.exe 

2. Double click IPKVMsetup.exe to configure the IP KVM by device setup as below. 

•> Device Setup 

Device 

Device MAC address i C3:EE:D3:0D:DD:7E 

Flefresh Devices 

Device Type 

□ Enable WLAN Configuration (WLAN Devices only) 

Netwoik Configuration 

IP auto configuration  None 

IP address 

Subnet mask 

Gateway 

192.166.1.22 

IP address 

Subnet mask 

Gateway 

255.255.255.0 

IP address 

Subnet mask 

Gateway  0.0.0.0 

Authentication 

Super user login 

Super user password 

New super user password 

New password (confirm) 

Super user login 

Super user password 

New super user password 

New password (confirm) 

Super user login 

Super user password 

New super user password 

New password (confirm) 

Super user login 

Super user password 

New super user password 

New password (confirm) 

Wireless

 LAN

 Configuration 

Wireless LAN ESSID 

Enable WEP encryption 

LAN WE P Key 

Query Device 

Setup Device 

OK | Cancel 

Help 

Status: Ready. 

3. Click

 Refresh Device

 to search the connected IP KVM 

4. Select the M.A.C. address, which you want to setup, then click

 Query Device 

5. Enter Super user login.

 The default is super 

6. Enter Super user password.

 The default is pass 

7. Enter the new super user password 

8. Re-enter the new password 

9. Change the desired IP address / Subnet mask / Gateway, then click

 Setup Device

 to confirm the setting to IP KVM 

10. The default address is as below:-

■ The single IP KVM model, such as M-IP1613 -

 http://192.168.L22 

■ The dual IP KVM model, such as M-IP1624 -

 http://192.168.L22

 (for 1st IP) 

http://192.168.L23

 (for 2nd IP) 

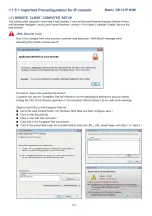
11. Open Internet Explorer (I.E. ), version 6.0 or above 

12. Enter the IP KVM address into the address bar 

- For Single IP -

 http://192.168.L22 

- For Dual IP -

 http://192.168.L22

 (for 1st IP ) 

http://192.168.L23

 (for 2nd IP) 

13. Enter username ( default is super) 

Password ( default is pass ) 

Authenticate Username and Password I 

Username 

Password 

14. After successful login to IP KVM, the user will enter the main page of IP KVM 

The setting is enough for intranet. 

If the users access KVM GUI via internet, please ask MIS for assistance and 

download IP KVM user manual 

P.5 

Summary of Contents for M0116

Page 1: ...KVMcl qb A i K L RoH5 R E A C H y i K L RoH5 R E A C H y M118 218 M1116 2116 I RoH5 R E A C H y M118 218 M1116 2116 I RoH5 R E A C H y M118 218 M1116 2116 I RoH5 R E A C H y Matrix DB 15 KVM c M M018...

Page 2: ...n the chassis Opening it yourself could damage the equipment and invalidate its warranty If any part of the equipment becomes damaged or stops functioning have it checked by qualified service personne...

Page 3: ...ade 1 7 Specifications P 1 P 2 P 3 P 5 P 6 P 8 P 9 Part2 Matrix DB 15 KVM M018 M028 M038 M0116 M0216 M0316 2 1 Package contents P 11 2 2 KVM port connection P 12 2 3 Remote Local console connection P...

Page 4: ...of direct sunlight away from sources of excessive dust dirt heat water moisture and vibration Unpacking The equipment comes with the standard parts shown in package content Check and make sure they ar...

Page 5: ...w power cord for receiver x 1 CE 6 6ft Combo KVM cable for receiver box x 1 Local Console Remote Console 1 M118 j f f i ra Power M C vv5 C J 0 r O O O O mm d i p nn 1 out Cascade M1116 p B B P g s EZ3...

Page 6: ...II it i III DH PS 2 Servers IIImm III l DB 15 Combo KVM port fiji 0i aag lan ffi f p gfrip ip gymMp g aro ffiajgffi tibz gft f 3iE g E j W g j g p ffiaSiEj ffigj d Mf ffiiM ffiggaJ NE 6 10 15 Combo KV...

Page 7: ...6 cable max 100m CAT 5 6 cable max 150m Network device hub or router aa ttteri 0 Local Remote USB Cat6 console Console jjjj 0 S S g ffi 5p 7 g S B m jg a 7 B7 g t S B 7 gfiare gjrare g B7 ffiggiflff...

Page 8: ...r USB K B Mouse Local Remote Button Button to to PC KVM switch A The receiver provides a hotkey function for remote console Please refer to P 19 III mis III i Local computer Optional setup NE 6 Combo...

Page 9: ...y Device Setup Device OK Cancel Help Status Ready 3 Click Refresh Device to search the connected IP KVM 4 Select the M A C address which you want to setup then click Query Device 5 Enter Super user lo...

Page 10: ...optimum mouse control during remote sessions Set the mouse pointer speed to a middle setting with no acceleration or snap to effects On a Windows target server system select Control Panel Mouse Point...

Page 11: ...to enter the URL URL should begin with http or https i j Jwa Control Panel 1 m General Update Java I d e a r l y Advanced J Enable Jaua content In ttiE browser Security for appic t ere not on the Exce...

Page 12: ...on slave KVM will be sacrificed and disabled Master KVM M lamJ f 5 m A 3a jP J nffil y lp Q 8 8 lp lp Q5 L ajig rg aj lg Q Q WM3p H m E m W3 gfSBRp jS7 g n ffiMff ffigBflff ffiBBflff G gjp Q p out in...

Page 13: ...2forM IP824 M IP1624 15 user login 1 x active user Internet Explorer Firefox Safari SSL v3 RSA AES HTTP HTTPs CSR RJ45 Ethernet per IP console Expansion Up to 240 servers by 8 level cascade Compatibil...

Page 14: ...P 10...

Page 15: ...r box x 1 M028 M0216 M028 or M0216 KVM unit x 1 Mounting set w bracket screws x 1 Power adapter w power cord for KVM x 1 Receiver box for remote console x 2 Power adapter w power cord for receiver x 2...

Page 16: ...1 M028 n H r3 P0Wer C O P_UBS CO O S O to13BB C O O V v _ C 0 O JJJJJd p_ v _co _ Remote 2 out Cascade M0216 BE F fi IQ t pln m iia g pgi tia s g Mi I NWI I I I I 16 15 14 13 12 11 10 9 E H P 7 sSi 0...

Page 17: ...ver 0E BillII ift i II PS 2 Servers II II II Its 1 c DB 15 Combo KVM port j jL FW I HE7 M JI7 B g m HE7 H I S jra sssstj a Kv SH g fssss p f w p gffiffffi M Q issssf NE 6 10 15 Combo KVM cable support...

Page 18: ...x DB 15KVM CAT 5 6 cable max 150m CAT 5 6 cable max 150m Receiver SB Remote Local Remote Cat6 USB Cat6 Console 3 console Console 1 3E OB S S Hfe mssfe OTI M S SD B BS AB j XN I3 a g SS 6 w fj C S C w...

Page 19: ...Local Remote Power Button Button to to PC KVM switch k The receiver provides a hotkey function for remote console Please refer to P 19 IIliiiiS II II Si 1 Monitor 7V Local computer Optional setup CE 6...

Page 20: ...matrix KVM the original remote console on slave KVM will be sacrificed and disabled Master KVM ir lOXBl r l I I mp 1p ffiMff ffisiiaffi fi lp S m p m XX8 lp MR mW8lp mw lp mtiBSbls m 3 lp goags j Mygr...

Page 21: ...te I O RJ45 via Cat5 Cat5e Cat6 cable up to 500 feet Expansion Up to 240 servers by 8 level cascade Compatibility Multi platform Mix PCs SUN and Mac G3 G4 Mac iMac Support Windows 7 Vista 2003 XP Linu...

Page 22: ...no PC port LEDs Channel button Bank button 16 ports 0 O O O O O O O O O O O O O O O O O O O O O O O O 1 2 3 4 5 6 7 8 Active Remote O O O O O O O O O O O O O O O O O O O O O O O O 9 1 0 1 1 1 2 1 3 1...

Page 23: ...without any change Remark a Blank has underscore while SPACE doesn t have b Press any alphanumeric key to move to next input item SPACE is treated as a valid character Change your password 1 Login the...

Page 24: ...sc Cancel Quit Enter Complete Switch to selected port Switch to previous or next port PgUp PgDn Switch to previous bank or next bank 1 2 3 4 Display port 01 0 8 0 9 1 6 1 7 2 4 2 5 3 2 Remark Display...

Page 25: ...Lock R default Except User Security settings Scroll Lock Scroll Lock U Disable and enable password security Default security is ON To enable disable the screen saving Scroll Lock Scroll Lock L functio...

Page 26: ...ole Resolution Frequency Hz 1600x1200 60 1440x900 60 1280x1024 60 1280x960 60 1152x864 75 1024x768 60 70 75 800 x 600 60 72 75 640 x 480 60 72 75 Resolution Frequency Hz 1600x1200 60 1280x1024 60 1280...

Page 27: ...I TECH COMPANY i Tech C o m p a n y LLC TOLL FREE 888 483 2418 EMAIL info iTechLCD com WEB www iTechLCD com...

Reviews: