background image


Page 5 

The Display Timing 

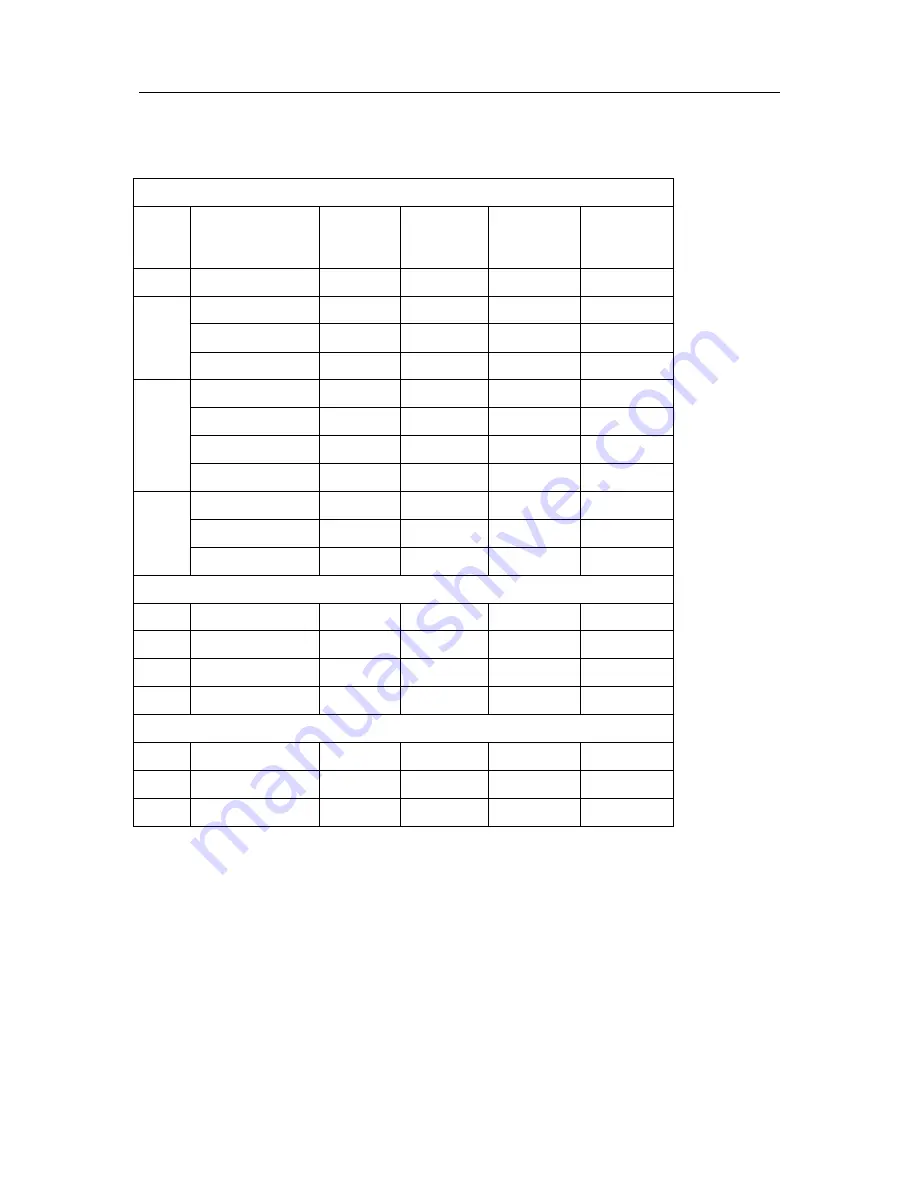
Applicable video timing 

The following table lists the better display quality modes that the LCD monitor provides.  If the 
other video modes are input, the monitor will stop working or display unsatisfactory picture quality. 


VESA Modes 

Mode 

Resolution 

Total 

Nominal 
Frequency 
±0.5KHz 

Nominal 
Frequency 
±0.5KHz 

Nominal 
Pixel Clock 
(MHz) 

DOS 

720x400@70Hz 

900x449 

31.469 

70.087 

28.322 

640x480@60Hz 

800x525 

31.469 

59.940 

25.175 

640x480@72Hz 

832x520 

37.861 

72.809 

31.500 

VGA 

640x480@75Hz 

840x500 

37.500 

75.000 

31.500 

800x600@56Hz 

1024x625  35.156 

56.250 

36.000 

800x600@60Hz 

1056x628  37.879 

60.017 

40.000 

800x600@72Hz 

1040x666  48.077 

72.188 

50.000 

SVGA 

800x600@75Hz 

1056x625  46.875 

75.000 

49.500 

1024x768@60Hz  1344x804  48.363 

60.004 

65.000 

1024x768@70Hz  1328x806  56.476 

70.069 

75.000 

XGA 

1024x768@75Hz  1312x800  60.023 

75.029 

78.750 

IBM Modes 

EGA 

640x350@70Hz 

800x449 

31.469 

70.086 

25.175 

DOS 

720x400@70Hz 

900x449 

31.469 

70.087 

28.322 

VGA 

640x480@60Hz 

800x525 

31.469 

75.000 

31.500 

XGA 

1024x768@72Hz  1304x798  57.515 

72.100 

75.000 

MAC Modes 

VGA 

640x480@60Hz 

800x525 

31.469 

59.940 

25.175 

SVGA  832x624@75Hz 

1152x667  49.725 

74.551 

57.2832 

XGA 

1024x768@75Hz  1328x804  60.927 

74.927 

80.000 


Summary of Contents for LCHH2010

Page 1: ......

Page 2: ...t Introduction 3 Hardware Installation 3 The Display Timing 5 The Display Outline Dimensions 6 The Display Controls 7 The Screen Adjustment 8 Troubleshooting Tips 10 Specification 11 Product Safety Pr...

Page 3: ...e with your computer Windows 98 2000 XP drivers for both the display and the video card are supplied on the Windows 98 2000 XP CD or diskettes Unfortunately Microsoft did not provide a complete listin...

Page 4: ...nector It is called 15pin Mini D sub connector 1 10 6 11 5 15 Pin No Signal Connector 1 Red Video Signal 2 Green Video Signal 3 Blue Video Signal 4 N C 5 Ground 6 Ground for red video signal 7 Ground...

Page 5: ...75Hz 840x500 37 500 75 000 31 500 800x600 56Hz 1024x625 35 156 56 250 36 000 800x600 60Hz 1056x628 37 879 60 017 40 000 800x600 72Hz 1040x666 48 077 72 188 50 000 SVGA 800x600 75Hz 1056x625 46 875 75...

Page 6: ...Page 6 The Display Outline Dimensions Unit mm...

Page 7: ......

Page 8: ...on of the display and OSD menu etc through the main menu display The Down Key and Up Key are used to scroll through items within the menu The selected item is highlighted as the scrolling move along T...

Page 9: ...crease volume gain when OSD is off Up key Increase item number or value of the selected item when Increase volume gain when OSD is off Select key Activate the selected icon or function Source key Inpu...

Page 10: ...OSD Control Function List OSD For PC input Page 10 The Screen Adjustment...

Page 11: ...can Select Source input PC AV S Video TV Component and Recall System data OSD This item can control OSD window function As OSD H Position OSD V Position OSD Transparence and OSD Off time Picture Adjus...

Page 12: ...temperature Press Select to execute 6500K Select 6500 color temperature Press Select to execute User Select USER color temperature Press Select to execute Red Adjust gain of the Red color Press Up or...

Page 13: ...Press Up to execute mute or Press Down to release mute Treble Adjust audio Treble Press Up to increase or press Down to decrease Bass Adjust audio bass Press Up to increase or press Down to decrease...

Page 14: ...e Press Up to come form Main Source Press Down to come form Sub Source Size Change the Sub Picture Size It supports 4 step size 0 33 66 100 Press Up to enlarge the sub picture Press Down to reduce the...

Page 15: ...ast Saturation Between colorful and colorless Hue Color varying Sharpness Adjusts the Sharpness Press Up to increase or press Down to decrease System Recall Restore the default value The value accordi...

Page 16: ...ansparency Press Up or Down to adjust the parameter Off Time Adjusts the OSD exit time Press Up or Down to adjust the parameter OSD For Video input Press Up or Down to locate the item you desire to ch...

Page 17: ...input PC AV S Video TV Component and Recall System data OSD This item can control OSD window function As OSD H Position OSD V Position OSD Transparence and OSD Off time All functions adjustment are s...

Page 18: ...Page 18 The Screen Adjustment...

Page 19: ...Press Up for Cable TV or press Down for Antenna TV MTS Set Multi Channel Television Sound STEREO A primary language and Hi Fi system broadcast SAP A second language broadcast MONO A primary language a...

Page 20: ...memories or erase Press Up to add a new channel or press Down to erase a channel CH Search Auto Channel scan Press Select to execute Sleep Setup the TV Sleep timer for Disable 10 20 30 40 50 60 90 mi...

Page 21: ...ease the value 5 MUTE Sound On or Off 6 DISPLAY 11 2 Shown a channel number in the screen 7 CHANNEL 3 Change the channel 15 8 VOLUME 17 Adjust the volume 16 9 JUMP 4 Return to last the TV channel 10 M...

Page 22: ...A dapter ou tput to the jack at therear of LCD Monitor Plug thePower cord to the Adapter Connect the Power cord to power outlet Turn o n the LCD Monitor and PC You canalso plug in RCA jac k to connect...

Page 23: ...nt of Display is lit 3 Check that Video Signal cable from the Display has been securely and correctly connected 4 Check that Video Card is firmly seated in card slot of Computer motherboard 5 Check th...

Page 24: ......

Page 25: ...ny kind fall into the display from ventilation holes Do not attempt to service this unit yourself Removal of the display cover may expose you to dangerous voltage or other risks Refer all servicing to...

Reviews: