background image

SCD area (

®

“3.8.5  Configure the SCD settings [SCD area]”), and VIQS area (

®

“3.6.4.6  Configure

the VIQS area”) is configured. To prevent this, perform the setting for the extra zoom function before
other settings.

3.6.4.4  Configure the settings relating to the privacy zone (“Privacy
zone” setup menu)

Click the [Setup>>] button of “Privacy zone” on the [Image quality] tab of the “Image/Audio” page.
(

®

“3.6.4  Configure the settings relating to image adjust, privacy zone, VIQS, and lens distortion compensation

[Image quality]”)
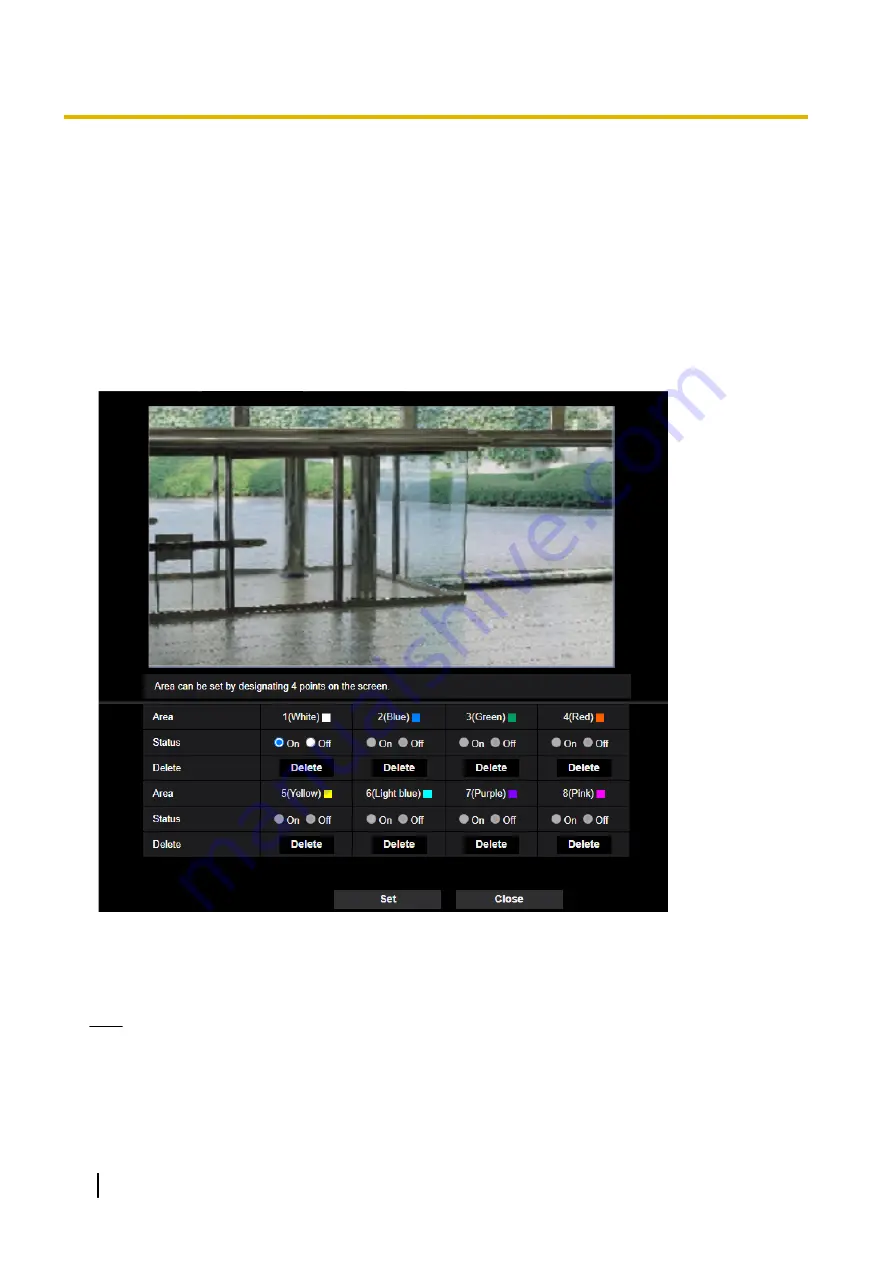
When there is a zone that you do not want to display, set the zone as a privacy zone is filled with gray.

[Area]

The privacy zone will be set by designating four peak points on an image. Each zone can be overlapped. The
zones are numbered sequentially from area 1.

Note

Set the privacy zone larger than the size of an object to be hidden.

[Status]

Select “On” or “Off” to determine whether or not to display the privacy zone.

On:

 The privacy zone will be displayed.

98

Operating Instructions

3 Detailed Settings

Summary of Contents for WV-S71300-F3

Page 1: ...Operating Instructions Network Camera Model No WV S71300 F3 WV S71300 F3 The model number is abbreviated in some descriptions in this manual ...

Page 2: ...ol iCT refer to our technical information website Control No C0133 Note Control No C used in this document should be used to search for information on our technical information website https i pro com global en surveillance training_support support technical_information and will guide you to the right information The captured screens are used based on the guideline by Microsoft Corporation Operati...

Page 3: ...ard Universal Plug and Play is described as UPnP or UPnP About the initial setting 1 Administrator registration At the time of first access to the camera or at the time of initialization the registration screen will be displayed Define the user name and the password for the administrator and enter them correctly Hereafter they can be used for login User name 1 to 32 characters Enter the user name ...

Page 4: ...you forgot or do not know the password or user name the camera must be initialized Because all settings other than preset position settings are deleted when the camera is initialized make sure to keep the information secure from third parties Refer to Parts and functions section in the Basic Information for more information about initializing the camera It is recommended to change the password per...

Page 5: ...a date on the camera When is clicked the date and time on the PC will be acquired and displayed Available range Jan 01 2013 Dec 31 2035 Time Click the button and set a time on the camera When is clicked the time on the PC will be acquired and displayed IMPORTANT Use an NTP server when the more accurate time date setting is required for the system operation 3 10 2 3 Configure the settings relating ...

Page 6: ...e left side of the displayed time and date Out Does not apply summer time Auto Applies summer time in accordance with the settings for Start time date and End time date month week day of the week time Default Out Start time date End time date When Auto is selected for Summer time daylight saving select the time date for the start time and the end time month week day of the week time Screen setting...

Page 7: ... setup menu 39 3 2 3 About the setup menu window 41 3 3 Perform management of the extension software and the schedule setting Ext software 43 3 3 1 Perform the installation uninstallation and version upgrade of the extension software Software mng 43 3 3 2 Set a schedule of the extension software Operation sched 46 3 3 3 Check the control log of extention software Control log 47 3 4 Use Easy Setup ...

Page 8: ...09 3 8 2 3 Configure settings relating to recording to an SD memory card when an alarm occurs 109 3 8 2 4 Configure settings relating to TCP alarm notification when an alarm occurs 109 3 8 2 5 Configure settings relating to HTTP alarm notification when an alarm occurs 109 3 8 2 6 Configure settings relating to SNMP transmissions of alarm images 109 3 8 3 Configure the VMD settings VMD area 110 3 8...

Page 9: ...3 11 Configure the settings relating to the schedules Schedule 158 3 11 1 How to delete the set schedule 160 3 12 Maintenance of the camera Maintenance 161 3 12 1 Check the system log System log 161 3 12 2 Upgrade the firmware Upgrade 161 3 12 3 Check the status Status 162 3 12 4 Reset the settings Reboot the camera Default reset 165 3 12 5 Settings data backing up or restoring logs Data 165 3 13 ...

Page 10: ... IP address of the camera colon port number in the address box of the browser Example http 192 168 0 11 8080 When this camera is in a local network configure the proxy server setting Settings Network and Internet Proxy not to use the proxy server for the local address Note Refer to Control No P0002 and Control No P0003 in the support video page of the support site below for more information if HTT...

Page 11: ... less users When 14 users are concurrently accessing the access limit message will be displayed for users who subsequently attempt to access If you set the Stream transmission Stream 1 Stream 2 Stream 3 Stream 4 to On an H 265 or H 264 image will be displayed based on the settings of the Stream encoding format If you set the Stream transmission Stream 1 Stream 2 Stream 3 Stream 4 to Off a JPEG ima...

Page 12: ...ill light red It will go off when the SD recording stops This indicator will be displayed when Manual or Schedule is selected for Save trigger on the setup menu 3 5 2 Configure the settings relating to the SD memory card SD memory card Snap shot button Click this button to take a picture a still picture The picture will be displayed on a newly opened window When right clicking on the displayed ima...

Page 13: ...stallation angle of view is registered 3 6 4 7 Register the initial installation angle of view If you click the Installation angle of view confirmation button an image showing the amount of deviation from the position when registering the installation angle of view the pitch direction of the camera and the roll direction is displayed in the main area It is a guide for returning to the original ang...

Page 14: ...ption set to On Stream selection display button Stream information display Displays the setup for stream encoding format image capture size bit rate and frame rate for the live view of a stream Note Displays the values set in the stream The actual bit rate and frame rate vary depending on the network environment and the used PC Main area Displays images from the camera The current time and date wi...

Page 15: ...adjusted in 4 steps Off Low Middle High by clicking the button or the button or by moving the volume cursor When the mic input button is clicked the mic input Camera to PC will be turned on off Note When Audio volume control mode is set to Adjust Mic input in the setup menu the volume cursor cannot be operated when using Audio recording or Audio detection When the camera is restarted the adjusted ...

Page 16: ...era and register the user name of Administrator and password in the web browser in advance Refer to our technical information website Control No C0302 for information about the terms and conditions for use of multi screen 1 From the Live view pull down menu in the Live page select Multi screen Images from the registered cameras will be displayed on a selected multi screen screen can be split up to...

Page 17: ... the resolution from the pull down menu to change it When you select 4 Screens in the Layout pull down menu the image capture size of the camera changes Switching between 320x180 default and 640x360 Note The frame rate may drop depending on the network environment and number of accessing users If the image capture size specified for JPEG cannot be obtained a JPEG image with an image capture size t...

Page 18: ...nge the password periodically 3 9 1 Configure the settings relating to the user authentication User auth Note It is necessary to configure the network settings of the mobile terminal in advance to connect to the Internet and monitor images from the camera 3 10 Configuring the network settings Network 1 Access to http IP address cam 1 or http Host name registered in the DDNS server cam 2 using a mo...

Page 19: ...the Advanced tab of the Network page enter as follows https IP address colon port number cam or https Host name registered in the DDNS server colon port number cam When the authentication window is displayed enter the user name of an administrator or user and password Depending on the mobile terminal in use password entry may be required each time the screen is switched It is impossible to send an...

Page 20: ... Note It is necessary to configure the network settings of the tablet device in advance to connect to the Internet and monitor images from the camera 3 9 1 Configure the settings relating to the user authentication User auth Depending on the device model the same screen as the PC may be displayed In that case access to http IP address live tab html or http Host name registered in the DDNS server l...

Page 21: ...60 Hz is not available Image rotation Set whether or not to rotate the image JPEG H 265 or H 264 0 Off Does not rotate the image 90 Rotates the image by 90 degrees 180 Upside down Turns the image upside down 270 Rotates the image by 270 degrees Default 0 Off IMPORTANT The position shifts if the image rotation setting is changed when the following area settings are configured Therefore configure th...

Page 22: ...he main area It will also turn off automatically after it is displayed for a while If the deviation from the angle of view when installed is large the display for the amount of deviation may not work properly Registering the installation angle of view Click Execute to save the current position as the initial installation angle of view Click Delete to delete the initial installation angle of view A...

Page 23: ...access 1 Only operable by users whose access level is 1 Administrator 2 Only operable by users whose access level is 1 Administrator or 2 Camera control when On is selected for User auth User auth 3 Only when accessing the camera via the Internet Operating Instructions 23 1 Operations ...

Page 24: ... light red 1 1 2 About the Live page while images are being recorded on the SD memory card The image saving interval can be configured on the SD memory card tab of the Basic page 3 5 2 Configure the settings relating to the SD memory card SD memory card 4 Click the Stop button in SD memory card Rec on SD to stop saving images on the SD memory card The SD recording status indicator will turn off 5 ...

Page 25: ... page Save images on the SD memory card When an alarm occurs images JPEG H 265 H 264 will be saved on the SD memory card The settings to save images on the SD memory card can be configured on the SD memory card tab 3 5 2 Configure the settings relating to the SD memory card SD memory card of the Basic page and the Alarm tab of the Alarm page 3 8 2 Configure the settings relating to the camera acti...

Page 26: ...ations can be sent at an alarm occurrence to the HTTP servers registered in advance Up to 5 HTTP servers can be registered as recipients of alarm notifications The URL sent to HTTP servers with alarm notifications can be specified The settings for HTTP alarm notification can be configured on the Notification tab of the Alarm page 3 8 8 2 Configure the settings relating to HTTP alarm notification 2...

Page 27: ...yed SFTP trans error log Logs filed when SFTP periodic image transmission fails will be displayed 1 Display the Live page 1 1 1 Monitor images from a single camera 2 Click the Camera control panel display button The camera control panel will be displayed 3 Click the Log Play Start button The log list will be displayed in a newly opened window log list window A B C E D IMPORTANT Only a single user ...

Page 28: ...d Date time Displays the logs recorded until the entered date and time on Date time box Search button Searches for logs according to the conditions specified in Event and Recording time The search result will be displayed on the log list Log list Displays the log search results You can play back recorded data by clicking on the time or duration of the recorded data displayed under Time date and Du...

Page 29: ...IMPORTANT If there are many recorded data files on the SD memory card it may take time to delete all of them In this case format the SD memory card However please note that formatting will delete all of the files on the SD memory card In the process of the deletion Alarm and Manual Schedule cannot be operated Do not turn off the power of the camera until the deletion is complete When the power of ...

Page 30: ...ry card Therefore images may look coarse on the Playback page If the Transmission interval is set to 1 minute or less in SFTP periodic image transmission on the Advanced tab the images saved on the SD memory card may not be played back in order when playing back from the SFTP periodic image transmission error log list The playback refresh interval may become slower when recording data to the SD me...

Page 31: ... will be displayed and paused when this button is clicked during playback Each time this button is clicked during pausing the frame previous to the currently displayed frame will be displayed Note When the mouse button is held down while the mouse pointer is on this button the image number will be decreased When the mouse button is released the decreasing of the image number will stop and the imag...

Page 32: ... the PC 1 6 2 Playback Stream 1 Stream 2 Stream 3 Stream 4 images saved to the SD memory card IMPORTANT Depending on the network environment download of video data may fail If downloading failed while playing images you may be able to download images after stopping the currently played images and starting the download again Depending on the network environment and status of the camera you may not ...

Page 33: ...e images and playback may become slow Recorded audio is not played back when Off is selected for Audio transmission mode on the Audio tab of the Image Audio page FF button Each time this button is clicked the playback speed will change When the button is clicked during fast playback playback speed will return to the normal playback speed Note The maximum speed of the fast playback varies depending...

Page 34: ...d Note The image playing screen cannot be operated while downloading Perform operations after the downloading is completed When the Cancel button is clicked in the process of the download the download will be canceled In this case video data already downloaded before clicking the Cancel button will be saved on the PC Video data are saved in the files of approx 60 MB When the file size of video dat...

Page 35: ...a 2 Click the button on the Live page The settings panel will be displayed When the button is clicked once again the settings panel will be hidden Refer to 2 1 3 About the settings panel for further information about this panel 2 1 2 How to operate the setup menu 1 Click each tab of the settings panel 2 Complete each setting item displayed in the frame on the right of the window Note Some items ma...

Page 36: ...nfigured 3 6 4 1 Configure the settings relating to image quality Image adjust setup menu Zoom tab On the Zoom tab the zoom and related items can be configured 3 6 4 3 Adjust the angular field of view using the Extra optical zoom function Registering the installation angle of view tab Displays the Registering the installation angle of view tab On the Registering the installation angle of view tab ...

Page 37: ...ected 5 600 seconds Default 5s Detailed setting tab Displays the Detailed setting tab On the Detailed setting tab shifting to the detailed setting and the operation panel setting can be configured Ext software Displays the Ext software page 3 3 Perform management of the extension software and the schedule setting Ext software Network Displays the Network page 3 10 1 Configure the network settings ...

Page 38: ... HTTPS function 3 10 3 How to configure HTTPS settings IMPORTANT Design and enhance security countermeasures to prevent leakage of information such as image data authentication information user name and password alarm E mail information SFTP server information DDNS server information etc Perform the countermeasure such as access restriction using the user authentication or access encryption using ...

Page 39: ...ion User auth for how to configure the access level 3 2 1 How to display the setup menu 1 Display the Live page 1 1 1 Monitor images from a single camera 2 Click the Detailed setting tab Camera detailed setting button on the Live page The setup menu will be displayed Refer to 3 2 3 About the setup menu window for further information about this menu 3 2 2 How to operate the setup menu A B Menu butt...

Page 40: ...e window 3 After completing each setting item click the Set button to apply them IMPORTANT When there are two or more Set Register and Execute buttons on the page click the respective button to the edited setting item Example A B C D When completing the setting items in field A click the Set button B below field A The edited settings in field A will not be applied unless the Set button B below fie...

Page 41: ...e settings relating to the SD memory card can be configured on the Basic page 3 5 Configure the basic settings of the camera Basic Image Audio button Displays the Image Audio page The settings relating to image quality image capture size etc of JPEG H 265 H 264 camera images can be configured on the Image Audio page 3 6 Configure the settings relating to images and audio Image Audio Multi screen b...

Page 42: ...esignate time zones to allow to activate the VMD function the SCD function and the Audio detection function 3 11 Configure the settings relating to the schedules Schedule Maintenance button Displays the Maintenance page System log check firmware upgrade status check and initialization of the setup menu can be carried out on the Maintenance page 3 12 Maintenance of the camera Maintenance Support bu...

Page 43: ...installed extension software will also be deleted 3 3 1 Perform the installation uninstallation and version upgrade of the extension software Software mng Click the Software mng tab of the Ext software page For menu display and how to operate refer to 3 2 1 How to display the setup menu and 3 2 2 How to operate the setup menu Installing the extension software 1 Save the extension software to be in...

Page 44: ...y operation during the installation process and wait until it completes 4 Obtain the registration key number and register the registration key Note Depending on the type of extension software you may need to register the registration key For information on how to obtain and register the registration key refer to the instruction manual of the extension software After registering the registration ke...

Page 45: ...nformation of the installed camera software will be displayed Ext software Uninstall button The installed extension software can be uninstalled Software version If you have installed ext software the version information of the installed ext software is displayed along with the version information of the SDK installed in the ext software Status The installation status of the extension software will...

Page 46: ...on software Operation sched Click the Operation sched tab of the Ext software page For menu display and how to operate refer to 3 2 1 How to display the setup menu and 3 2 2 How to operate the setup menu Select an extension software for which an operation schedule is set Operating day of week Select Time table 1 Time table 2 or Off for each day of the week Time table 1 Time table 2 From the pull d...

Page 47: ... be displayed Up to 200 control logs can be saved on the built in memory of the camera When the saved control logs have reached the maximum number the newer logs will overwrite the older control logs In this case the oldest log is the first to be overwritten The control logs will be displayed in group of 100 logs each and the logs will be saved even when the power of the camera is turned off Next ...

Page 48: ... is properly configured click the Status tab on the Maintenance page and check that the Enable is displayed for Status of UPnP 3 12 3 Check the status Status When Enable is not displayed refer to Cannot access the camera via the Internet in 4 2 Troubleshooting When the UPnP Auto port forwarding setting is changed the Auto port forwarding setting under UPnP on the Advanced tab of the Network page a...

Page 49: ...he Image Audio page JPEG 1 Image capture size QVGA 320x180 Stream 1 Stream 2 Stream 3 Stream 4 Transmission priority Best effort Max bit rate per client 1024 kbps Stream 1 Image capture size 1280x960 1280x720 Stream 2 Image capture size VGA 640x360 Stream 3 Image capture size VGA 640x360 Stream 4 Image capture size QVGA 320x180 Network tab on the Network page Common Max RTP packet size Limited 128...

Page 50: ... current settings are displayed here You can set event actions for SD schedule recording SFTP periodic image transmission alarm detection Once the settings are completed in each setup menu click the Next button to proceed The setup flow is as follows Note If you click the Next button the settings in the screen will be saved 50 Operating Instructions 3 Detailed Settings ...

Page 51: ...ry recording H 265 H 264 Page 59 SFTP periodic image transmission Page 60 Event detailed setup Configure the details of the settings in event action setup Settings of image transmission conditions Settings of recording conditions Settings of recording conditions Settings of image transmission method SFTP settings E mail settings Schedule settings Completed Completed 3 4 2 1 Configure the schedule ...

Page 52: ...etection alarm setup menu If you select Schedule and click the Next button the schedule function type setup menu will be displayed 3 4 2 6 Schedule Configure SD recording or SFTP periodic image transmission schedule function type setup menu 3 4 2 2 Alarm Configure VMD SCD and audio detection alarm setup menu The settings relating to actions when an alarm is detected can be configured in this secti...

Page 53: ...d 3 4 2 3 Alarm Configure the alarm function type Alarm function type setup menu Note If you click the Next button the setting items in the screen are saved Back button If you click the Back button the event function type setup menu will be displayed 3 4 2 1 Configure the schedule alarm event function type setup menu 3 4 2 3 Alarm Configure the alarm function type Alarm function type setup menu He...

Page 54: ...Configure SD memory recording H 265 or H 264 video recording setup menu Note If you click the Next button the setting items in the screen are saved Even when the audio detection alarm is set alarm recording onto the SD memory card will not be performed Back button If you click the Back button the alarm setup menu will be displayed 3 4 2 2 Alarm Configure VMD SCD and audio detection alarm setup men...

Page 55: ...ormation about how to set the above screen Next button The mail setup menu will be displayed 3 4 2 5 Alarm Configure the mail notifications and mail server Back button If you click the Back button the alarm function type setup menu will be displayed 3 4 2 3 Alarm Configure the alarm function type Alarm function type setup menu C Configure SD memory recording H 265 or H 264 video recording setup me...

Page 56: ...um value for the pre alarm duration decreases Post alarm recording duration Set the duration to save image data on the SD memory card after an alarm occurrence 10s 20s 30s 40s 50s 60s 120s 180s 240s 300s Default 30s The actual recording time may sometimes be longer than the duration selected for this setting Next button The mail setup menu will be displayed 3 4 2 5 Alarm Configure the mail notific...

Page 57: ...ngs Refer to 3 10 2 1 Configure the settings related to sending E mails for information about how to configure the above screen Set button If you click the Set button setup will be completed Operating Instructions 57 3 Detailed Settings ...

Page 58: ...selected for the recorded image Next button If you select SD memory recording and click the Next button the video recording setup menu will be displayed 3 4 2 7 Schedule Set SD memory recording video recording setup menu If you select SFTP periodic image transmission and click the Next button the SFTP periodic image transmission setup menu will be displayed 3 4 2 8 Schedule Configure SFTP periodic...

Page 59: ...pture mode 1fps 3 1fps 4 2fps 6 25fps 8 3fps 12 5fps 20fps 25fps When 15fps mode is selected for Image capture mode 1fps 3fps 5fps 7 5fps 10fps 12fps 15fps When 12 5fps mode is selected for Image capture mode 1fps 3 1fps 4 2fps 6 25fps 8 3fps 12 5fps Default 30fps Note If you click the Next button the Transmission priority will be set to Frame rate Transmission priority The bit rate will automatic...

Page 60: ... recording setup menu To configure the schedule settings Refer to 3 11 Configure the settings relating to the schedules Schedule for information about how to set the above screen Set button If you click the Set button setup will be completed Back button If you click the Back button the video recording setup menu will be displayed 3 4 2 7 Schedule Set SD memory recording video recording setup menu ...

Page 61: ...n is On If you click the Next button the SFTP periodic image transmission schedule setup menu will be displayed When configuring the SFTP periodic image transmission schedule Note If you click the Next button the setting items in the screen are saved Back button If you click the Back button the schedule function type setup menu will be displayed 3 4 2 6 Schedule Configure SD recording or SFTP peri...

Page 62: ... button setup will be completed Back button If you click the Back button the SFTP periodic image transmission setup menu will be displayed 3 4 2 8 Schedule Configure SFTP periodic image transmission SFTP periodic image transmission setup menu Note If SFTP periodic image transmission is not selected in Operating mode SFTP periodic image transmission will not be performed 62 Operating Instructions 3...

Page 63: ...e entered title will be displayed in the Camera title field Available number of characters 0 20 characters Unavailable characters Default The model No is displayed Date time Enter the current time and date When 12h is selected for Time display format AM or PM can be selected The date and time of the PC will be obtained and set it to the camera by checking the Set PC time to the camera checkbox and...

Page 64: ...orresponding to the location where the camera is in use Default GMT 09 00 Osaka Sapporo Tokyo Summer time daylight saving Select In Out or Auto to determine whether or not to apply daylight saving time Configure this setting if the summer time daylight saving time is applied in the location where the camera is in use In Applies summer time An asterisk will be displayed on the left side of the disp...

Page 65: ...nt Note When Opaque is selected the opaque black part may be set wider than the section where date time and camera title on screen are displayed depending on the character size and number of characters OSD Character size Select the character size of the date and time as well as text displayed in the image 50 Displays in 50 of the standard size 75 Displays in 75 of the standard size 100 Displays in...

Page 66: ... 4 5 Configure the VIQS setting Mask area 3 6 4 2 Set mask areas Overlay image 3 5 5 Configure the overlay image function Overlay image If 90 or 270 is selected for Image rotation depending on the Character size setting and the number of characters used characters displayed on the screen may be cut off When 90 or 270 is selected for Image rotation the position selectable with OSD Position is limit...

Page 67: ...ory card in this product Default Off Note For further information about the extension software refer to our technical information website Control No C0103 If you set the extension software mode from On to Off formatting the SD memory card is recommended If you are operating extension software that uses the SD memory card the operation of recording to the SD memory card is not guaranteed Audio reco...

Page 68: ...D memory card should be influenced by the number of the image files stored and log savings on the SD memory card Selecting Stream 1 Stream 2 Stream 3 or Stream 4 for Recording format can reduce the number of files that can be stored on the SD memory card If the data writing speed goes down after data is repeatedly written on an SD memory card we recommend replacing the SD memory card When the sett...

Page 69: ... used because the password configured for the SD memory card and the password configured for the camera do not match Check that the passwords are correct Error Undefined error Displayed when an error occurs in the SD memory card Check the SD memory card Note The password lock function supports only SDHC memory cards and SDXC memory cards If you will use the SD memory card on a device other than th...

Page 70: ...stream selected in Recording format to 12 Mbps For SD memory cards with an SD Speed Class 10 use a card that supports UHS I Ultra High Speed I Use a microSD memory card dedicated to i PRO cameras Note When Stream 1 is selected the settings for Stream 1 on the Image tab of the Image Audio page will be changed to the settings for Stream 1 recording When Stream 2 is selected the settings for Stream 2...

Page 71: ...in advance on the Alarm tab When JPEG 1 or JPEG 2 is selected for Recording format Schedule is unavailable When connected with our network disk recorder Save trigger may be displayed in a gray out state as Network failure To change the setting of Save trigger after disconnecting the recorder set Not use for SD memory card once and then set Use again Alarm recording is not available for streams tha...

Page 72: ...12 5fps mode is selected for Image capture mode 0 08fps 0 17fps 0 28fps 0 42fps 1fps Default 1fps Image saving interval Number of images to be saved Pre alarm Number of images to be saved Select a number of pre alarm images to be saved on the SD memory card from the following Off 1pic 2pics 3pics 4pics 5pics Default Off Image saving interval Number of images to be saved Post alarm Image saving int...

Page 73: ...0s 180s 240s 300s Default 30s The actual recording time may sometimes be longer than the duration selected for this setting SD memory card error LED SD memory card error LED Select On Off to determine whether to activate the red LED indicator when an SD memory card error is detected SD memory card error detection conditions Write error read error etc On When an error status is detected the red LED...

Page 74: ...rmatted while another user is in operation the operation will be canceled It is impossible to access the SD memory card during the process of formatting All data saved on the SD memory card will be deleted when the SD memory card is formatted Do not turn off the power of the camera during the process of formatting After formatting the SD memory card available size may be smaller than the total siz...

Page 75: ...n and download the root certificate for the pre installed certificate When implementing alteration detection of video data MP4 files on the SD memory card using exclusive software the downloaded certificate is used CA Certificate CRT key generate CRT key encryption key used for alteration detection is generated To generate the CRT key click the Execute button to display CRT key generate dialog box...

Page 76: ...nfirm button is clicked the registered information of the installed certificate CA certificate will be displayed in the CA Certificate Confirm dialog box When the Delete button is clicked the installed certificate CA certificate will be deleted CA Certificate Certificate download Downloads the certificate CA certificate issued by CA from the camera When implementing alteration detection of video d...

Page 77: ...ction can be configured on this page Overlay Select On or Off to determine whether to display an uploaded image overlaid On Displays uploaded an image overlaid Off Does not display uploaded an image overlaid Default Off IMPORTANT When On is set for Overlay an overlaid image will be recorded during the SD memory card recording Note If Character size of OSD is 150 or 200 Overlay image is not selecta...

Page 78: ...aded will be saved when they are uploaded Position The display position of the uploaded image upper left corner of the image will be displayed with X and Y coordinates 1 In case that 16 9 is set for Image capture mode When 4 3 is set for Image capture mode Y will be 479 0 0 639 0 0 359 1 upper left corner of the image X Y uploaded image 639 359 1 There are following two methods to change the displ...

Page 79: ...ain If the uploaded image is to be displayed out of the setup screen the initial display position center of the live image will be restored Permeation Select On or Off to determine whether the color selected at Selection of color to be penetrated is to be transparent On Gives transparency to the color selected at Selection of color to be penetrated Off Does not give transparency to the color Defau...

Page 80: ...l display stream Select the image to display on the Live page from the following JPEG 1 JPEG 2 Stream 1 Stream 2 Stream 3 Stream 4 Multi screen Default Stream 1 Note When JPEG 1 or JPEG 2 is selected the refresh interval can be selected MJPEG Refresh interval 1s Refresh interval 3s Refresh interval 5s Refresh interval 10s Refresh interval 30s Refresh interval 60s Stream 1 Stream 2 Stream 3 or Stre...

Page 81: ...ze Image quality of JPEG 1 and JPEG 2 on this section Refer to 3 6 3 Configure the settings relating to Stream Image for further information about the settings relating to H 265 or H 264 images Image capture size Select the image capture size to display the JPEG image When 16 9 mode 30fps mode or 16 9 mode 25fps mode is selected for Image capture mode JPEG 1 1920x1080 1280x720 640x360 320x180 JPEG...

Page 82: ...elected for Stream transmission for Stream 1 Stream 2 Stream 3 or Stream 4 the refresh interval of JPEG images is limited to a maximum of 5 fps 30fps mode 15fps mode or 4 2 fps 25fps mode 12 5fps mode Stream encoding format Select the stream encoding format for transmission H 265 Transmits H 265 images H 264 Transmits H 264 images Default H 265 Image capture size Select the image capture size from...

Page 83: ...H 264 images will be transmitted with the maximum bit rates that are set for Max bit rate per client Default VBR Note When Frame rate is set for Transmission priority number of users who can access the camera may be limited Frame rate Select a frame rate from the following When 16 9 mode 30fps mode 4 3 mode 30fps mode or 4 3 mode 15fps mode is selected for Image capture mode 1fps 3fps 5fps 7 5fps ...

Page 84: ...rk page 3 10 1 Configure the network settings Network When a value with attached is set images may not be streamed It is recommend that the bit rate setting of the stream to be 8192 kbps or lower Setting a value higher than 8192 kbps may cause abnormalities in the continuity of the recorded video When the refresh interval is too short the actual bit rate may exceed the set bit rate depending on th...

Page 85: ...Mid Variable GOP 4s 16s Default Off IMPORTANT When Low Variable GOP 1s 8s Mid Variable GOP 4s 16s or Frame rate control Variable GOP 4s 16s w frame rate control is selected recording to an SD memory card cannot be performed Note When using GOP control the refresh interval is increased when streaming H 265 or H 264 images For this reason do not use it when the network environment has frequent error...

Page 86: ...sary to fix the port number for stream transmission such as when using in a particular LAN environment it is recommended to select Unicast port AUTO Unicast port MANUAL Up to 14 users can access a single camera concurrently It is necessary to select Unicast port1 Image and Unicast port2 Audio manually to transmit images and audio from the camera When Unicast port MANUAL is selected the port number...

Page 87: ... the unit the port number to be used will be the multicast port number plus 1000 Multicast TTL HOPLimit 2 Enter a value for Multicast TTL HOPLimit Available value 1 254 Default 16 IMPORTANT When transmitting stream images via the internet the transmitted image sometimes may not be displayed depending on the settings of a proxy server or a firewall In this case refer to the network administrator Wh...

Page 88: ...played in a newly opened window 3 6 4 1 Configure the settings relating to image quality Image adjust setup menu Extra optical zoom Click the Setup button to display the setup menu that can configure the settings relating to extra optical zoom The setup menu will be displayed in a newly opened window 3 6 4 3 Adjust the angular field of view using the Extra optical zoom function Privacy zone Click ...

Page 89: ...nged values will be applied to the currently displayed image on the Image quality tab Click the mark on the left of each item in the setup menu to expand the respective item and enable detailed settings Click the mark on the left of an expanded item to return to the screen displayed before the item was expanded Example Basic adjustment Basic adjustment Brightness Adjust the brightness If you move ...

Page 90: ... reduction function reduces noise automatically under the condition of low illuminance If you move the slider in the direction the noise reduction effect is strengthened There may be many afterimages If you move the slider in the direction the noise reduction effect is weakened There are fewer afterimages Click the Reset button to reset to the default setting Default 128 Light control mode Light c...

Page 91: ...een the color mode and the black white mode from the following Off The color mode is selected Auto Switch to the black white image when the brightness luminance around the camera is about 1 0 lx or less Switching the image will take some time Default Off White balance White balance Select a method of white balance adjustment from the following White color can be adjusted by Red gain and Blue gain ...

Page 92: ...on and white balance adjustment speed will be reset to default Default 16 Intelligent auto Intelligent auto Select On Off to determine whether or not to activate the Intelligent auto function Intelligent auto can detect conditions back lighting outdoor night time etc people s faces and moving objects and then automatically adjust the camera s aperture gain shutter speed and contrast in order to di...

Page 93: ...mpensation will increase If you move the slider in the direction the effect of backlight compensation will decrease Click the Reset button to return to the default setting Default 16 HLC level Adjust the high light compensation level If you move the slider in the direction the effect of high light compensation will increase If you move the slider in the direction the effect of high light compensat...

Page 94: ...or other conditions clearer using digital image processing On Activates the fog compensation function Off Stops the fog compensation function Default Off Level Adjust the fog compensation level The level of fog compensation will increase when the slider is moved in the direction and decrease when the slider is moved in the direction Click the Reset button to reset to the default setting Default 4 ...

Page 95: ...6 4 2 Set mask areas This explains how to mask an area of the image and adjust brightness 1 Display the Image adjust setup menu 3 6 4 Configure the settings relating to image adjust privacy zone VIQS and lens distortion compensation Image quality 2 Click on the left of Intelligent Auto to display the detailed intelligent auto menu To set a white balance mask area click on the left of White balance...

Page 96: ...ed into 48 8 6 4 Click the divided areas to be masked The clicked areas will be masked and will become white To cancel masking click the area again 5 Click the End button after completing masking areas The borders on the image displayed on the Image quality tab will disappear 96 Operating Instructions 3 Detailed Settings ...

Page 97: ... 4 1 Configure the settings relating to image quality Image adjust setup menu It is possible to adjust the angular field of view using the extra zoom function Click this button to adjust the zoom ratio to the Wide side Click this button to set the zoom ratio to x1 0 Click this button to adjust the zoom ratio to the Tele side Click these buttons to adjust the horizontal vertical position of the ima...

Page 98: ...ettings relating to image adjust privacy zone VIQS and lens distortion compensation Image quality When there is a zone that you do not want to display set the zone as a privacy zone is filled with gray Area The privacy zone will be set by designating four peak points on an image Each zone can be overlapped The zones are numbered sequentially from area 1 Note Set the privacy zone larger than the si...

Page 99: ...ossible to moderate the image data size by lowering the image quality of other areas The VIQS setting is available only for H 265 or H 264 images Up to 8 VIQS areas can be set To check the image after configuring VIQS when H 265 or H 264 images are selected under Stream you can check the image by pressing the Confirm button You can also check by displaying an H 265 or H 264 image on the Live page ...

Page 100: ...n be confirmed with the Confirm button Default Off Stream 4 Select On or Off to determine whether or not to activate the VIQS function for the transmitted Stream 4 images The VIQS Stream 4 images can be confirmed with the Confirm button Default Off IMPORTANT When the setting for Image rotation on the Basic tab is changed after setting On for the VIQS setting the VIQS area may move out of alignment...

Page 101: ...difference level the more the image quality of the non specified area is reduced This makes it possible to moderate the image data size 3 Select On or Off to determine whether or not to activate the VIQS function for the transmitted images of Stream 1 Stream 4 4 Click the Set button This unit is updated with the setting contents Click the Delete button corresponding to the area to be deleted 5 Cli...

Page 102: ...sition when registering the installation angle of view the pitch direction of the camera and the roll direction For information about the displayed content refer to S in 1 1 2 About the Live page Angle of view registration Click Execute to save the current position as the initial installation angle of view Click Delete to delete the initial installation angle of view Angle of view error lamp Set O...

Page 103: ...h Middle Low When High is selected it is easier to hear quiet sounds but sounds may be heard as noise If you do not want to hear noise select Middle or Low These settings are linked with the volume settings of the Audio recording Default High Audio bit rate Set the audio compression bit rate G 726 Live 16kbps 32kbps G 711 Live 64kbps cannot be changed AAC LC Live Recording 64kbps 96kbps 128kbps De...

Page 104: ...Select the audio input encoding format from G 726 G 711 or AAC LC Default AAC LC Note Mic input is available only with AAC LC when using a web browser G 726 and G 711 use only the audio input to the mic left For the mic left refer to the Installation Guide Audio volume control mode Select the operation method using the volume cursor of the Mic input button on the Live page Adjust PC speaker Change...

Page 105: ... refer to Control No P0002 and Control No P0003 in the support video page of the support site This camera is specified when selfcamera is displayed for the IP address or host name Note For further information about Network Camera Recorder with Viewer Software Lite which is suited to viewing images from several cameras refer to our technical information website Control No C0301 When using the host ...

Page 106: ...val 1s Refresh interval 3s Refresh interval 5s Refresh interval 10s Refresh interval 30s Refresh interval 60s Displays the JPEG format still image camera image in the selected interval Default MJPEG Image capture size 4 Screens Select the image capture size for 4 screens in initial display 640x360 320x180 Default 320x180 106 Operating Instructions 3 Detailed Settings ...

Page 107: ...on tab of the Alarm page will be displayed Command alarm Select On or Off to determine whether or not to receive the command alarm The command alarm is the function that provides notification of a TCP alarm notification from the other cameras When On is selected alarm actions will be performed between multiple cameras Default Off Reception port Select a port number to be used to receive the comman...

Page 108: ...ng SD memory card Click SD memory card setup to display the setup menu that can configure the settings relating to recording images on an SD memory card when an alarm occurs The setup menu will be displayed in a newly opened window 3 8 2 3 Configure settings relating to recording to an SD memory card when an alarm occurs TCP alarm notification Click TCP alarm notification to display the setup menu...

Page 109: ...n an alarm occurs Click TCP alarm notification of Camera action on alarm on the Alarm tab of the Alarm page 3 8 2 Configure the settings relating to the camera action on alarm occurrence Alarm Refer to 3 8 8 1 Configure the settings relating to TCP alarm notification for information on configuration for these settings 3 8 2 5 Configure settings relating to HTTP alarm notification when an alarm occ...

Page 110: ...ending on the network environment notification may be delayed After configuring the VMD area the VMD area may move out of alignment when Image rotation of the Basic tab is changed Make sure to check the VMD area after changing the Image capture mode setting The motion detection function is not the dedicated function to prevent thefts fires etc We are not responsible for any accidents or damages th...

Page 111: ...e VMD area and 1 White will be automatically applied to Area Status Select On or Off to determine whether or not to perform video motion detection On Performs video motion detection Off Does not perform video motion detection Default Off Detection area Adjust the size of the VMD area using the slider The smaller the selected value is the higher the sensitivity of VMD area becomes The current value...

Page 112: ... Light detection control may not work when brightness change is too small When On is selected for Light detection control the video motion detection may not be performed even when detecting a subject moving over the whole screen Area No notification When TCP alarm notification is clicked the Notification tab of the Alarm page will be displayed 3 8 8 Configuration of the settings relating to alarm ...

Page 113: ...h area will be numbered in order The areas will be identified by the respective outline colors The Status of the outline to be set for the area will become On 2 Adjust Detection area and Detection sensitivity using the slider Refer to 3 8 3 Configure the VMD settings VMD area for further information about the Detection sensitivity and Detection area The currently displayed area and its detection s...

Page 114: ...r the power of this product is turned on After a scene change is detected The alarm occurrence indication button 1 1 2 About the Live page will be displayed when scene change is detected by the SCD function The alarm occurrence indication button will be displayed at a VMD alarm occurrence or when receiving a command alarm as well After configuring the SCD area the SCD area may move out of alignmen...

Page 115: ...rom Very Low Low Middle or High Default Middle Detection time The SCD function issues an alarm when the scene change continues for a specified time of period 3s 5s 10s 30s 1min Default 3s Delete button Click the Delete button to be deleted the selected area SCD information addition Information addition Select On or Off to determine whether or not to add SCD information to superimposed image data D...

Page 116: ...further information about the Detection sensitivity and Detection area Change areas and the settings of Detection area and Detection sensitivity as necessary 3 Click the Set button after completing the settings IMPORTANT The setting will not be applied unless the Set button is clicked 4 To invalidate the SCD area click the Set button after selecting Off for Status The outline of the invalidated SC...

Page 117: ...e high reliability is constantly required such as a prevention system We are not responsible for any accidents or damages that may occur The audio detection feature uses only the audio input to the mic left For the mic left refer to the Installation Guide Audio detection Select On or Off to determine whether or not to perform audio detection On Perform audio detection Off Does not perform audio de...

Page 118: ...o determine whether or not to provide notification by TCP alarm notification according to the settings for the Alarm and Diag checkboxes of Destination of notification below When an alarm is detected Alarm When a notification of the remaining capacity of the SD memory card has been provided Diag When the SD memory card has become full Diag When the SD memory card cannot be recognized Diag When an ...

Page 119: ...the extension software ends Destination server address Enter the destination server address or host name Available characters Alphanumeric characters the colon the period the underscore _ and the hyphen To delete the registered destination server address click the Delete button respective to the desired destination server address Notification per VMD area Select On or Off to determine whether or n...

Page 120: ...assword to access the HTTP server Available number of characters 0 63 characters Unavailable characters Default None blank Notification data Enter the notification data to add after the destination HTTP server addresses set in Address 1 Address 5 Available characters Alphanumeric characters Default cgi bin comalarm cgi CMD 01 Note When the HTTP alarm function is enabled leakage of the HTTP server ...

Page 121: ...ou can set which functions are available or unavailable for guest users for whom user authentication has not been performed Default Use Authentication Set the user authentication method Digest or Basic Uses Digest or Basic authentication Digest Uses Digest authentication Basic Uses Basic authentication Default Digest Note To enhance the security it is recommended to select Digest for Authenticatio...

Page 122: ...ected for Access level can be operated 3 Live only Allowed to display live view Functions selected for Access level can be operated Default 3 Live only Access level Select the available functions based on the user access level camera control live view guest user Default Camera control All are checked Live only All are not checked Guest User All are not checked Note If you have set User authenticat...

Page 123: ...C If On is selected for User auth the user authentication is required regardless of the host authentication settings IP address Enter the IP address of the PC to be allowed to access the camera Host name cannot be entered for the IP address Note When IP address subnet mask is entered it is possible to restrict PCs in each subnet For example when 192 168 0 1 24 is entered and 2 Camera control is se...

Page 124: ...n the User mng page For menu display and how to operate refer to 3 2 1 How to display the setup menu 3 2 2 How to operate the setup menu The settings relating to IEEE 802 1X can be configured on this page IEEE 802 1X Select On or Off to determine whether or not to perform port authentication using IEEE 802 1X Default Off User name Enter the user name to access the authentication LAN switch Availab...

Page 125: ...N switches Private key or Client Certificate including private key Installation Install the private key or Client Certificate that includes private key Installation is possible only when Off is selected for IEEE 802 1X n Specification of private key and Client Certificate including private key Item Specifications Remarks Data format Format PEM or PFX Extension pem or pfx Key size bit 1024 1536 204...

Page 126: ...word EAP TLS 1 Click the Choose File button of CA Certificate Certificate install Then select a CA Certificate and click the Execute button The host name CommonName designated when created the certificate will be displayed at Information 2 Click the Choose File button of Private key or Client Certificate including private key and select a private key or Client Certificate that includes Private key...

Page 127: ...tificate includes intermediate CA Certificate the Client Certificate needs to come first then the intermediate CA Certificate When a certificate over 10 Kbyte is installed no error will be displayed during installation However an error may occur at the time of connection 3 9 4 Configure the data encryption settings Data encryption Click Data encryption on the User mng page For menu display and how...

Page 128: ...ce tab When using data encryption make sure to change the password When On is selected for data encryption it is recommended to set the total bit rate of the stream becomes 16 Mbps or less When On is selected images cannot be monitored using a browser Please use our supported devices to monitor encrypted images The encrypted MP4 files and JPEG images cannot be viewed on the image playing screen in...

Page 129: ...audio is data encrypted G 726 and G 711 are not data encrypted To encrypt both the image and audio set Data encryption Batch change to On and set Audio input encoding format to AAC LC For encrypted MP4 files and JPEG images you can use the decryption tool to confirm the images Operating Instructions 129 3 Detailed Settings ...

Page 130: ...ange it to that IP address Auto AutoIP The IP address is configured using the DHCP function When the DHCP server is not found the IP address is automatically configured Auto Advanced Using the DHCP function network address information is referred to and an unused IP address is configured to the camera as a static IP address The configured IP address is automatically determined within the subnet ma...

Page 131: ...an IPv6 address manually Off Manual entry of an IPv6 address will become unavailable Default Off IP address IPv6 When On is selected for Manual manual entry of the IPv6 address is required Do not enter an address already in use Note When connecting to the manually configured IPv6 address beyond the router use an IPv6 compatible router and turn on the automatic IPv6 address assignment function In t...

Page 132: ...information about the maximum packet size in the network line Default Unlimited 1500byte HTTP max segment size MSS Select Unlimited 1460byte Limited 1280byte or Limited 1024byte to determine whether or not to restrict the maximum segment size MSS when viewing images from the camera using the HTTP protocol We recommended that you use this feature with the default setting When the MSS is restricted ...

Page 133: ...rmation refer to the operating instructions of the router in use The port forwarding function changes a global IP address to a private IP address and Static IP masquerade and Network Address Translation NAT have this function This function is to be set in a router Router Internet WAN Cable modem XDSL modem Address translation using the port forwarding function vvv xxx yyy zzz 50000 A 192 168 0 1 5...

Page 134: ...from the initial angle of view is detected and when the deviation is corrected Default Off Alarm image attachment Select On or Off to determine whether or not to attach an image to the E mail to be sent when an alarm is detected Default Off Image capture size Select the image capture size of images attached to an alarm E mail from the following JPEG 1 JPEG 2 Default JPEG 2 SMTP server address Ente...

Page 135: ...e number of characters 0 128 characters Unavailable characters Sender s E mail address Enter the E mail address of a sender The entered E mail address will be displayed in the From sender line of the sent E mails Available number of characters 3 128 characters Available characters Alphanumeric characters the at sign the period the underscore _ and the hyphen SSL Select On if you want to use SSL en...

Page 136: ...aced by the cause of alarm and sent For VMD alarm VMD For SCD alarm SCD For terminal alarm Terminal name set in Terminal 1 Terminal 2 and Terminal 3 of Terminal name Example If the name of Terminal 1 is Terminal1 it is Terminal1 For command alarm CMD For audio detection alarm AI sound classification Gunshot Audio detection Gunshot For audio detection alarm AI sound classification Yell Audio detect...

Page 137: ...e cause of the alarm is added 3 10 2 2 Configure SFTP Here configure the SFTP SSH File Transfer Protocol function You can securely transmit images to a server using an SSH Secure Shell encrypted data stream The following two transmission functions are available Transmitting images when an alarm occurs Transmitting images periodically SFTP alarm setting Alarm image SFTP transmission Select On or Of...

Page 138: ...0x1080 you cannot configure the pre alarm If image control during an alarm is On image quality during an alarm is applied only for post alarm recording It is not applied for pre alarm recording If you select a setting indicated with for Maximum number of images in Pre alarm you may not be able to transmit the specified number of images depending on the resolution and image quality The table below ...

Page 139: ...ssion you must configure the SFTP periodic image transmission schedule in the Schedule tab on the Schedule page 3 11 Configure the settings relating to the schedules Schedule Directory name Enter the name of the directory where the image file to be transmitted will be saved For example to specify the img directory under the root directory of the SFTP server enter img Available number of characters...

Page 140: ...anumeric characters the colon the period the underscore _ and the hyphen IMPORTANT If you enter a host name in SFTP server address you must configure the DNS in the Network tab on the Network page 3 10 1 Configure the network settings Network Port number Enter the control port number of the SFTP server Available port number 1 65535 Default 22 The following port numbers are unavailable since they a...

Page 141: ...red manually on NTP server address Default Manual IMPORTANT When obtaining the NTP server address from the DHCP server it is necessary to select DHCP Auto AutoIP or Auto Advanced for Network Settings on the Network tab of the Network page 3 10 1 Configure the network settings Network NTP server address When Manual is selected for NTP server address setting enter the IP address or the host name of ...

Page 142: ...3 Check the status Status When Enable is not displayed refer to Cannot access the camera via the Internet in the 4 2 Troubleshooting section When the live page or the setting page is not correctly displayed such as when replacing the router in use set UPnP Auto port forwarding to Off once and then set it to On again Camera short cut Select whether or not to create the shortcut to the camera on the...

Page 143: ...icate Generate Certificate Signing Request When using the security certificate issued by CA Certificate Authority as the security certificate used for the HTTPS protocol the CSR Certificate Signing Request will be generated To generate the CSR click the Execute button to display the CA Certificate Generate Certificate Signing Request dialog window CA Certificate CA Certificate install Installs the...

Page 144: ...onfigure the settings for the DDNS function Refer to 3 10 4 How to configure the settings relating to DDNS for how to configure the settings relating to DDNS Area Select the region where the camera is installed Japan Global Note If the camera is used in Japan select Japan If the camera is used outside of Japan select Global The Viewnetcam com service that is displayed when Global is selected canno...

Page 145: ... and the slash Default None blank Note When IP address subnet mask is entered it is possible to restrict IP address of SNMP manager from which request is permitted by subnet For example when 192 168 0 1 24 is entered all requests from the SMNP managers in the range from 192 168 0 1 to 192 168 0 254 will be permitted SNMPv3 User name Set the SNMPv3 user name Available number of characters Empty fie...

Page 146: ...port numbers are unavailable since they are already in use 20 21 22 23 25 42 53 67 68 69 80 110 123 161 443 554 995 10669 10670 59000 61000 SNMPv2c Community Enter the community name of the destination address of the SNMP trap Available number of characters 0 32 characters Unavailable characters 2 byte characters Default None blank IMPORTANT When using the SNMP trap function it is necessary to ent...

Page 147: ... Default auth error Alarm VMD On Off When the check box is checked a trap will be sent at the time when a video motion detection is activated Default Not checked Off Alarm VMD Trap string Set the string of characters to be used for the trap of VMD Available number of characters 0 20 characters Available characters 0 9 A Z a z and the following marks Default VMD alarm Alarm Audio detection On Off W...

Page 148: ...can be used to set the priority of image audio data sent from routers The priority set to this function must match the DSCP value configured to the router When using the Diffserv function contact the network administrator Image DSCP 0 63 Enter the packet priority for video data Available values 0 63 Default 0 Audio DSCP 0 63 Enter the packet priority for audio transmission reception Available valu...

Page 149: ...nable disable the MQTT function When set to On or it is On when the camera starts up it will connect to the set server When the set alarm occurs the settings will be notified to the server Default Off Server Address Enter the IP address or host name of the MQTT server to be notified when an alarm occurs Available number of characters 1 128 characters Available characters Alphanumeric characters th...

Page 150: ...en the Delete button is clicked the installed CA certificate will be deleted Server certificate verification When Protocol is set to MQTT over SSL and Server certificate verification is set to Enable the server certificate is verified using the root CA certificate registered during the SSL connection Default Enable Note When Server certificate verification is set to Enable install the root CA cert...

Page 151: ... Layer Discovery Protocol allows you to achieve interoperability by sending and receiving the camera s device information to and from LLDP compatible devices LLDP Select Enable or Disable to determine whether to enable the LLDP function and Fabric Attach Default Disable When set to Enable LLDP including TLVs with the checks in the table below will be sent End Of LLDPDU TLV Chassis ID TLV Port ID T...

Page 152: ... 10 4 How to configure the settings relating to DDNS When activating the DDNS function using the camera either of the following DDNS services is available Viewnetcam com service Dynamic DNS Update RFC2136 compliant IMPORTANT Before using the DDNS service it is necessary to perform the port forwarding setting for the router About Dynamic DNS Update RFC2136 compliant Operation using DDNS services ot...

Page 153: ...le of the Viewnetcam com service A C A B E D D B C E A DNS server B Internet C Provider D Viewnetcam com service server E Remote site Global address is changed The contracted provider allocates a global address to the router or the camera The global address is not static but dynamic viewnetcam com and the current global address is automatically registered If you are enrolled in Viewnetcam com the ...

Page 154: ...gister the information in the registration window to enroll in the Viewnetcam com service Access interval Select the interval to access the Viewnetcam com service server to check the IP address and the host name from the following 10min 20min 30min 40min 50min 1h Default 1h Global IP Address Notification Method Typically Global IP Address Notification Method should be set to Normal If you cannot a...

Page 155: ...L set at the time of registration can be used for camera access However this URL is unavailable when accessing the camera from the PC connected to the same network LAN Note When the registration for the Viewnetcam com service is completed the URL registered for Personal Camera URL is displayed It may take up to about 30 minutes until the URL of the registered camera is validated To cancel the enro...

Page 156: ...re port forwarding while referring to the instruction manual of the router When configuring use the IP address and port number that you checked in step 3 Depending on the router the port forwarding feature may be described as address translation static IP masquerading virtual server or port mapping Note If you manually configure port forwarding to your router be sure to set Auto port forwarding to...

Page 157: ... form of host name domain name Available characters Alphanumeric characters the period and the hyphen Default None blank Note Refer to the network administrator for further information about the available host names Operating Instructions 157 3 Detailed Settings ...

Page 158: ...SD Recording stream The SD recording will be performed at the designated time in the schedule Further the Recording format is enabled only when there is a stream Image adjust 1 Scene 1 Images are set to the image settings of Scene file 1 at the designated time in the schedule When the designated time for the schedule finishes images are set to the image settings of Scene file is not applied Image ...

Page 159: ...3 or Stream 4 for Recording format on the SD memory card tab and select Schedule for Save trigger Save trigger 2 Select days of a week by checking the respective checkboxes 3 From the pull down menu select the start time and the end time of the schedule When not designating time check the checkbox of 24h 4 Click the Set button after completing the settings The result will be displayed at the botto...

Page 160: ...mission SCD permission Audio detection permission Access permission E mail permission 3 11 1 How to delete the set schedule 1 Uncheck the check box of the set day of the week 2 Click the Set button after completing the settings The schedule of the selected day of the week is deleted 160 Operating Instructions 3 Detailed Settings ...

Page 161: ... to be overwritten The system logs will be displayed in group of 100 logs each and the logs will be saved even when the power of the camera is turned off Latest 100 When clicking Latest 100 the latest 100 system logs will be displayed Next 100 When clicking Next 100 the next 100 system logs will be displayed Number of pages display The currently opened page will be displayed in the page total page...

Page 162: ...ding the firmware When upgrading the application software use the designated file extension img for the firmware upgrade The name of the firmware to be used for the upgrade should be model name Use small letters WV is not required _xxxxx img xxxxx indicates the version of the firmware Do not turn off the power of the camera during the upgrade process Do not perform any operation during upgrading a...

Page 163: ... com service the UPnP function or the self check USB interface Status If the Wi Fi USB adapter for installation is connected to the USB terminal and recognized the part number information of the Wi Fi USB adapter will be displayed If it is not recognized it will be displayed as Not use Disable To disable the Wi Fi USB adapter for installation click Execute To have the Wi Fi USB adapter for install...

Page 164: ...culated by the camera they may differ to the actual number of overwrite times The above information will not be displayed if SD memory card password lock is set and the password is not matched No Time date Description of the log Displays the log related to the SD memory card Category Indication Description SD memory card SD Format Successfully formatted the SD memory card SD Format error Error occ...

Page 165: ...setup menu The setting data of the camera can be initialized and reboot of the camera can be performed on this page Reset to the default Except the network settings Click the Execute button to reset the settings to the default Note that the network settings will not be reset It is impossible to operate the camera for about 3 minutes after the initialization Reboot Click the Execute button to reboo...

Page 166: ... the restoration is complete The camera will be rebooted when the restoration is complete Make sure to set the file name of setup data files used when restoring to model name dat The model name must be written in lower case letters and WV is not needed Default Restore all settings except the network settings IMPORTANT When 5 minutes or more is required to restore setup data files there is a possib...

Page 167: ...ort website are explained on the Support page To access our support website from a web browser click the link for the support page When Click here for OSS information is clicked the license of the OSS in use will be displayed Operating Instructions 167 3 Detailed Settings ...

Page 168: ...igured correctly The DNS server may be down Ask the network administrator Failed to find the SMTP server The IP address of the server may be incorrect Check if the IP address of the server is configured correctly The SMTP server may be down Ask the network administrator Internal error Undefined error An error occurred in the E mail function Check if the E mail settings are configured correctly Err...

Page 169: ...om the DDNS server The DDNS server may be down Ask the network administrator Same host name has registered The same host name has already been registered in the DDNS server Check if the DDNS Update settings are configured correctly Internal error Undefined error An error occurred in the DDNS function Check if the DDNS Update settings are configured correctly Error indications relating to NTP Categ...

Page 170: ...User name or IP address The login user name will be displayed when On is selected for User auth The IP address of the PC currently accessing to the camera will be displayed when On is selected for Host auth Error indications relating to login error Category Indication Description Login failure User name The user name that has failed in login will be displayed when On is selected for User auth If n...

Page 171: ...may be incorrect Check if the IP address of the destination of notification is configured correctly The destination of notification may be down Ask the network administrator Failed to resolve destination addr from DNS The DNS server settings may be incorrect Check if the DNS settings are configured correctly The DNS server may be down Ask the network administrator Authentication error Entered user...

Page 172: ...re because the file corrupted during the firmware file transfer Check the communication environment and retry Upgrade failure Other error Undefined error occurred in the firmware upgrade process Please wait for a while and retry Indications relating to deviation detection Category Indication Description Installation status A change from the registered Installation angle of view was detected Log is...

Page 173: ...ory User name or password isn t correct Internal error Undefined error An error occurred in the SFTP function Check the SFTP settings again Indications relating to MQTT Category Indication Description MQTT MQTT connection error Failed to connect with the server failed to authenticate the certificate or disconnected excludes disconnections from the camera due to setting changes however MQTT notific...

Page 174: ...indows command prompt ping IP address of the camera If there is reply from the camera the connection is normal If there is no reply check the connection with the following methods using a computer connected to the same network as the camera If the firewall settings on the PC are enabled temporarily disable them before performing settings on the camera Start the IP Setting Software confirm the came...

Page 175: ...nd the PC are connected in the different subnet Is the IP address of the default gateway set for the camera correct Is the name currently used to access the camera different from the name registered for the Viewnetcam com service Access the camera again with the registered name 154 Did you access http while using the HTTPS function To use the HTTPS function access https It is also necessary to ent...

Page 176: ...d access using the port number of this camera 130 131 152 Cannot access the camera via the URL of the Viewnetcam com service Is the global address of camera or router notified to the Viewnetcam com service server Log into the My Account page of Viewnetcam com website to check the information of the registered camera If the global address is not displayed for the IP address access the camera and re...

Page 177: ...ed for the camera access from a PC For tablet devices Is the URL correct Check if the URL is entered correctly 18 Is the SSL encryption method different from that of the camera Select HTTP Do not select HTTPS for HTTPS Connection on the Network page the Advanced tab and access the camera again 142 Did you access http while using the HTTPS function To use the HTTPS function access https It is also ...

Page 178: ...e traffic of the network or the concentration of access to the camera there might be difficulties displaying the camera picture Request the camera picture using the web browser such as by pressing the F5 key etc No image is displayed or too dark Is the brightness setting set at an appropriate level Click the Normal button of Brightness 12 Images are displayed washed out Is the brightness setting s...

Page 179: ...on an SD memory card When frequently overwritten it may be at the end of product life It is recommended to replace the SD memory card Audio is not output from other products such as a network disk recorder or PC software package Some of the products such as a network disk recorder or PC software package may not support G 711 Set Audio input encoding format of the products to G 726 32 kbps or AAC L...

Page 180: ...ames When 120 DPI or higher is selected for DPI setting they may not be displayed correctly Right click on the desktop click Display settings and then move the slider of Change the size of text apps and other items to 100 Recommended Select Landscape of Orientation Reached the concurrent access limit Please try again later is displayed on the Live page Change the value set for Max bit rate per cli...

Page 181: ... be saved for the system administration Video saved at the alarm occurrence Approx 60 MB per file Video that was started to be recorded on February 24 2021 19 38 26 10000001_210224193826_A mp4 Ex Video saved manually or during the period of the schedule Approx 60 MB per file Ex 10000001_210224193826_L mp4 Video that was started to be recorded on February 24 2021 19 38 26 Destination where video fi...

Page 182: ...PGQP3466ZA C0322 0 i PRO Co Ltd https www i pro com i PRO Co Ltd 2022 ...

Reviews: