143
Step 3
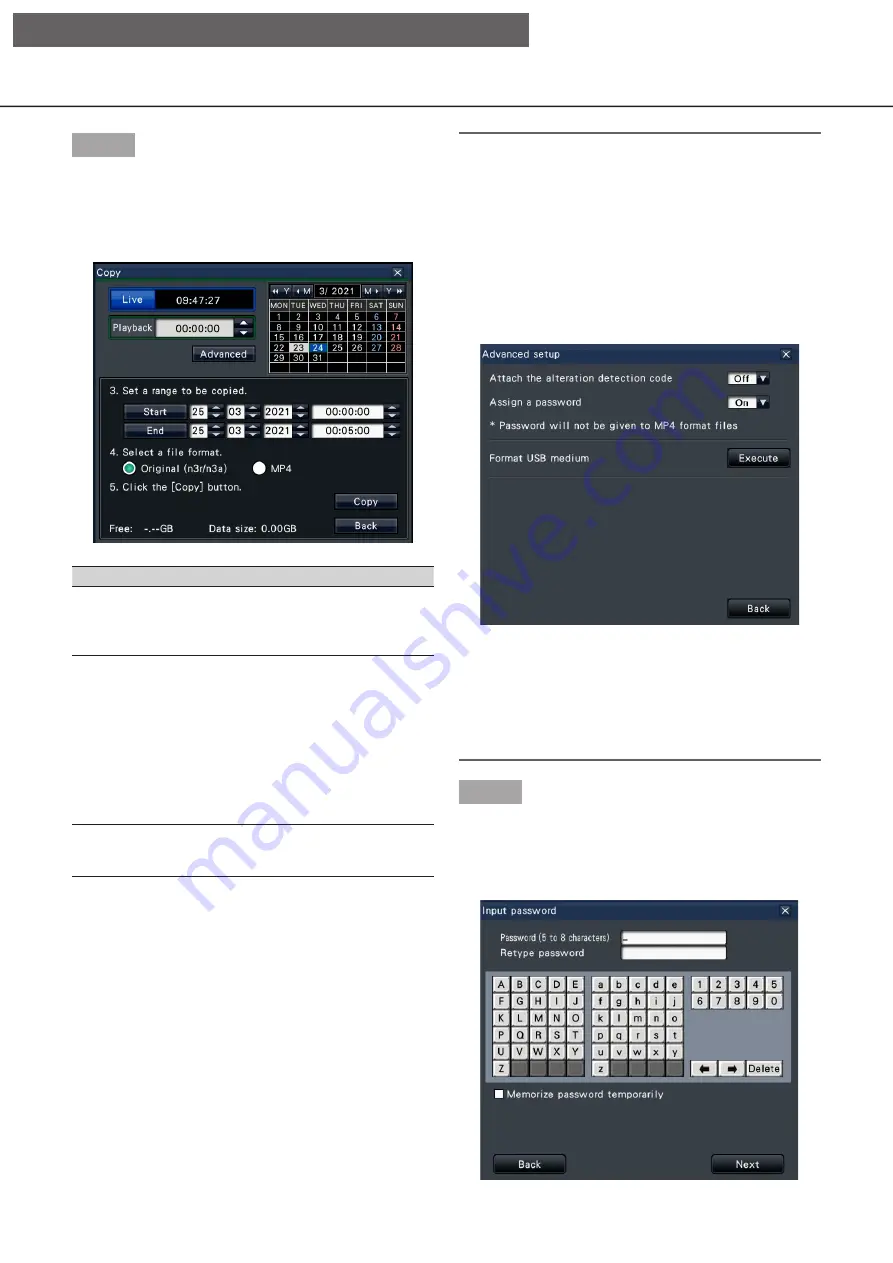
Set copying conditions following the instructions on
the screen.
Clicking [Next]/[Back] button switches the page. Click
the [×] button to close the window.
Item
Description
Camera selection
Check the number of the camera
whose recorded data is to be copied.
Checking [All] will copy the recorded
data of all cameras.
Date & Time range Specify times and dates to define the
range for copying recorded data. Set
the year, month, date & time of the
start point and end point.
It is also possible to set the start point
and end point of the filter range by
clicking the [Start]/[End] buttons after
clicking the desired date on the
calendar and then selecting the
desired time in the [Playback] box.
File format selection Check the file format (Original (n3r/
n3a), MP4) of the recorded image to
be copied.
Free:
The remaining space of the storage medium will be
displayed.
Data size:
The total volume of all recorded images to be
copied (including the viewer software) will be
displayed.
* Indicated as *.** GB while the data volume is
being calculated.
* When the calculated value exceeds the remaining
volume during calculation, ">" will be indicated in
front of the data size, and the calculation stops.
* If ">" is indicated even though the calculated
value is smaller than the remaining volume, it
means that over 10000 of recorded data exists as
target.
Note:
• Images recorded in H.264 or H.265 can be copied
in MP4 format. If audio is recorded in AAC-LC, the
image is copied in MP4 format with audio.
• Copying and downloading (
☞
format are available for up to 2 users at the same
time.
• To attach a code for alteration detection, click the
[Advanced] button. On the advanced setup window,
set [Attach the alteration detection code] to "On".
• When you assign a password to the data that you
will copy, click the [Advanced setup] button and
set "On" for [Assign a password] on the displayed
advanced setup screen.
• Clicking the [Back] button will return to the copy
panel.
Step 4
Click the [Copy] button on the copy panel.
→
→
If [Assign a password] is set to "On", the
password entry screen will be displayed.
Otherwise proceed to Step 6.
[Operation via recorder's main monitor]


