i-onik TP7-QC Quick Start Manual Download Page 13

28

29

Internet

1. Network Settings

The tablet features a built-in Wi-Fi module. Click 

, the settings menu will be displayed on the 


tablet.

1.1 Wi-Fi

1.1.1 Slide the “Wi-Fi” switch button to 

 to enable Wi-Fi.

1.1.2 Click “Wi-Fi” to enter the Wi-Fi settings menu.

1.1.3  The system will automatically search for available networks and display the name of the 


network.

Click a wireless network and the tablet opens a window. Enter the network key and click “Connect”. 

If the connection is successful, the network icon 

 will be displayed in the Notice/Fast settings 


column of the main interface.

Please note: 

The tablet will save connected routers automatically. When searching for a network,

the tablet will automatically connect to the saved router. 

When the network icon 

 is displayed in the main interface, the tablet has connected to the Wi-Fi 

network successfully.

2. Built-in 3G Connection

First insert the 3G SIM card into the SIM card slot. Enter the setting menu, click “wireless &  

network”, then click “more”, click “mobile network”. Turn on the module and click “network operator”, 

the system will automatically connect to the internet, hold on for a moment to wait for finishing the 

connection to use 3G network. 
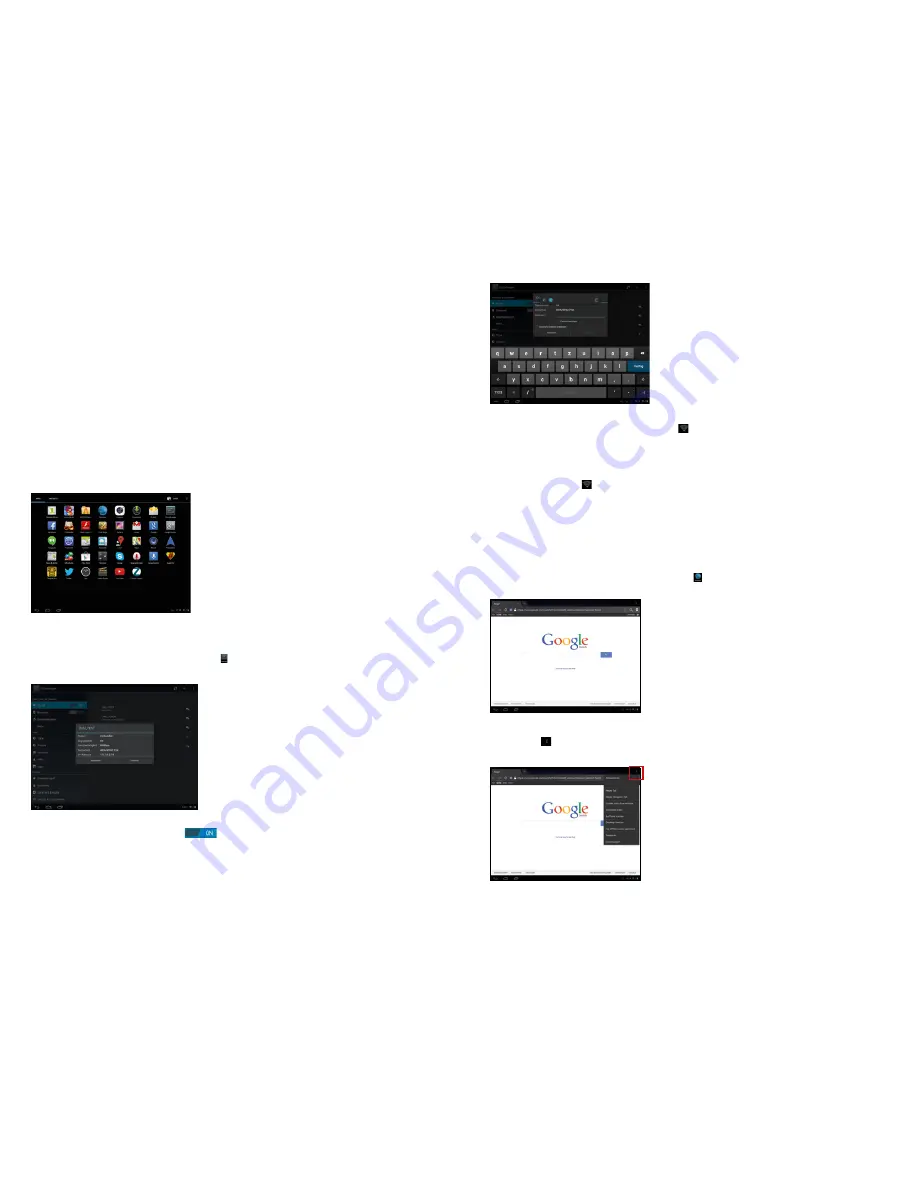
3. Internet

3.1  When successfully connected to a network, click 

 in the main interface to enter the Google 

browser.

3.2 Click the input box. The keyboard will pop-up. Type in a new search and open the website.  

3.3  Click the   icon (red border) and a dropdown menu with more operational functions is  

displayed.

In the settings under “Storage” you can choose whether you want to use your device as a media 

device (MTP) or as a camera (PTP).  

MTP:

  Allows you to transfer media files to Windows or by using Android File Transfer to Mac 


computers (see www.android.com/file transfer). 

PTP:

  Allows you to transfer photos using the camera software and transfer files to computers that do 

not support MTP. 

8.  Connection to an External Storage (e.g. USB Stick, microSD Card) via OTG Cable

From the File Manager, select the menu item “usbdisk” or “sdcard”.

System Settings

The settings interface allows a variety of custom settings and you can overview relevant information 

of all the installed software.

Click “Settings” in the application program menu to enter the settings menu. 

APPS

In the apps settings interface, users can see all installed applications. If you open one application, 

the relevant information is displayed. If you do not wish to use an application any longer, select 


“Delete” to remove the application. 

Summary of Contents for TP7-QC

Page 1: ...rzanleitung Quick Start Guide 25039 25040 Chips and More GmbH Gewerbestr 7 D 79112 Freiburg Tel Nr Tablet Support 49 800 8 08 25 80 E Mail support tablet i onik de www i onik de Kostenfrei aus allen deutschen Netzen Free from all German telephone networks ...

Page 2: ...otential nutzen können Die Funktionen werden erklärt und detaillierte Informationen gegeben Zudem erhalten Sie Tipps und Tricks um die technische Leistungsfähigkeit zu verstehen Die beigelegte Garantiekarte erklärt Ihnen unsere zusätzlichen Serviceleistungen Bitte lesen Sie die Garantiebestimmungen sorgfältig durch um eventuelle Probleme zu vermeiden Dieses Hochleis tungsgerät verfügt über leistun...

Page 3: ...e die Oberfläche nicht mit Alkohol Lösungsmittel oder Benzol Kontaktieren Sie uns bitte wenn Sie Probleme haben Dieses Gerät sollte bei den ersten drei Ladevorgängen mindestens 12 Stunden lang aufgeladen werden Bitte bewahren Sie das Produkt nicht an feuchten oder staubigen Orten auf Achten Sie bitte auch darauf das Produkt nicht im Sommer bei geschlossenen Fenstern im Auto aufzubewahren Vermei de...

Page 4: ...ablet einschalten 1 1 Drücken Sie den Ein Ausschalter an der Seite des Geräts lange Drücken um das System hochzufahren Sie werden einige Sekunden lang Animationen auf dem Boot Screen sehen bevor der Sperr Bildschirm erscheint siehe Screenshot 2 TF Karte microSD Karte Befolgen Sie die Anweisungen des Symbols das auf dem Bildschirm erscheint wenn Sie eine TF Karte einlegen Bitte beachten Sie dass di...

Page 5: ...en löschen siehe unten Widgets Widgets zufügen löschen siehe unten Zurück Taste Drücken Sie diese Taste in einem Popup Menü um einen Arbeitsvorgang abzubrechen Verwenden Sie diese Taste in anderen Untermenüs um zu deren Haupt menüs zurückzukehren Home Taste Drücken Sie diese Taste um zum Hauptmenü zurückzukehren Geöffnete APPS Klicken Sie um alle geöffneten APPS anzuzeigen Klicken Sie auf eine APP...

Page 6: ...der sdcard Systemeinstellungen Das Einstellungsmenü ermöglicht eine Reihe von benutzerdefinierten Einstellungen und Sie können sich einen Überblick über die gesamte installierte Software verschaffen Klicken Sie Einstellungen im Anwendungsmenü um zum Einstellungsmenü zu gelangen APPS Sie können alle installierten APPS auf dem APPS Einstellungsbildschirm aufrufen Wenn Sie eine APP öffnen können Sie ...

Page 7: ...eine Verbindung zu dem gespeicherten Router her Wenn das Netzwerksymbol auf dem Hauptbildschirm angezeigt wird dann ist das Tablet mit dem WLAN Netzwerk verbunden 2 Integrierte 3G Verbindung Stecken Sie zuerst die 3G SIM Karte in den SIM Kartenschlitz klicken Sie in den Einstellungen Drahtlos Netzwerke dann Mehr und Mobilfunknetze Schalten Sie das Modul an und klicken Sie Mobilfunkanbieter das Sys...

Page 8: ...tos zu suchen Hier finden Sie alle Fotos und Videos die auf dem Tablet oder der TF Karte gespeichert wurden 2 2 Wählen Sie dies um ein Foto zu öffnen 2 3 Video abspielen Abspielen pausieren Abspielzeit Gesamtzeit 3 E Mail Klicken Sie im Application Programm Menü um die E Mail Einstellungen zu öffnen Geben Sie die E Mail Adresse und das Passwort sowie die übrigen notwendigen Einstellungen ein damit...

Page 9: ...cteristics of this product so you can get the best out of your experience using the tablet The product s features are described and detailed information is given Furthermore you receive tips and hints to fully understand the technical capabi lity of the tablet The warranty which is included will explain you our additional services Please read the terms of warranty carefully to avoid unnecessary pr...

Page 10: ...ns Tablet Overview 1 Tablet Introduction This chapter describes the appearance of the tablet including its buttons and ports it will guide you to understand the features and accessories TP7 85 1200QC 3G The SIM card slot and TF card slot are located under the cover Note 1 Clicking and dragging are performed using the LCD touch screen Please do not use pens pencils or other sharp objects to click o...

Page 11: ...ng on the Tablet 1 1 Press the power switch at the side of the tablet long press and the machine will be booted The booting screen and animations will be shown on the LCD screen for a few seconds before you will enter the lock screen as shown in the screenshot below 1 2 Press and hold the unlock button and a circle will appear around the lock Drag to the right to unlock The hold and drag function ...

Page 12: ... interface 6 Changing your Wallpaper In order to personalize the main interface users can set their favorite pictures or photos as wallpaper of the main interface 6 1 Click the touch screen long press in the main interface to open the Choose wallpaper dialog box 6 2 Click Wallpaper to enter the selection menu of pictures 6 3 Select a picture Now the wallpaper is selected 7 Connection to a computer...

Page 13: ... to wait for finishing the connection to use 3G network 3 Internet 3 1 When successfully connected to a network click in the main interface to enter the Google browser 3 2 Click the input box The keyboard will pop up Type in a new search and open the website 3 3 Click the icon red border and a dropdown menu with more operational functions is displayed In the settings under Storage you can choose w...

Page 14: ...e main interface to display the music player menu 1 3 2 Select the music player to return to the player menu 2 Browsing Pictures 2 1 Click in the application program Interface to browse pictures Here you find all pictures and videos saved on the tablet or a TF card 2 2 Select to open a picture 2 3 Select to play a video Play pause Play time Total time Software Management The product supports third...

Page 15: ...Ware direkt bei Ihrem Händler abzugeben Bei missbräuchlicher und unsachgemäßer Behandlung Gewaltanwendung und bei Eingriffen die nicht von unserem Fachpersonal vorgenommen wurden sowie bei Entfernung des Sicherheitssiegels erlischt der Garantieanspruch 2 Jahre Garantie ab Kaufdatum Kurze Fehlerbeschreibung For customers from Germany How do I get a return receipt 1 Call us free of charge see front ...

Page 16: ...des auftretenden Fehlers Innerhalb Deutschlands kostenlos QUALITY PRODUCTS FROM CHIPS AND MORE Service This warranty is valid in the European Union For technical support please contact Chips and More GmbH Gewerbestr 5a D 79112 Freiburg Tel 49 800 8082580 Mo Fr 9 00 17 00 hours 49 76 64 403 69 12 Mo Fr 9 00 17 00 hours for customers outside Germany Mail support tablet i onik de Internet www i onik ...

Reviews: