background image

34

35

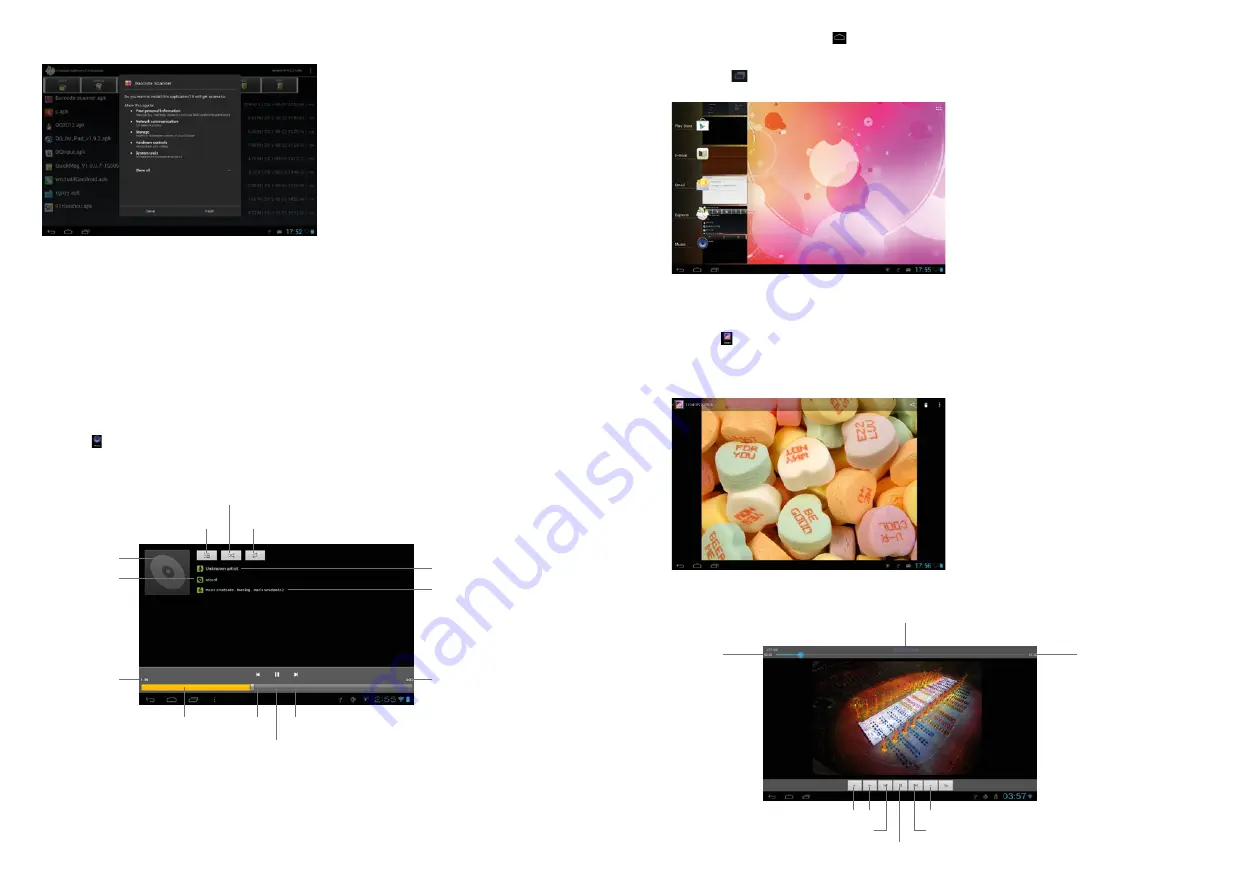
2. Software Installation

2.1 Click the software to be installed in the explorer. The MID will open the installation menu.

1.3  Background play


When playing music, click   to open the main interface. The MID will play the music in the 

background. 

1.3.1 Click 

 in the main interface to display the music player menu. 

1.3.2 Select the music player to return to the player menu.

2. Browsing Pictures

2.1   Click 

 in the Application Program Interface to browse pictures. Here you find all pictures and 

videos saved on the MID or a TF card.

2.2 Select to open a picture.

2.3 Select to play a video.

2.2  Click „Install”. The MID will show the progress. After installation, it will display „Application 


installed successfully”.

2.3  Click “Finish” to exit. The application shortcut will be added to the “Application function key 

menu”. 

2.4 Click the icon to open the software.

Special note:

You can also download chats, like QQ, MSN, etc.

Applications

1. Playing Music

1.1 Click 

 in the Application Program Interface to enter the playlist.

1.2 Click a music file to open and play it.

Play mode

Random

Playlist

Scedule

Volume

Playlist

Previous

Next

Play/Pause

Previous

Play/Pause

Next

Special cover

Play time

Total time

Schedule

Special name

Play time

Total time

Song name

Artist

Summary of Contents for TP8-1200QC

Page 1: ...Quick Start Guide 25025 Chips and More GmbH Gewerbestr 7 D 79112 Freiburg Tel Nr Tablet Support 49 800 8 08 25 80 E Mail support tablet i onik de www i onik de Kostenfrei aus allen deutschen Netzen Free from all German telephone networks ...

Page 2: ... in Aussehen und Funktionalität von der Beschreibung in dieser Anleitung abweichen Wir behalten uns das Recht vor das Produkt die Spezifikation und das Design ohne vorangehende Bekanntmachung zu verbessern Inhalt Vorsichtsmaβnahmen 4 Technische Spezifikationen 4 Tablet MID Übersicht 5 1 Tablet Einleitung 5 2 TF Karte 6 3 Aufladen 6 Schnellstart 6 1 Das MID einschalten 6 2 Das MID ausschalten 7 3 S...

Page 3: ... Gerät nicht wenn Sie Auto fahren oder zu Fuß unterwegs sind Dies könnte einen Unfall verursachen Der USB Zugang ist nur für die Datenübertragung geeignet bitte verwenden Sie ihn nicht zum Aufladen des Geräts Das Gerät ist nicht wasserfest Technische Spezifikationen Hauptteil Gehäusematerial Aluminium Größe ca 206 x 150 x 8 9 mm Gewicht ca 432 g Konfiguration Betriebssystem Android 4 1 CPU Allwinn...

Page 4: ... Drücken und halten Sie die Taste mehr als 3 Sekunden Wenn nicht ausdrücklich erwähnt sind alle Bedienungen in dieser Anleitung mittels kurzem Drücken auszuführen 360 Grad Rotation Rotieren Sie das MID um zwischen Horizontal und Vertikalansicht zu wechseln 1 Das MID einschalten 1 1 Drücken Sie den Ein Ausschalter an der Seite des Geräts lange Drücken um das System hochzufahren Sie werden einige Se...

Page 5: ...dem Hauptbildschirm um das Application Programm Menü zu öffnen Drücken Sie die Widget Option und der Widget Bildschirm wird geöffnet Drücken und Halten des Symbols öffnet den Widget hinzufügen Bildschirm Bewegen Sie das Symbol auf den Ort wo Sie das Symbol platzieren möchten Das Widget wird nun zum Hauptbildschirm hinzugefügt 4 Hauptbildschirm Sprachsuche Symbol Home Statusleiste Geöffnete Apps Te...

Page 6: ...ie im Anwendungsmenü um zum Einstellungsmenü zu gelangen APPS Sie können alle installierten APPS auf dem APPS Einstellungsbildschirm aufrufen Wenn Sie eine APP öffnen können Sie die Informationen zu dieser APP sehen Sollten Sie eine APP nicht mehr nutzen wollen wählen Sie Löschen um diese zu entfernen Shortcut Widgets löschen Drücken und halten Sie ein Shortcut oder Widget Symbol auf dem Hauptbild...

Page 7: ...dschirm um zum Explorer zu gelangen Sie können Programme die auf dem Gerät oder einer TF Karte gespeichert sind browsen kopieren löschen verschieben bearbeiten und umbenennen 2 Internet 2 1 Klicken Sie auf dem Hauptbildschirm um den Google Browser zu öffnen wenn eine Netzwerk verbindung besteht Klicken Sie auf ein drahtloses Netzwerk und das MID öffnet ein Fenster Klicken Sie die Leertaste geben S...

Page 8: ...ies um ein Video abzuspielen 2 2 Klicken Sie Installieren Der Fortschritt der Installation wird vom Gerät angezeigt Nach erfolgreicher Installation erhalten Sie die Meldung Anwendung erfolgreich installiert 2 3 Klicken Sie Beenden um den Bildschirm zu verlassen Der Shortcut der APP wird zum APP Menü hinzugefügt 2 4 Klicken Sie auf das Symbol um die Software zu öffnen Wichtige Bemerkung Sie können ...

Page 9: ...Apk Installer Klicken Sie Apk Installer und wählen Sie Install Klicken Sie dann Internal Memory um die neue Software zu installieren Klicken Sie auf Manage um zu starten exportieren deinstallieren oder abzubrechen 4 Kamera und Videoaufnahmen Klicken Sie im Application Programm Menü um die Kamera manuell zu öffnen Foto Vorschau Vordere hintere Kamera Einstellungsmenü Foto Video Foto Videoaufnahme ...

Page 10: ...s manual We reserve the right to improve the product specification and design without prior notice Content Important Safety Precautions 22 Technical Specification 22 Tablet MID Overview 23 1 Tablet Introduction 23 2 TF Card 23 3 Charging 24 Finding your Way 24 1 Turning on the MID 24 2 Switching off the MID 25 3 Lock screen and Power saving Mode 26 4 Main Interface 26 5 Custom Screen 27 6 Changing...

Page 11: ... MID Overview 1 Tablet Introduction This chapter describes the appearance of the MID including its buttons and ports it will guide you to understand the features and accessories Note 1 Clicking and dragging are performed using the LCD touch screen Please do not use pens pencils or other sharp objects to click on the screen to avoid scratching 2 Please keep the speakers clean to avoid them being bl...

Page 12: ...ng Key action definition 1 Short press press less than 1 2 seconds 2 Long press press and hold for more than 3 seconds All operations in this manual are performed by a short press unless stated otherwise 360 degree rotation Rotate the MID to switch between horizontal and vertical view 1 Turning on the MID 1 1 Press the power switch at the side of the MID long press and the machine will be booted T...

Page 13: ... the main interface to open the Application Program menu Press the WID GETS option This will open the widget interface Pressing and holding the icon will open the add widget interface Move the icon to the place where you want to place the widget and it will added to the main interface 4 Main Interface Voice Search Icon Home Notice Fast Settings Column Apps are opened Text search Icon Widgets Back ...

Page 14: ...he Application Program menu to enter the settings menu APPS In the apps settings interface users can see all installed applications If you open one application the relevant information is displayed If you do not wish to use an application any longer select Delete to remove the application Delete Shortcut Widgets Press and hold a shortcut icon or widget icon in the main interface until on the top o...

Page 15: ...xplorer You can browse copy delete move edit and rename programs saved on the MID or a TF card Click on a wireless network and the MID will open the message screen Click space to open the keyboard enter the password and click Connect If the connection is successful the network icon will be displayed in the Notice Fast settings column of the main interface Please note The MID will save connected ro...

Page 16: ...TF card 2 2 Select to open a picture 2 3 Select to play a video 2 2 Click Install The MID will show the progress After installation it will display Application installed successfully 2 3 Click Finish to exit The application shortcut will be added to the Application function key menu 2 4 Click the icon to open the software Special note You can also download chats like QQ MSN etc Applications 1 Play...

Page 17: ...eive email messages 5 Apk Installer Click Apk Installer select Install Then click Internal Memory to install new software Click Manage to launch export uninstall or cancel 4 Camera and Video Click in the Application Program Interface to open the camera manual Photo preview Front Rear camera Settings menu Photo Video Photo Video recording ...

Reviews: