background image

H-MS1115 (

www.hyundai-electronics.ru

)

16

System setup

Note:

  Some  menus  may  be  different  from  real  OSD  menu.  The  setup  menu  instruction  is  only  for  your

reference.

1.  Press SETUP button to enter the setup menu. In Setup mode, press SETUP button again to quit the

setup page.

2.  Use the LEFT/RIGHT buttons to choose the setup page: General setup page, Audio setup page, Video

setup page, Preference page, Password setup, Exit.

3.  Press the DOWN button to enter the setup page selected.
4.  Use the UP and DOWN buttons to select the option you want to adjust.
5.  Press RIGHT to enter the adjustment list. Use the UP and DOWN buttons to select the adjustment and

press PLAY button to confirm and LEFT button to return to options list.

6.  To return to setup page list press the LEFT button in the options list.

Note:

 Some setup items are concerning the present modes. The items in gray can't be set up. The

setup is memorized and kept after power off.

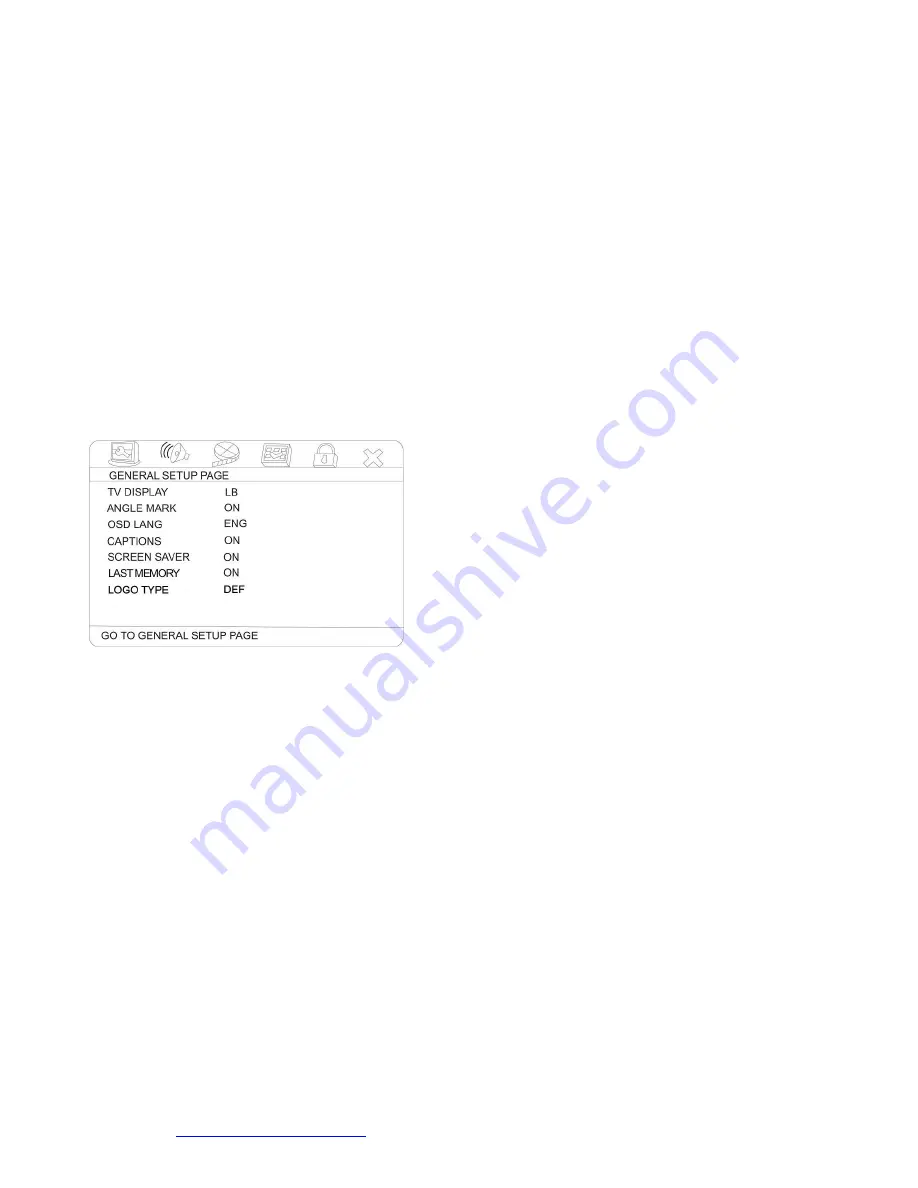
General setup page

TV DISPLAY

Normal/PS (4:3 PanScan)

: When the unit connects to the normal TV set, the wide-screen image shows on

the full screen, but some part is cut off.

Normal/LB (4:3 LetterBox)

: When the unit connects to the normal TV set, the wide-screen image shows

and black bars appear on the top and bottom of screen.

16:9 Wide

: Use this item when the unit is connected with the wide screen TV set

.

16:9 Wide squeeze

: Use  this  item  when  the  unit  is  connected  with  the  normal  TV  set

,

if you want to

squeeze the picture.

ANGLE MARK

It will show the angle mark when playing DVD disc with multi-angle view if selecting On.

OSD LANGUAGE

Select on-screen display language.

CAPTIONS

This function doesn't work when the disc without caption. If the caption is Off, press SUBTITLE button
on the RC to make caption on.

SCREEN SAVER

If the Screen saver is set On and the unit is switched on without a disc playing for several minutes, a
moving picture appears on the screen, and the unit will go to standby mode after several minutes. You can
press STANDBY button on the remote controller to wake it up

.

LAST MEMORY

When this function is on, the unit can memorize the time elapsed from the last time you played the disc.
When playing next time, it will resume playing from the memorized time.

Summary of Contents for H-MS1115

Page 1: ...H MS1115 DVD MICRO SYSTEM Instruction manual DVD ...

Page 2: ...nt Table of content 2 Important safeguards 3 Features 4 Accessories 4 Disc features 6 Disc Terms 7 Controls 8 Front and side panel buttons 8 Rear panel 8 Remote Control RC 9 Connection 10 System setup 16 Functions 21 Troubleshooting 25 Specifications 26 ...

Page 3: ...t use constant current source Supply line cord protection Make sure that the cord is right connected and does not have any damage Incorrect attachment and damage of cord may cause fire and electrical shock Service Do not try to eliminate breakages by your own When the sound is off the indicator does not light the smoke appears or any other troubles take place which were not mentioned in this manua...

Page 4: ... Touch pad buttons Supports DVD R RW DVD R RW CD R RW Compatible with DVD DVCD Super VCD VCD HDCD CDDA MP3 WMA Kodak Picture CD JPEG Built in Dolby Digital AC 3 decoder DTS digital out Support of MPEG4 DivX Connectors composite component YUV S Video VGA 5 1 stereo optical coaxial line in RCA USB SD MMC MS card slots Russian and English OSD Accessories Instructions manual Remote control A V cable F...

Page 5: ... play the following types of discs Type of disc Symbol Contents DVD Audio Video DVCD Audio Video SVCD Audio Video Video CD VCD Audio Video HDCD Audio CDDA Audio MP3 Audio WMA Audio Kodak Picture CD Digital photo JPEG Digital photo MPEG4 DivX Audio Video ...

Page 6: ...Subtitle Video aspect ratio Parental lock Angle Handling discs When holding discs please hold it by its rim When holding discs be sure the label side should be upwards Do not grasp the non label side of the disc Disc storage Never store disc in the place with high temperature strong light or humidity Put the disc back to the case after playback Cleaning Wipe the discs from time to time using a sof...

Page 7: ...ion on which active and stillness picture divided into certain portions is called scene and every scene will be showed on screen menu with a scene number that can be easily found while on playing A scene usually is formed with one or several tracks PBC function SVCD VCD If a SVCD or a VCD is played a content menu may be showed on screen this is what is called Play back control viz PBC function Dis...

Page 8: ...US NEXT button 6 STOP button 7 PLAY PAUSE button 8 RC receiver 9 USB slot 10 SD MMC MS card slot Rear panel 1 Easy Link 5 1 CH audio signal output and Power In jack 2 VGA output 3 S VIDEO output 4 Optical digital output 5 Coaxial audio output 6 YUV video 7 L R and video output 8 5 1 CH audio jack 1 SELECT button 2 UP DOWN buttons 3 MENU button ...

Page 9: ...D USB button 14 TUNING button 15 LEVEL UP DOWN buttons 16 MEMORY button 17 AMP MENU button 18 EJECT button 19 SEARCH button 20 PROG button 21 DISPLAY button 22 STOP button 23 PAUSE STEP button 24 TITLE button 25 Cursor buttons LEFT RIGHT UP DOWN 26 PLAY button 27 MENU button 28 FAST REWIND FAST FORWARD buttons 29 PREVIOUS NEXT buttons 30 REPEAT button 31 A B button 32 P N button 33 AUTO button 34 ...

Page 10: ... to shift the video output to YUV interlace signal output mode Shift the TV input mode to Y Cb Cr Y Pb Pr video connection setting If your display device with Y Pb Pr jack use the YUV cable to connect with the display s Y Pb Pr jack to the DVD player s YUV jack Press VIDEO button to shift the video output to YUV progressive signal output mode Shift the TV input mode to relevant mode S Video connec...

Page 11: ...ofer by the supplied power cord Connect the left and right speaker to the corresponding jack on the sub woofer Connect the white lead with sign to electrode the other white lead to electrode Use the AV cable yellow to connect the player Video output jack with the TV video input jack Note Choose the player amplifier output set the Audio Output Mode to Stereo ...

Page 12: ...tput 5 1CH output coaxial and optical digital audio output for Audio connection use Connecting To A Common Amplifier Connect the player s 2CH L R output to the common amplifier s L R input connector with audio cable as shown below Note Choose 2CH audio output mode please set the Downmix to LT RT ...

Page 13: ...H MS1115 www hyundai electronics ru 13 Connecting To An Amplifier With 5 1CH Audio Output Connect the player s 5 1CH output to the amplifier s 5 1CH input connector with audio cable as shown below ...

Page 14: ...er By Coaxial and Optical Jack To enjoy the Hi Fi Dolby surround system you can also connect the player to an amplifier by using the player s coaxial output jack or optical output connector correspondingly Set the player s audio output mode as SPDIF Output to SPDIF RAW in Speaker setup menu ...

Page 15: ...5 www hyundai electronics ru 15 Connecting to AUX IN jack Connect the player s AUX IN jack with audio output jack of other audio or video equipment DVD or TV Press INPUT button on the RC to shift to AUX status ...

Page 16: ... to the normal TV set the wide screen image shows on the full screen but some part is cut off Normal LB 4 3 LetterBox When the unit connects to the normal TV set the wide screen image shows and black bars appear on the top and bottom of screen 16 9 Wide Use this item when the unit is connected with the wide screen TV set 16 9 Wide squeeze Use this item when the unit is connected with the normal TV...

Page 17: ...his item should be selected FRONT CENTER REAR SUBWOOFER SPEAKER If your speaker system includes the above speakers you can set these items according to the real speaker states TEST TONE In 5 1CH mode choose ON this will check 5CHs in turn This setup item must be done with no disc in the player and the condition of Downmix being set with OFF DIALOG With Audio Output mode set as LT RT or Stereo you ...

Page 18: ...ge signal DYNAMIC If watching large dynamic scope movie program at night to select this mode you can reduce the volume to a very low level at the same time to keep the fine details sounds In this case this doesn t disturb the family and keep the quality sounds CHANNEL DELAY If the above setups dissatisfy you you can set the speaker distances in the real conditions Press the button UP DOWN to selec...

Page 19: ...igital filter Off 1x 2x The initial factory setup is 1x Videosetup COMPONENT YUV select video output in analog component video format when connecting to Y U V terminals VGA select this item when connecting to VGA terminal OFF component video output TV MODE Select progressive or interlace modes HD MODE Select OFF 720P 1080i scanning modes QUALITY You can set sharpness brightness contrast gamma hue ...

Page 20: ... is supported by disc content it will work Otherwise the disc default value works And these settings can be changed respectively by pressing AUDIO and SUBTITLE buttons when playing PARENTAL The control level is for parental to control playing content and protect your children from violence and erotic The disc the level of which is higher than the setting level cannot be played COUNTRY REGION Refer...

Page 21: ...reen press MUTE button again and the sound will resume MENU When playing a DVD disc press MENU button once to return to sub menu When playing a SVCD VCD 2 0 discs press MENU button and the disc menu will appear use number buttons to choose track ZOOM When playing DVD SVCD VCD discs press ZOOM button to zoom in or zoom out the picture In zoom in mode press cursor buttons to move the picture for vie...

Page 22: ...ailable for the multiple angle shooted discs Multiangle means that a scene is shot from more than one angle so that audience can watch from different angle SLOW Press for slow motion playback VIDEO Switches among different video output TUNING Press to activate manual search function Use LEVEL UP or DOWN buttons to adjust the current frequency LEVEL The default function is to control the volume of ...

Page 23: ... to select the contents in the menu 2 Picture Rotation It can be operated when the picture is displayed Once another picture is selected rotation will be cancelled automatically Use cursor buttons to select different rotation modes 3 ZOOM ZOOM button is used to turn on or turn off the zoom and move function When the function is turned on press FAST FORWARD FAST REWIND buttons to control zoom propo...

Page 24: ...nsert the memory card or USB stick 2 Press CARD USB button repeatedly to switch between USB drive and memory card for playback 3 Use cursor buttons to select the available audio video files that you wish to play on the USB drive or memory card 4 Press PLAY button to start the playback 5 If you want to remove the USB drive or memory card please press STOP first to stop the current playback and then...

Page 25: ...e connected devices No sound Sound setup is incorrect Perform proper audio setup Sound distorted Sound volume level is too high Decrease the sound volume level Disc is not inserted Insert a disc into the slot Unit cannot read a disc Disc is inserted incorrectly Insert the disc correctly The direction of the RC to the sensor Use the RC in compliance with the instruction manual The distance between ...

Page 26: ...cture CD JPEG Built in sound decoders Dolby Digital AC 3 5 1CH stereo video Coaxial audio Optical VGA RCA Line in Composite video S Video Component YUV USB Jacks SD MMC MS cards Progressive scan MPEG 4 DivX Support of subtitle for MPEG4 Support of color systems PAL NTSC 16 9 and 4 3 two screen size for selection Digital equalizer Russian and English OSD Children lock Multi shooting angles Function...

Page 27: ...H MS1115 www hyundai electronics ru 27 27 28 29 29 DVD 31 32 33 33 33 34 35 41 50 51 ...

Page 28: ...H MS1115 www hyundai electronics ru 28 220 1 ...

Page 29: ...dai electronics ru 29 DVD DVD Hyundai DVD R RW DVD R RW CD R RW DVD DVCD Super VCD VCD HDCD CDDA MP3 WMA Kodak Picture CD JPEG MPEG4 DivX Dolby Digital AC 3 DTS digital YUV S Video VGA 5 1 RCA USB SD MMC MS FM YUV 7 30 ...

Page 30: ...H MS1115 www hyundai electronics ru 30 DVD DVCD SVCD Video CD VCD HDCD CDDA MP3 WMA Kodak Picture CD MPEG 4 DivX JPEG ...

Page 31: ...H MS1115 www hyundai electronics ru 31 DVD DVD 5 1 Dolby digital surround DTS ...

Page 32: ...H MS1115 www hyundai electronics ru 32 DVD DVD SVCD VCD CD VCD PBC SVCD VCD SVCD VCD VCD PBC 1 1 SVCD VCD PBC 2 0 VCD DivX 3 Bit rate ...

Page 33: ...H MS1115 www hyundai electronics ru 33 1 2 3 POWER 4 EJECT 5 PREVIOUS NEXT 6 STOP 7 PLAY PAUSE 8 9 USB 10 SD MMC MS 1 5 1 2 VGA 3 S VIDEO 4 5 6 YUV 7 8 5 1 1 SELECT 2 UP DOWN 3 MENU ...

Page 34: ...AUDIO 10 SUBTITLE 11 ANGLE 12 VIDEO 13 CARD USB 14 TUNING 15 LEVEL UP DOWN 16 MEMORY 17 AMP MENU 18 EJECT 19 SEARCH 20 PROG 21 DISPLAY 22 STOP 23 PAUSE STEP 24 TITLE 25 26 PLAY 27 MENU 28 FAST REWIND FAST FORWARD 29 PREVIOUS NEXT 30 REPEAT 31 A B 32 P N 33 AUTO 34 INPUT 35 PRESET 36 ST MONO 37 AMP STANDBY ...

Page 35: ... MS1115 www hyundai electronics ru 35 Video S Video YUV VGA P N PAL NTSC Y Cb Cr Y Cb Cr YUV YUV VIDEO YUV TV Y Cb Cr Y Pb Pr Y Cb Cr YUV YUV VIDEO YUV TV S Video S Video S video VGA VGA VGA VGA PLAY VGA ...

Page 36: ...H MS1115 www hyundai electronics ru 36 5 1CH ...

Page 37: ...H MS1115 www hyundai electronics ru 37 2 5 1 2CH L R L R 2CH ...

Page 38: ...H MS1115 www hyundai electronics ru 38 5 1 5 1CH 5 1CH ...

Page 39: ...H MS1115 www hyundai electronics ru 39 Dolby Digital Hi Fi Dolby surround SPDIF SPDIF RAW ...

Page 40: ...H MS1115 www hyundai electronics ru 40 LINE IN LINE IN DVD INPUT AUX ...

Page 41: ...H MS1115 www hyundai electronics ru 41 1 SETUP SETUP 2 3 4 5 PLAY 6 T 4 3 PS 4 3 LB 16 9 16 9 SUBTITLE STANDBY ...

Page 42: ...H MS1115 www hyundai electronics ru 42 DOLBY SURROUND 5 1CH ...

Page 43: ...H MS1115 www hyundai electronics ru 43 SPDIF SPDIF SPDIF SPDIF RAW SPDIF PCM LPCM 48 96 Dolby Digital ...

Page 44: ...H MS1115 www hyundai electronics ru 44 7 PRO LOGIC II 5 1CH Dolby digital DVD 10 HDCD 1 2 1 YUV YUV VGA VGA YUV HD 720p 1080i PLAY ...

Page 45: ...H MS1115 www hyundai electronics ru 45 PAL NTSC Auto Auto NTSC PAL PBC SVCD VCD AUDIO SUBTITLE 136900 ...

Page 46: ...aver PLAY PLAY STOP DVD SVCD VCD CD STOP STOP PAUSE PAUSE STEP PLAY MUTE MUTE MUTE MENU DVD MENU SVCD VCD 2 0 MENU ZOOM DVD SVCD VCD ZOOM VOLUME VOL VOL FAST FORWARD FAST REWIND FAST FORWARD FAST REWIND PLAY PREVIOUS NEXT DVD PREVIOUS NEXT SVCD VCD CD PREVIOUS NEXT DISPLAY DISPLAY SEARCH DVD SEARCH ...

Page 47: ... CD VCD SVCD MP3 CD VCD SVCD PBC TITLE LANGUAGE DVD DVD 8 DVD AUDIO SUBTITLE DVD DVD 32 SUBTITLE ANGLE DVD DVD ANGLE SLOW VIDEO VGA YUV OFF TUNING LEVEL UP DOWN LEVEL MEMORY LEVEL UP DOWN 00 30 AMP MENU WVOL BASS TREB PROGRAM PROG 10 20 PLAY DVD SVCD VCD CD ...

Page 48: ...MP3 PLAYBACK STOP UP DOWN LEFT PLAY PLAY PREVIOUS NEXT PICTURE CD PLAYBACK 1 PLAY 2 3 DVD SVCD VCD ZOOM FAST FORWARD FAST REWIND MENU STOP NEXT PREV PLAY ZOOM F FWD SEARCH FAST REWIND UP DOWN LEFT RIGHT JPEG SELECT SELECT DVD AUX FM AM MENU 1 FM AM MENU MAVOL WVOL BAS TRE PRESET STEREO MONO TUNING AUTO 2 DVD AUX MENU MVOL WVOL BAS TRE UP DOWN ...

Page 49: ...S1115 www hyundai electronics ru 49 MVOL WVOL BAS TRE PRESET 60 30 FM AM ST MONO FM AM USB SD MMC MS USB SD MMC MS 1 POWER USB 2 CARD USB USB 3 4 PLAY 5 USB STOP USB DVD USB DVD USB USB USB USB SD MMC MS 8 ...

Page 50: ...H MS1115 www hyundai electronics ru 50 VIDEO DVD 8 ...

Page 51: ...ics ru 51 2 1 25 x 2 50 AM FM 60 FM 65 108 DVD R RW DVD R RW CD R RW DVD DVCD Super VCD VCD HDCD CDDA MP3 WMA Kodak Picture CD JPEG Dolby Digital AC 3 5 1 VGA RCA S Video YUV USB SD MMC MS MPEG 4 DivX MPEG4 PAL NTSC 16 9 4 3 220 50 ...

Reviews: