Hyundai H-LED19V6 Instruction Manual Download Page 9

8

9

Operation

Operation

6. Press MENU button to return to the 

previous menu page. Press EXIT button on the 
RC to quit the menu.

  Some menu items may be in grey color, 

in this case they are not adjustable. Pictures 
of OSD menu are for reference only; they may 
differ from the real screens.
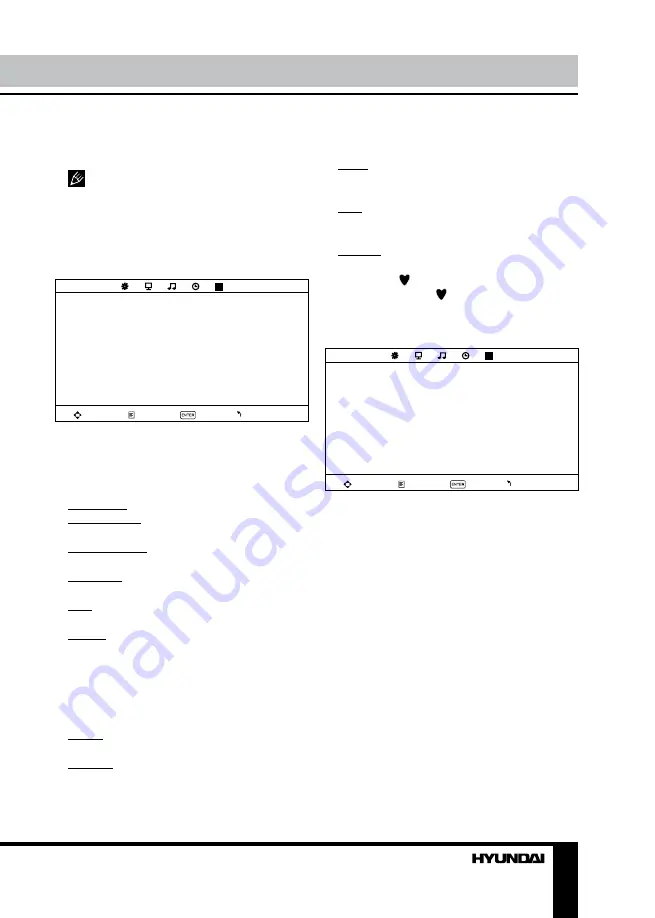
Channel setting 

(only for TV source)

CHANNEL

Auto tuning
ATV Manual tuning
Programme edit

Move

Menu

Enter

Exit

•  

Auto tuning: 

press RIGHT button to start 

automatic search of available channels. To 
stop the process press MENU button.

•  

ATV manual tuning

: Press ENTER button 

to enter into manual tuning menu:

Current Ch: select channel number.
Color System: select corresponding color 

system.

Sound System: select corresponding sound 

system.

Fine-tune: perform fine adjustment of the 

current frequency.

AFC: set On/Off automatic frequency 

correction. 

Search: press LEFT/RIGHT buttons; the 

unit will search for next available channel 
downward or upward and save it under the 
current number.

•  

Program Edit

: this item allows you to sort 

TV programs according to your preferences. 
Enter into program edit menu:

Delete: Select the channel you want to delete. 

Press red button to delete the channel.

Rename: Highlight the needed channel. Press 

green button; then press UP/DOWN buttons to 
select a symbol. Press LEFT/RIGHT buttons to 

select the next symbol. Press green button to 
confirm.

Move: Highlight the needed channel. Press 

yellow button; select the position to put the 
channel into. Press yellow button to confirm.

Skip: Highlight the needed channel. Press 

blue button; now this channel will be skipped 
when you select previous/next channels.

Favorite: Select the channel you want to edit. 

If this channel is your favorite channel, you can 
add the mark   to the channel as your favorite 
channel by pressing   button.

Picture setting

PICTURE

Picture mode
Contrast
Brightness
Color
Tint
Sharpness
Color temperature
Noise reduction

Move

Menu

Enter

Exit

•  

Picture Mode

: User/Standard/Dynamic/

Mild.

•  

Contrast

•  

Brightness

•  

Color

•  

Tint

: adjust the tone of color when your 

system is in NTSC.

•  

Sharpness

•  

Color Temperature

: Normal/Warm/Cool.

•  

Noise Reduction

: Digital noise reduction 

effect for reducing the video noise level: Off/
Low/Middle/High.

Summary of Contents for H-LED19V6

Page 1: ...LED TV Instruction manual H LED19V6 LCD...

Page 2: ...nel setting Picture setting Sound setting Timer setting Option setting Screen setting USB operation General operatoins of file playback General information Troubleshooting Causes of interference Acces...

Page 3: ...twist pull or roast the power cord Please contact the service center immediately if you found that the core is showed in the air or has been broken Please replace the AC outlet if the metal bolt cann...

Page 4: ...ct If it moves or is tipped over it may be damaged Do not place any fire source such as candlelight close to this product or place it on this product If it is tipped over or fallen down it may cause d...

Page 5: ...e has a HDMI output jack you can connect the signal to the unit by HDMI cable not included Component input is intended for receiving component video signal if connected to the component output of exte...

Page 6: ...enna jack 9 Left audio input RCA 10 Right audio input RCA 11 Composite video input 12 Component video input 13 Power switch 14 USB port 15 HDMI input 16 Power cord 17 PC VGA input 18 PC audio input 19...

Page 7: ...low button button 23 Blue button button 24 E W button 25 SUBPAGE button Changing the battery 1 Remove the battery compartment cover on the back of the RC 2 Insert the batteries into the battery compar...

Page 8: ...the current signal source Teletext operations option Select a TV channel in order to pick up the picture signal of Teletext Teletext button functions are as follows TEXT Press this button to enter in...

Page 9: ...to sort TV programs according to your preferences Enter into program edit menu Delete Select the channel you want to delete Press red button to delete the channel Rename Highlight the needed channel P...

Page 10: ...uage Aspect ratio Blue screen Key lock Reset Software upgrade USB Move Menu Enter Exit OSD Language select the language of the OSD menu TT Language select teletext language Aspect ratio Auto 4 3 16 9...

Page 11: ...or to listen to When highlighting the file the file information will appear on the right and picture will be previewed in the center not available for music files Press ENTER button or button to play...

Page 12: ...nect the audio signal cord properly Set the sound system properly The RC does not work Batteries are improperly installed or exhausted Make sure the positive and the negative polarities are correct Re...

Page 13: ...1000 USB movie photo and audio support Power supply 100 240 V 50 60 Hz Power consumption 35 W Electric shock protection class II Unit dimensions with stand 463 x 165 x 342 mm Net Gross weight 3 kg 3...

Page 14: ...14 USB 14 15 15 15 17 17 17 18 18 18 18 19 19 19 19 20 20 21 21 22 22 22 23 23 23 24 24 24 25 25 25 26 27...

Page 15: ...15 220...

Page 16: ...16 LCD 10 18 2...

Page 17: ...17 4 4 100...

Page 18: ...18 75 RCA VGA VGA PC HDMI HDMI HDMI VCR DVD RCA 5 1 RCA 75...

Page 19: ...19 6 7 1 2 3 4 5 1 CH 2 VOL 3 MENU 4 TV AV 5 POWER 6 7 8 9 RCA 10 RCA 11 12 13 14 USB 15 HDMI 16 17 PC VGA 18 19 20 21 22 23 8 9 10 11 12 14 13 15 16 17 18 19 20 21 22 23...

Page 20: ...9 21 20 22 23 24 25 1 POWER 2 3 SOURCE REVEAL 4 SIZE ZOOM 5 MENU 6 ENTER 7 VOL VOL 8 SLEEP 9 LIST REPEAT 1 2 3 10 11 12 TEXT 13 HOLD STILL 14 INFO INDEX 15 16 AUDIO 17 RECALL 18 EXIT 19 CH CH 20 CANCE...

Page 21: ...VOL VOL SLEEP 10 240 SLEEP AUDIO TV Nicam Stereo Mono Dual I Dual II SOURCE TV AV AV YPbPr HDMI PC TV CH CH 0 9 0 200 RECALL INFO ZOOM 4 3 16 9 1 2 TEXT TEXT HOLD INDEX SIZE REVEAL SUBPAGE 0001 SUBPAG...

Page 22: ...22 2 VOL 3 ENTER CH 4 CH 5 VOL CH 6 MENU EXIT MENU ENTER...

Page 23: ...23 NTSC SPDIF SPDIF PCM 0 240 USB 4 3 16 9 1 2 USB...

Page 24: ...24 PC c USB USB USB USB ENTER USB ENTER USB USB 2 0 320 FAT FAT32 USB ENTER ENTER ENTER INFO ENTER REPEAT EXIT...

Page 25: ...25...

Page 26: ...26 1 1 2 1 3 2 4 1 5 4 6 1 7 1 8 1 9 1...

Page 27: ...27 18 5 47 5 1366 x 768 16 9 PAL SECAM B G DK I NICAM 2 x 2 RCA USB VGA HDMI 200 1000 USB 220 50 60 100 240 35 II 463 x 165 x 342 3 3 7...

Reviews: