background image

7

Operation

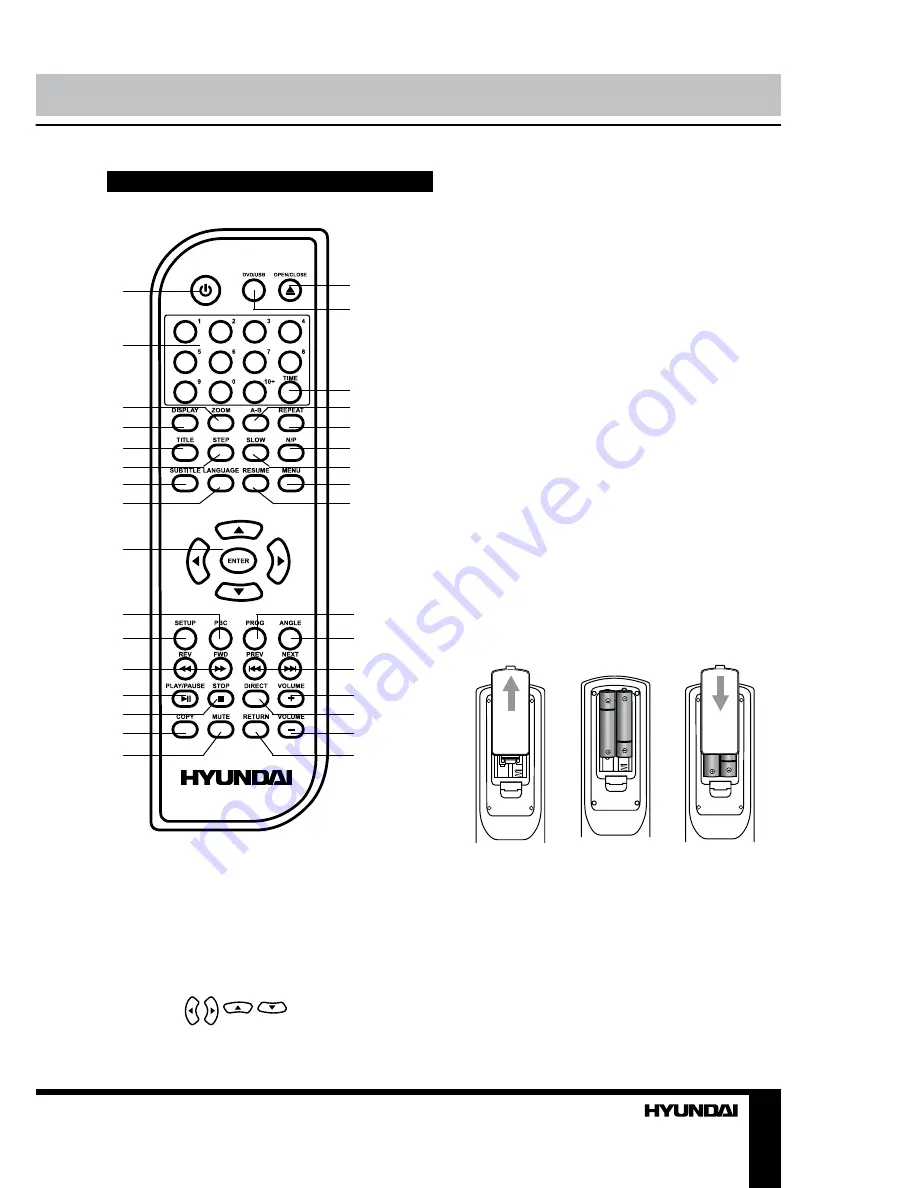
Remote controller (RC)


1

2

3
4
5
6

7
8

9

10
11

12
13
14
15
16

17
18

19
20

21
22
23

24
25

26
27

28
29
30

31
32

1.  POWER button

2.  Digit buttons

3.  ZOOM button

4.  DISPLAY button

5.  TITLE button

6.  STEP button

7.  SUBTITLE button

8.  LANGUAGE button
9.  Cursor ( / /

/

) buttons/ENTER 

button

10.  PBC button
11.  SETUP button
12.  REV/FWD buttons
13.  PLAY/PAUSE button
14.  STOP button
15.  COPY button
16.  MUTE button
17.  OPEN/CLOSE button
18.  DVD/USB button
19.  TIME button
20.  A-B button
21.  REPEAT button
22.  N/P button
23.  SLOW button
24.  MENU button
25.  RESUME button      29. button
26.  PROG button           30.  DIRECT button
27.  ANGLE buttons        31.  VOLUME- button
28.  PREV/NEXT button  32.  RETURN button 

Changing the battery

1.  Remove the battery compartment cover 

on the back of the RC.

2.  Insert the batteries into the battery 

compartment making sure that the correct 

polarity is observed.

3.  Install the cover back.

•  Use two AAA/1.5V batteries for the RC. 

The RC should be pointed at remote sensor 

within 8 meters and within 30 degrees at the 

left or the right side.

•  Take the battery out of the RC if it is not 

used for a long time.

•  Do not mix new and used batteries or 

different types of batteries. Weak batteries can 
leak and severely damage the RC.

1

2

3

Summary of Contents for H-DVD5003

Page 1: ...DVD DVD PLAYER Instruction manual H DVD5005...

Page 2: ...nt panel Rear panel Remote controller Changing the battery Button functions Open close Power Title Subtitle Angle Menu Play pause Cursor buttons Number buttons Enter Stop Step FWD REV PREV NEXT Prog S...

Page 3: ...is moved from cold premises to the warm room or vice versa condensate may form on the laser head and the device may not operate properly In this case please turn the device on for 1 2 hours without di...

Page 4: ...om their real images Supported formats Disc types Symbol Contents DVD Compressed digital audio video MPEG4 DivX Compressed digital audio video Video CD VCD Compressed digital audio video Super VCD SVC...

Page 5: ...left to connect the stereo audio outputs of this unit to the TV or a stereo input of power amplifier Coaxial digital audio Use a special coaxial cable to connect the coaxial output of this unit to the...

Page 6: ...Display 5 STOP button 6 POWER button Not indicated USB port right panel Rear panel H 1 2 9 8 0 0 0 0 0 0 1 OFF ON MODEL H DVD5005 Power supply 110V 240V 50 60 Hz 20W 1 2 3 4 5 6 1 Power cord 2 Compon...

Page 7: ...tton 24 MENU button 25 RESUME button 29 VOLUME button 26 PROG button 30 DIRECT button 27 ANGLE buttons 31 VOLUME button 28 PREV NEXT button 32 RETURN button Changing the battery 1 Remove the battery c...

Page 8: ...ou can display this menu by pressing MENU button PLAY PAUSE When playing the disc press PLAY PAUSE button once to pause press PLAY PAUSE button again to return to normal playback Cursor buttons Press...

Page 9: ...REPEAT button continually to repeat track all repeat off When playing MP3 disc press REPEAT button continually to play single repeat track repeat all repeat off A B Press A B button at the start point...

Page 10: ...r is off General setup General Audio Dolby Video MP4sub Prefer General Setup Page TV fromat Angle mark OSD lang Captions Screen saver Last memory TV format Normal PS When the unit is connected to the...

Page 11: ...subtitle setup page General Audio Dolby Video MP4sub Prefer Mpeg4 Subtitle setup page Subtitle font Background color Outline color Text color Horiz align Vert align Reformat changed the operation mod...

Page 12: ...If a setting is supported by disc content it will work Otherwise the disc default value works Parental The control level is for parental to control playing content and protect your children from viol...

Page 13: ...ining files of these formats is inserted following menu interface will be displayed 1 2 3 1 Playback info window shows current playback time track number volume level playback status stop play pause e...

Page 14: ...of the discs Do not touch the recorded surface of the discs Use 12 cm CDs Use only conventional fully circular discs Do not use irregularly shaped discs Cleaning discs Fingerprints should be carefully...

Page 15: ...erted Insert the disc Disc inserted incorrectly Install the disc with the label side facing up Condensate on the unit laser head Switch the unit on without disc for an hour Remote control does not ope...

Page 16: ...3 WMA Kodak Picture JPEG MPEG4 DivX Support of subtitle for MPEG4 Audio Dolby Digital decoder DTS digital out Video Support NTSC PAL Connectors Composite SCART Coaxial Stereo Functions Screen saver Zo...

Page 17: ...ngle Menu Play pause Enter Stop Step FWD REV PREV NEXT Prog Slow Setup N P Repeat A B DVD USB Language 17 18 18 18 19 20 20 21 21 21 21 22 22 23 23 23 23 23 23 23 23 23 23 23 23 23 23 24 24 24 24 24 2...

Page 18: ...18 1 1 2 Warning RISK OF ELECTRIC SHOCK DO NOT OPEN...

Page 19: ...19 DVD MPEG4 DivX Video CD VCD Super VCD SVCD CDDA MP3 WMA Kodak Picture CD JPEG...

Page 20: ...20 SCART 21 SCART SCART SCART DTS DTS DTS...

Page 21: ...21 1 2 3 4 5 6 1 2 OPEN CLOSE 3 PLAY PAUSE 4 5 STOP 6 POWER USB H 1 2 9 8 0 0 0 0 0 0 1 OFF ON MODEL H DVD5005 Power supply 110V 240V 50 60 Hz 20W 1 2 3 4 5 6 1 2 3 4 5 6 SCART...

Page 22: ...OOM 4 DISPLAY 5 TITLE 6 STEP 7 SUBTITLE 8 LANGUAGE 9 ENTER 10 PBC 11 SETUP 12 REV FWD 13 PLAY PAUSE 14 STOP 15 COPY 16 MUTE 17 OPEN CLOSE 18 DVD USB 19 TIME 20 A B 21 REPEAT 22 N P 23 SLOW 24 MENU 25...

Page 23: ...N CLOSE POWER POWER POWER TITLE DVD TITLE SUBTITLE DVD SUBTITLE ANGLE DVD ANGLE MENU DVD MENU SVCD VCD2 0 PBC MENU PLAY PAUSE PLAY PAUSE ENTER ENTER STOP DVD SVCD VCD CD STOP PLAY PAUSE STOP STEP DVD...

Page 24: ...V 2X 4X 8X 16X 32X PREVIOUS NEXT DVD PREVIOUS SVCD VCD CD PREVIOUS DVD NEXT SVCD VCD CD NEXT PROG PROG 10 ENTER 20 ENTER PROG SLOW SLOW X2 X4 X8 X16 SETUP SETUP N P N P PAL NTSC REPEAT REPEAT DVD REPE...

Page 25: ...k Control DIRECT DVD RESUME TITLE ZOOM DVD SVCD VCD ZOOM 2x 3x 4x VOLUME VOLUME VOLUME VOLUME MUTE MUTE MUTE DISPLAY DISPLAY TIME TIME ENTER RETURN DVD Super VCD VCD2 0 RETURN PBC COPY Ripping USB 1 S...

Page 26: ...26 ENTER 6 Dolby MP4sub 4 3 PS 4 3 LB 16 9 DVD SUBTITLE POWER USB Dolby MP4sub SPDIF...

Page 27: ...27 SPDIF SPDIF SPDIF RAW SPDIF PCM PCM Dolby digital Dolby Digital Dolby MP4sub Dolby digital Mix Mono Dolby MP4sub RGB SCART MPEG4 General Audio Dolby Video MP4sub Prefer Mpeg4 Mpeg4 15...

Page 28: ...28 Dolby MP4sub PAL NTSC PAL NTSC 136900 Ripping RIPPING CD RIPPING CDDA 3 USB ID3 CD text ID3 RIPPING RIPPING COPY CD USB...

Page 29: ...29 ENTER bit rate ENTER Start ENTER OPEN CLOSE VOLUME VOLUME USB RIPPING USB MP3 JPEG MP3 12 MP3 CD 600 170 MP3 CD JPEG Joint Photographic Expert Group 15 20 DivX USB 1 2 3...

Page 30: ...30 1 2 3 ENTER ENTER JPEG STOP PROG ANGLE PROG ENTER...

Page 31: ...31 12 DVD 1 1 1 AAA 1 5V 2 1 1 1...

Page 32: ...32 1 2...

Page 33: ...1 2 x x 255 X 235 X 43 1 2 1 48 DVD DVD R DVD RW CD CD R CD RW USB DVD Super VCD VCD HDCD CDDA MP3 WMA Kodak Picture JPEG MPEG4 DivX MPEG4 Dolby Digital DTS Digital NTSC PAL SCART CD 3 USB 110 240 50...

Reviews: