background image


22 

AUX Input


8. AUX Input 


8.1 AUX Connector 

It is possible to connect your portable media player to the car audio system for playback of 
the audio tracks via the car speakers. 


To get the best results when connecting the portable media to the car audio system, follow 
these steps: 

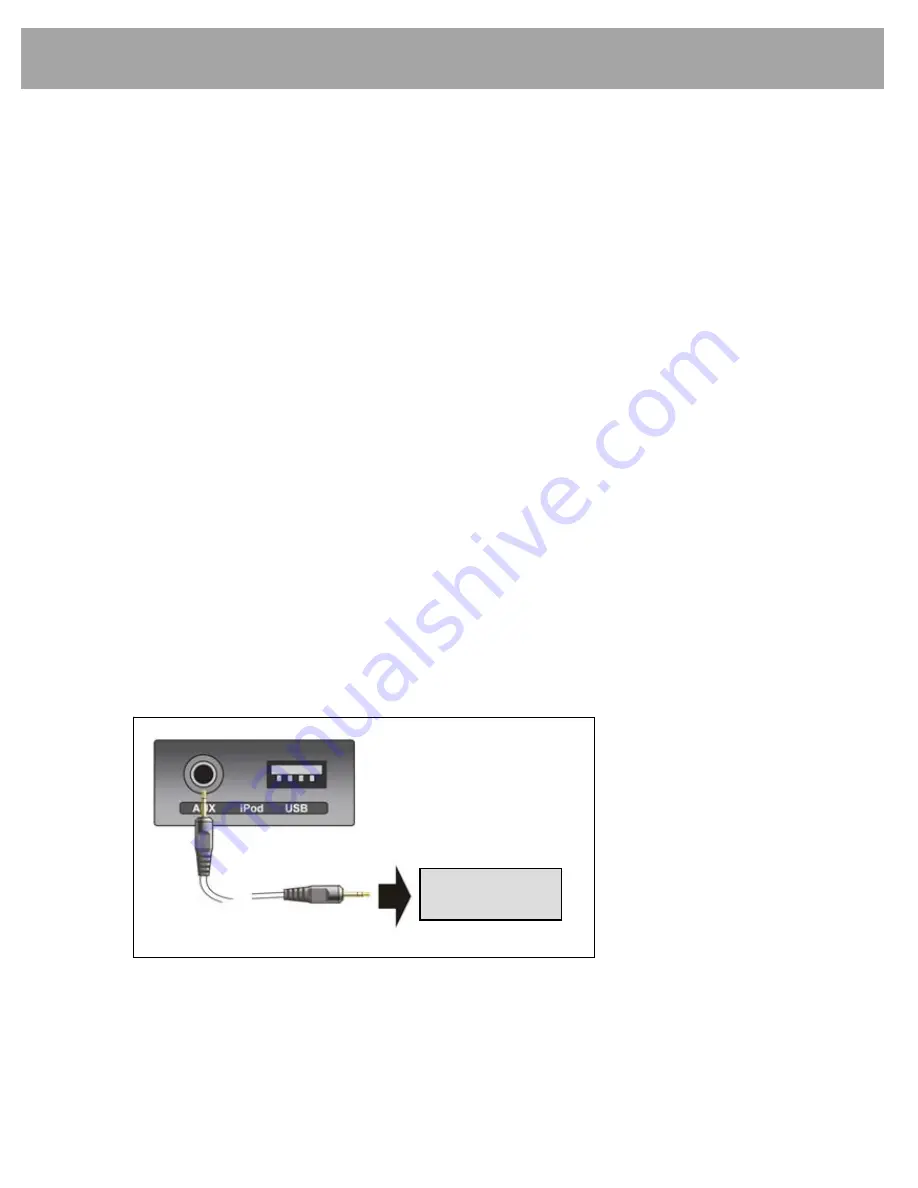
1) Use the supplied 3.5 mm stereo plug to 3.5 mm stereo plug cable to connect the media 

player headphone socket to the AUX socket located inside the centre console. 

2) Adjust the portable media player to approximately ¾ (75%) volume level and start 

playback. 

3) Press button 

on the car radio or press the steering wheel remote 

MODE

 button until 

the display shows 

Connected


Note: 

a. 

The audio quality of your media player and the audio tracks on it may not be of the 
same sound quality as the car audio system's CD player. 

b. 

If the volume level of the media player is too low compared with the radio or CD, 
increase the volume of the connected media player. 

c. 

If the sound of the media player is too loud and/or distorted, decrease the volume of the 
player. 

d. 

For technical information regarding the AUX input, refer to the specification section at 
the end of this manual. 


AUX socket located inside the centre console 


8.2 Recording 

Press the

 REC

 icon to start recording the current file. For more information on the recording 

feature, refer to section 1.3.2. 
Once the 

REC

 icon is pressed, recording will start from the currently playing point within the file. 


Your portable 

Media Player 

Summary of Contents for GD-01

Page 1: ...INSTRUCTION MANUAL GD 01 MP3 USB AUX BLUETOOTH iPod CD PLAYER WITH AM FM RADIO ...

Page 2: ... main vehicle user manual are not relevant to the radio model depicted in this user manual Contents 1 General Controls Page 04 2 Steering Wheel Controls Page 09 3 AM FM Tuner Page 10 4 CD DA Player Page 12 5 CD MP3 WMA Player Page 14 6 USB Player Page 17 7 iPod Player Page 20 8 AUX Input Page 22 9 My Music Page 23 10 Bluetooth Audio Player Page 26 11 Memo Page 29 12 Bluetooth Page 30 13 Setting Pa...

Page 3: ...tions q POWER VOL Power ON OFF Volume w AUDIO TUNE Audio settings Tuning Other e RADIO Button r MEDIA Button t SETUP Button y EQ Button Equalizer u Off Hook Button i On Hook Button o Automatical Up Tuning Track Up Cue a Automatical Down Tuning Track Down Review s DISP Button d DISC Slot f DISC Eject g Warning LED h Microphone j Preset Buttons q u i o a w e r t y d s h f g j ...

Page 4: ...urn knob q left or right to increase or decrease the volume then press knob q again to set that volume level as the start up volume level w Audio Settings The tone and individual speaker levels may be adjusted 1 Press knob w the display shows the current level setting 2 Refer section 11 2 2 for more information on adjust the level e RADIO Button This button operates several tuner functions 1 Press...

Page 5: ...er section 10 3 Press the button accepts an incoming phone call 4 Hold and press the button redials the last dialed phone number i On Hook Button This button operates several functions 1 Press the button rejects an incoming call 2 Press the button ends an active phone call 3 Press the button cancels Phone screen s Display Setting DISP button The radio display may be switched off to reduce the amou...

Page 6: ...io will return to the previous mode Note If the eject function does not operate due to an internal error press and hold button f for more than 2 seconds g Warning LED This LED lamp blinks every 1 second when the ignition is turned OFF to act as a deterrent against theft ...

Page 7: ...rding Press the REC icon again to re start recording from where the last recording ended 3 During recording pressing the STOP icon will stop recording and the Save Recording text will be displayed on the screen 4 Here press the YES icon to save the recording file with the file name displayed on the screen Press the NO icon to cancel recording and restore the previous screen Press the RENAME icon t...

Page 8: ...ORE icon to finalize changes to the file name Note a Some special characters may not be supported b Files with identical file names cannot be saved more than once within a mode c Up to 27 characters can be used to save file names Icon Description Used to insert a capital letter Used to insert a backspace 123 Used to insert symbols and numbers Used to insert special characters 123 Used to insert nu...

Page 9: ...o CUE or REVIEW the current playing track Note a The SEEK buttons may not operate when using some Bluetooth music players b CUE and REVIEW is not available when using BT Audio mode 2 3 MODE button Press the MODE button for less than 1 second to change to the next available mode The complete mode sequence for selection is shown below Press the MODE button for more than 1 second to switch the HYUNDA...

Page 10: ...plays the FM1 FM3 FM3 and AM modes Displays the currently playing frequency Displays preset frequencies Records currently playing broadcast Shows preset list Saves frequencies with superior reception to preset buttons Converts frequency bandwidth in order of FM1 FM2 FM3 AM ...

Page 11: ... is disconnected 3 5 Recording Press the REC icon to start recording the current broadcast For more information on the recording feature refer to section 1 3 2 3 6 Viewing Preset Frequency Lists 1 Press the LIST icon to display the Preset lists by bandwidth 2 Up to 6 stations can be saved to presets for each FM1 FM2 FM3 and AM bandwidths 3 From the list press the desired preset to listen to the se...

Page 12: ...play shows the track name 4 2 CD DA Player Screen Icon Description Current track Total tracks Displays the play time for the current track Displays the track name Records the currently playing song Displays file list within the disc Scans the beginning parts of disc tracks in sequential order approx 10 seconds per track Repeats the current track Plays disc tracks in random order 4 3 Recording Pres...

Page 13: ... or button i to restore the previous screen 4 7 Track Scan SCAN icon when press will play the first 10 seconds of each track on the disc SCAN will appear on the display When the desired track is reached press the icon again to cancel the function The set will then play the selected track 4 8 Repeat Play During disc play press RPT icon to play the selected track repeatedly RPT will appear on the di...

Page 14: ...n the steering wheel 4 The radio display shows the file ID3 information If the ID3 information is too long to be display at once the display will scroll the ID3 information when pressed 5 2 CD MP3 WMA Screen Icon Description Current file Total file Displays the play time for the current file Displays current file information Title Artist Album Name Copies the currently playing file Displays file l...

Page 15: ...to section 8 5 4 File Browser 5 4 1 File browser using knob w The file browser is a feature used to locate specific files within the radio 1 Turn knob w to display the files available on the CD 2 When the desired file is displayed press knob w to begin playback of that file 5 4 2 File browser using File List 1 Press the LIST icon to display the list of files within the disc 2 Select the desired fi...

Page 16: ...on the display Playback of the same file will continue to repeat until the icon is pressed again Press the icon again to cancel the repeat function If playing MP3 WMA files in folders press and hold the RPT icon RPT F will appear on the display files within the current folder will be repeated 5 7 Random Play During disc play press RDM icon to play files on the disc in a random or shuffled order RD...

Page 17: ...y Reading and then music playback will begin 3 If another mode is selected USB player may be resumed by pressing the MEDIA button on the radio or by pressing the MODE button on the steering wheel 4 The radio display shows the file ID3 information If the ID3 information is too long for the display the display scrolls when press that ID3 information Notes When Using the USB Player a If there are no ...

Page 18: ...the current file Displays current file information Title Artist Album Name Copies the currently playing file Displays file list within the USB device Scans the beginning parts of files in sequential order approx 10 seconds per file Repeats the current file Plays files within the USB device in random order ...

Page 19: ... file number to be played is increased Press and hold this button to CUE or advance rapidly in the forward direction 6 5 a File Down Review This button a is used to select file down When this button is pressed playback of the current file is re started and if pressed again the playback of the previous file begins Press and hold this button to REVIEW or advance rapidly in the backward direction 6 6...

Page 20: ...le ID3 information If the ID3 information is too long for the display the display scrolls when press that ID3 information 7 2 iPod Player Screen Icon Description Current file Total files Displays the play time for the current file Displays current file information Title Artist Album Name Records the currently playing file Displays the CATEGORY SEARCH screen Repeats the current file Plays files wit...

Page 21: ...es 2 Select the desired category to display sub categories If there are no sub categories then the stored file list will be displayed 3 Repeat Step 2 until reaching the stored file list 4 Press the icon to move to the previous list page and the icon to move to the next list page 5 To move to a previous category press the name of the current category displayed at the top of the screen For example p...

Page 22: ...splay shows Connected Note a The audio quality of your media player and the audio tracks on it may not be of the same sound quality as the car audio system s CD player b If the volume level of the media player is too low compared with the radio or CD increase the volume of the connected media player c If the sound of the media player is too loud and or distorted decrease the volume of the player d...

Page 23: ...rder 9 2 o File Up Cue This button o is used to select file up When this button is pressed playback of the next file is started Each time the button is pressed the file number to be played is increased Press and hold this button to CUE or advance rapidly in the forward direction 9 3 a File Down Review This button a is used to select file down When this button is pressed playback of the current fil...

Page 24: ...ng files from My Music List 1 Press the LIST icon to display the My Music list screen Recorded files from various modes are displayed 2 Select the desired file from the list to play the file 3 Press the icon to move to the previous list page and the icon to move to the next list page 4 Pressing the icons allow you to check recorded files by mode Modes are shown in the following order 5 Press the i...

Page 25: ... the first 10 seconds of each file 9 8 Repeat Play During My Music play press RPT icon to play the selected file repeatedly RPT will appear on the display Playback of the same file will continue to repeat until the icon is pressed again Press the icon again to cancel the repeat function Press and hold the RPT icon RPT F will appear on the display files within the current folder will be repeated 9 ...

Page 26: ...g Wheel Remote Control 5 Press the MODE button until BT Audio is displayed 6 Select the music player of your Bluetooth device 7 Press PLAY on the device to begin playback see notes below 8 Press UP or DOWN icon buttons on the steering wheel to advance to the next or previous music track Notes When Playing Bluetooth Audio a Check your Bluetooth device user manual for details of how to play music tr...

Page 27: ...ays the paused audio Pauses the audio Plays the next audio Records the current audio 10 3 Recording Press the REC icon to start recording the current audio For more information on the recording feature refer to section 1 3 2 In BT Audio mode the PAUSE feature is not supported during recording ...

Page 28: ...ally connect to the HYUNDAI Bluetooth radio 3 Connect the music player to the HYUNDAI Bluetooth radio using the Device Manager and Select Phone actions described earlier in this user manual 4 Start playing music from the Bluetooth music player using the Bluetooth Audio function 5 Now connect the mobile phone to the HYUNDAI Bluetooth radio using the menu system of the mobile phone Do not use the HY...

Page 29: ...to record voice memos through the device MIC 11 1 Recording Memos Press the REC icon to record user memos For more information refer to section 1 3 3 Note Memo mode cannot be selected with the MODE button on the Steering remote controller ...

Page 30: ...herefore become drained if the ignition switch remains in the ACC position for an extended period of time b Bluetooth technology uses low power radio transmission to connect to your Bluetooth mobile phone or Bluetooth music player As radio signal strength reduces over distance the quality of sound performance during phone calls and music playback may become poor if the distance between the radio a...

Page 31: ...s of vertical black sections providing a guide to the battery charge level This indicator may not be 100 accurate nor show the identical level of the battery compared to the indicator on the mobile phone or music player If your device does not transmit battery condition level via Bluetooth or is not fully compatible with the car radio Bluetooth specification the indicator is not displayed Signal L...

Page 32: ...Icon Description Displays the network name device name of connected mobile phone Displays the KEYPAD screen Displays BLUETOOTH SETTING Displays recent call lists Displays stored contacts Connects call to previously saved emergency number ...

Page 33: ...w Pairing Active Enter Code 0000 into Device 6 Now set your Bluetooth device to search for and pair with the HYUNDAI Bluetooth radio A guide for setting your Bluetooth device to search and pair with the radio is provided in section 12 3 2 Setting your Bluetooth device to pairing mode 7 If you wish to end the radio PAIRING mode press button i 8 If pairing is successful then the phrases Connected an...

Page 34: ...an be used c Once the Bluetooth pairing is complete the HYUNDAI Bluetooth radio will attempt to connect to your device Some devices will require further operation to then connect to the car radio It is recommended that the device is set to Automatically Connect to the HYUNDAI Bluetooth radio so that whenever the car ignition switch is switched on the device will automatically connect to the HYUNDA...

Page 35: ...ected previously paired Bluetooth device is switched off or if the Bluetooth feature is switched off then the HYUNDAI Bluetooth radio will retune to the previous screen when connection is attempted 12 3 5 Deleting a Paired Bluetooth Device If a previously paired Bluetooth device is no longer to be used with the HYUNDAI Bluetooth radio it may be deleted from memory 1 Select the Device Manager scree...

Page 36: ...ile phone Notes When Making or Receiving a Call a It is important to press the OFF HOOK green button on the mobile phone to make a call if the number to be called is entered using the keypad of the mobile phone b It is possible that during an incoming or outgoing call the connection between your phone and the other party may drop out or end for no apparent reason In most cases this will be due to ...

Page 37: ... connect the call 5 The phrase Calling will be displayed on the HYUNDAI Bluetooth radio screen and the call is converted to Handsfree mode 12 4 4 Switching to Private Handset Mode During a Call During an incoming or outgoing call started in Handsfree mode it is possible to switch to the private call mode using the mobile phone handset to speak to and hear the calling party in private 1 During a ca...

Page 38: ... second delay 10 SEC Automatically answers all incoming calls after a 10 second delay 4 The selected setting is displayed in orange and is applied immediately upon selection 12 5 3 Setting Calling Voice Ringer Volume Level The level of the calling voice ringer volume heard through the HYUNDAI Bluetooth radio and car speakers is adjusted using this setting 1 Press the u button to select the Bluetoo...

Page 39: ...e once a Bluetooth phone is connected 12 5 6 Making a Call from the Phonebook 1 Press the u button to select the Phone screen 2 Press the PHONEBOOK icon The list of registered contacts is displayed 3 Press the Search icon to display the keypad screen 4 After entering the desired name press the Search icon 5 Press the icons to move the list in up down direction to search for the desired contact 6 A...

Page 40: ... 2 1 Equalizer Setting An equalizer curve for different music types may be selected CLASSIC POP ROCK and JAZZ 1 Press the t button to display the Setup screen 2 Press 2 Sound 3 Press 1 Equalizer 4 Press the desired equalizer type on the screen The setting is saved and the previous screen is restored 5 Pressing the SET icon allows the user to adjust the sound tone For more information refer to sect...

Page 41: ...music track cue or review buttons are pressed 4 The selected setting is displayed in orange and is applied immediately upon selection 13 2 4 Loudness Setting When listening to music at low volume levels this feature will boost the bass and treble output levels 1 Press the t button to display the Setup screen 2 Press 2 Sound 3 Within 4 Loudness select the desired setting 4 The selected setting is d...

Page 42: ...ooth Radio 1 Press the t button to display the Setup screen 2 Press 4 Time 3 The 12Hour icon displays 1 day as 12 hours while the 24 Hour icon displays 1 day in 24 hours 4 Press the icons to set the current time 5 Press the SET icon to save the setting 6 Press the icon to return to the previous screen ...

Page 43: ...h radio 3 Connect the USB storage device with the valid firmware file to the radio 4 Once the USB storage device is connected files within the USB storage device will play automatically 5 If the firmware file is normal the firmware upgrade screen is displayed when the Preset 2 and 5 buttons are simultaneously pressed and held 6 If the w knob is turned then system upgrade and Bluetooth upgrade are ...

Page 44: ...firmware upgrade is successful Upgrade completed appears on the display on the radio changes to Tuner mode NOTE 1 To upgrade the firmware the firmware file and at least one MP3 file must exist within the USB storage device 2 Before conducting the upgrade first check the version of your Hyundai Bluetooth radio and conduct upgrades only when necessary 3 If the GUI upgrade file and System Firmware do...

Page 45: ...t expose discs to direct sunlight high temperatures or high humidity for extended periods Do not stick paper tape or labels on the disc surfaces nor write on them with any type of marker 2 Discs with non standard shapes e g heart square star cannot be played on this unit Attempting to do so may damage the unit Do not use such discs 3 Before playing clean the discs with a cleaning cloth specificall...

Page 46: ...ce to replace your faulty MP3 WMA CD Player This product guarantee does not cover damage to your MP3 WMA CD Player with CD MP3 WMA and TUNER if it has been subjected to misuse or abuse A fee to extend warranty service to any unit that has been misused or abused will be applied prior to any service work carried out This guarantee does not cover any call for warranty service or change over product s...

Page 47: ...oped by Microsoft Corporation WMA is similar to MP3 with respect to size sound quality and text display WMA files are created using the Windows Media Player on a personal computer Your HYUNDAI Bluetooth radio plays most WMA files Note The elapsed playing time shown on the display may not be correct when playing MP3 files encoded with variable bit rate VBR MP3 and WMA files encoded at bit rates low...

Page 48: ...the equipment off and on the user is encouraged to try to correct the interference by one or more of the following measures Reorient or relocate the receiving antenna Increase the separation between the equipment and receiver Connect the equipment into an outlet on a circuit different from that to which the receiver is connected Consult the dealer or an experienced radio TV technician for help You...

Page 49: ...at Red Book IEC 908 Logical File Format ISO 9660 level 1 2 3 Joliet UDF 1 02 1 50 2 00 2 01 Usable Sampling and Bit Rates MP3 Sampling rate 44 1 KHz Bit rate 32 320 KB s with VBR WMA Bit rate 48 192 KB s ID3 Tags ID3v1 ID3v2 AUX Input Sensitivity 2V VOLUME STEP 20 400 and 800 mV 10 K Ohm USB Charging Current 600mA Bluetooth Version 2 0 Output Power 4dBm Max Profile Advanced Audio Distribution Prof...

Page 50: ...P N 6350200026 ...

Reviews: