background image

  14

Assembly

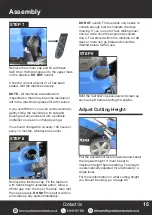
STEP 4

Attach the base of the handle to the mower 
and tighten bolts securely.

STEP 5

Attach the upper handle to the lower handle 
and tighten bolts securely.

STEP 6

Slowly pull the recoil cord and thread it 
through the cord loop.

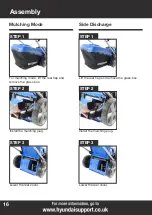
STEP 1

Lift the rear cover.

Grass Collection Mowing

STEP 2

Remove the mulch plug if fitted.

STEP 3

Attach the grass collecting bag.

       You must read the assembly safety on 
the previous page before you begin.

!

Summary of Contents for HYM430SP

Page 1: ...PETROL LAWNMOWER HYM430SP HYM460SP HYM510SP Instruction Manual...

Page 2: ...the time of production however HYUNDAI Power Products may make modifications to the product without notification GENPOWER LTD Isaac Way London Road Pembroke Dock UNITED KINGDOM SA72 4RW T 44 0 1646 6...

Page 3: ...e 21 After Each Use 22 Stopping Procedure 22 Troubleshooting 23 Specifications 24 Maintenance And Care 25 33 Checking Oil Level 27 Filling The Fuel Tank 27 Disposal 32 33 Spare Parts 34 Tips For Mowin...

Page 4: ...5 Fuel Filler Cap 6 Air Filter 7 Primer Bulb 8 Spark Plug 9 Exhaust 10 Side Discharge Chute 11 Oil Filler Dipstick 12 Central Cutting Height Adjuster 13 Grass Collector 14 Recoil Starter Handle Featur...

Page 5: ...tres away from the machine during operation If approached stop the machine immediately PROTECT FROM MOISTURE Do not expose the product to rain or wet conditions WEEE SYMBOL Waste electrical products s...

Page 6: ...ponsibilty of the user to assess the potential risk of the area where work is being Preliminary Operations 1 Always wear anti slip and resistant work footwear and long trousers while using the machine...

Page 7: ...k the general condition of the machine before using and in particular Check that the blade is not worn or damaged Replace the entire blade and all worn or damaged fittings to preserve balance Any repa...

Page 8: ...dentify electrical isolation methods and isolate all electrical supplies Prior to use and with all electrical supplies isolated you MUST check all electrical cables plugs and connectors for the follow...

Page 9: ...arging batteries are highly flammable and explosive and great care should be taken to charge in well ventilated areas There is an explosion risk if the battery terminals are short circuited when conne...

Page 10: ...diately or go to Hospital let them know that you suspect carbon monoxide poisoning DO NOT use in an enclosed area or moving vehicle 2 You must only work in daylight or with good artificial light in go...

Page 11: ...blockages or unclogging the discharge chute Before cleaning checking or working on the machine After striking a foreign object you must inspect the machine for damage and make repairs before using it...

Page 12: ...leaves the machine the engine and cutting means will stop within a few seconds The lawnmower is manufactured according to the latest safety requirements These include a blade brake that stops the engi...

Page 13: ...ceived WARNING Unboxing and assembling the lawnmower should be done on a flat stable surface with enough room Disposal of the packaging should be done in accordance with the local regulations in force...

Page 14: ...to the lower handle and tighten bolts securely STEP 6 Slowly pull the recoil cord and thread it through the cord loop STEP 1 Lift the rear cover Grass Collection Mowing STEP 2 Remove the mulch plug i...

Page 15: ...he oil you can remove some by gently tilting the machine on its side and pouring out any excess oil into a suitable container or use an oil change syringe You should change the oil every 100 hours or...

Page 16: ...lug STEP 3 Lower the rear cover Side Discharge STEP 1 Lift the rear flap and remove the grass box STEP 2 Install the mulching plug STEP 3 Lower the rear cover Mulching Mode STEP 1 For mulching mode li...

Page 17: ...Assembly 17 STEP 4 Lift the side flap STEP 5 Insert the side discharge chute STEP 6 Allow the spring loaded side flap to rest on the discharge chute...

Page 18: ...ebar and if followed will enter the deck of the lawn mower behind the engine STEP 1 Follow the cable you want to attach and determine which lever it will attach to STEP 2 Gently prise the lever inward...

Page 19: ...ter located on the side of the engine Lock Nut Adjustment Nut STEP 2 Undo the lock nut and wind it forwards 19 STEP 3 Move the adjustment nut towards the lock nut and continually check the cable tensi...

Page 20: ...equire adjustment STEP 1 Follow the drive cable down towards the lawnmower until you reach the drive cable adjuster Lock Nut Adjustment Nut STEP 2 Undo the lock nut and wind it forwards STEP 3 Wind th...

Page 21: ...ons Fill the fuel tank with unleaded petrol Go to page 27 for instructions Check the OPC cable if there is more than 10mm movement in the OPC lever before the cable begins to move then the OPC cable w...

Page 22: ...on how to clean your machine Stopping Procedure CAUTION The engine and exhaust will remain hot for a while after use Ensure the engine and exhaust have cooled before carrying out any maintenance or st...

Page 23: ...defective Spark plug gap is incorrect Air filter element is dirty Fit new correctly gapped spark plug Set plug to 0 7 0 8mm Clean or replace air filter element Engine idles poorly Air filter element i...

Page 24: ...ion 6 Position 6 Position Cutting Height 25 75mm 25 75mm 25 75mm Cutting Width 420mm 457mm 508mm Grass Collector Type Half Plastic With Polyester Bag Half Plastic With Polyester Bag Half Plastic With...

Page 25: ...ened 7 When handling disassembling and re assembling the blade make sure to wear work gloves 8 Keep the blade well balanced during sharpening All work on the blade disassembly sharpening balancing re...

Page 26: ...parts caused by petrol 6 Use the water hose attachment to clean the internal parts of the chassis only certain models have this To perform cleaning connect garden hose adjust the cutting height to max...

Page 27: ...s oil into a suitable container or use an oil syringe You should change the oil every 100 hours or every 12 months whichever is sooner Filling The Fuel Tank 1 Remove the fuel filler cap 2 Fill the fue...

Page 28: ...electrode making sure that there is no damage to the insulator or electrode STEP 5 The spark plug gap should be 0 70mm to 0 80mm Check the gap by using a feeler gauge Adjust as necessary by carefully...

Page 29: ...not covered by warranty STEP 1 To gain access to the air filter press the 2 latch tabs STEP 2 Remove filter check for contamination and clean or replace as required Also clean the foam pre filter Was...

Page 30: ...ck the blade in order to obtain a good cut the blade should always be sharp and well balanced At regular intervals check the tightness of all nuts bolts and screws If the blade hits an obstacle check...

Page 31: ...ed as in the previous section You can use a light oil or silicone spray to coat the equipment NOTE If storing the lawn mower for a period of 30 days or more you must follow proper storage and winteris...

Page 32: ...free clean cloth ensuring no dirt or debris falls into the cylinder chamber and gently pull the recoil starter handle to coat the cylinder bore with the fresh oil 9 Refit the spark plug 10 Once all w...

Page 33: ...dance with your local authority or recycling centre Certain products contain batteries which should not be disposed of in your domestic waste You MUST recycle batteries in accordance with your local a...

Page 34: ...80 Recoil Start Assembly PAE005251 Grass Collector PAB005742 Spark Plug PAE005202 Air Filter PAE000466 Engine Oil 600ML SAE30 OIL HYM430SP Part HYM430SP Part Number Blade PAC001476 OPC Cable PAB000980...

Page 35: ...emely heavy cutting reduce the width of cut by overlapping the previously cut path and mow slowly How Often Should I Mow Spring March April May Mow once a week on a high to medium height setting Summe...

Page 36: ...And Heavy Duty Trenchers Compactor Plates Petrol Compactor Plates Cement Mixers Portable Electric Cement Mixers Mini Dumpers 4 Wheel Drive Mini Dumper Power Barrow Yard Sweeper Self Propelled Yard Swe...

Page 37: ...ithout prior notice whenever necessary Our latest manuals are also placed online All our manuals can be downloaded at www hyundaipowerproducts co uk Returning Your Product If you are returning your pr...

Page 38: ...Notes 38...

Page 39: ...39 Notes...

Page 40: ...40 Notes...

Page 41: ...41 Notes...

Page 42: ...te Of Purchase Dealer Name Dealer Phone Model Number Serial Number As soon as you have purchased the machine we recommend that you fill out the following If you need to contact an authorised dealer or...

Page 43: ...4 2010 EN ISO 11094 1991 EN ISO 5395 1 2013 EN ISO 5395 2 2013 EN ISO 14982 2009 Delclaration for 2000 14 EC Noise Emissions in the Environment by Equipment for use Outdoors Notified Body for EC Direc...

Page 44: ...broke Dock UNITED KINGDOM SA72 4RW T 44 0 1646 687 880 F 44 0 1646 686 198 E info hyundaipowerequipment co uk www hyundaipowerproducts co uk Imported Distributed by Genpower Ltd for The United Kingdom...

Reviews: