background image


23

Irrelevant 

communication or 

noise is heard on the 

channel. 


You may be interrupted by 

radios using the same 

frequency. 


Change the frequency, or adjust the squelch 

level. 


The radio may be set with 

no signaling. 


Set signaling for all member radios to avoid 

interference at the same frequency. 


The noise is too loud. 


You may be too far away 

from other members. 


Move towards other members. 


You may be at an 

unfavorable position. For 

example, your 

communication may be 

blocked by high buildings or 

frustrated in the 

underground areas. 


Move to an open and flat area, and restart 

the radio. 


You may suffer from 

external disturbance (such 

as electromagnetic 

interference). 


Stay away from equipment that may cause 

interference. 


If the above solutions can not fix your problems, or you may have some other queries, please contact us 

or your local dealer for more technical support.   


Summary of Contents for PD500

Page 1: ...round digital functions and remarkable quality to refresh your experience and enable you to be responsive to emergent situations To derive optimum performance from your product please read this manua...

Page 2: ...ailable on both analog and digital channels Term Explanation Key Operation Short press to press a key and release it quickly Long press to press a key and remain holding it down for a predefined perio...

Page 3: ...chnology embodied in this product is protected by intellectual property rights including patent rights copyrights and trade secrets of Digital Voice Systems Inc This voice coding technology is license...

Page 4: ...zations to develop standards for safe exposure to RF radiation These standards consist of United States Federal Communications Commission Code of Federal Regulations 47CFR part 2 sub part J American N...

Page 5: ...s subject to the following two conditions 1 This device may not cause harmful interference and 2 This device must accept any interference received including interference that may cause undesired opera...

Page 6: ...e proper distance is important because RF exposures decrease with increasing distance from the antenna Use only manufacturer s name approved supplied or replacement antennas batteries and accessories...

Page 7: ...d transmit no more than 50 of the time and always adhere to the following procedures Your radio radiates measurable RF energy only while it is transmitting during talking not when it is receiving list...

Page 8: ...g the Radio On Off 15 Adjusting the Volume 15 Selecting a Zone 15 Selecting a Channel 15 Switching the Channel Mode 15 Call 16 Private Call 16 Group Call 16 All Call 16 Calls on Analog Channels 17 Fun...

Page 9: ...6 MIC AGC 21 Radio Registration Service 21 Troubleshooting 22 Care and Cleaning 24 Optional Accessories 25...

Page 10: ...contact your dealer Battery Charger Power Adapter Antenna Belt Clip Strap Radio Unit CD Owner s Manual Safety Information Booklet Quick Reference Guide Note The antenna may vary with different frequen...

Page 11: ...uct Controls NO PART NAME NO PART NAME 1 PTT KEY 7 Accessory Jack 2 SK1 Side KEY 8 Microphone 3 Channel Selector Knob 9 Battery Latch 4 Speaker 10 Antenna 5 LED Indicator 11 Belt Clip 6 Radio On Off V...

Page 12: ...present or not 8 Squelch Off Momentary 9 Scan To receive signals on other channels 10 Nuisance Temporary Delete To temporarily ignore unwanted channel activity 11 Adjust Squelch Level To temporarily a...

Page 13: ...er to AC source See arrow 2 Plug the power adapter into the rear socket of the charger See arrow 3 Place the radio with the battery attached or the battery alone into the charger 4 The charging proces...

Page 14: ...Caution Be sure to read the Safety Information Booklet to get necessary safety information Assembling the Accessories Attaching the Antenna Turn the antenna clockwise to fasten it To remove the antenn...

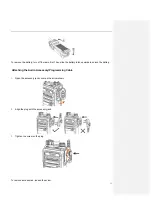
Page 15: ...the battery latch upwards to unlock the battery Attaching the Audio Accessory Programming Cable 1 Open the accessory jack cover as the arrow shown 2 Align the plug with the accessory jack 3 Tighten t...

Page 16: ...13 Caution When you are using an external accessory waterproof performance of the radio may get affected...

Page 17: ...easily identify the current radio status LED Indicator Radio Status LED flashes green Powering on LED flashes red Powering off LED glows red Transmitting LED glows green Receiving LED flashes green sl...

Page 18: ...radio supports 3 zones Zone 1 Zone 2 and Zone 3 Each zone contains 16 channels at most You may quickly toggle to your desired zone by pressing the programmed Zone Up or Zone Down key In the process y...

Page 19: ...ny operation and you may hold down the PTT key within the preset time period to call back Group Call Transmitting a Group Call In standby mode hold down the PTT key to transmit a Group Call to the Gro...

Page 20: ...17 Note You cannot respond to an All Call Calls on Analog Channels To transmit on an analog channel hold down the PTT and speak into the microphone To receive release the PTT key...

Page 21: ...ress the programmed Scan key in standby mode a high pitched tone sounds or Switch to a channel on which the feature Auto Scan is enabled via the programming software 2 After the feature is enabled you...

Page 22: ...y key to enable the feature a high pitched tone sounds To disable the feature release this key a low pitched tone sounds Squelch Off If the feature Squelch Off is enabled the speaker will keep unmuted...

Page 23: ...ows Medium Red LED glows Low Red LED glows and the low battery alert sounds Insufficient Scrambler Encrypt The Scrambler Encrypt feature can encrypt your audio signals to prevent eavesdropping Thus pr...

Page 24: ...e Pseudo Trunking This feature can be enabled via the programming software If your radio operates on a channel with this feature enabled and one time slot is already occupied it can transmit and recei...

Page 25: ...charge or replace the battery The volume may be set to a low level Increase the volume The antenna may get loose or may be improperly installed Power off the radio and re install the antenna The speak...

Page 26: ...r away from other members Move towards other members You may be at an unfavorable position For example your communication may be blocked by high buildings or frustrated in the underground areas Move t...

Page 27: ...Attach the accessory jack cover when the product is not in use Product Cleaning Clean up the dust and fine particles on the product surface and charging piece with a clean and dry lint free cloth or...

Page 28: ...sparent Acoustic Tube black beige EAN17 EAN18 Remote Speaker Microphone IP57 SM18N2 Receive Only Earbud ESS07 Receive Only Earpiece with Transparent Acoustic Tube ESS08 Vehicle Adapter for Charger CHV...

Reviews: