background image

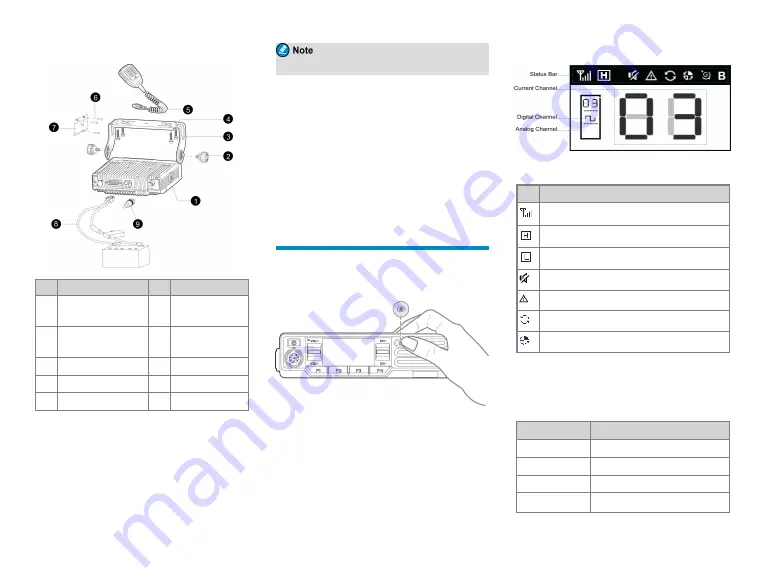
Parts

NO.

Part Name

NO.

Part Name

1

Mobile Radio

6

4 mm x 16 mm

Screw

2

Locking Knob

7

Microphone

Hanger

3

Mounting Bracket

8

Power Cord

4 4.8 mm x 20 mm Screw 9

RF Antenna

5

Palm Microphone

10

/

Procedure

1. Select a location where you can operate the radio

conveniently, drill holes based on the shape of the
mounting bracket, and then use the 4.8 mm x 20 mm
screws to secure the bracket.

2. Connect RF antenna and power cord to the radio.

The RF antenna should be purchased separately.

3. Slide the radio into the properly mounted bracket and

secure it using the locking knobs.

4. Install the microphone hanger in a location where it

can be reached easily, and use the 4 mm x 16 mm
screws to secure it.

5. Align the triangle index on the palm microphone with

the microphone installation index, plug the connector
into the radio, and rotate the connector clockwise to
secure it.

6. Place the palm microphone on the hanger when you

do not use it.

Basic Operations

Turning the Radio On or Off

To turn the radio on or off, long press the

On-Off

key.

Understanding the Screen

Status Bar

Icon

Radio Status

More bars indicate stronger signal strength.

The radio operates in high power mode.

The radio operates in low power mode.

The radio operates in silent mode.

The radio is in emergency mode.

The radio is scanning.

The radio is roaming.

Checking LED Indications

To determine the radio status, check the LED indicator on
the radio according to the following table:

LED Indicator

Radio Status

Flashes green

Being turned on.

Glows green

Receiving.

Glows red

Transmitting.

Flashes orange

Scanning or roaming.

4

Summary of Contents for MD61 Series

Page 1: ...ommunications Corporation Limited Address Hytera Tower Hi Tech Industrial Park North 9108 Beihuan Road Nanshan District shenzhen People s Republic of China Hytera Communications Corporation Limited MD...

Page 2: ...ions and step by step procedures for use It also includes a troubleshooting guide To avoid bodily injury or property loss caused by incorrect operation please carefully read the Safety Information Boo...

Page 3: ...ion This equipment generates and can radiate radio frequency energy If not installed and used in accordance with the instructions it may cause harmful interference to radio communications However ther...

Page 4: ...sted and complies with SAR limits users can obtain Canadian information on RF exposure and compliance Apr s examen de ce mat riel aux conformit aux limites DAS et ou aux limites d intensit de champ RF...

Page 5: ...ndications 4 Adjusting the Volume 5 Selecting a Zone and Channel 5 Call Services 5 Call on Digital Channel 5 Call on Analog Channel 5 Quick Text 6 Supplementary Features 6 Power Level 6 Time out Timer...

Page 6: ...r 22 Directs you to access a multi level menu Go to File New Italic Denotes document titles For details about using the DWS refer to Dispatch Workstation User Guide Courier Denotes To set the IP addre...

Page 7: ...o the vehicle wiring and other parts l Connect the antenna and power cord to the radio before you install it in the bracket And make sure the antenna and power cord are dedicated for digital radios of...

Page 8: ...e it 5 Align the triangle index on the palm microphone with the microphone installation index plug the connector into the radio and rotate the connector clockwise to secure it 6 Place the palm microph...

Page 9: ...from an individual user in a group to all the other members in the group l All call a call from an individual user to all the other users on the current channel The All Call feature must be authorize...

Page 10: ...ockout The Busy Channel Lockout feature allows the radio to keep beeping when you press and hold PTT key when the current channel is occupied by other radios When the current channel is idle you can t...

Page 11: ...ler to assign any one to the radio Type Description Operation Ignition or Switch Allows you to turn the radio on or off by following the ignition sense or pressing the On Off key l Start the engine to...

Page 12: ...ler Analog Features Scrambler The Scrambler feature allows the radio to invert the frequency spectrum of transmitted audio signals Only the receiving radio with the same scrambler setting can restore...

Page 13: ...frequency Change the frequency or adjust the squelch level The radio in analog mode may be set with no signaling Request your dealer to set signaling for the current channel to avoid interference You...

Page 14: ...Use neutral cleanser and a non woven fabric to clean the keys knobs and front case after long time use Do not use chemical preparations such as stain removers alcohol sprays or oil preparations so as...

Page 15: ...tera Communications Corporation Limited Address Hytera Tower Hi Tech Industrial Park North 9108 Beihuan Road Nanshan District shenzhen People s Republic of China Hytera Communications Corporation Limi...

Reviews: