background image


Operator Manual                                                                                                                    Chapter4. Receipt Printer (SPR60) 


©  

Hyosung  TNS  Inc. 

All  Rights  Reserved.                                          4-13


Clear the jammed paper in the presenter 


► When any of the following cases occurs, please remove the paper manually: 

Paper is jammed into the path of Presenter; 
Paper does not enter the paper output path of presenter. 


► Remove the jammed paper manually in the following steps:   

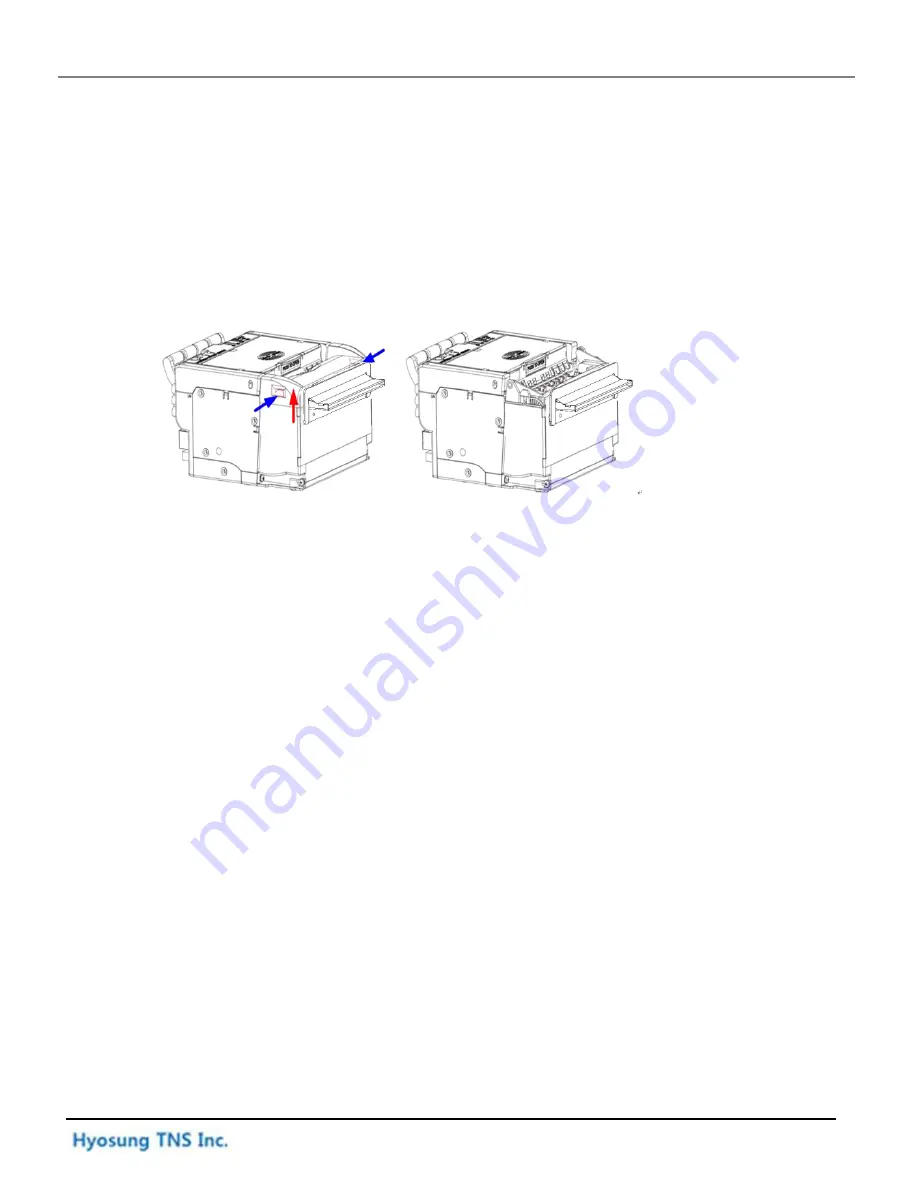
1. Press the snap-fit on Pre upper path as shown in the following figure and apply force upwardly to 

remove the Presenter top cover; 


<Clean the jammed paper in the Presenter> 


2. Take out the jammed paper and install the Pre top cover to the printer. 


Summary of Contents for MONiMAX8100QTN

Page 1: ...Operator Manual MONiMAX8100QTN System V01 00 01 2018 04 10 Hyosung TNS Inc All Rights Reserved...

Page 2: ...System No Version Date Description of Change Chapter 1 V01 00 00 2018 03 30 Preliminary version All 2 V01 00 01 2018 04 10 Changed the corporate name CI All Hyosung TNS Inc All Rights Reserved The co...

Page 3: ...TN 3 1 Opening the security door and accessing to the device BRM 3 4 Switching Power On Off 3 7 Switching Power On 3 7 Switching Power Off 3 7 Power Supply Status 3 8 Security Locking Device Cencon Lo...

Page 4: ...sing the Temporary Stacker TSK 5 22 How to remove the jam 5 23 Chapter6 Check Single Deposit Module CSM33 6 1 Configuration Specification of Device 6 1 Device Configuration 6 1 Device Specification 6...

Page 5: ...the E mail addresses and telephone numbers provided separately What is in This Manual MONiMAX referred to as MX This manual is designed to provide the operation guide for the MX8100QTN and the detaile...

Page 6: ...business Module refers to a plug in device that can be serviced or replaced Note s and bill s refer to the individual documents loaded into and dispensed from the dispenser Servicing and maintenance...

Page 7: ...n PIN Pad 13 H W Hardware 14 I F Interface 15 ISO International Standard Organization 16 JPR Journal Printer 17 LCD Liquid Crystal Display 18 MCU Magnetic Card Unit 19 OPL Operation Panel for Customer...

Page 8: ...the equipment Note This equipment has been tested and found to comply with the limits for a Class A digital device pursuant to part 15 of the FCC Rules These limits are designed to provide reasonable...

Page 9: ...uipment in an area away from any combustible materials The equipment may catch on fire from overheating or short circuit of the power supply unit Disassembly Warnings Do not disassemble or modify the...

Page 10: ...d documents are listed as follows If needed please contact staffs of our technical support team and maintenance team Installation Manual Service Manual VDM Manual Error Code Manual For the contact of...

Page 11: ...s inconvenience which occurs when bank clerks directly handle cash with customers and relieves workload upon tellers by processing deposit withdrawal of cash automatically Relieves risks and burden of...

Page 12: ...of MX8100QTN and key units The fascia provides the interface between the customer and MX8100QTN The customer selects transactions and requests information at the fascia Cash Bill Recycling Machine Con...

Page 13: ...PCIe 1slot PCIe x 4 1slot Serial Ports 4 Ports Internal connector USB Ports USB 2 0 21 Ports MAIN B D 2 Ports Mini Hub1 4ports Mini Hub2 7ports Hub3 4 4ports USB 3 0 2 Ports USER PORTS Graphics On bo...

Page 14: ...Check Single Deposit Module CSM33 Interface Type USB 1 1 Main USB 2 0 BC Media Size Width Min 60 mm Max 102 mm Length Min 110 mm Max 230 mm Thickness Min 0 075 mm to Max 0 2 mm Deposit Type Single Ca...

Page 15: ...VCPS 2 1 3 MSD qVSDC and IRWIN Mifare Apple Pay other Mobile Wallets Receipt Printer SPR60 Printing Type Thermal Line Printing Printing speed 100mm sec Printing Width Max 80mm Paper Roll Capacity 5 0...

Page 16: ...ung TNS Inc All Rights Reserved Item Specification Remarks Environment Safety Door Open Direction LEFT TO RIGHT SWING Front View Normal Swing Install Method Anchor Weight About 992 lbs 450kg Battery S...

Page 17: ...of a motherboard HDD multiple serial card and so on Basic functions of the control electronics used in this ATM is similar to that of a personal computer you may have in your office or home with excep...

Page 18: ...e ATM prompts the customer to use the customer keypad to enter transaction information The 16 key keypad uses an Encryption PIN Pad technology to secure the information entered by the customer at the...

Page 19: ...hine The idea of recycling is to make the cash that is paid in during deposit transactions available again for dispensing This considerably lengthens the replenishment or emptying cycles on cash in ca...

Page 20: ...Chapter2 Introduction Operator Manual 2 10 Hyosung TNS Inc All Rights Reserved...

Page 21: ...ng TNS Inc All Rights Reserved 2 11 Check Single Deposit Module CSM33 Check Scan Module 33 Check Scan Module accepts a sheet of check in endorsement way The consumer can deposit a check through the CS...

Page 22: ...Chapter2 Introduction Operator Manual 2 12 Hyosung TNS Inc All Rights Reserved...

Page 23: ...operated device mounted directly to the ATM fascia The consumer inserts an ATM card in the card entry slot and then removes the card to begin the transaction The dip card reader can read magnetic stri...

Page 24: ...eserved Contactless Card Reader CCR The contactless card reader is designed to support contactless transactions It is composed of a compact controller module and an antenna module Basic Specification...

Page 25: ...t of the customer s transaction The transaction information can include the amount of withdrawals deposits or transfers the ATM number and location and other desired information After the customer use...

Page 26: ...inning operator Hyosung TNS Inc All Rights Reserved 3 1 Chapter3 For the beginning operator Opening the upper fascia and accessing to the devices in the upper body of MX8100QTN Opening the upper fasci...

Page 27: ...TNS Inc All Rights Reserved The devices in the upper body of MX8100QTN 1 Pull out the Receipt Printer and Check Deposit Module by pressing the button and pulling the handle towards you 2 Receipt Print...

Page 28: ...Operator Manual Chapter3 For the beginning operator Hyosung TNS Inc All Rights Reserved 3 3 3 Control Electronic CE PC Main Controller Control Electronic CE PC Power Supply...

Page 29: ...d accessing to the device BRM Opening the security door 1 Open the exterior door using key 1 2 Unlock the locking device Cencon lock refer to the section of Security Locking Device Cencon 3 Turn the s...

Page 30: ...All Rights Reserved 3 5 Accessing to the BMU Body Module Up Upper Body of BRM 1 Open the upper fascia 1 the exterior door of the security door 2 using key 2 Push down the lever A and pull the BMU in...

Page 31: ...BMD Body Module Down Lower Body of BRM 1 Open the exterior door using key 1 2 Unlock the locking device Cencon lock and open the security door 2 3 Push down the lever B to release the lock from BRM58...

Page 32: ...as follows 1 Press the power switch ON 2 The system will be turn on automatically Switching Power Off The system turning off process is as follows 1 Press the power switch OFF 2 The system will be sh...

Page 33: ...m Switch Status Main S W is pressed on I position AC power is being supplied to the power supply unit and only AC IN LED is turned on Main S W is pressed on O position AC power is not supplied to the...

Page 34: ...shelved Instead the Shelved Mode combination is used to open the lock without any Smart Key The default Factory Combination is set to 50 25 50 Practice opening the lock in shelved mode with the defaul...

Page 35: ...he security door 6 Turn the dial a minimum of one complete rotation to the left CCW to extent the bolt Note After opening and closing any lock you should always check to ensure that the lock is physic...

Page 36: ...ck to the Factory combination of 50 25 50 This is an option that is only available while the lock is in Shelved Mode and is intended only for temporary use after the ATM is deployed but before the loc...

Page 37: ...l your are comfortable opening the lock with the new combination 6 Extend Bolt Turn the Dial to the left CCW to extend the bolt 7 Power Lock Turn the dial to the left CCW until the Change Key symbol a...

Page 38: ...ation is displayed 14 EC Enter New Shelved Mode Combination OPr Enter the new shelved mode combination by pressing those digits on the lock s keypad The numbers will be displayed on the LCD as they ar...

Page 39: ...do not expose the printer to direct sunlight strong light and heat 4 Do not use or store the printer in a place exposed to high temperature high humidity or serious pollution 5 Do not place the print...

Page 40: ...lity Presenter Paper holding Paper retraction Paper ejection Note The Presenter is a paper accommodation mechanism and locates at the front end of the printer Special Function Anti jam Anti pull Appli...

Page 41: ...ts Reserved 4 3 Characteristics and parameters can be set by software Single USB interface or single serial interface is optional Mark identification and checkout Lower mark sensor for non thermal sid...

Page 42: ...ication Optional ID of paper roll core 18 Minimum ID of paper roll 24 Maximum OD of paper roll 220mm Paper roll diagram Note The supported paper thickness and paper roll diameter is as followings when...

Page 43: ...ion referring to the figure below In using marks it is recommended to use the following parameter L1 mark width 8mm L1 paper width L2 mark width 4mm L2 8mm The reflectivity of marks is less than 15 Th...

Page 44: ...ensor on thermal side is optional while only one of the other three sensors can be installed Notice 1 Please use the recommended paper or its equivalents Using other types of paper may affect print qu...

Page 45: ...er interface 3 Button for opening and closing the top cover 8 Paper exit 4 Paper near sensor socket 9 Presenter 5 Paper guide block 10 Print module Print unit and controlling parts The controlling par...

Page 46: ...ers the Presenter and the Presenter will stop running when the paper head is held by the Presenter Cut paper the printer will cut paper if press the FEED CUT button for two times continuously Notice T...

Page 47: ...her the paper is retracted correctly during the process of paper retraction 2 Paper out sensor Detect the status of print paper and confirm whether the print paper has been taken away or not 3 Present...

Page 48: ...r Install load the paper roll The paper roll is easy to be installed on SPR60 and the steps are as following Turn on the power and then place the paper head in the paper feeding path as shown in the f...

Page 49: ...tance and release your hands when the platen roller starts rotating and holds the paper 3 The printer starts loading paper and then the printer can execute print tasks after finishing loading the pape...

Page 50: ...r inlet of the cutter in the front of print head 3 The cutter can t cut off paper Remove the jammed paper manually in the following steps 1 Turn off the printer power 2 Press the spanner slightly with...

Page 51: ...Paper is jammed into the path of Presenter Paper does not enter the paper output path of presenter Remove the jammed paper manually in the following steps 1 Press the snap fit on Pre upper path as sh...

Page 52: ...ork normally or Paper jams Print head uplifting Print head is uplifted Paper end Paper sensor detects paper end Calibration failure Marked paper calibration error Paper near end Paper sensor detects p...

Page 53: ...r Errors during paper loading Problems during printing Problems Possible reasons Solutions The receipt can t be ejected out smoothly Paper jams Check paper feeding path remove wastepaper and reload pa...

Page 54: ...ther problems Problem Possible reasons Solutions LED does not light and printer does not work The printer is not connected with the power correctly The printer isn t turned on Connect the printer with...

Page 55: ...page Print self test page in the following steps Turn off printer power then keep pressing the FEED button for at least 1 second while turning on the printer The printer will start to print a self te...

Page 56: ...Chapter4 Receipt Printer SPR60 Operator Manual 4 18 Hyosung TNS Inc All Rights Reserved...

Page 57: ...Operator Manual Chapter4 Receipt Printer SPR60 Hyosung TNS Inc All Rights Reserved 4 19 Explanation of self test page...

Page 58: ...ler BRM58 The idea of recycling is to make the cash that is paid in during deposit transactions available again for dispensing This considerably lengthens the replenishment or emptying cycles on cash...

Page 59: ...minations Supportable Bill Size Short Way 62 85 mm Long Way 117 177 mm Max number of Deposit or Dispensing Deposit Up to 300 bills 48mm Dispensing Up to 200 bills 47 2mm Storage Capacity Recycle Depos...

Page 60: ...ody BMU Dimension Width 300 3 mm Length 717 3 mm Height 297 3 mm Weight 34kg except bill weight Lower Body BMD Dimension Width 300 3 mm Length 572 3 mm Height 524 3 mm Weight 30kg except bill weight R...

Page 61: ...Bill Conditions Acceptable condition 1 Bill which is very clean and can readily be recognized as a true bill 2 Bill has sufficient life or sizing to be handled easily 3 Bill which can be manually held...

Page 62: ...cler BRM58 Hyosung TNS Inc All Rights Reserved 5 5 Unacceptable condition 1 Bill with serious wrinkles torn or broken section wherein paper fiber is broken and separation begins Wrinkle Torn Broken se...

Page 63: ...life or sizing but stained seriously 3 Bill with holes Perforated bill 4 Bill ragged and cannot be held straightly when one end is supported by a hand 20mm 0 79inch 35mm 1 38inch When the bill is hel...

Page 64: ...Recycler BRM58 Hyosung TNS Inc All Rights Reserved 5 7 5 Bill with cellophane tape scotch tape etc 6 Bill with folds 7 Gradually curved bill bills tied by hand seal etc 8 Bill with folded lines Case...

Page 65: ...Chapter5 Bill Recycler BRM58 Operator Manual 5 8 Hyosung TNS Inc All Rights Reserved Case 3 Note Bill distortion should not exceed 10 mm 0 39inch...

Page 66: ...ose the lower module BMD Opening Lower Module BMD Opening Lower Module 1 Push down the lever A to release the lock from BRM58 Frame After that hold the end of lever A and pull it until the lower unit...

Page 67: ...Module BMD Closing Lower Module 1 Close the mid transport path by pressing the lever C At this time the mid transport path is closed through 2 steps so you have to close it by pressing the lever C onc...

Page 68: ...cling Cassette RC with bills How to replenish the recycling cassette with bills 1 Separate the lower unit from the BRM58 Frame Refer to Opening Lower Module 2 Take out the cassette by lifting up the h...

Page 69: ...the arrow while pressing the green lever E 5 Check if the Stack Sheet protrudes from the guide If it protrudes from the guide as shown in the picture below turn the roller and put it back inside the...

Page 70: ...plenishing the bills Caution Prior to replenishing the Cassette with notes 1 Unfold the notes so that the notes do not stick together 2 Remove all notes with holes or notes that are torn 3 Unfold the...

Page 71: ...cycler BRM58 Operator Manual 5 14 Hyosung TNS Inc All Rights Reserved 8 Fold the holder of cassette and mount the cassette onto the set guide 9 Mount the lower unit onto the BRM58 Frame Refer to Closi...

Page 72: ...ct Cassette RT RJC How to remove bills from Retract Reject Cassette 1 Separate the lower unit from the BRM58 Frame Refer to Opening Lower Module 2 Hold the handle A and completely separate the Retract...

Page 73: ...ssing the green lever B on the lower part of Retract Reject Cassette Remove the bills when enough space is created for removing them 5 Press the green lever B in the lower part of the Retract Cassette...

Page 74: ...osing the rear transport path close the door and completely lock the Retract Reject cassette by turning the key Remove the key after locking the cassette 8 Close the door and mount the Retract Reject...

Page 75: ...close the upper module BMU Opening Upper Module BMU Open the upper module of BRM 1 Push down the lever A and pull the BMU in the arrow direction Closing Upper Module BMU Close the upper module of BRM...

Page 76: ...ill Recycler BRM58 Hyosung TNS Inc All Rights Reserved 5 19 Opening the Customer Service Module CSM Opening the Customer Service Module 1 Hold the handle A and lift up the Customer Service module to f...

Page 77: ...Customer Service Module 1 Release the lock by holding A with one hand and pushing the safety lock B forward with the other hand 2 Push the CSM forward slowly to completely close it If it is completely...

Page 78: ...BRM58 Hyosung TNS Inc All Rights Reserved 5 21 Opening the Temporary Stacker TSK Opening the Temporary Stacker TSK 1 After releasing lock by pressing the lever A hold the handle B and lift up the Temp...

Page 79: ...ase the lock by holding the handle B with one hand and pushing the safety lock C forward with the other hand And then slowly push the Temporary Stack forward to close it completely CAUTION Do NOT take...

Page 80: ...occurs remove the jam referring to each case of the following CASE 1 Removing jam from the Customer Service Module 1 Press the green knob A and turn the screw B counterclockwise using driver or a coi...

Page 81: ...ammed bill can be seen 4 Turn the knob E counterclockwise to take out the jammed bills as much as you can and then remove the bills completely with the other hand 5 If the jam occurs in the separation...

Page 82: ...nternal and external shutters by turning the screw C and B clockwise 8 Open the Customer Service Module in order to remove the jammed bill on the transport path refer to Opening the Customer Service M...

Page 83: ...26 Hyosung TNS Inc All Rights Reserved 10 Remove the bills caught in the gap between the guides And then move the lower guide to its original position to be hooked 11 Close the Customer Service Modul...

Page 84: ...o Opening Upper Module 2 Open the Customer Service Module and remove the jammed bill from the lower side refer to Opening the Customer Service Module 3 If the jam occurs in the Gate section remove the...

Page 85: ...SE 3 Removing jam from BC Bill Checker 1 Open the Customer Service Module and Temporary Stacker refer to Opening the Customer Service Module and Opening the Temporary Stacker 2 Unlock the green lever...

Page 86: ...er5 Bill Recycler BRM58 Hyosung TNS Inc All Rights Reserved 5 29 4 After removing the jammed bill lock the BC by fully pressing it 5 Close the Tape Escrow and Customer Service Module refer to Closing...

Page 87: ...er Service Module and Temporary Stacker refer to Opening the Customer Service Module and Opening the Temporary Stacker 2 Remove the bill from TOP Transport Path 3 Remove the jammed bill by lifting up...

Page 88: ...Stacker refer to Opening the Customer Service Module and Opening the Temporary Stacker 2 Lift the handle A and open the door Hold the door with your hand so that it is not closed 3 Move the Push Plate...

Page 89: ...ammed bill from TOP Transport Path open the Temporary Stacker and turn the roller in the direction of the arrow as shown in the picture below 6 After removing the jammed bill close the Customer Servic...

Page 90: ...M58 Frame refer to Opening Lower Module 2 The bill on the Mid Transport Path appears when you turn the green knob A counterclockwise At this time remove the jammed bill 3 In case of the bill jammed wh...

Page 91: ...led information refer to How to replenish the Recycling Cassette RC with bills 3 The jammed bill comes out when you turn the inner roller from bottom to upward At this time remove the jammed bill 4 Pu...

Page 92: ...w to remove bills from Retract Reject Cassette RT RJC 3 Pull down the Push Plate to remove the jammed bill for more information refer to How to remove bills from Retract Reject Cassette RT RJC Remove...

Page 93: ...tract Reject Cassette RT RJC 3 Open the rear guide by pressing the lever in order to remove the jammed bill for more information refer to How to remove bills from Retract Reject Cassette RT RJC Remove...

Page 94: ...uring Transaction Stand by to prevent an influx of foreign bodies 3 ALG Alignment Auto Alignment Execution for Check MICR Read 4 REG Recog MICR CIS MR Read MICR Character written on check using Magnet...

Page 95: ...Chapter6 Check Single Deposit Module CSM33 Operator Manual 6 2 Hyosung TNS Inc All Rights Reserved PRT Open Upper Cover Open ReerFeeding Open...

Page 96: ...n MG06H Z01 Reflection Two side Transmission Reflection Red Green Blue IR940 UV Transmission Green IR730 IR880 200dpi Digital I F Face up and Down Check Identification Available Endorsement Printer HP...

Page 97: ...r6 Check Single Deposit Module CSM33 Operator Manual 6 4 Hyosung TNS Inc All Rights Reserved Item Assortment Details of Spec Remarks Interface USB2 0 Debug port RS232C Perform ance Transport Speed 508...

Page 98: ...6 5 Check Conditions Acceptable condition 1 Bill which is very clean and can readily be recognized as a true check 2 Check has sufficient life or sizing to be handled easily 3 Check which can be manu...

Page 99: ...l 6 6 Hyosung TNS Inc All Rights Reserved Unacceptable condition 1 Bill having serious wrinkles torn or broken section wherein paper fiber is broken and separation begins Wrinkle Torn Broken section C...

Page 100: ...equate life or sizing but stained seriously 3 Check with holes Perforated check 4 Check ragged and cannot be held straightly when one end is supported by a hand 20mm 0 79inch 35mm 1 38inch When the bi...

Page 101: ...gle Deposit Module CSM33 Operator Manual 6 8 Hyosung TNS Inc All Rights Reserved 5 Check with cellophane tape scotch tape etc 6 Check with folds 7 Gradually curved check checks tied by hand seal etc B...

Page 102: ...Operator Manual Chapter6 Check Single Deposit Module CSM33 Hyosung TNS Inc All Rights Reserved 6 9 8 Check with folded lines Case 1 Case 2 Case 3 Note Check distortion should not exceed 10 mm 0 39inch...

Page 103: ...r Manual 6 10 Hyosung TNS Inc All Rights Reserved CSM33 Access To access to the CSM33 follow the procedures below 1 Pull out the Check Deposit Module by pressing the button and pulling the handle towa...

Page 104: ...specification of Felt 2 Replace the Felt once in six months 3 Replace the Ink Cartridge when the quantity consumed of it is 4 5 million characters S W Operation Green 1 Sustainable Push for 3 seconds...

Page 105: ...w to open close each Module Main Module Opening Put the thumb inside the Lever A and pull it counterclockwise to release the lock Then continually lift it counterclockwise Main Module Closing Press th...

Page 106: ...e upper front panel with the Cover of Main Module opened Entrance of CSM can be Damaged so be sure to close the cover of main module before closing the upper front panel Printer Module Opening Put the...

Page 107: ...or Manual 6 14 Hyosung TNS Inc All Rights Reserved How to replace the Cartridge Replace the cartridge as follows 1 Pull the Knob C forward 2 Turn the Knob clockwise and pull it forward 3 Push down the...

Page 108: ...eplace the Felt Replace the felt as follows 1 Lift up PRT Module and unfasten the screw of the right 1 place 2 Lift up PRT Module and unfasten the screw of the left 1 place 3 Unfasten the screw fixing...

Page 109: ...Chapter6 Check Single Deposit Module CSM33 Operator Manual 6 16 Hyosung TNS Inc All Rights Reserved 5 Hold the Felt with pliers 6 Take off the Felt 6 5...

Page 110: ...yosung TNS Inc All Rights Reserved 6 17 How to remove the check from Stack Bin Remove the check from the stack bin as follows 1 Insert the key in the lock and turn the key clockwise Lock Open 2 Hold t...

Page 111: ...the turning knob 1 When turning the knob E clockwise the check moves forward 2 When turning the knob E counterclockwise the check moves backward How to remove jam from Main Module 1 Open the Main Modu...

Page 112: ...Inc All Rights Reserved 6 19 How to remove jam from Rear Feeding Module 1 Open the RF Module and remove the jammed check Careful for the damage Be careful the shock when closing each module again aft...

Reviews: