background image

Embedding the joint tape

You should begin by embedding all 

butt joints using your 

flat joint nozzle.


Once those are dry, use the same process to embed all tapered joints. 

Do not 

overlap tape at any point in the process. If you are using self-adhesive tape, 
you will not need to embed the tape. Simply apply the tape to the joint and 
skip to “Finishing the Surface” 
(page 20.)

Embedding butt joints and taper joints

  1.   Starting at one end of a butt joint, squeeze the trigger and pull the  

nozzle along the joint to apply a generous (and continuous) coat of mud 

(illustration a)

. Stop a few feet short of completion and work back from  

the other side to assure good coverage close to the adjoining wall.

  2.   Rest the gun in a bucket of water with the nozzle submerged until you 

need it again.

  3.  Cut drywall tape to the correct length. 

  4.   Press the back of the tape (the rough side) into the mud, fully covering the 

seam. 

(illustration b)


  5.   Use a putty knife to smooth and firmly seat the tape, remove excess mud 

and reapply it over the tape as a thin first coat. 

(illustration c)

  6.  Repeat this process for all butt joints.

  6.   Repeat the same process for all tapered joints and let all joints dry  

for up to 24 hours. See compound manufacturer’s instructions.

TIP

Always check your wall and address imperfections before you begin taping, including 
protruding screws or nails, loose paper or large gaps.

TIP

Always squeeze mud out in one direction to avoid tape bunching up. If the tape has 
been embedded correctly, you will see the silhouette of the tape, but not the paper itself. 

There should be no loose edges. 

b

c

a

18

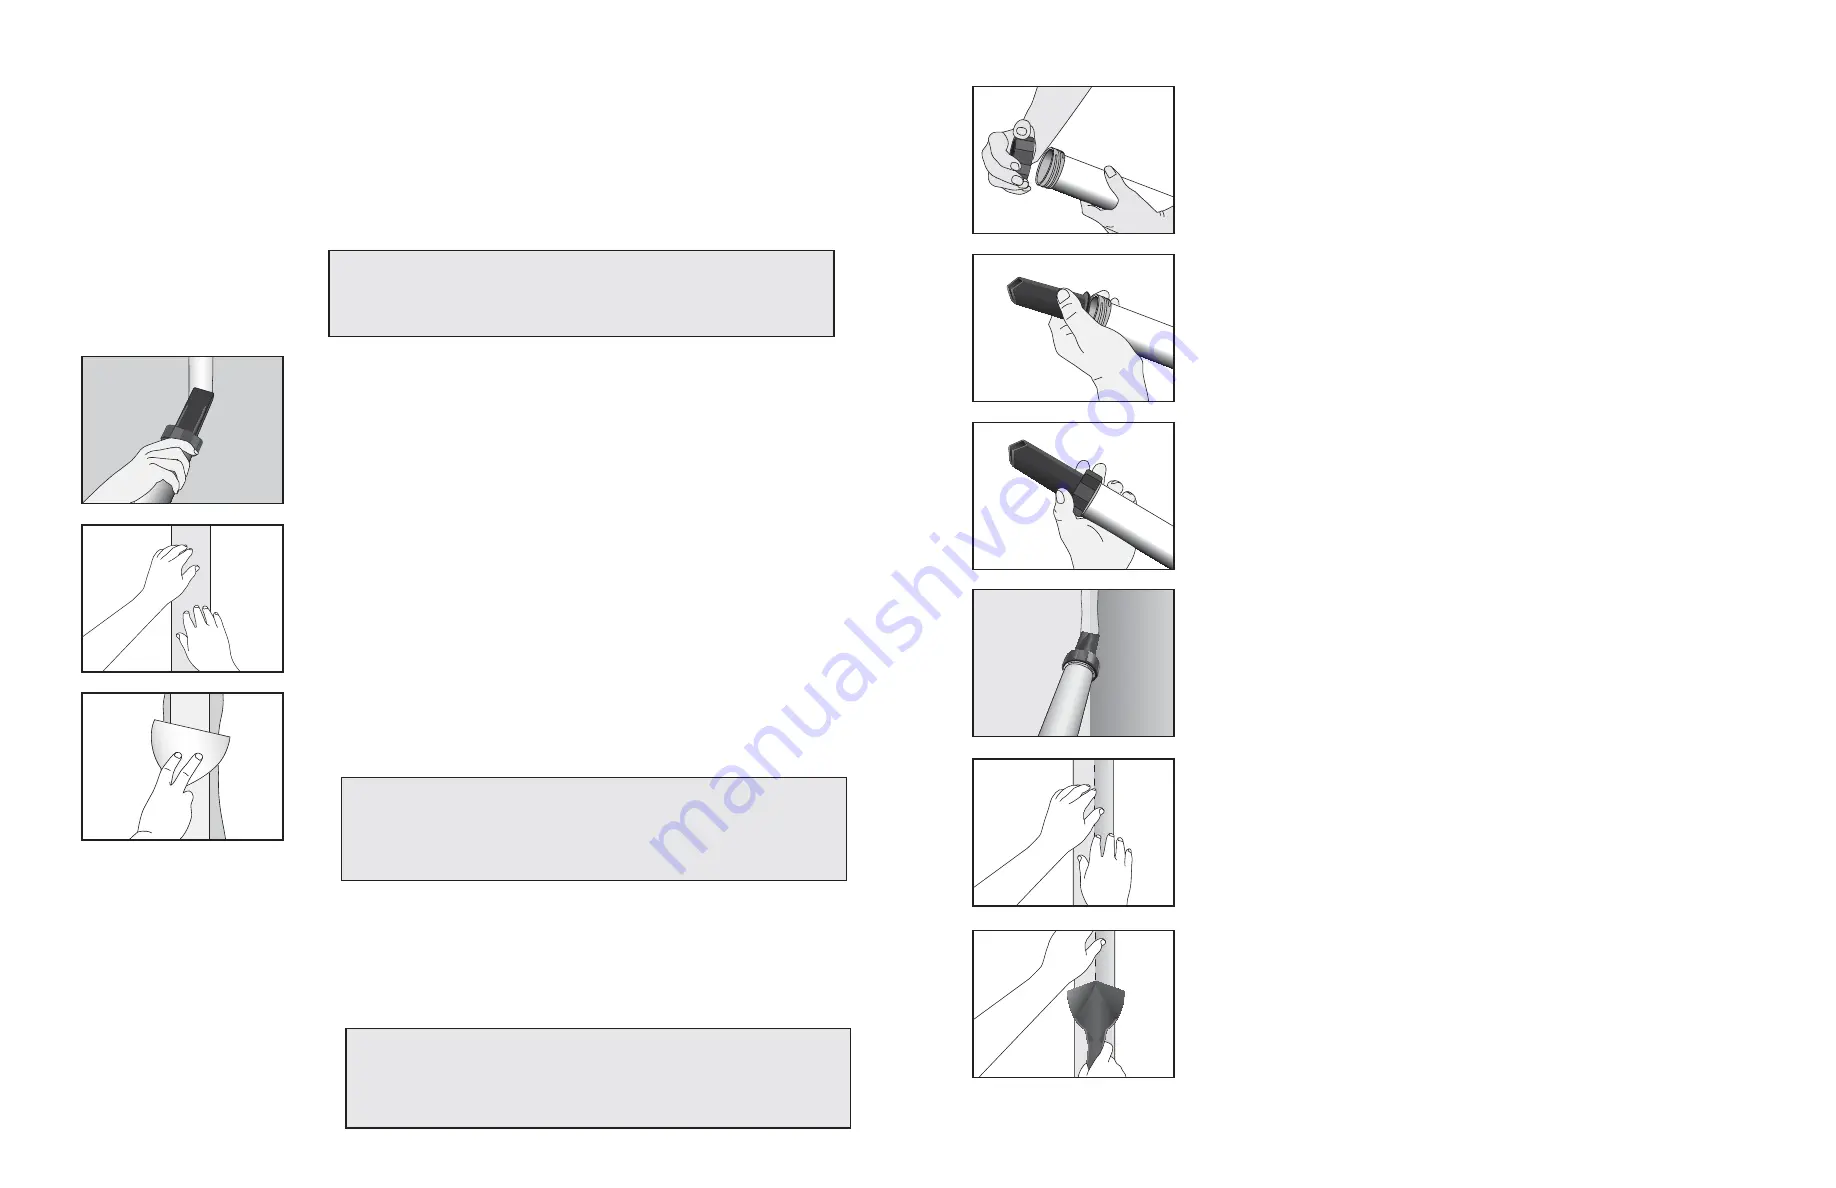
Embedding corner joints

  1.   Remove the front ring of the MudGun


(illustration d). 

(Or, if the last head 

used was the finishing head, remove the T-adapter.)

  2.  Place the 

inside corner nozzle

 on the front of the MudGun

(illustration e)

  3.  Replace the front ring and tighten. 

(illustration f)

  4.   Working from top to bottom, pull the nozzle down the length of the corner, 

slowly pumping the trigger to apply a thin (and continuous) coat of mud 

(illustration g)

. When you reach knee-height, stop, turn the MudGun™ and 

work up from the bottom.

  5.  Rest your MudGun

 in the bucket of water.

  6.   Cut drywall tape to the length needed. Fold it along the score so that the 

rough side of the tape will be facing into the wall.

  7.   Starting at the ceiling, push the tape into the mud, using your fingers to 

run down the entire length of the joint. 

(illustration h)

  8.   Again starting at the ceiling, hold the tape in place with your finger and use 

the 

inside corner smoothing tool

 to push tape fully into the corner and 

pull downward 

(illustration i).

 Remove any excess mud from the tool as 

you move down the joint by scraping it into the 5-gallon bucket of water.  
Continue until you reach the bottom of the joint.

  9.   Let dry for up to 24 hours. See compound manufacturer’s instructions. 

Sand with 220-grit sandpaper or sanding sponge.

g

h

i

d

e

f

TIP

Always embed the entire joint in one direction. Stopping in the middle and pulling up 
from the bottom of the joint will leave creases and wrinkles in the tape.

19

Summary of Contents for 09600

Page 1: ...MUDGUN Drywall Finishing System Quick Start Guide Hyde Tools Inc A Hyde Group Company 800 872 4933 custrelations hydetools com hydetools com Watch the demonstration video online at hydetools com ...

Page 2: ...nts MudGun Pro for model 09610 This section page 13 provides step by step instructions for loading drywall mud from a 5 gallon bucket and completing larger taping jobs Finishing taping full rooms Small remodeling projects involving butt and or corner joints Larger coverage areas where 5 gallon buckets of drywall compound are more economical Before using your MudGun please use the illustrations pro...

Page 3: ...3 Watch the video at hydetools com ...

Page 4: ...0 if your job involves a corner joint Patching Instructions For holes under 8 inches 203mm use a drywall repair patch at least two inches larger than the hole providing 1 inch of overlap on all sides Follow directions on the package to apply it to the wall For larger repairs cut a drywall replacement patch board slightly larger than the hole Place the patch board over the hole and trace its outlin...

Page 5: ...until you need it again 5 Cut drywall tape to the correct length 6 Press the back of the tape the rough side into the mud fully covering each seam illustration i Do not overlap tape at the corners 7 Use the 6 inch putty knife to smooth and firmly seat the tape squeeze excess mud out from under the tape and reapply it over the tape as a thin first coat illustration j 8 Let dry for up to 24 hours Se...

Page 6: ...s wavy and uneven on the edges smooth the compound out by making another pass over the coating using the finishing head without pulling the trigger 5 Rest the gun in water and let the mud dry for up to 24 hours See compound manufacturer s instructions 6 After both sides are dry set the slide adjuster on 0 illustration i 7 Run a bead of mud down the center of each joint illustration j 8 Let the mud...

Page 7: ... ring and tighten illustration h 4 Working from top to bottom pull the nozzle down the length of the corner slowly pumping the trigger to apply a thin and continuous coat of mud illustration i When you reach knee height stop turn the MudGun and work up from the bottom 5 Rest your MudGun in the bucket of water 6 Cut drywall tape to the length needed to reach from ceiling to floor Fold it along the ...

Page 8: ...rer s instructions 4 Sand lightly with 220 grit sandpaper or sanding sponge to eliminate imperfections Prime before painting 12 mudgun m l replacement mudpaks Each MudPak contains 21 5 oz 645 ml of premixed drywall compound for approximately 20 feet of coverage depending on the contour adjustment setting you are using Replacements are available in a 6 pack from retailers who sell this kit or can b...

Page 9: ...ed joints are those that have one wrapped tapered edge of the drywall meeting another tapered edge of drywall and are easiest to finish because they will be flat after you fill the taper in the drywall see illustration Normally on walls tapered joints run horizontally because you can buy drywall sheets in different lengths and create one long tapered joint with few or no butt joints bisecting it v...

Page 10: ...e brake with your thumb illustration f 7 Keeping the brake depressed and the mud gun straight up pull the plunger rod until it is fully extended Do not squeeze the trigger or the plunger rod will jam illustration g 8 Turn the MudGun up quickly to prevent mud from falling out 9 Place the flat joint nozzle on the front of the MudGun illustration h 10 Replace the front ring and tighten illustration i...

Page 11: ...id tape bunching up If the tape has been embedded correctly you will see the silhouette of the tape but not the paper itself There should be no loose edges b c a 18 Embedding corner joints 1 Remove the front ring of the MudGun illustration d Or if the last head used was the finishing head remove the T adapter 2 Place the inside corner nozzle on the front of the MudGun illustration e 3 Replace the ...

Page 12: ...making another pass over the coating using the finishing head without pulling the trigger 10 Rest the gun in water and let the mud dry for 24 hours See compound manufacturer s instructions 11 Once dry set the slide adjuster on 0 illustration h 12 Run a bead of mud down the center of each joint illustration i 13 Let the mud dry then check the flatness of the taped area using a straight edge The fla...

Page 13: ...the joint place the finishing head 2 inches from the corner with the front facing into the corner illustration l 2 As you dispense mud first push the head into the corner illustration m then pull it back along the full length of the joint illustration n This will avoid leaving excess mud in the corner Finishing corner joints 1 Using the inside corner nozzle apply a light coat of compound over the ...

Reviews: